
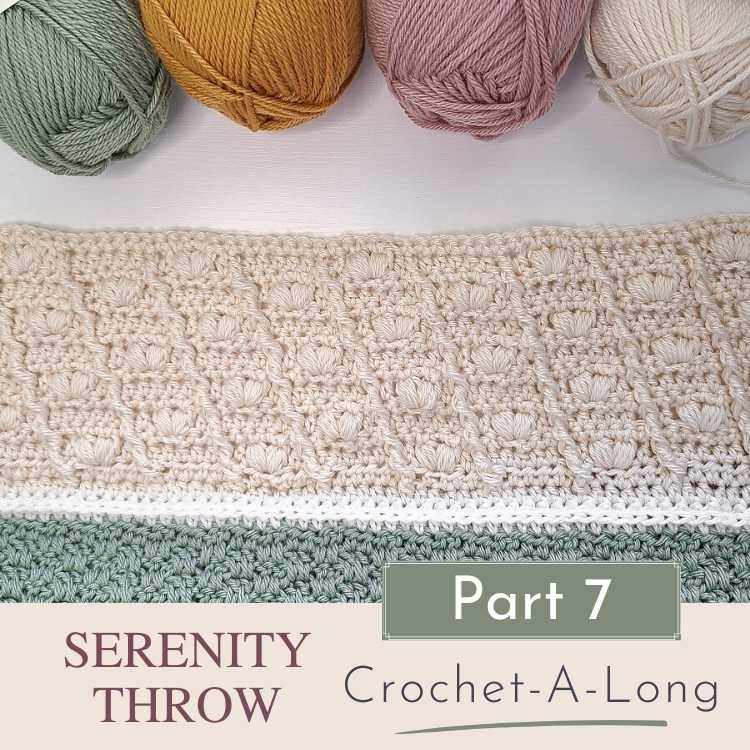
Serenity Throw Blanket CAL Part 7 – Floating Hearts Stitch
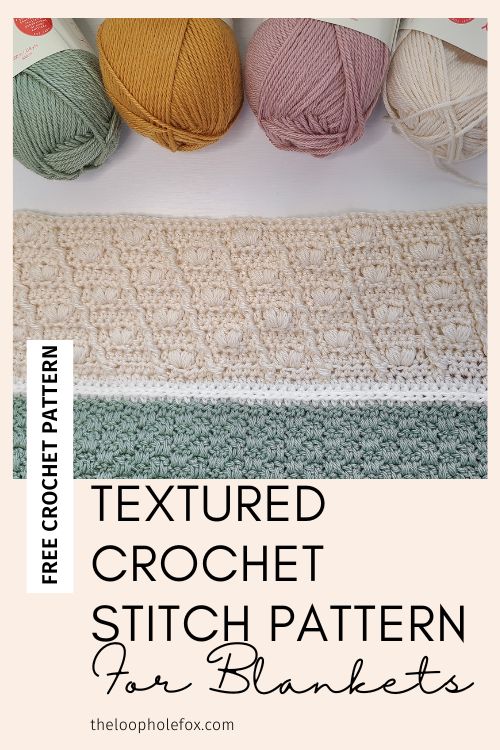
I am so excited to release my part of the Serenity Throw Blanket CAL. Part 7 of the CAL is a crochet stitch pattern for blankets that features simple diagonal ribbing and Puff Stitches set up to look like floating hearts.
About this crochet stitch pattern for blankets
This crochet stitch pattern for blankets is Part 7 of the Serenity Throw Blanket Crochet-A-Long (CAL).
The pattern includes diagonal crochet ribbing made from front post stitches and Puff V stitches that resemble hearts. These Puff V’s are offset inside the diagonal ribbing so they look like they’re floating upward.
While the pattern may look a bit intimidating and does technically have an intermediate skill level, it’s not downright difficult.
The most difficult part of this crochet stitch pattern for blankets is making sure you place your stitches in the right place.
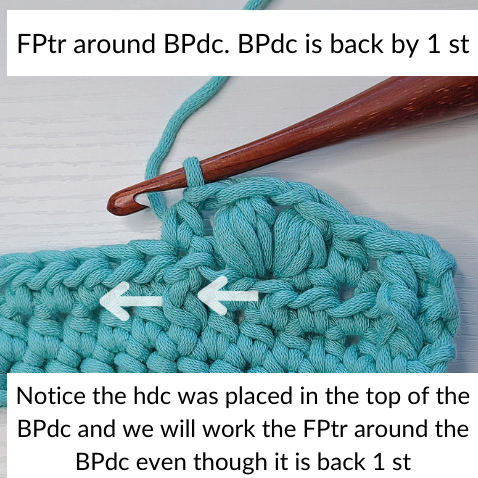
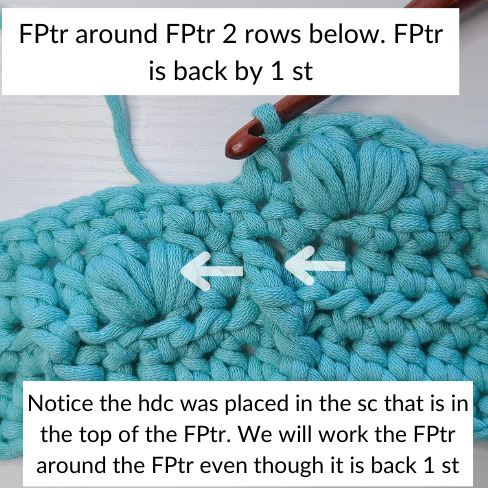
When we work Front Post or Back Post stitches, we never want to put a stitch into the top of the stitch we worked the post on (unless specifically instructed). We have to “skip” or ignore the top of the stitch behind the FP or in front of the BP stitch so that we don’t unnecessarily increase our work.
The Front Post Treble Crochet stitches are placed 2 rows below and 1 stitch back to create the diagonal ribbing, so it’s imperative that you pay attention to your stitch placement and make sure you are ignoring the top of the stitch behind the Front Post Treble Crochet.
All versions of this pattern come with both a photo tutorial and a video tutorial, if you need them. Whether that is the free version of the pattern here on the blog, the PDF pattern or in the eBook.
While this crochet stitch pattern for blankets may push your knowledge in the beginning, I absolutely believe you can do it and will finish the pattern having increased your skills.
What is the Serenity Throw Blanket CAL?
This pattern is a part of the Serenity Throw Blanket CAL, which is a collaborative crochet-a-long designed by 12 different designers.
Each Part of this crochet blanket is as different as they are lovely and showcases how designers work together to create beautiful patterns for you to follow.
Hosted by myself and Agat of Made by Gootie, we created a blanket that is worked in strips with one part on top of the other, so there is no fancy seaming or anything required.
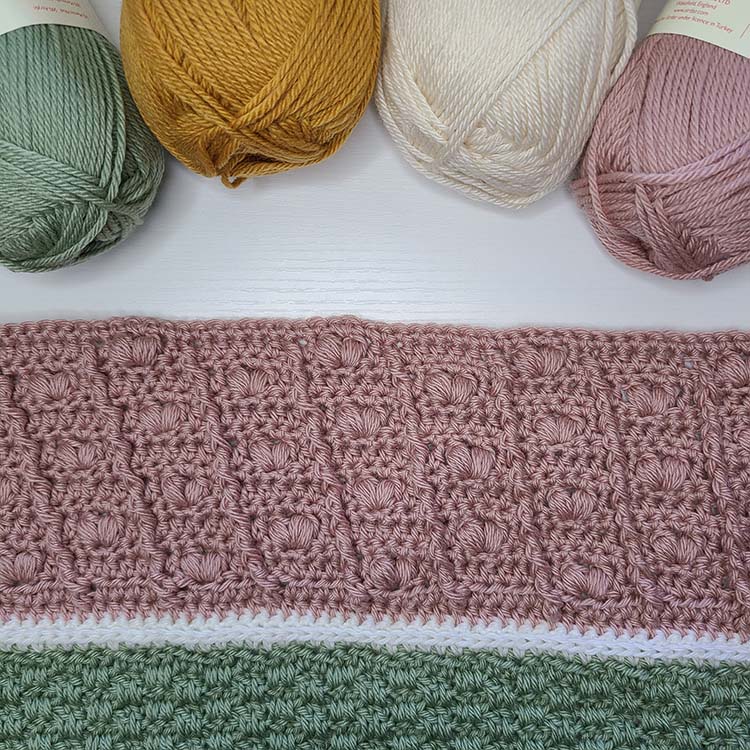
The end result of this crochet along blanket pattern designed by 12 different designers is this gorgeous crochet throw blanket:

Where to Get the Serenity Throw Blanket Part 7 Pattern
This crochet stitch pattern for blankets is a free pattern in this blog post. You can scroll down to view the free version.
This pattern is featured in the Serenity Throw Blanket CAL hosted by myself, The Loophole Fox, and my lovely friend Agat of Made by Gootie.
The free download of the PDF pattern for this event expired at 7:59 AM PST November 8, 2023. The PDF is no longer available to download for free.
Because this pattern is a part of the Serenity Throw Blanket CAL, the PDF version of the pattern is only available in the Serenity Throw Blanket CAL eBook.
You will get a much better value for your money purchasing the eBook that has all 12 patterns than you would purchasing just my one. 🙂
You can purchase the Serenity Throw Blanket eBook to receive the PDF for this pattern as well as all of the other 11 patterns for this blanket.
This pattern is a part of the Serenity Throw Blanket CAL, which is a collaborative crochet-a-long designed by 12 different designers. Each strip is as different as they are lovely and showcases how designers work together to create beautiful projects for you to create.
If you’d like to see all of the patterns that are a part of the Serenity Throw Blanket CAL, click the button below.

SKILL LEVEL
Intermediate. Crocheters looking to follow this pattern should know how to:
- Read a crochet pattern – Though there IS a video tutorial and photo tutorial for this crochet stitch pattern for blankets, you should always know how to read crochet patterns.
- Work the basic stitches – Chain, single crochet, half double crochet and double crochet.
- Work both Front Post and Back Post Stitches, including Back Post Double Crochet and Front Post Treble Crochet.
- Including the understanding of not working into the top of the stitch behind the FP or in front of the BP stitch.
- Work Puff Stitches
- Understand how to work several stitches into one stitch
- Feel comfortable counting stitches and skipping stitches.
- In this pattern, you will be working Front Post Treble Crochet’s 2 rows below and back 1 stitch to make the diagonal ribbing. This is easier than it sounds and is explained both in the text of the pattern, in the picture tutorial and shown extensively in the video tutorial.
This is NOT a beginner pattern. Absolute beginners will find this pattern outside of their skill level but adventurous beginners could be able to work through it, especially since this pattern comes with a photo tutorial and a video tutorial.
DISCLAIMER: This post includes affiliate links. This means, should you decide to purchase a product via one of these links, I will receive a small commission at no extra cost to you. I only recommend products I use and love (Or products I know others love, have heavily researched, know have good ratings and plan to purchase myself). These small commissions help to support this blog and continue keeping most of my patterns free. You can read more on my Privacy Policy, if you prefer.
MATERIALS
Medium (4) Worsted weight wool or wool blend yarn of your choice.
You will need approximately: 5.75 oz / 160 grams / 350 yards.
Yarn Used: Sirdar Country Classic Worsted in color Clotted Cream (cream colored swatch) and Oyster (pink colored swatch).
TOOLS & NOTIONS
5 mm (H-8) Hook – Check out my favorite crochet hooks!
Tapestry needle
Scissors
Stitch markers, if you prefer them
GAUGE
16 hdc x 12 rows = Approximately 4 inches x 4 inches.
Gauge shouldn’t be massively important as this pattern was designed to follow the gauge of the other sections.
Note: I am a tight crocheter, so my tension is usually tighter than others. Learn more about gauge and what this means here. Please also note that the entire Serenity Throw Blanket was based off of my gauge, so you should be fine moving forward with this Part without checking gauge.
FINISHED SIZE
50 inches wide x 5 inches tall.
ABBREVIATIONS (US TERMS)
- Ch – Chain
- Sc – Single Crochet
- Hdc – Half Double Crochet
- BPdc – Back Post Double Crochet *
- FPtr – Front Post Treble Crochet * (The tutorial linked is for Front Post Double Crochet. FPtr is worked the same way, just with one additional yarn over prior to inserting around the post).
- Puff – Puff St *
- Puff-V – Puff V Stitch*
- Sk – Skip
- Spc – Space
- St(s) – Stitch(es)
- RS – Right Side
- WS – Wrong Side
- 2 Rows Below * See special note
- * – See Special Stitches
- […] – Repeats are listed within brackets.
- (…) – Stitch counts are listed at the end of the row in parenthesis & bold italics.
NOTES
- This stitch pattern is the seventh part of the Serenity Throw Crochet Blanket, you can find the rest of the patterns in the CAL post.
- When you finish this part of the blanket, work the transition rows as instructed in the main CAL event.
- Chain 1 at the beginning of the row does not count as a stitch.
- The stitch multiple for this blanket is a multiple of 12 stitches.
- Make sure you do not work into the top of the stitch behind any Front Post Stitch or in front of any Back Post stitch.
- “1 hdc 5 sts” – This means that you will place 1 half double crochet into each of the indicated amount of stitches. Using this example, you will place 1 hdc in each of the next 5 stitches for a total of 5 hdc.
- When working the FPtr stitches, the stitch in which the post stitch is worked will always be one stitch back. This is what makes the diagonal lines.

- SPECIAL NOTE – 2 Rows Below: This pattern asks you to place front post stitches on the posts of stitches 2 rows below. This means you will not place them on the indicated stitch of the previous row but on the second row below.
- For example: In Row 3, 2 rows below will be Row 1. In Row 5, 2 rows below will be Row 3. Most of these should be fairly easy to find as you will be working them on Back Post or Front Post stitches. The exceptions are the first FPtr in Row 3 and Row 15.
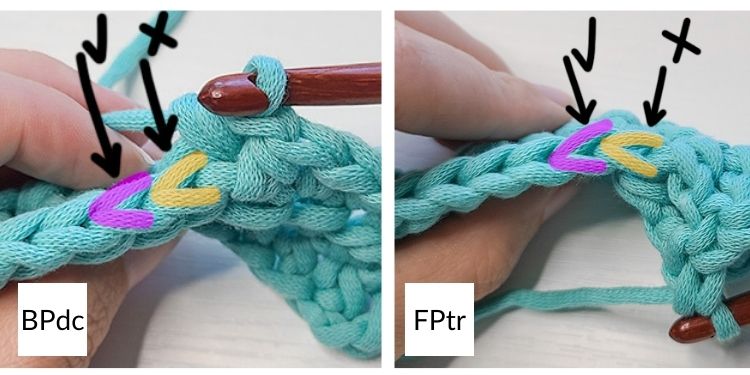
Special Stitch – Back Post Double Crochet (BPdc)
To work a Back Post Double Crochet (BPdc), you will: Yarn over, insert hook from back of work to front of work between the posts of the previous and current stitch. Maneuver the hook back to the back of the work on the other side of the stitch post. Your hook will now sit horizontal with the post of the stitch on the back of the hook. Yarn over, pull a loop through. Yarn over, pull through 2 loops. Yarn over, pull through 2 loops. BPdc complete!
Check out my Back Post Double Crochet Photo Tutorial for visuals.
Special Stitch – Front Post Treble Crochet (FPtr)
To work a Front Post Treble Crochet (FPtr), you will: Yarn over twice and insert hook from front of work to back of work between the posts of the previous and current stitch. Maneuver the hook back to the front of the work on the other side of the stitch post. Your hook should now sit horizontal with the post of the stitch on the front of the hook. Yarn over, pull a loop through. 4 loops on hook. [Yarn over, pull through 2 loops] Repeat inside brackets 3 times. FPtr complete!
Check out my Front Post Double Crochet Photo Tutorial for visuals. (The tutorial linked is for Front Post Double Crochet. FPtr is worked the same way, just with one additional yarn over prior to inserting around the post).
Note: When working FPtr or BPdc, you will always “skip” or ignore the top of the stitch you worked the post on. For FPtr, the top of the stitch is behind the FPtr. For BPdc, the top of the stitch is in front of the BPdc. This stitch counts as already worked because we have worked a post stitch.
(Pics below – BPdc left, FPtr right – The top of stitch we don’t work into is highlighted yellow with an X & arrow pointing to it. The next stitch of the row is highlighted pink with a check mark & an arrow pointing to it).
Special Stitch – Puff Stitch (4 YO Closed Puff St)
The Puff Stitch used in this blanket section is a “4 YO” Puff Stitch. Puff Stitches come in a variety of sizes and styles, so it’s important to make sure you’re using the right variation.
To work this puff stitch, you will: [Yarn over, insert your hook into the indicated stitch and pull up a loop]. Complete the instructions within brackets in the same stitch 4 total times. You will have 9 loops on hook. Yarn over and pull through 8 of the 9 loops. 2 loops remain on hook. Then, yarn over and pull through the 2 remaining loops.
Check out my Puff Stitch Photo Tutorial for visuals. This tutorial goes through 2 different types of Puff Stitches, so make sure you look for the “Closed Puff Stitch” portion.
Special Stitch – Puff-V
This pattern uses a “Puff V” which creates a V stitch with puff stitches.
To work a Puff-V, you will: Place 1 Puff Stitch in the indicated stitch. Then, chain 1 and place 1 more Puff Stitch in the SAME stitch. Puff-V complete!
Floating Hearts Video Tutorial
This crochet stitch pattern for blankets comes with a video tutorial. This video tutorial is meant to be a companion to the written tutorial and isn’t meant to be used alone.
You can find watch the video tutorial by clicking play in the video above, by clicking this link or copy and pasting it into your browser: https://youtu.be/OhSn-5FrlaY.
Floating Hearts – Free Crochet Stitch Pattern for Blankets
If you have not read all of the notes for this crochet stitch pattern for blankets, please go read them now before starting.
Row 1 (RS) – Ch 1 (does not count as a stitch here or throughout), turn. 1 hdc each of the 192 sts. (192)
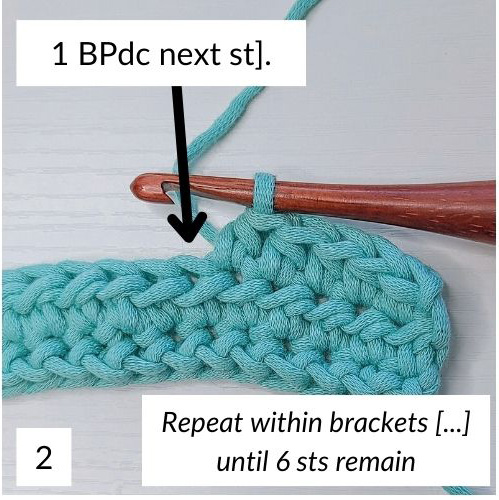
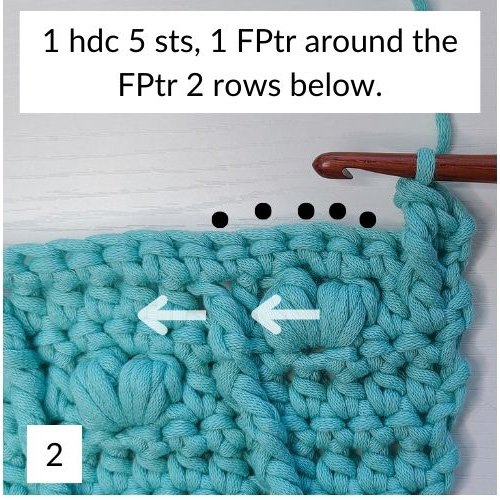
Row 2 (WS) – Ch 1, turn. [ 1 hdc 5 sts (Pic 1), 1 BPdc next st (Pic 2) ]. Repeat inside brackets until 6 sts remain (Pic 3). 1 hdc 6 sts. (192 sts total – 161 hdc, 31 BPdc)


Make sure you have read the pattern notes, especially Notes 7 & 8, prior to working the following rows.
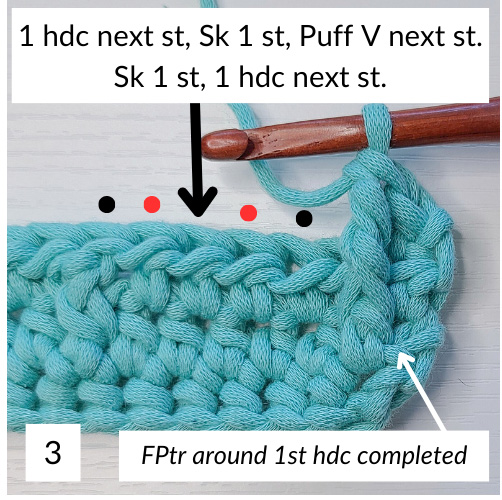
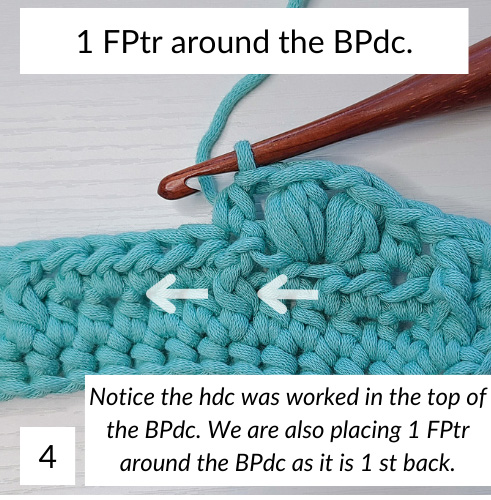
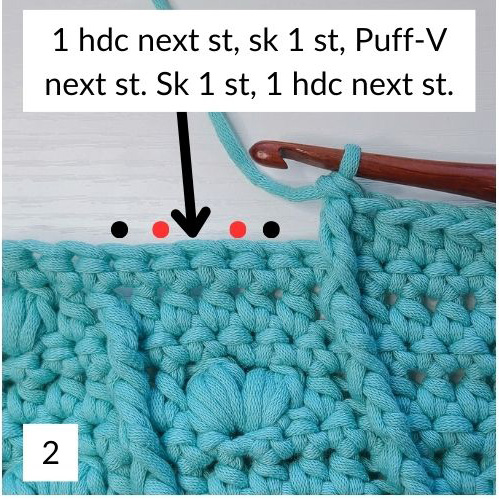
Row 3 (RS) – Ch 1, turn. 1 hdc 1st st, 1 FPtr around post of 1st hdc 2 rows below From Row 1 (Pics 1 & 2). 1 hdc next st, sk 1 st, Puff-V in next st. Sk 1, 1 hdc next st (Pic 3), 1 FPtr the BPdc (Pic 4).
[ 1 hdc 5 sts, 1 FPtr the BPdc (Pic 5). 1 hdc next st, sk 1 st, Puff-V in next st. Sk 1, 1 hdc next st, 1 FPtr the BPdc (Pic 6) ]. Repeat inside brackets until 4 sts remain (Pic 7). 1 hdc 4 sts. (192 sts – 112 hdc, 32 FPtr, 16 Puff V’s)


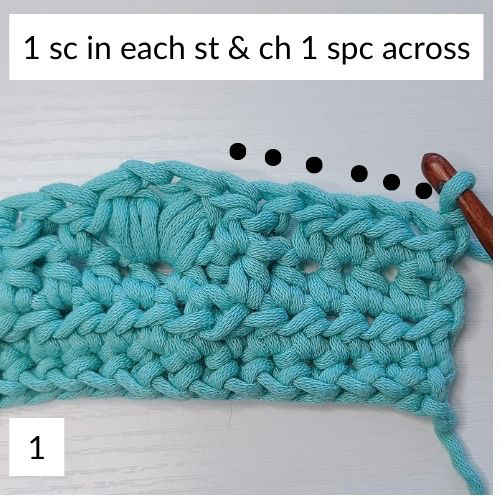
Row 4 (WS) – Ch 1, turn. 1 sc in each st and ch 1 spc across. (192)


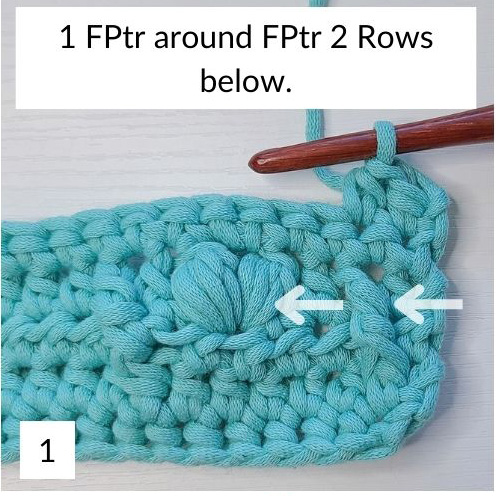
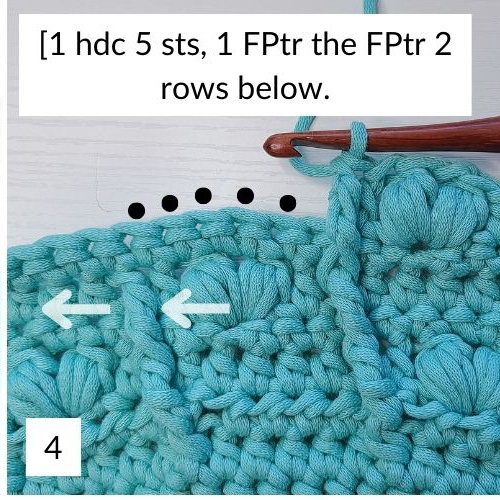
Row 5 (RS) – Ch 1, turn. 1 hdc 2 sts, 1 FPtr around FPtr 2 rows below (Pic 1). 1 hdc 5 sts, 1 FPtr around FPtr 2 rows below (Pic 2).
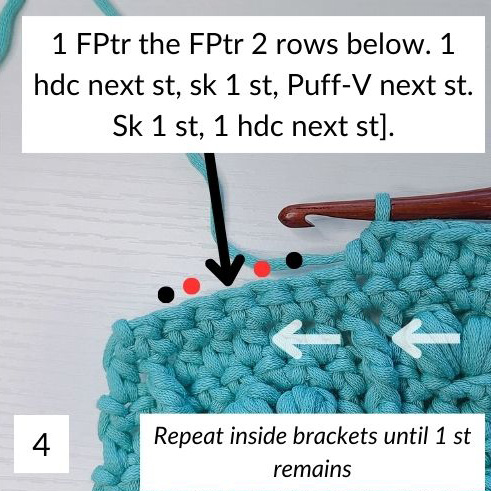
[ 1 hdc next st, sk 1 st, Puff-V in next st (Pic 3). Sk 1, 1 hdc next st, 1 FPtr the FPtr 2 rows below (Pic 4). 1 hdc 5 sts, 1 FPtr the FPtr below (Pic 5) ]. Repeat inside brackets until 3 sts remain. 1 hdc 3 sts. (192 sts – 115 hdc, 32 FPtr, 15 Puff V’s)


Row 6 (WS) – Ch 1, turn. 1 sc in each st and ch 1 spc across. (192)
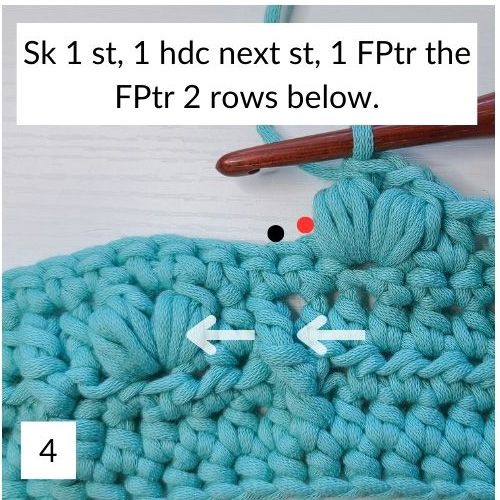
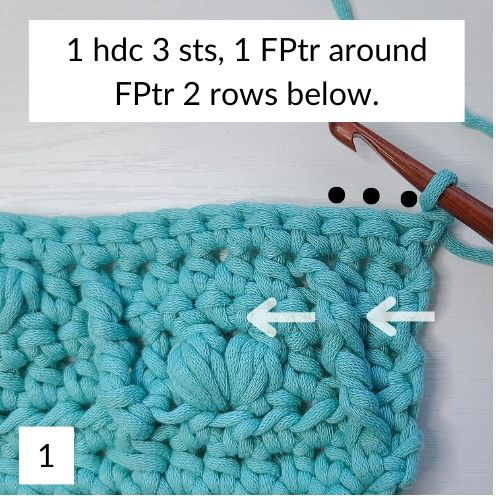
Row 7 (RS) – Ch 1, turn. 1 hdc 3 sts, 1 FPtr around FPtr 2 rows below (Pic 1). 1 hdc next st, sk 1 st, Puff-V in next st. Sk 1, 1 hdc next st (Pic 2), 1 FPtr the FPtr 2 rows below (Pic 3).
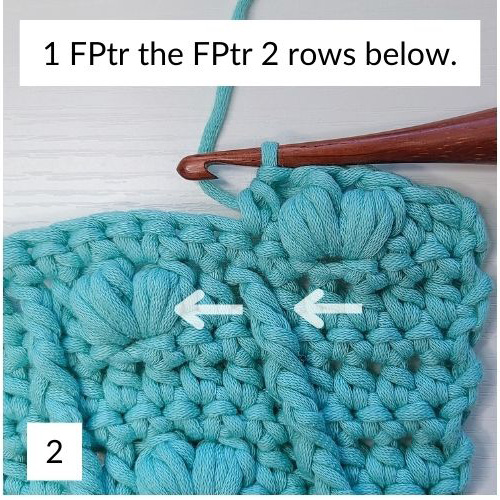
[ 1 hdc 5 sts, 1 FPtr the FPtr 2 rows below (Pic 4). 1 hdc next st, sk 1 st, Puff-V in next st. Sk 1, 1 hdc next st (Pic 5), 1 FPtr the FPtr 2 rows below (Pic 6) ]. Repeat inside brackets until 2 sts remain. 1 hdc 2 sts. (192 sts – 112 hdc, 32 FPtr, 16 Puff V’s)


Row 8 (WS) – Ch 1, turn. 1 sc in each st and ch 1 spc across. (192)
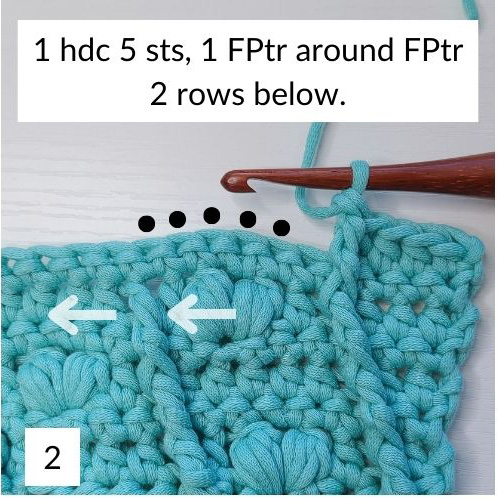
Row 9 (RS) – Ch 1, turn. 1 hdc 4 sts, 1 FPtr around FPtr 2 rows below (Pic 1). 1 hdc 5 sts, 1 FPtr around FPtr 2 rows below (Pic 2).
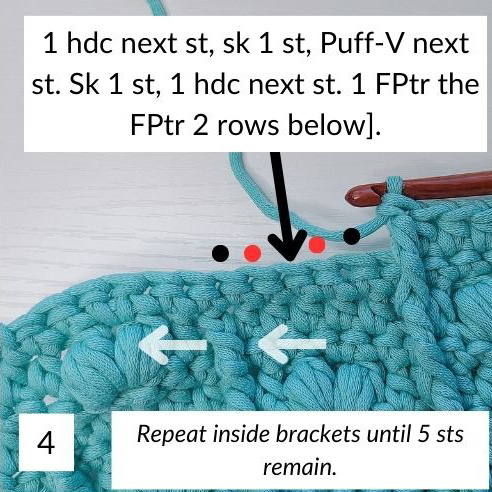
[ 1 hdc next st, sk 1 st, Puff-V in next st. Sk 1, 1 hdc next st, 1 FPtr the FPtr 2 rows below (Pic 3). 1 hdc 5 sts, 1 FPtr the FPtr 2 rows below (Pic 4) ]. Repeat inside brackets until 1 st remains. 1 hdc last st. (192 sts – 115 hdc, 32 FPtr, 15 Puff V’s)


Row 10 (WS) – Ch 1, turn. 1 sc in each st and ch 1 spc across. (192)
Row 11 (RS) – Ch 1, turn. 1 hdc 5 sts, 1 FPtr around FPtr 2 rows below (Pic 1). 1 hdc next st, sk 1 st, Puff-V in next st. Sk 1, 1 hdc next st (Pic 2).
[ 1 FPtr the FPtr 2 rows below, 1 hdc 5 sts (Pic 3). 1 FPtr the FPtr 2 rows below. 1 hdc next st, sk 1 st, Puff-V in next st. Sk 1, 1 hdc next st (Pic 4) ]. Repeat inside brackets until 1 st remains. 1 hdc last st. (192 sts – 113 hdc, 31 FPtr, 16 Puff V’s)


Row 12 (WS) – Ch 1, turn. 1 sc in each st and ch 1 spc across. (192)
Row 13 (RS) – Ch 1, turn. 1 hdc 2 sts. Sk 1 st, Puff-V next st. Sk 1 st, 1 hdc next st (Pic 1), FPtr around FPtr 2 rows below (Pic 2).
[ 1 hdc 5 sts, 1 FPtr the FPtr 2 rows below (Pic 3). 1 hdc next st, sk 1 st, Puff-V in next st. Sk 1, 1 hdc next st, 1 FPtr the FPtr 2 rows below (Pic 4) ]. Repeat inside brackets until 5 sts remain. 1 hdc 5 sts. (192 sts – 116 hdc, 31 FPtr, 15 Puff V’s)


Row 14 (WS) – Ch 1, turn. 1 sc in each st and ch 1 spc across. (192)
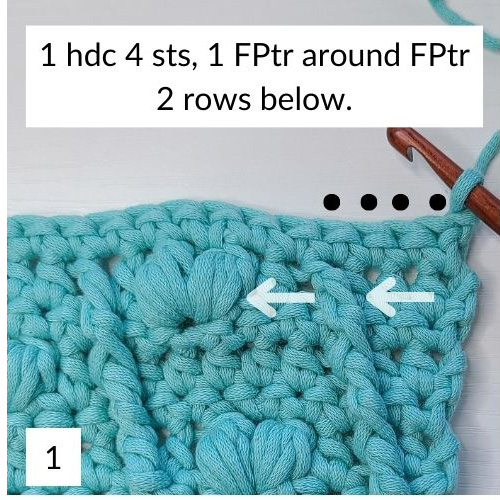
Row 15 (RS) – Ch 1, turn. 1 hdc 1st st, 1 FPtr around post of 1st hdc 2 rows below From Row 13 (Pic 1). 1 hdc 5 sts, 1 FPtr around the FPtr 2 rows below (Pic 2).
[ 1 hdc next st, sk 1 st, Puff-V in next st. Sk 1, 1 hdc next st, 1 FPtr the FPtr below (Pic 3). 1 hdc 5 sts, 1 FPtr the FPtr below (Pic 4) ]. Repeat inside brackets until 4 sts remain. 1 hdc 4 sts. (192 sts – 112 hdc, 32 FPtr, 15 Puff V’s)


Row 16 (WS) – Ch 1, turn. 1 sc in each st and ch 1 spc across. (192)
Change color and continue to work transition rows. Then, move on to Part 8 of the Serenity Blanket.
That’s it! You’re now ready to move on to Part 8 of the Serenity Throw Blanket CAL. Part 8 of the CAL releases on November 9, 2023 at 8 AM PST. You can find the link for this pattern at this time on Agat’s Serenity Throw Blanket CAL main page.
Love this crochet stitch pattern for blankets? Share the love and Pin it to Pinterest!
One of my greatest joys is seeing your finished crochet projects from my patterns or tutorials, so when you post to Instagram, don’t forget to tag me so I can show you some love! I’m @theloopholefoxcrochet. You can also share pictures on my recent posts on Facebook or within my Facebook group!
And don’t forget to pin this to your Pinterest boards, so you can remember it for later!
Don’t forget to join my Facebook Group so we can chat all about your creations! We are a group for crocheters of all experiences, all interests and love to hang out together. Come join the fun!

Shannon | Designer & Editor
Shannon helps crocheters find their next project and build their skills with in depth tutorials and crochet patterns on her blog, theloopholefox.com.
With more than a decade of crochet experience, Shannon knows that understanding why we do something matters just as much as how we do it. She teaches new techniques and crochet stitches in depth so you can crochet with confidence.
Find More Crochet Blanket Patterns:
The Aspen Throw Blanket
The Fledgling Baby Afghan
The Friendship Blanket CAL (2021)
Something New Baby Blanket
Rising Star Baby Blanket
Piper Baby Blanket
Harmony Throw Blanket CAL (2022)
2023 Crochet Temperature Blanket
Avery Baby Blanket