
2023 Crochet Temperature Blanket
With the holiday season coming to an end, you might be thinking about your next big crochet project. Why not add a crochet temperature blanket to your project list? With their easy-to-crochet nature, exciting color work and sentimental value, crocheting a temperature blanket can be a great addition to your project list.
There’s no denying that sometimes you need a break from big intricate projects but still want to crochet. Let a crochet temperature blanket be the project you look toward during these times. Despite a simple stitch pattern that is easy to crochet, a crochet temperature blanket remains interesting as you’re crocheting 1 row a day to document the year in the best way we know how – with yarn!
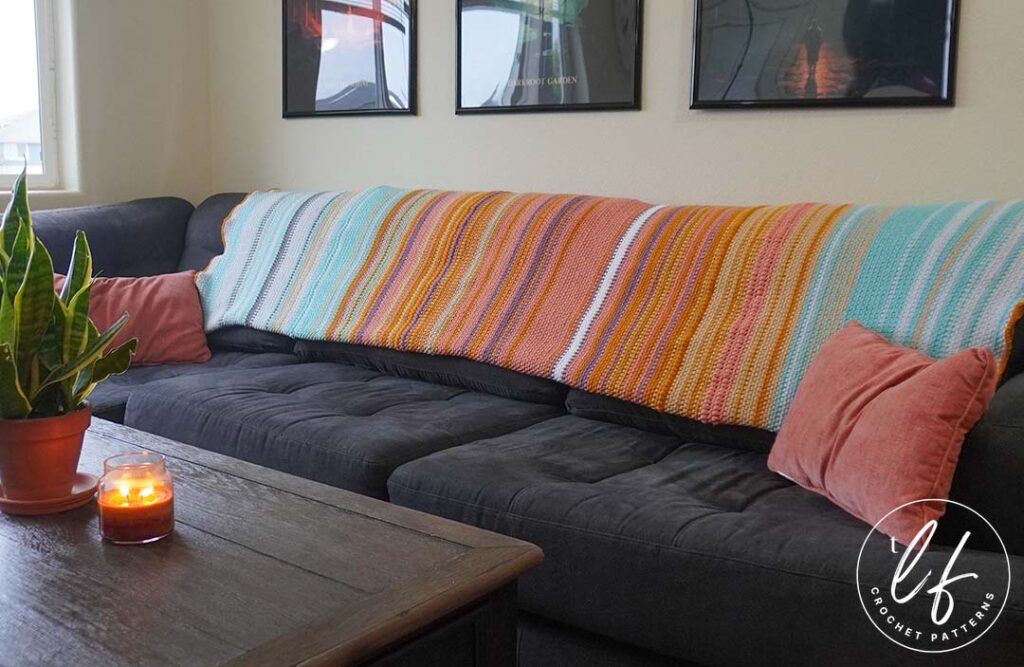
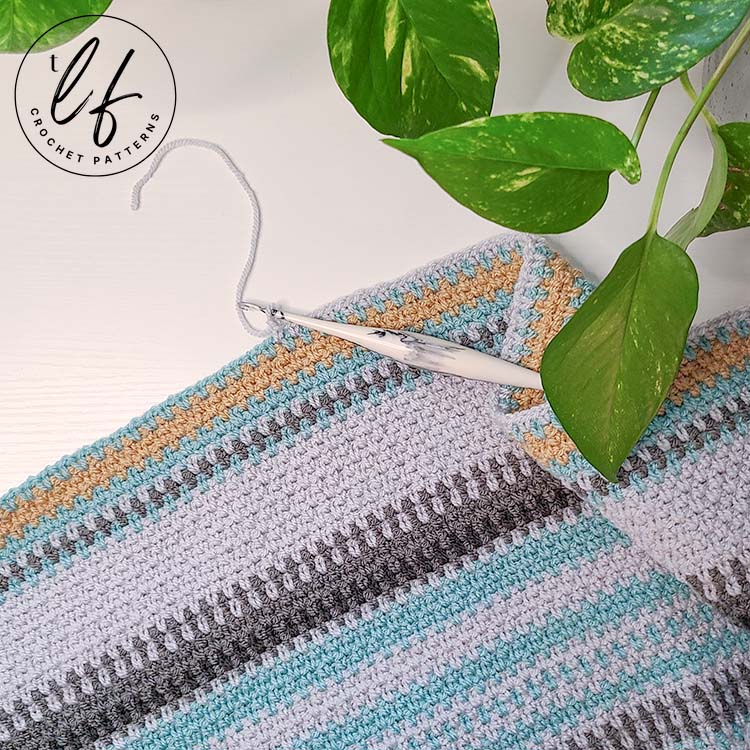
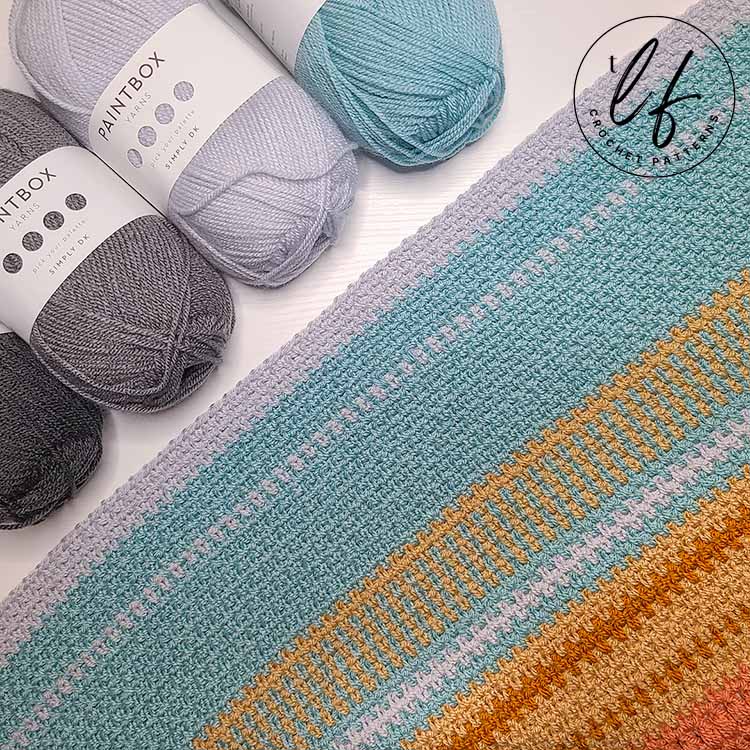
The Loophole Fox’s Completed 2023 Crochet Temperature Blanket
Looking for something specific? Use these links to jump to your desired location:
- How to Plan Your Own Crochet Temperature Blanket
- Details & Pattern for My Crochet Temperature Blanket
- 2023 Crochet Temperature Blanket Progress by Month
- Completed 2023 Crochet Temperature Blanket (With interesting data!)
What is a Crochet Temperature Blanket?
Simply stated, a crochet temperature blanket is a way of recording a year with our craft.
This is a project in which we crochet 1 row for each day of the year, or 365 rows. You can crochet 1 row each day or set aside time once a week to crochet each day for the week. How you schedule your crocheting is up to you but each row will correspond to the date.
We begin with January 1st and end on December 31st, typically. You can start on any day you like, though, as long as you follow through for 365 days.
So, if you count June 1st as your first day on your blanket, make sure to work through the year and into the next, ending on May 31st.
In this blog post, I’ll break down questions and how to plan a crochet temperature blanket in detail. After reading through this blog post, you should have all the detailed information you need to get started.
A quick overview of what a crochet temperature blanket project is: You will pick a location and year (typically your current location and the current year, though you can choose any you like), break down the temperature range into increments (usually by 5 or 10 degrees) and assign a color to each temperature increment to create a Color Key, track the temperatures daily and get crocheting!
Do I have to do the current year?
Not at all! Many crocheters choose a different year from the current year for their crochet temperature blanket. While most crocheters choose to follow the current year, it’s fairly common for crocheters to choose a year that is special to them or a year that is special to the person they’re making the blanket for.
Other options for the year could be the birth year of a child, the year of a marriage, the year you graduated from college or any other year that holds a special meaning to you or the recipient.
Do I have to do my current location?
Nope! You can pick any location that you’d like. You can choose your home town, favorite vacation location, a place you’d love to go to but haven’t yet or somewhere random just for fun. It’s up to you!
This can be especially fun for crocheters who live in climates that don’t have a wide variety of weather.
Can I track something other than the temperature?
Absolutely. While it’s technically a crochet temperature blanket, that doesn’t mean you have to abide by “temperature”.
You can track almost anything that you like, as long as it’s something that can be quantified daily. Anything you can think of that you can assign a color to and measure daily, you can use for a crochet temperature blanket.
What if I can’t start on January 1st?
That’s totally okay! After all, who is really going to be checking to make sure you started on January 1st? Not me!
As long as you track and measure the temperature (or other thing you’re tracking) daily and can crochet “Row 1” for January 1st, you’re all set!
Do I have to do one row a day?
Technically, yes. You do want to work a row for each day of your crochet temperature blanket… But do you have to actually crochet 1 row a day? No.
You can plan to work on the blanket once a week or once every few days and work all of the rows necessary to keep up with the date.
So, while you can work 1 row a day for the next 365 days, you certainly don’t have to as long as you keep track of the temperatures and end up working 365 total rows.
How to Plan Your Own Crochet Temperature Blanket
There are 6 things to consider when planning your temperature blanket. This may seem like a lot, but I promise they all work together and are pretty easy. The hardest thing you’ll have to do is pick colors!
We’ll go through each of these in depth, but here’s the basics to consider:
- Choosing a stitch pattern & creating a gauge swatch
- Creating your color key
- and how to know the range of temperatures for the location you choose
- Choosing the best yarn
- Planning your color palette
- What year you’ll do (if not the current year)
Choosing a stitch pattern & creating a gauge swatch
The first thing you want to do when you start planning your crochet temperature blanket is to choose your stitch pattern and do a gauge swatch.
Yep, before all the fun stuff of choosing your colors and temperature sets, you should know what crochet stitch you want to use. This will help you plan to create a blanket that is an appropriate size.
Without gauge swatches, temperature blankets can become absolutely massive.
For most crochet temperature blanket projects, you’ll want to use a stitch that is short. Because you’ll end up working 365 rows, shorter stitches are better for this type of project. A blanket of all double crochet stitches, for example, would be massive.
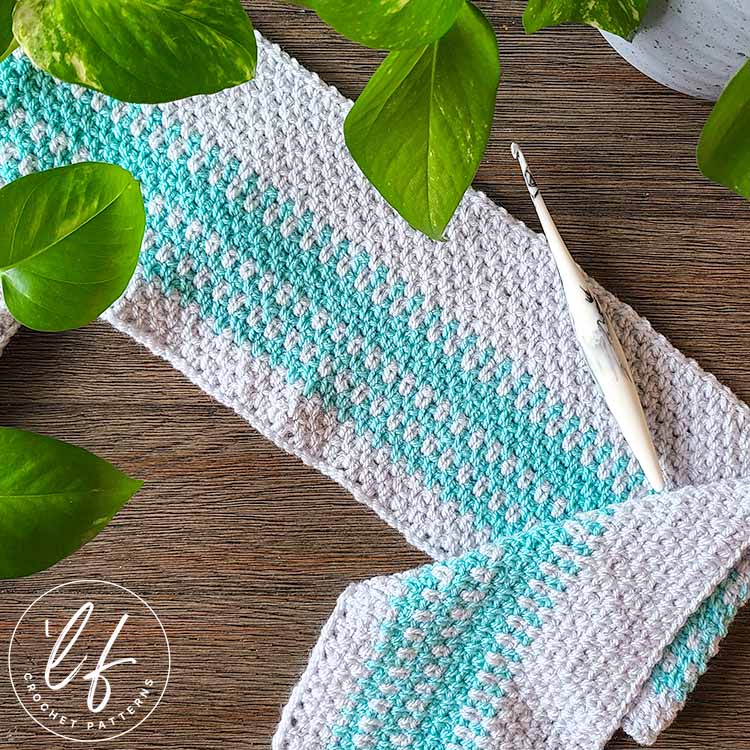
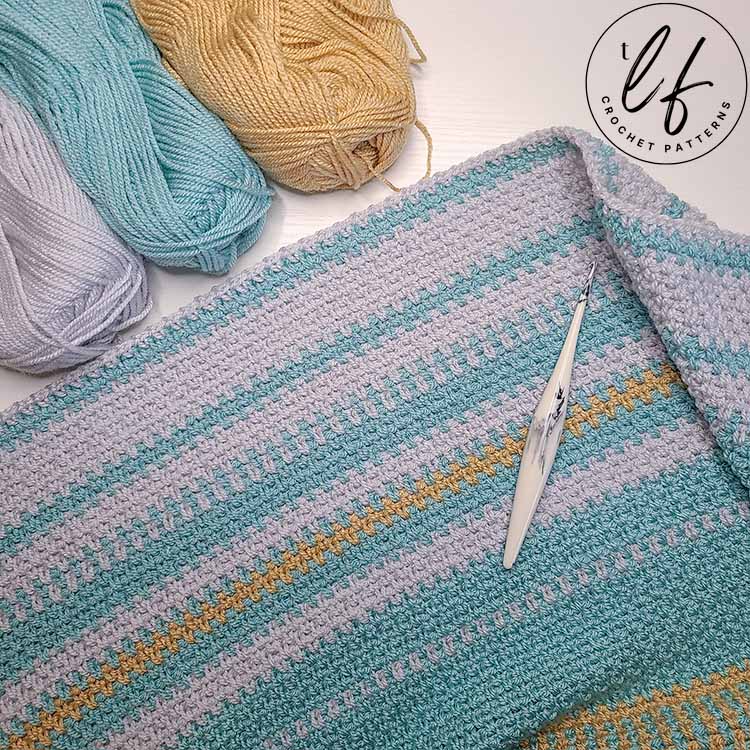
The Moss Stitch (also known as the Linen Stitch) is very popular for crochet temperature blankets. It is an easy stitch that has a woven look that helps to blend the colors together. It’s also generally quite fast compared to other stitches as it’s 1 single crochet, chain 1, skip 1 and repeat.
If you were to choose the Moss Stitch, my stitch tutorial will help you through creating a gauge swatch of this stitch and figuring out the number of stitches to make it the size you’d like.
Any other short stitch will do, though. You can use single crochet, slip stitches or any stitch pattern as long as they aren’t too tall.
Regardless of the stitch you decide on, make sure to do a gauge swatch to determine how many stitches you need for the width of your blanket and to make sure that your blanket won’t become too tall. My blog post about Gauge and Why It Matters will help, if you haven’t made a gauge swatch before.
Creating your Color Key
For a crochet temperature blanket we are, of course, tracking temperatures and for this we will make a Color Key. This will help keep us organized with our colors so we know which color is assigned to which set of temperatures.
For the project to work out as best as possible, you’ll want to first choose whether you’re tracking the high or low temperature for the day.
Once you know which side of the temperatures you want to track, you’ll need to plan out temperature sets that will relate to your yarn color for your key. You don’t have to choose a yarn color for every temperature. Depending on where you live, that could be 90+ colors!
Setting up your Color Key using temperature sets will help narrow down the colors that you’ll need and give you a plan and key to look back on.
In the US, our temperatures are in Fahrenheit and I live in an area that can have our high’s be as low as 20ish in the winter and as high as 100+ in the summer. So, for me, I’d choose to break down this range of temperatures into increments of 10.
For example:
- 11-20 F
- 21-30 F
- 31-40 F
- 41-50 F
- 51-60 F
- 61-70 F
- 71-80 F
- 81-90 F
- 90-100 F
Breaking down my temperatures into sets of 10 degrees means that I would only have to use 9 colors – not 90! 😉
If you live in a part of the world that uses Celsius instead, you could break them down into sets of 5 degrees so that you still have a nice wide range of color.
For example:
- 0-5 C
- 6-10 C
- 11-15 C
- 16-20 C
- 21-25 C
- 26-30 C
- 30+ C
Breaking down Celsius temperatures into 5 degree increments like the example above would mean that you would use 7 colors.
Of course, you can always break down the temperatures however you like, regardless of if you use Fahrenheit or Celsius. These are just general examples to help show how you could plan out your temperatures.
How to know the temperature range for the location you choose
If the location you choose for your temperature blanket is where you live, you probably have a good idea of just how cold and hot it gets and can plan your increments around your generally known temperatures.
If you’re choosing a different location, a vastly different year than the current year or maybe just moved to where you are now, you can google “Average Temperatures for LOCATION in YEAR“. For example, I can google “Average Temperatures for Los Angeles in 1980” and the top result shows me a graph of temperatures, like this:

So, if I were to make a crochet temperature blanket using Los Angeles as a location and the year 1980, I would be able to determine the general high and low temperatures to plan my Color Key around this temperature range, even though I don’t live there and it’s not 1980.
DISCLAIMER: This post includes affiliate links. This means, should you decide to purchase a product via one of these links, I will receive a small commission at no extra cost to you. I only recommend products I use and love (Or products I know others love, have heavily researched, know have good ratings and plan to purchase myself). These small commissions help to support this blog and continue keeping most of my patterns free. You can read more on my Privacy Policy, if you prefer.
Choosing the best yarn
The first and possibly most important thing to know about making a crochet temperature blanket is that it is almost impossible to know exactly how much yarn you’ll use of each color.
Especially if you plan on making your crochet temperature blanket for the current year, you won’t know the temperatures of future days.
For this reason, it’s important to choose a yarn that is easily accessible. It is very likely that you will run out of one or more colors through your project. So, you will want to choose yarn that you can purchase easily (whether online or in store) and is almost always in stock.
Mass produced yarn, like Lion Brand or Paintbox, will be a better choice for yarn than a hand dyed yarn that can come in and out of stock randomly or even be discontinued.
You will also want to choose a yarn brand that has a wide range of colors. Paintbox Yarn is a fantastic example of this. Their Simply Aran line has 62 colors to choose from so your options for a color palette are basically endless.
Additionally, you’ll want to stay within the same brand of yarn whenever possible. While you can mix brands, you’re more likely to run into gauge issues. Two brands might both call a yarn Medium weight, but that means next to nothing when it comes to gauge.
Planning your color palette
The most common color palette for crochet temperature blankets is a set of rainbow colors that follow the general idea of temperatures. Colder colors, like blue, are reserved for colder days and warmer colors, like red, are reserved for warmer days.
This palette is common because it works well. You’ll generally have a blanket that starts and ends with the colder colors and warms up to the yellows, oranges and reds in the center.
You certainly don’t have to do it that way, though. You can choose any color palette you like! You don’t have to force yourself into the rainbow of colors if you don’t want to.
You could choose colors that match the decorations of your home, a monochromatic palette of varying saturations of the same color, decide to use red for the cold days and blue for the warm days – the choice is yours!
It’s your crochet temperature blanket, after all!
If you’d like to break away from the rainbow temperatures and consider other options but you aren’t sure where to start, try googling “palette of 10 colors” (or however many colors you’ll use) and look at the image results. You’ll get a variety of palettes that will help give you some color inspiration.
Choosing the year
You don’t have to crochet a temperature blanket for the current year. You can certainly choose a different year, a different location or both to create a temperature blanket that will be special to you or the person you intend to gift it to.
Once you know the year and location you want to use, you can follow the steps I did above to find the range of temperatures to start planning out your increments. You’ll google “Average Temperatures for LOCATION in YEAR”.
Once you have your averages and your colors planned, you’re all set to get working on your blanket and, the best part, you don’t even have to wait to find out what the temperatures will be!
You can use the Wunderground site to find records of temperatures for almost anywhere!
To use this site, click the hyperlink above. In the upper right hand corner of the webpage, there will be a search bar. Type in the location you’ve chosen (or where you live, if you’re making a temperature blanket for where you live but in a different year) and choose it from the drop down menu that pops up.
The page will load to today’s current temperatures and data. Just above today’s temperature, there are tabs like “Today”, “Hourly”, “10-Day”, etc. In these tabs will be “History”. Click it.
From here, you can choose to view the daily, weekly or monthly temperatures for your location based on the time frame that you input.
If you’re making a temperature blanket for the current year but missed a day, you can check the past weather using this and can input the specific day you’re looking for.
If you’re making a crochet temperature blanket for a completely different year, I would recommend looking at the monthly records, as it will be much faster to jot them all down this way than it would be to look at each day individually.
I played around with this site a bit to make sure that it pulled data for several locations and years. I discovered that it was 72 degrees in the city I was born in on the day I was born. Fun!
I checked cities in different countries, different years, etc. You should be able to find historical temperature data using this site but, if you can’t, you should be able to find data by doing some google searching.
Create a 2023 Crochet Temperature Blanket with The Loophole Fox
In 2023, I finally dove into crocheting a temperature blanket. 2023 was the first full year my husband and I lived in a new state and I thought… what better way to document it than through a crochet temperature blanket?
I am beyond thrilled with how my crochet temperature blanket turned out. It also turned out to be so much more than just a temperature blanket.
It became a keeper of memories, an interesting color journey, a lesson in releasing control and so much more.
The lovely crocheters in my Facebook Group and I created temperature blankets together in 2023. We put the stitch and shape of the blanket up to a vote and, overwhelmingly, the vote was for a rectangle blanket using the Moss Stitch.
Simple, easy and gorgeous – These crocheters have good taste!
While my crochet temperature blanket journey is over for this year (I think I may do one in 2025!), I’d still love to see your progress if you’re making one for 2024. You can show off your work by joining my Facebook Group, tagging me in your Instagram photos (@theloopholefoxcrochet) or joining my newsletter!
Planning the Crochet Temperature Blanket (AKA Technical Information)
Planning out a crochet temperature blanket is a lot of fun. You get to think about all the colors you’ll use, what stitch pattern you’ll use and dream of what it will look like finished.
It also takes a lot of math and planning. I’ll walk you step by step through my plans, my gauge and what size my crochet temperature blanket should turn out to be after my gauge tests. You’re welcome to follow the plans that I have set out or alter them as you see fit.
Yarn, Tools & Notions
For my crochet temperature blanket, I’ll be using the following:
- DK (Light – 3) Weight Yarn – Paintbox Simply DK
- 4mm (G-6) Hook – I’ll be using my favorite Furls Streamline in Cookies and Cream
- Stitch Markers
- Scissors
- Tapestry Needle
Note that you can use a different weight of yarn and hook size, if you’d like. Make sure to read over the Gauge and Size section to help you create a blanket that is the size you’d prefer.
I’m using DK weight for 2 reasons – It will help keep the blanket from becoming too tall and it has better drape than the medium Paintbox yarn.
Gauge
Using DK weight Yarn and the Moss Stitch
20 sts (sc and ch 1 spcs) x 18 rows = Approximately 4 inches x 4 inches
Making a gauge swatch for a crochet temperature blanket is extremely important. You can skip this part but you may end up with a very wonky blanket that is super long and not super wide.
You are welcome to base your blanket off of my gauge but I would recommend checking your own gauge, as well. Especially if you decide to use a different yarn weight.
I tested gauge using Paintbox Yarns (my chosen yarn to use) in both their Simply Aran (Medium – 4) and Simply DK (Light – 3) yarn.
Ultimately, I’ve decided to go with DK weight. Here’s why:
When working a crochet temperature blanket, you know that you will have 365 rows (1 row for each day of the year). This means we are working backward with gauge. Typically, we make a gauge swatch to see how many rows we would need to work to create a certain size but, in this case, we are beholden to 365 rows.
Initially, I made a gauge swatch using the Simply Aran (Medium – 4) yarn and a 5mm hook. After doing the math, I discovered that with my tension, my crochet temperature blanket would end up being absolutely massive.
I’m setting out to make a crochet temperature blanket that is more of a throw blanket size for my couch, not a California King Size, you know what I’m saying?
Using the Simply DK yarn by Paintbox Yarns makes the blanket more the size that I’m looking for.
Size
Of course, there are a ton of variables in project such as this that could make it so the size is off somehow. That being said, I am aiming for my blanket to be finished at approximately 85-90 inches long and 60-65 inches wide, after the border.
January 2024 update: Guess what!? It ended up being about 90 inches long!
This is approximately the size of a twin blanket so I’ll count it as a big ol’ throw blanket. 🙂
Marking Special Dates
To make my crochet temperature blanket even more special to me, I’m planning to mark special dates by using Puff Stitches instead of single crochets for the date.
So, for the rows that will correspond to dates of my birthday, my husbands birthday, our anniversary, etc., I will crochet 1 puff Stitch, chain 1, skip 1 instead of 1 single crochet, chain 1, skip 1.
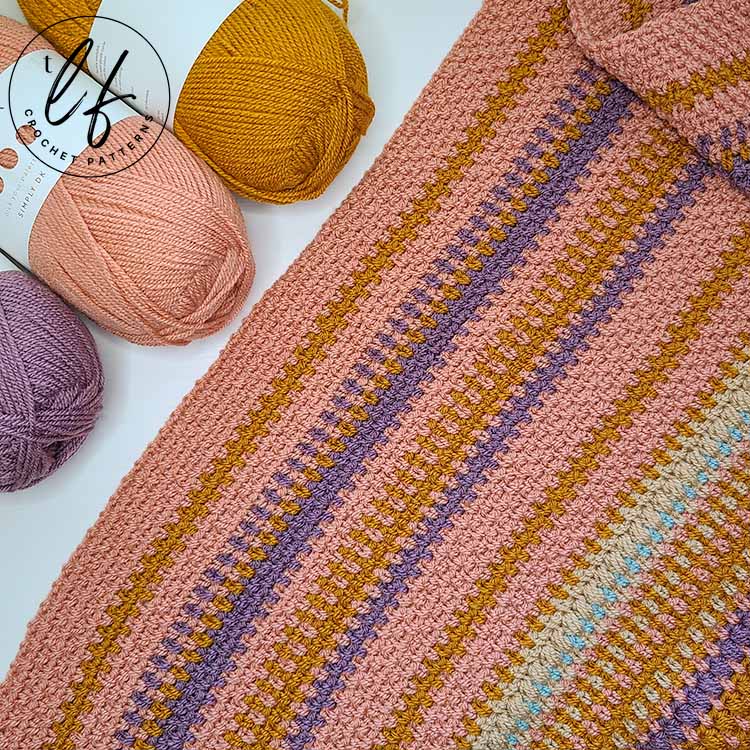
My Colors and Temperatures
Prior to choosing colors for my temperature increments, I looked around at different palettes of colors to get a general feeling for what I wanted.
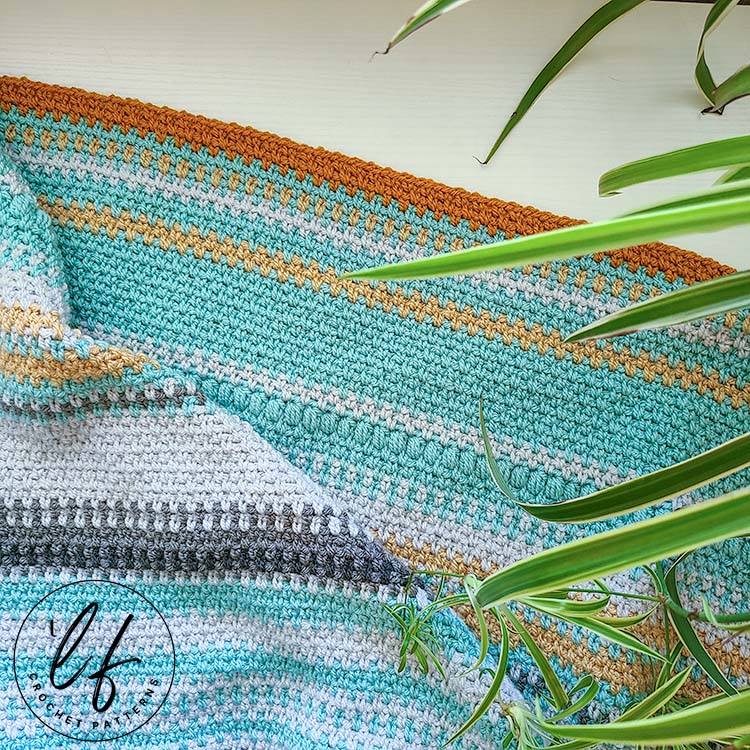
I decided to go with a palette that is not the “typical” crochet temperature blanket palette which means I did not use a classic rainbow of colors. I instead chose colors that are softer shades like pastels and played around with different ideas.
While my palette has kept the “cool” to “warm” colors, I’ve played around with some colors that might not typically be seen in temperature blankets and, instead of choosing red for the hottest days, I’ve picked white because 90-100 f is “white hot” to me. 😉
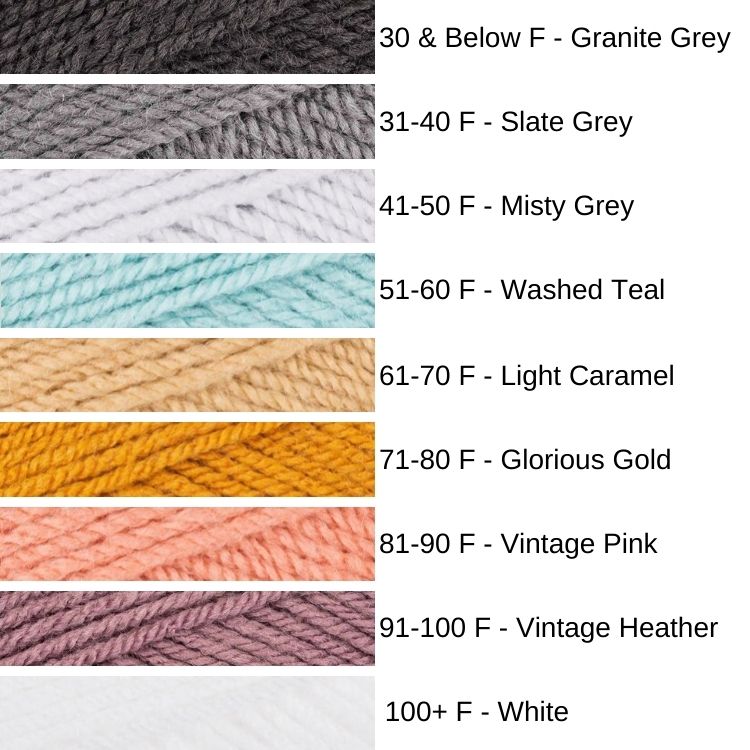
Here’s my temperature and color palette with my chosen colorways, all chosen from Paintbox Yarns on Lovecrafts in their Simply DK line.
- 30 & Below F – Granite Grey
- 31-40 F – Slate Grey
- 41-50 F – Misty Grey
- 51-60 F – Washed Teal
- 61-70 F – Light Caramel
- 71-80 F – Glorious Gold
- 81-90 F – Vintage Pink
- 91-100 F – Vintage Heather
- 100+ F – White
Creating a Temperature Tracker
There are a ton of different ways you can track the temperatures for your blanket. You can write them down in a note book, make note of them in your notes on your phone or grab a printable tracker to use that has all of the dates laid out.
I ended up using an Excel Spreadsheet, but I made a temperature tracker PDF that you can download for free right here on my blog, print and use as you like.
This temperature tracker PDF has all 12 months on separate pages, so that you can keep your dates organized. Each month has the list of dates and an area to write the temperature for the day. There is also a section for “Special Dates” that you can note down to remember. This way if you’re following my plan of marking your special dates with puff stitches instead of single crochets, you can remember to do so. 🙂
This tracker works for ALL years, not just 2023. If you’re making a blanket for a different year or you’re here after 2023, you certainly can still use this as I included February’s extra day for the leap year (the 29th) and the dates are organized in a list, not a calendar.
Grab the free PDF for this temperature tracker by clicking the button below! 🙂
Pattern Notes
- As this pattern is a simple repeat of 1 row using the Moss Stitch, only a few rows will be written to get you started and then will state to repeat.
- Make sure to change to the color you’ve chosen for the temperature of the day for each new row.
- Row 1 = Day 1 (January 1), Row 2 = Day 2 (January 2), etc.
- “Special Date” rows will be written out below. My special dates don’t start until later in the year, but yours might start as soon as January 1! I’ve included instructions for how I will work my Special Date rows below.
- When working the Moss Stitch, the chain 2 that begins the row always counts as a chain 1 space. You may want to place a stitch marker in this space while you get used to the pattern, if you aren’t already.
- If you have never worked the Moss Stitch before, I have a photo and video tutorial that will help!
- My “Special Date” rows will essentially be the Moss Stitch but worked with Puff Stitches instead of single crochets.
- I will be using “Closed” Puff Stitches. See special stitches for details on how to work this stitch or check out my Puff Stitch tutorial.
- In the Moss Stitch pattern, we count both the chain 1 spaces and the single crochet as stitches.
- The stitch pattern itself will always be an even amount of stitches. So when you chain, you’ll always want your chain to be a multiple of 2 + 1 turning chain.
- Example: If you want 12 stitches (6 single crochet, 6 chain 1 spaces), you’ll need to chain 13.
Special Stitch – Puff Stitch
This pattern uses a puff stitch. Puff stitches are worked in a few different ways – so it is important to know which puff stitch to use.
For the purposes of this pattern, we will be working with a “Closed Puff Stitch”.
To work this puff stitch, you will: [Yarn over and insert your hook into the indicated stitch. Yarn over and pull up a loop.] Repeat inside of the brackets 2 more times in the same stitch. You should now have 7 loops on your hook. Yarn over and pull through 6 of the 7 loops. 2 loops on hook, yarn over, pull through 2.
Crochet Temperature Blanket Pattern
Chain 299
Row 1 / Day 1 – Single crochet in the 3rd chain from hook (this counts as a chain 1 space). [Chain 1, skip 1 chain, 1 single crochet in the next chain]. Repeat instructions inside brackets across the row to the end. Your final single crochet should be in the last chain. (298 stitches, counting chain spaces as stitches / 149 sc, 149 ch 1 spcs)
Row 2 / Day 2 – Chain 2 (counts as a chain 1 spc here and throughout), turn. Skip the first single crochet and place 1 single crochet in the first chain 1 space. [Chain 1, skip 1 single crochet, 1 single crochet in next chain 1 space]. Repeat inside brackets across the row to the end. Your last single crochet should be in the last chain 1 space*. (298 stitches, counting chain spaces as stitches / 149 sc, 149 ch 1 spcs)
*Note: “The last chain 1 space” is created by the chain 2 turning chain. For Row 2, your last single crochet will go in the space created when placing your first single crochet in the 3rd chain from the hook. Beyond Row 2, all single crochets will be placed in the chain 1 space created by the 2 turning chains.
Row 3 / Day 3 through Row 365 / Day 365 – Repeat Row 2 / Day 2.
Special Dates – Chain 3 (counts as a chain 1 spc here and throughout), turn. Skip the first single crochet and place 1 Puff Stitch in the first chain 1 space. [Chain 1, skip 1 single crochet, 1 Puff Stitch in next chain 1 space]. Repeat inside brackets across the row until 1 chain space (created by the chain 2 turning chain in the previous row) remains. Place 1 half double crochet in this chain 1 space. (298 stitches, counting chain spaces as stitches / 148 Puff stitches, 1 half double crochet, 149 ch 1 spcs)
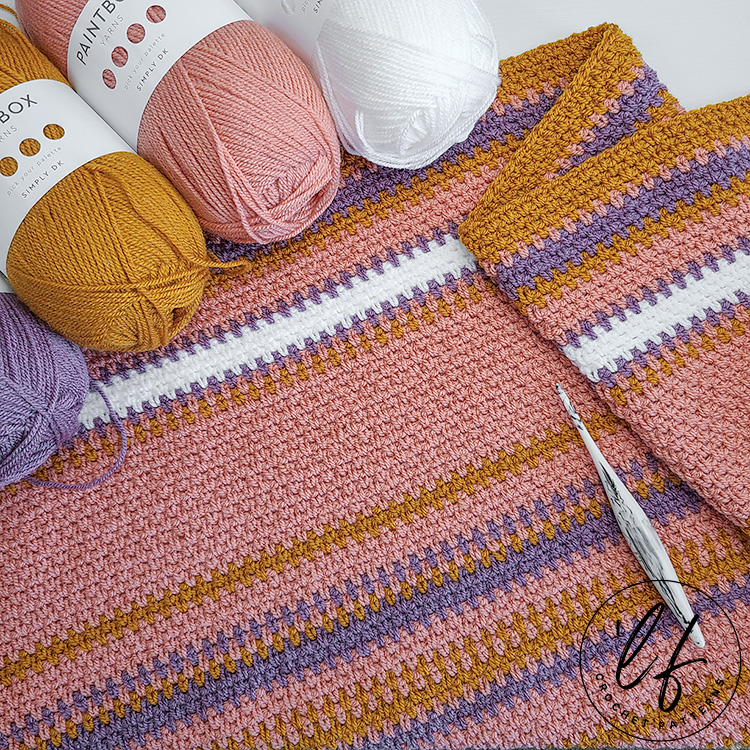
Crochet Temperature Border Pattern
I decided to do an easy, delicate border on my crochet temperature blanket. I played around with a few ideas but ended up absolutely loving a delicate border as it didn’t take away too much from my blanket.
If you’d like to create the same border, here’s how:
Choose 1 or 2 colors from your left over yarn. I chose White for Rounds 1 and 2 and Glorious Gold for Round 3.
One color will work totally fine but I do like the extra personality with 2 colors. If you use one color, ignore any notes to change color.
Please note that these instructions DO NOT include a stitch count. Your stitch count will likely be different from mine so I will not add to confusion by including them.
Once you’ve chosen your colors, you will:
Arrange the blanket so that the wrong side of your last row worked is facing toward you. Join your first chosen border color in the first single crochet of the row (the last single crochet worked in your final row / what would be the first stitch if you had turned the work and started a new row).
Border Round 1 – Ch 1. Place 1 sc in the first stitch, 1 sc in ch 1 spc. [1 sc in next stitch, 1 sc in ch 1 spc.]. Repeat across the row to the end. Your last sc placed will be in the ch 2 that started your final row.
At the end of the row, ch 2 and rotate to work along the long raw edge of the blanket. Place 1 sc in the side of each row down to the end.
At the end of this side, ch 2 and rotate to work along the bottom of the blanket (the starting chains). Place 1 sc in the first ch 1 spc, 1 sc in bottom of next st. [1 sc in the ch 1 spc, 1 sc in bottom of next st]. Repeat across the row to the end. Your last sc placed will be in the bottom of a single crochet.
At the end of the row, ch 2 and rotate to work along the long raw edge of the blanket. Place 1 sc in the side of each row down to the end. At the end, ch 2 and sl st to first sc made in border to close.
Border Round 2 – Ch 1, turn. In ch 2 spc, place 3 sc. [1 sc in each st to next ch 2 spc. In ch 2 spc, place 3 sc]. Repeat inside brackets 3 times total. 1 sc in each remaining st. Sl st to first sc of round to close.
Change to your second color of yarn, if you are using 2 colors.
Border Round 3 – Do not turn. In each st around the border of the blanket, place 1 sl st and ch 1. For example: place 1 sl st in the first st, ch 1. Place 1 sl st in the next st, ch 1. Do not skip any stitches. The ch 1’s create the texture in the border. At the end, sl st to the first sl st made to close. Cut yarn, weave ends.
TIP: Put a stitch marker in the very first slip stitch. You will need to slip stitch into this to close and it may be difficult to see, so a stitch marker will help.
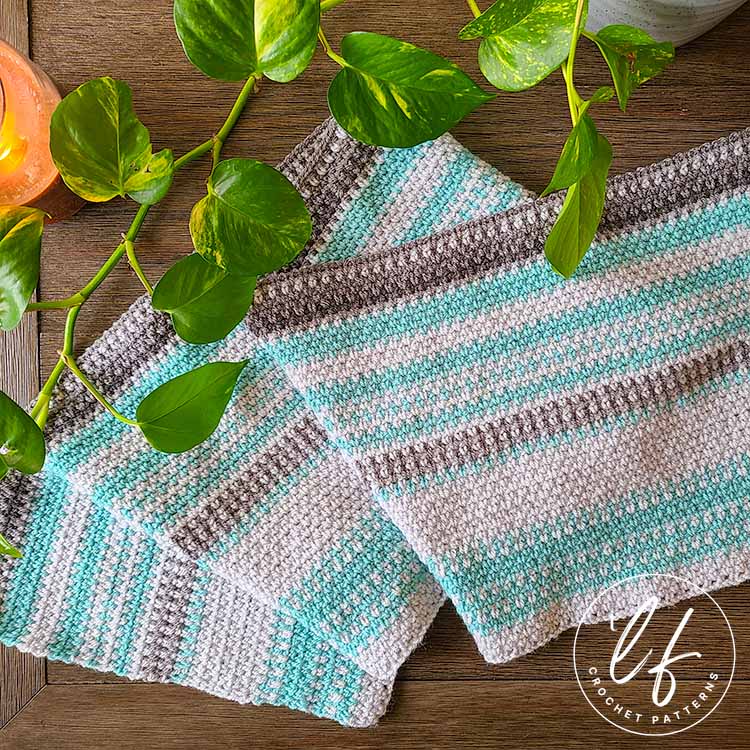
Crochet Temperature Blanket Progress
As the year and my crochet temperature blanket progressed, I updated this blog post with photos and my thoughts. You can go through my thoughts for each month or you can jump down to my completed crochet temperature blanket and check out the statistics!
January Crochet Temperature Blanket Progress
Early in my crochet temperature blanket, I was concerned about the lack of variation in colors. I nearly went back and changed my color key so that my temperature sets were different so that I would have more colors in the early months.
I did not end up doing that and I’m glad I didn’t. The longer stripes of the colder colors showed up on both sides of the blanket and I really love how it turned out.
I did end up having to change yarn colors, though. I had a totally different color palette chosen but one of the colors I wanted wasn’t in stock even through April.
What I found interesting is that I actually liked the new Color Key better than the original.
February Crochet Temperature Blanket Progress
February finally allowed me to use my 3rd and 4th colors. This is when I really started to see my vision of colors come to life and the excitement set in.
We had a big snow storm at the end of the month that allowed me to use a wider range of my colder yarn colors. We ended up with 4 inches of snow where we are and 10 inches in the city – and I was very excited about it. I love snow!
What was really cool about February was that it was the most snow accumulation in 24 hours since 1949 for this area. I was able to actively document that within my blanket – How cool is that?
When I originally updated this post with my progress, I said that I’d likely change to 5 degree sets instead of 10 in future blankets to get more color variation. I’m not totally sold on this anymore. Seeing the blanket fully completed makes these bigger stripes make sense.
March Crochet Temperature Blanket Progress
March was the month where the fun really started. While it was still mostly cold weather (50s and lower), at the very end of March I was able to start using a warmer color I chose for the 60s.
I found it really interesting just how excited I was to see a new color and add it into the blanket. It was super interesting to see the temperatures change visually and to see it progressively get warmer.
The big issue I had in March was time. I honestly just completely ran out of time to work on my blanket for the most part. I was super busy designing, planning big projects, writing blog posts, etc. at the time that working on my crochet temperature blanket didn’t happen for the most part.
I did end up carving out a chunk of time to get it done because I was absolutely determined to not fall behind. I was crocheting away happily until the tail end of yarn slipped through my fingers.
That was that! I was out of Misty Grey and didn’t have another skein. You can see in my image how all of a sudden, there’s the end of the yarn and I was only halfway through the row.
I ended up having to order more yarn and fell behind for a little bit but I did get caught up in time for the April update.
I was particularly motivated to get to April. April 1st was be my first “special” day in which I use puff stitches instead of single crochets.
April 1st is my Maine Coon’s “gotcha” day – my April Fools kitty! He’s been such a big part of my life for the past 11 years and I truly can’t imagine my life without him. So he will got a special day marked out just for him in the blanket. (My two other pets, our dog and additional cat, also received “special dates” because they’re just as important, of course!)
April Crochet Temperature Blanket Progress
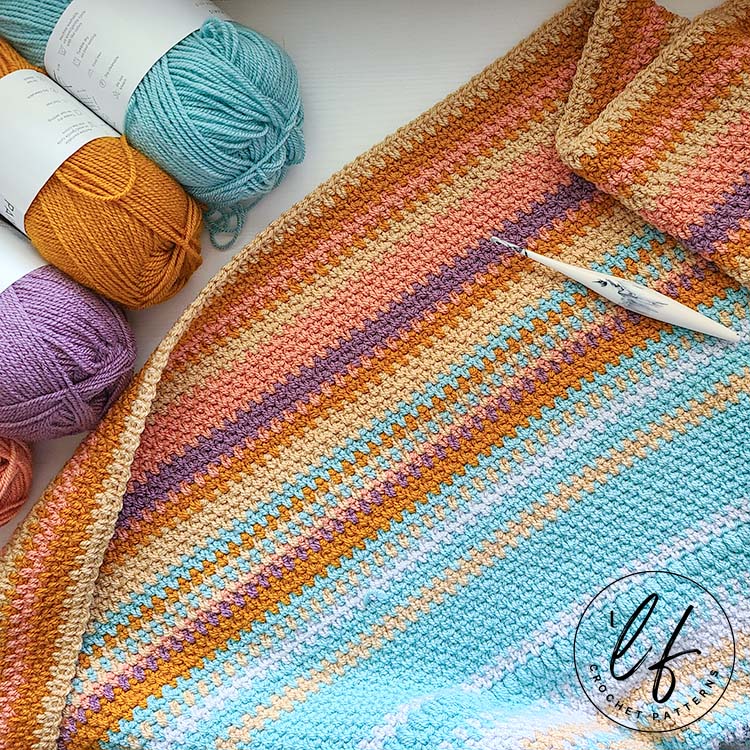
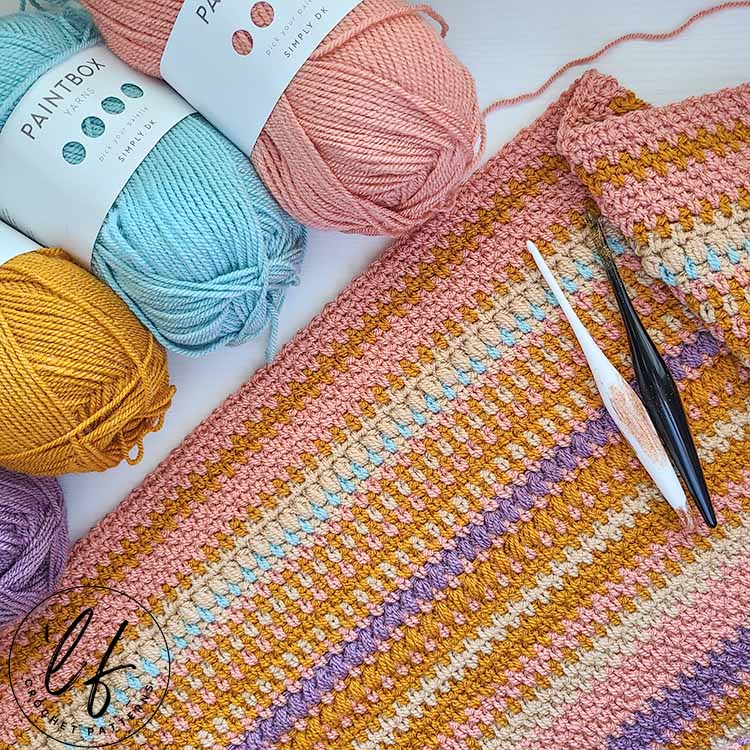
April was my first “favorite month” in this crochet temperature blanket. I planned my entire color palette around the Washed Teal yarn, so I was incredibly excited to see it comes into action. I also really loved finally putting some of the Glorious Gold into the blanket.
I chose Glorious Gold for my 70s temperatures – The “golden” days of warmth when it’s not too cold and not too warm. Perfection!
April also brought my first “special date” which you can see in the row of Puff Stitches. This row reflects April 1st, which is my Maine Coon’s gotcha day.
By April, I was really loving how the blanket was coming together. I took an additional picture of it on a blanket ladder (while I still could, anyway) to show the progress. I’m loved the bigger stripes of color and how the new colors come in to play in a more chaotic fashion.
May Crochet Temperature Blanket Progress
Oh hey there, warmer temperatures!
May was a total change up from April in terms of our temperatures. April stayed mostly in the 50s with a few days of warmer weather scattered in at the end. Then May came along and brought all of it’s gorgeous sunny days.
May 1st begins at the second teal row from the top. Aside from 3 days of 50s, all temperatures were at least 60 and above, with many beautiful 70s days that are shown with the gold yarn.
We were also hit with a bit of a heatwave and had several days that were in the upper 90s. Not my favorite weather by any means. I choose the purple for those hot days to help me look forward to crocheting them – purple is my favorite color. 🙂
May is the month where I definitely struggled to keep up and ended up setting aside blocks of time to crochet like mad to get May completed.
The reality is that I just did not feel well for a big part of May and didn’t keep up with it as well as I would have liked. But! It’s okay to slow down and give yourself time to rest, even if you don’t complete everything in the self imposed deadline.
June Crochet Temperature Blanket Progress
In June I said “Hello!” to summer and also hello to questioning my sanity every time I worked on the blanket during the hot weather.
June turned out to be my absolute favorite month out of the entire blanket. Not only is June a huge month for our household, it also had the most variation in color. I just absolutely loved it.
My husband and I have birthdays are only one day apart and we celebrate our wedding anniversary in June. Woo! There was a lot of cake eating and trip having this month – I wouldn’t have it any other way.
Of course, since my husband and I are both Gemini’s, I just had to include both of the Furls Gemini Zodiac Hooks in this Temperature Blanket update – Aren’t they gorgeous?
All of my special dates are marked with rows of Puff Stitches to be a part of the celebration. What is really fun is that my birthday ended up in my favorite color (purple) and my husbands birthday ended up in his favorite color (gold/orange). How cool is that?
July Crochet Temperature Blanket Progress
Oh boy, July was a hot one!
In July, I only used three colors in my crochet temperature blanket: Glorious Gold, Vintage Pink and Vintage Heather. This means that the temperatures only dropped to the high 70s and not super often at that. We mostly had 80+ days and a few absolutely scorching days of 90+.
Despite all the heat which I am really not a fan of, I do love how July panned out in terms of colors and how the temperatures control them.
You know those times when the sun sets and the sky lights up like cotton candy with shades gold, pink and purple? That’s what this month reminds me of.
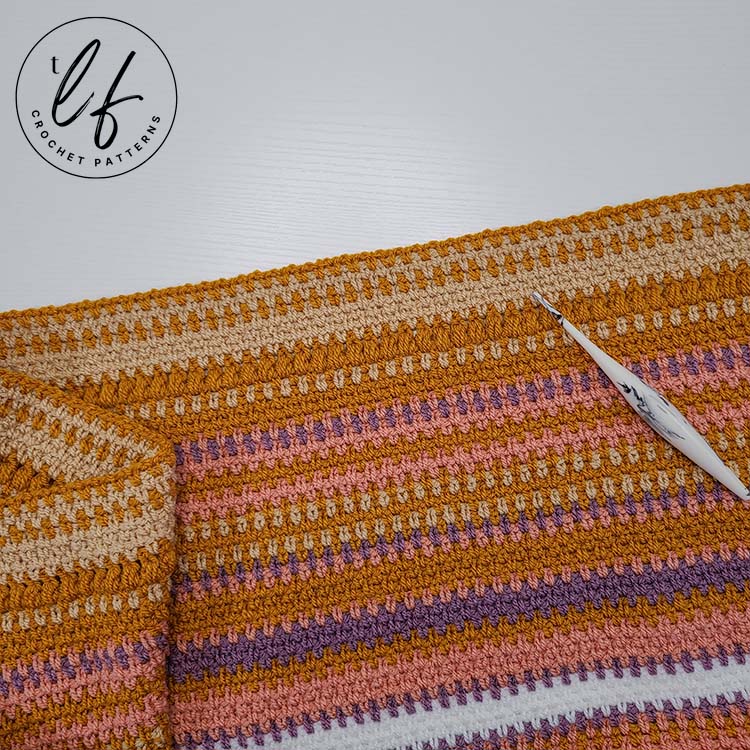
August Crochet Temperature Blanket Progress
August’s addition to my crochet temperature blanket was a lesson in releasing control.
August was my least favorite update in my crochet temperature blanket. Specifically, I didn’t like that our major heat wave, 4 days of 100f + heat, looked planned.
The 90 degrees (purple) on either side of the 100+ days (the big white strip) look like I planned for it to be that way and I don’t like it as much as the other months.
I really had to force myself to not just throw in a little bit of a different color in the middle of the big white stripe to make it look more chaotic and unplanned.
When I first started this project, I really, really had to let go and let the temperatures tell me what to do. As a designer, it was surprisingly hard for me to let the temperatures control the colors when I first started.
However, as time went on, I really enjoyed the chaos and not knowing what was going to happen. I loved that colors changed randomly and that there was no true rhyme or reason to what was happening with them. I’ve really enjoyed the surprise of how pretty it can be with the random colors at random rows.
August had a horrible heatwave that made me grit my teeth and buy a portable air conditioner (we bought this one and it actually cooled our 2 bedroom, 850 sq ft apartment to a reasonable degree, which I didn’t expect – yay for things working well!).
Those 100f + days are white because it was absolutely white hot and unbearable – without the portable AC, at least. You know I spent my days crocheting on this blanket basically cuddling with that AC unit, haha.
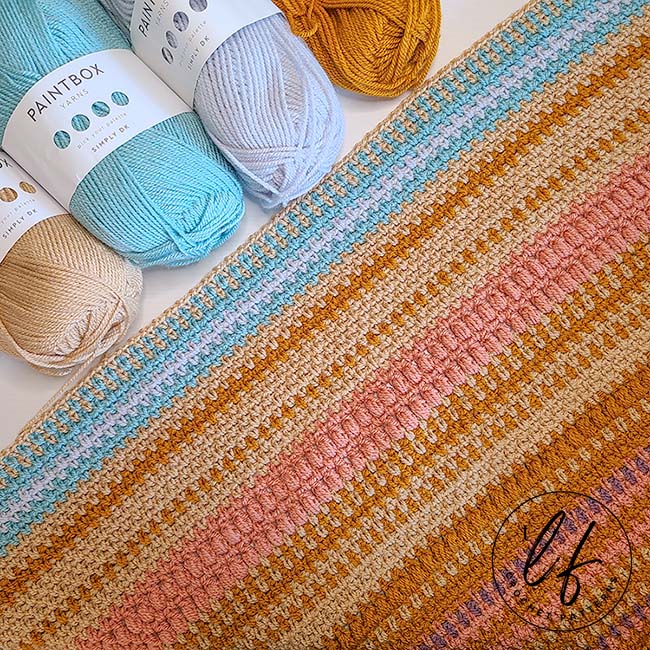
September Crochet Temperature Blanket Progress
September brought back the fluctuating temperatures which I absolutely love.
It looks to me like confetti, a celebration or even a golden sunset showing the end of summer. I absolutely love how September turned out in my blanket.
Of course, there’s a special date this month – My little black cat’s “Gotcha Day”! I will never forget how the little black fuzz ball that was a kitten walked up onto my porch, jumped up on my lap and settled down like he owned the place. I suppose he does now… Haha.
September started out quite warm, bouncing between the high 80s and low to mid 90s. All of a sudden, a cooler front came in and we received tons of rain – which I love! You can see where near the end of September, the weather switched to 70s (gold) and 60s (the light tan color). It was such a relief to me to have this weather back as I don’t do well in the heat at all.
October Crochet Temperature Blanket Progress
The warm weather tried to hold on through October but eventually, more mild days took over and we were well on our way into autumn and winter.
The peachy puff stitch rows are my two special dates for October. The first is October 5th, for when my husband and I first got together. Yep! I am that much of a sap that I included both our wedding anniversary and when we first started dating. He’s great, what can I say?
The second special date is October 7. This my pup’s “gotcha day”, from when we brought her home when she was just a puppy. Hard to believe she’s over 4 years old now!
I absolutely loved all the different colors in October and I was excited to have that teal back! I based my entire color palette around the teal so I’m happy to see it back in action. I was surprised to see our weather dip down into the 40s for the highs, though. It’s a bit early for that!
I went back and checked last years temperatures because I felt like October stayed warm longer in 2022 and I was right! It stayed in the 70s and 80s until nearly the end of the month and then dipped down. Interesting to compare, at any rate!
On a personal side, October was a very long month for me and it was generally been quite stressful. I really enjoyed coming back to this blanket to work on it. The simple stitches, the repetitive motions and the colors were so soothing and, while I loved working on my crochet temperature blanket all year, this was the first month that I noticed it has actually helped my mental health.
November Crochet Temperature Blanket Progress
The cold days returned and that means the teal and light gray are showed up in full force for November.
As I was crocheting the last few rows for November, I thought back to the start of the blanket. Like November, January and February were mostly teal and light gray with big stripes of one color.
I’ll be honest and say that I really didn’t like it. I was indecisive, worried that the entire blanket would be like that, considered switching up my temperature ranges and colors… Generally drove myself a bit crazy.
I did end up sticking with what I had already set up, though. As the year moved on, the colors came more sporadically and I particularly loved the warmer months where it would jump from the 60s to the 70s to the 80s and back again. It felt much more chaotic and interesting, like confetti, how I expected a temperature blanket to be.
Anyway, I’m glad I stuck it out. While I’m still not a big fan of the big stripes of one color in general, I’m glad that they’re back so that both the start and end of the blanket are balanced out in an interesting way.
The more solid structure of the colder weather really holds together the chaos of the warmer months, I think and I’m much happier than I thought I would be.
December Crochet Temperature Blanket Progress
365 rows? Done!
I can’t believe all the rows for this blanket have been completed. It’s a bit of a bitter sweet moment, really. I’m excited to be done with this long haul project but I’m also sad to leave it. It was such an interesting project that really became more than just tracking temperatures.
I think what’s most interesting is that this blanket became so much more for me than just tracking temperatures… It has become a keeper of memories, an interesting color journey, a lesson in releasing control and so much more.
I’ll be working on a border and will post instructions for whatever border I decide on hopefully in the next couple of weeks. I’ve been very indecisive with my border… perhaps because this blanket means more to me than I thought it would.
At any rate, that’s nearly a wrap on my 2023 crochet temperature blanket! There will be one final update with the border in which I’ll take a full size photo (the best I can, of course!) but otherwise… it’s time to leave 2023 in 2023. 😉
Finished 2023 Crochet Temperature Blanket (& Interesting Data!)
Now that I have finished my 2023 crochet temperature blanket, it’s time to show off the completed project.
Also, I’m a nerd for data and charts, so I’m going to include some interesting facts about my blanket. 🙂
First things first, look at this beauty:
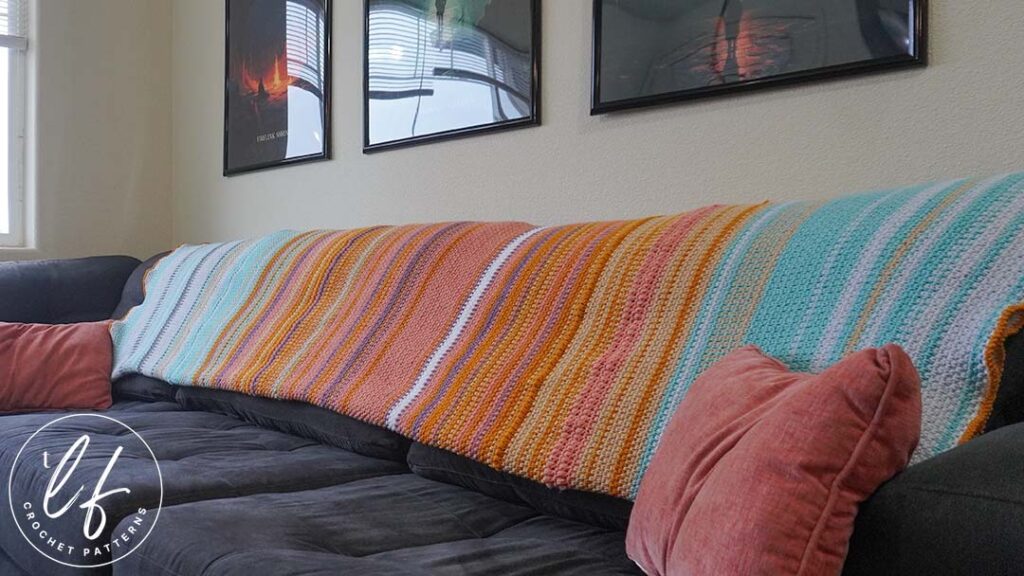
Seeing the entire blanket finished brings me so much joy. It’s really interesting to me just how sentimental this project became. I love seeing how the temperatures changed throughout the year. I also particularly loved how much it helped me learn to release control, how much it helped my mental health when I needed it, and how it’s become a keeper of memories.
Now, onto the fun data!
Size
Now that the blanket is completely finished with a border, I’ve measured it.
The blanket turned out to be approximately 94 inches long and 64 inches wide.
This isn’t too far off from my original goal. My goal was anywhere between 81 and 90 inches and about 60 inches wide.
I’m not upset that it’s bigger that the goal. For one thing, who doesn’t like a big ol’ comfy blanket?
On the other, I know as a designer that there are variables in crochet that can make things a different size, regardless of what we do.
I knew the “special date” rows of Puff Stitches would add some height and I was okay with that.
Additionally, over time, the blanket has stretched just slightly. I mean, this blanket is heavy so we can expect some added length if it’s held up.
Speaking of heavy….
Weight of Blanket
The blanket turned out to be a whopping 4.2 pounds. Yep. I weighed myself holding the blanket and weighed myself without it, did the math and there it is: 4.2 pounds.
Total Yarn Usage
Based on the weight of the blanket, I was able to get a good idea of just how much yarn I used (including the border).
4.2 pounds = 67.2 ounces = Approximately 1905 grams of yarn.
Paintbox Simply DK has 100 grams per skein of yarn. This means I used just over 19 skeins.
Paintbox Simply DK has 302 yards per skein. 19 skeins x 302 yards = 5,738 yards.
And, for an additional fun statistic… 5,738 yards = Approximately 3.26 miles of yarn.
Yarn Usage Breakdown By Color
I also broke down an approximate idea of how much of each color I used. Keep in mind, this is specific to my blanket, my tension, my location, etc. A crochet temperature blanket you create will not match these numbers but, depending on your location, it could give you a good general idea.
And, because I love data, graphs and charts, I made a pie chart!
Here’s the breakdown of temperatures, how many rows were crocheted per temperature and the approximate yarn usage for each color:
- 30 F & Below (Granite Grey) – 1 Row, approximately 6 grams.
- 31-40 F (Slate Grey) – 5 Rows, approximately 26 grams.
- 41-50 F (Misty Grey) – 75 Rows, approximately 391.
- 51-60 F (Washed Teal) – 92 Rows, approximately 479 grams.
- 61-70 F (Light Caramel) – 53 Rows, approximately 276 grams.
- 71-80 F (Glorious Gold) – 52 Rows, approximately 271 grams.
- 81-90 F (Vintage Pink) – 66 Rows, approximately 344 grams.
- 91-100 F (Vintage Heather) – 17 Rows, approximately 89 grams.
- Over 100 F (White) – 4 Rows, approximately 21 grams.
(All yarn usage is rounded up to the nearest whole number in grams).
Crochet Temperature Blanket FAQs – Quick Answers
What yarn should I use for a crochet temperature blanket?
Any fiber of yarn you prefer will work well. Try to stay within the same brand of yarn whenever possible. Pick a yarn that is easily accessible – Mass produced yarns are typically a better choice as they are usually in stock and come in a wide variety of colors.
What crochet stitch is best for a temperature blanket?
Choose a short stitch so that your blanket doesn’t become too long since you’ll be working 365 rows. Single crochet, Back Loop Only Slip Stitches, Moss Stitch, etc.
How many colors should I use for a temperature blanket?
This one is completely up to you! You can break down the range of temperatures for your area into as many or as few sets of temperatures as you like. This means you can use as many or as few colors as you like!
How many skeins of yarn do I need for a temperature blanket?
It’s almost impossible to say exactly how much yarn you would need total and for which color because of the nature of the project. I would expect to use around 3,000-5,000 yards total, but that’s a ballpark guess.
If you’re concerned about cost, choose a nice yarn that is still economical like Lion Brand Basic Stitch or Paintbox Yarns.
How do I find temperatures?
You can use the Wunderground site to find records of temperatures for almost anywhere! Input the location you’re using for your temperature blanket and the site will pull up the current temperatures. Use the “History” tab on this page to find temperatures in the past for your chosen location.
Love the idea of a crochet temperature blanket and want to save this post for later? Pin it to Pinterest!
Final Thoughts on my Crochet Temperature Blanket
I have to say that I truly loved this project.
I know crochet temperature blankets aren’t cup of tea and that’s okay. I can see where just crocheting a bunch of rows in random colors doesn’t interest a lot of people.
However, I love, love, love mine. While it started out just crocheting rows in colors the temperatures told me to use, it became so much more.
I’ve said it a few times but I’ll say it again: This crochet temperature blanket holds memories (my birthday trip to the mountains, a historic snowstorm, red velvet cake for our wedding anniversary), taught me to release control, made me look at how I manage my time, etc.
If you have never made a crochet temperature blanket, I’d recommend it.
And if you aren’t interested in making a massive blanket, you could always make it much less wide and have a fun and funky scarf! 🙂
Don’t forget to join my Facebook Group so we can chat all about your creations! We are a group for crocheters of all experiences, all interests and love to hang out together. Come join the fun!

Shannon | Designer & Editor
Shannon helps crocheters find their next project and build their skills with in depth tutorials and crochet patterns on her blog, theloopholefox.com.
With more than a decade of crochet experience, Shannon knows that understanding why we do something matters just as much as how we do it. She teaches new techniques and crochet stitches in depth so you can crochet with confidence.
So excited to do this!!,
Me, too! I’m so excited you’ll be making one, too!
I waited 7 months for love crafts to restock “slate grey” last year. I hope it doesn’t take that long to get your colors!
Oh my gosh! I hope it doesn’t take that long. If it does, I’ll have to change my choices. 🙂
Most color palettes chosen have temps that do not reflect the desert southwest part of the country. We can get temps over 115 degrees in the summer time, but the winters are milder with the temps “only” getting down to the lower 30’s and sometimes the upper twenties – with the occasional teens! The blankets shown are beautiful.
The desert southwest is such a gorgeous place. I absolutely loved going into the desert like Anza-Borrego and Joshua Tree when I lived in Southern California. I agree that most temperature setups don’t reflect the unique temperature ranges of the southwest desert. That’s why I think it’s so important to make your own color key. 🙂