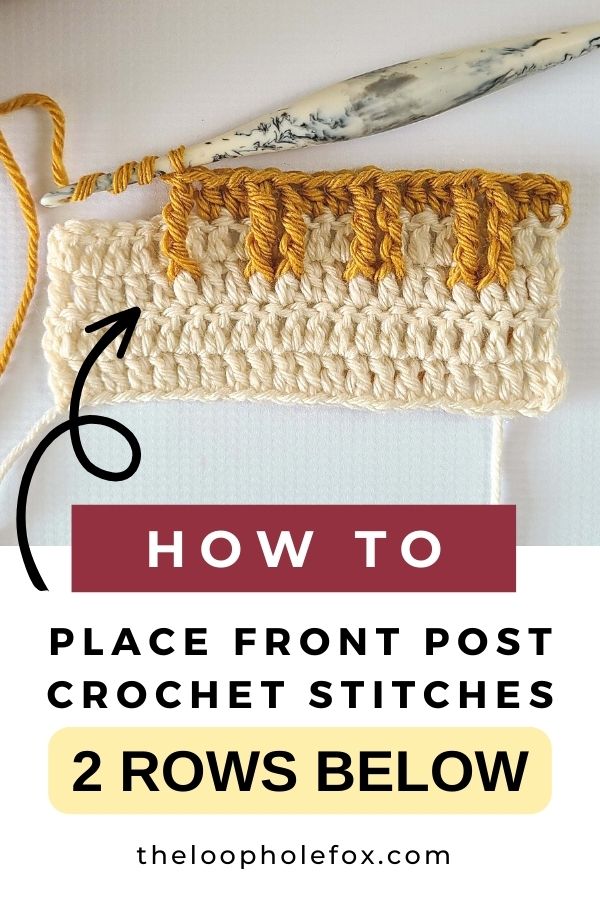
How to Front Post Crochet 2 Rows Below – How to Identify Stitches and Why You’d Use this Technique
You’ve seen it in crochet patterns before: “Place 1 Front Post Double Crochet in the next stitch 2 rows below” or “Skip 2 stitches, place Front Post Treble Crochet in the next stitch 2 rows below”. While the pattern makes it sound simple, it can be difficult to identify the stitches to work into especially if you need to skip stitches.
Because crochet stitches don’t always sit perfectly straight on top of each other, it can be difficult to know where you need to place your stitches. So, how do you identify these stitches so you can properly crochet 2 rows below?
In this tutorial, we will be talking about how to crochet 2 rows below when using front post stitches. This technique is commonly used to create a raised texture in an otherwise dense stitch and is sometimes used in cables.
In this tutorial, you will learn how to identify stitches in the rows below and how to work into them when using Front Post Stitches. This means that we will be going in depth into stitch anatomy and how to find the correct stitches to work into.
The idea of working crocheting 2 rows below sounds daunting, but it’s easier than it sounds once you know how to count and identify the stitches in the rows below the one you’d currently be working into.
The most common stitch pattern that most crocheters have at least heard of that uses this technique is the Alpine Stitch but it is used for more than just the one stitch pattern. The Alpine Stitch, once you get the first few rows done, is fairly easy since it’s ribbed texture is simply 1 single crochet, 1 front post double crochet 2 rows below.
But not all stitch patterns are going to be as straight forward as placing 1 stitch after the other.
So, let’s talk about how to crochet 2 rows below and, specifically, how to find the right stitches to work into so we can work all kinds of different crochet patterns.
What should I know before following this tutorial?
This tutorial is for confident advanced beginners who are looking to take their skills into more intermediate patterns.
This is not an absolute beginner tutorial. Before following this tutorial, you should be confident with the standard stitches like single crochet, half double crochet and double crochet. You should also be familiar and somewhat comfortable with front post stitches, like the Front Post Double Crochet.
In this tutorial, we will specifically be using the Front Post Double Crochet and the Front Post Double Treble Crochet. If you are unfamiliar with these stitches, I recommend following my tutorials before following this one.
How to Find the Correct Stitch 2 Rows Below
The absolute hardest part of placing a front post stitch around a stitch 2 rows below is finding the correct stitch to work into.
Crochet stitches don’t stand up perfectly straight, especially the taller stitches like double crochets, so it certainly can be confusing.
To understand how to identify the right stitch, we first need to review some row and stitch anatomy.
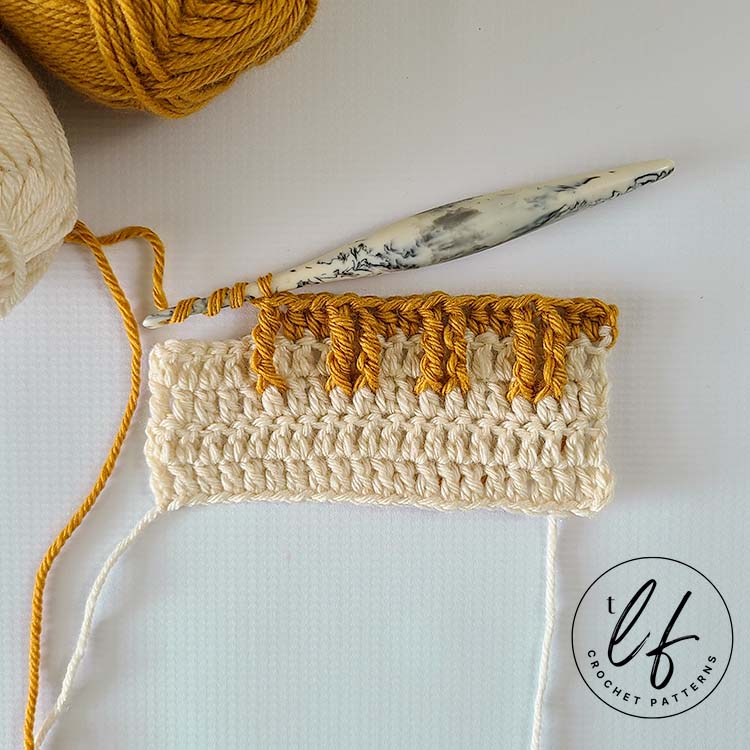
Here I have a swatch of 6 rows of double crochet with 12 stitches in each row.
When a pattern is telling you to place a front post crochet stitch two rows below, they’re referencing the row the black arrow is pointing to (with 2 on the left side).
The row that we would typically work a standard stitch (like a single or double crochet) in is the first row below.
The row below the first row is “2 rows below”.
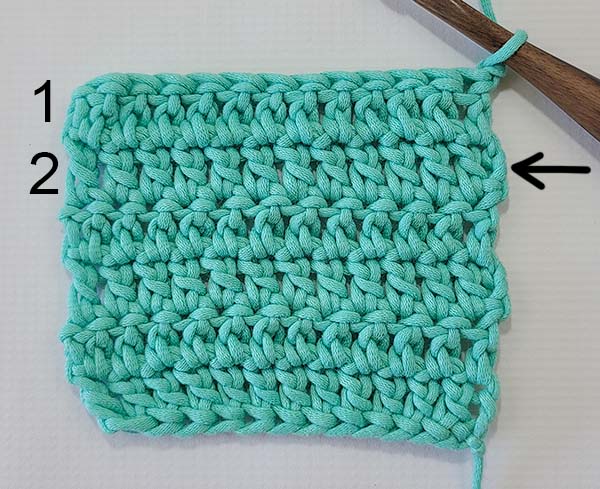
For stitch anatomy, we need to know where the “top” of the crochet stitch is and where the post of the stitch is.
In this image, I’ve highlighted the top of the double crochet in orange. This is where you would normally insert your hook if you were going to place a standard crochet stitch.
I’ve highlighted the post of the stitch yellow.
We know that this yellow highlighted post “belongs” to the orange highlighted top of the stitch.
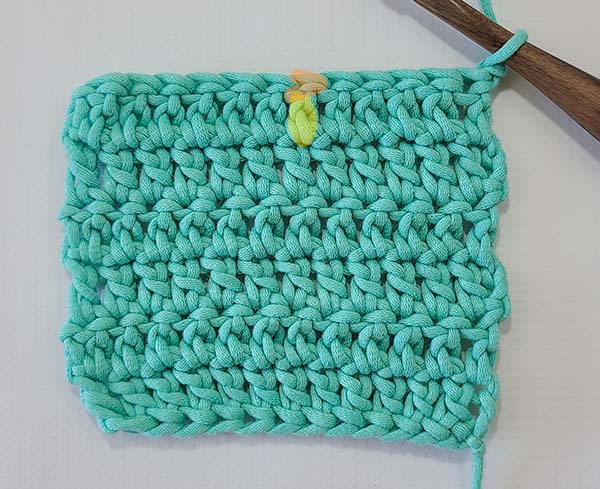
Of course, this swatch looks totally normal. It is just made of double crochets, after all. But let’s take a closer look at how these stitches stack on top of each other and how it can be easy to lose track of the stitches 2 rows below when you’re crocheting.

In this image, you can see that I’ve placed a yellow highlight vertically down the row. It is almost zig zagged.
The nature of crochet stitches (all crochet stitches, not just double crochet) is that they lean.
This is most notable in the round – You know when your seam goes diagonal instead of straight up and down?
Worked in rows, the stitches lean to the left for one row and then lean to the right for one row.
So, with all of the leaning and this zig zagged line, how are we to make sure that we are working into the correct stitch – especially when we have more stitches than 12?
Let’s say we wanted to place a stitch in the 6th stitch 2 rows below.
Remember the orange highlighted top of the stitch and yellow highlighted post of the stitch for a moment. We know that a yellow highlighted post “belongs” to an orange highlighted top of the stitch. We can use this knowledge to follow the stitch downward to find the correct stitch.
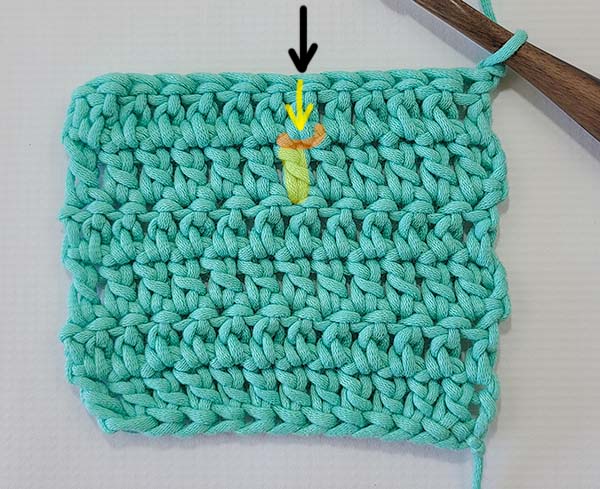
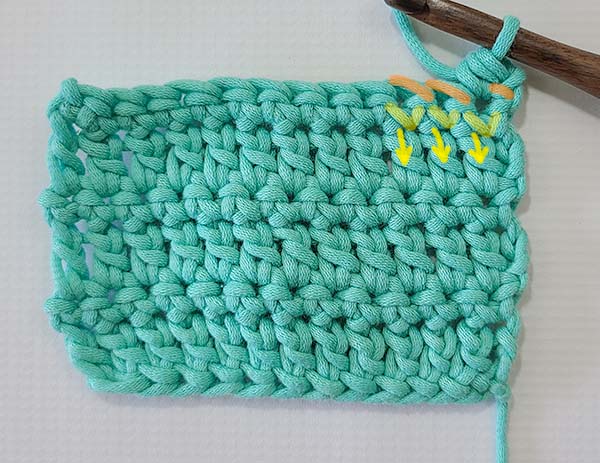
The black arrow in this image points down to the 6th stitch of this row. Below the black arrow, a yellow arrow also points downward.
This yellow arrow represents the post of the 6th stitch but, instead of being highlighted just to show where it is, we are going to follow the yellow arrow down to find the top of the stitch this post was worked into.
Below the yellow arrow, the top of the stitch this post was worked into is highlighted orange and the post that belongs to the top of the stitch is highlighted yellow.
We now know that this yellow highlighted post is where we would place our front post stitch, if we were to place a front post stitch in the 6th stitch 2 rows below.
Because we know the stitch anatomy, we were able to follow the stitches downward from the top of the first stitch, through the post of the stitch, to the top of the second stitch and, finally, to the post that we would work around.
If, for sake of example, a crochet pattern instructed you to work 3 rows below instead of 2 rows below, you could continue to follow the stitch posts downward to find the 6th stitch 3 rows below. You won’t run into working 3 rows below very often, though.
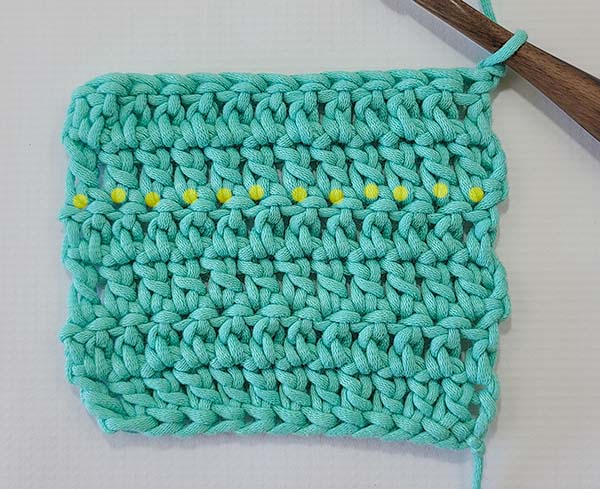
Couldn’t you just count the post of the stitches two rows below over until you find the 6th stitch, though?
Yeah! Absolutely. With smaller projects that don’t have a ton of stitches (like 192, for example), you could easily count the posts. You could count them across like I’ve highlighted with yellow dots until you find the stitch you’re looking for.
With larger projects, though, you’ll likely want to be able to identify the stitch without counting.
Additionally, it’s always a good thing to understand the stitch anatomy of our projects.
Placing a Front Post Crochet Stitch 2 Rows Below
Now that we know how to find the correct stitch, let’s use it in practice so that we know what it will look like when we work further down the rows in the pattern.
While you’re placing the stitch, your work will pull downward and feel like a jumbled mess. Trust the process and continue placing the stitch. It will even out.
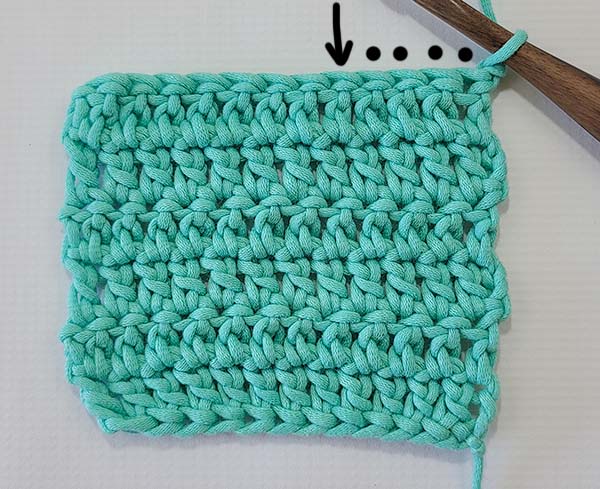
Let’s pretend a crochet pattern is telling us to place 1 half double crochet in the first 4 stitches and then 1 Front Post Double Treble Crochet in the next stitch 2 rows below.
Placing the 4 half double crochet stitches is easy. We will place 1 in each stitch that has a black dot over it in the image.
Then, we come to the 5th stitch that a black arrow is pointing to.

Using the method we outlined above, we can identify the post of the 5th stitch that we will work our Front Post Double Treble Crochet in.
We will follow the yellow arrow representing the 5th stitch down to find the top of the stitch it was worked into in the row below.
The top of the stitch that the 5th stitch was worked into is highlighted orange.
Below the top of the stitch is the post of the stitch which is highlighted yellow. We know that we place our Front Post Double Treble Crochet around this post.
If you haven’t worked a Front Post Double Treble Crochet before, you can review my step by step photo tutorial to learn it in depth.
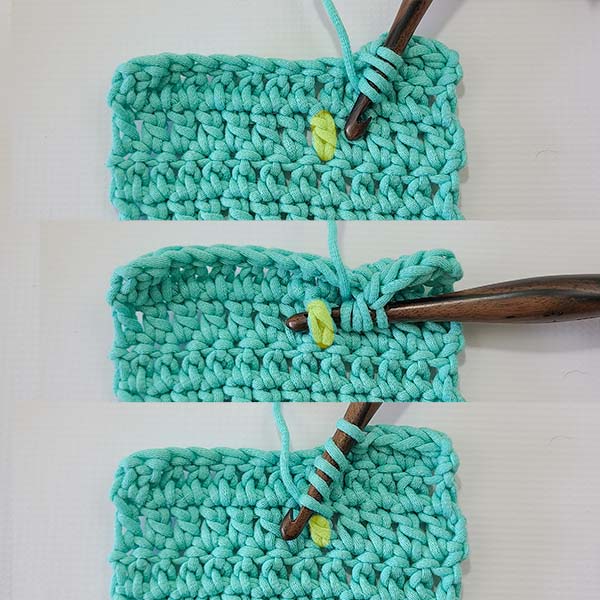
In this image, you can see that I have started my Front Post Double Treble in the stitch 2 rows below. I have yarned over 3 times, inserted my hook from front to back around the post of the stitch, yarned over and pulled up a loop. I have 5 loops on my hook.
Notice how far down the crochet hook has to go to properly work around this stitch post.
There are 2 important things to note here:
- In the middle image, you can see how much this technique is pulling the current row downward. This can feel strange and like it will warp your work. Don’t worry, the height of the stitch used will allow the current row to stand back up where it should be one the stitch is completed.
- We have completely skipped over the first row that we would normally work into, which is why this technique requires a taller stitch like the Front Post Double Treble.
- Always follow the stitch pattern the designer uses when they are using this technique. They’ve chosen the stitches according to their height which will work best for the pattern.
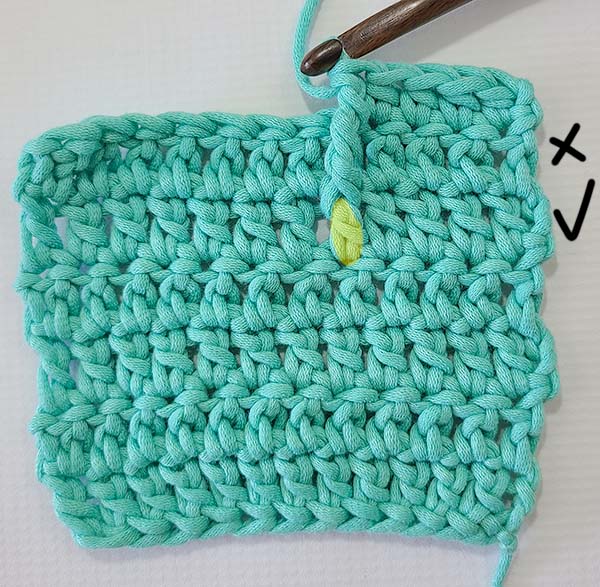
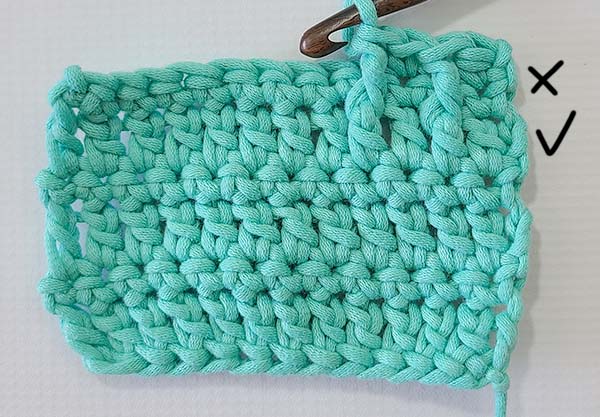
Now that the Front Post Double Treble Crochet is completed, you can see that the work stands up properly as it should.
We have completely skipped over the first row below (marked with an X on the right side of the row). This is the row we would normally work a stitch into if we weren’t using this technique.
The row that is 2 rows below is marked with a check mark. The post that we worked our stitch around is highlighted yellow.
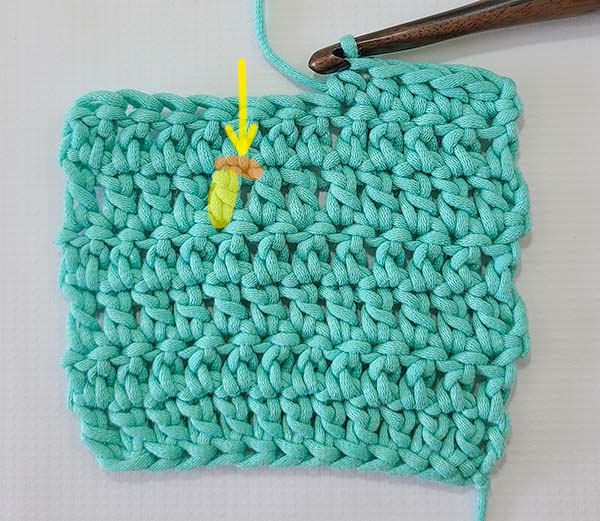
Let’s now, for the sake of example, say that we are to put 1 half double crochet in the next stitch and then 1 Front Post Double Treble Crochet in the following stitch 2 rows below.
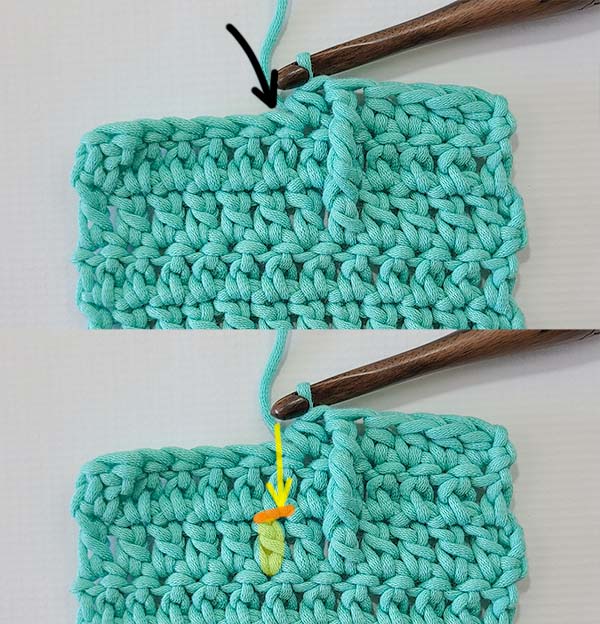
This image shows the same picture twice however, the bottom image is highlighted to help clearly identify the post of the stitch we will work into.
In this image, I’ve already placed the 1 half double crochet and now I’m prepared to place 1 front post double treble crochet in the next stitch 2 rows below.
Using the same method we have been using, we will follow the stitch posts down, as highlighted.
If you wanted to, you could just count 2 stitch posts over from the first front post double treble crochet to make it “easy” but we are in a tutorial for stitch anatomy, after all. 😉
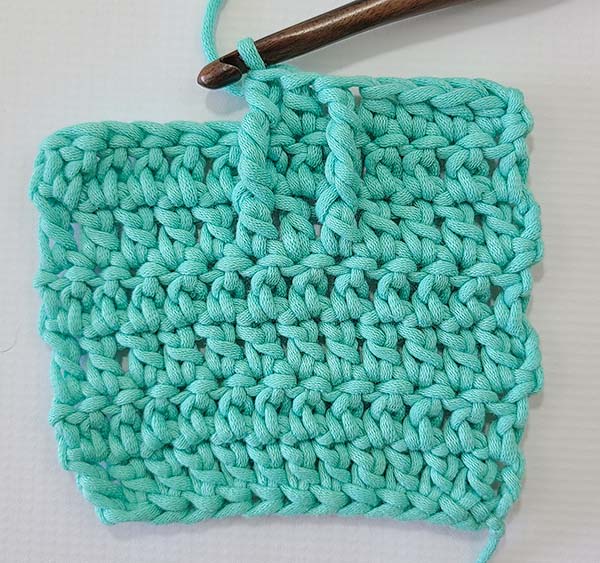
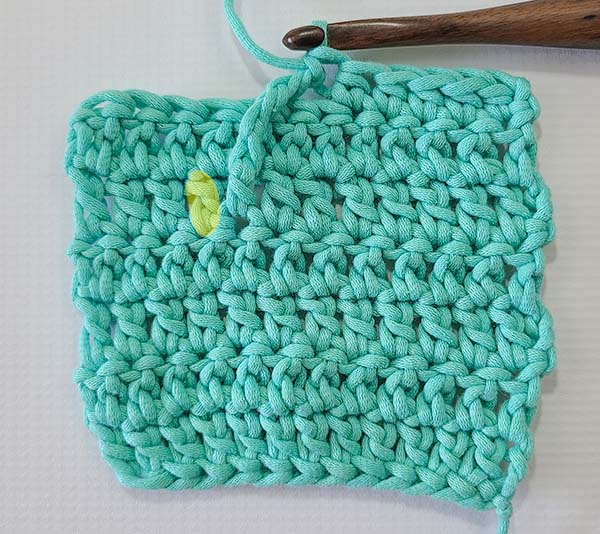
Here is the front post double treble crochet placed. Now we can really start to see the texture of these stitches.
Isn’t the texture of this technique interesting? We can see why the taller stitches are necessary, since they reach all the way down to the row below without causing the work to bunch up.
What if the first row below is single crochet?
How do I find the stitch 2 rows below?
Of course, you won’t always be looking for the stitch 2 rows below on just double crochets. Sometimes, it’ll be on half double crochets (which look similar enough to double crochets that they usually don’t need their own tutorial for this).
And, sometimes, there will be a row of single crochet that is your first row below. Single crochet’s don’t really have posts and the wrong side of them looks a bit weird. So, how do we identify the stitch below a single crochet?
Good question!
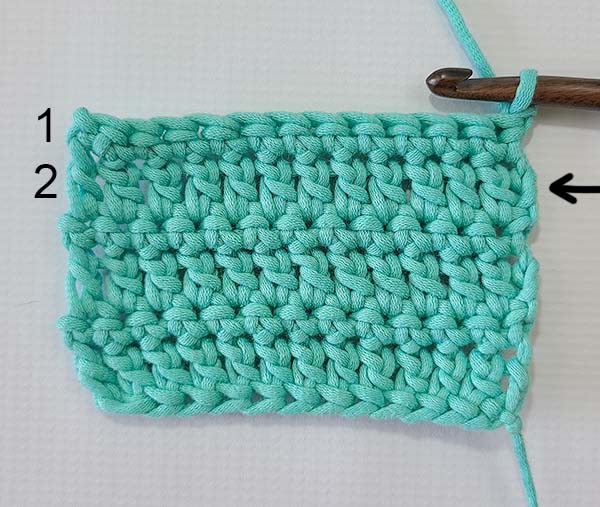
This is a swatch of 6 rows with 12 stitches. It is 1 row of double crochets followed by 1 row of single crochets.
The last row worked on this swatch is a row of single crochets. The row previous is a row of double crochets.
Similar to the swatch of all double crochets, a black arrow points to the second row below and the rows are numbered 1 and 2.
Note: Patterns with this technique will almost never ask you to place a front post stitch around a single crochet. That’s why I am only using double crochet in this tutorial. I’m not saying that you’ll never run into one, but they are very uncommon.
The wrong side of single crochets don’t look the same as the wrong side of other stitches. The loops of single crochets don’t look the same because you only yarn over and pull a loop through once, so they aren’t pulled up as much and don’t have the same space that other stitches do.
When following a single crochet downward to find the post below, we want to pay attention to the V shapes that are under the top of the stitch.
These “V shapes” are created when we insert our hook into the stitch, yarn over and pull a loop through.
The top of the stitch is highlighted orange and the “V shape” is highlighted yellow.
Just like with the double crochets, once we identify the top of the stitch the “post” of the single crochet was worked into, we can identify the post of the stitch we will place a front post stitch around.

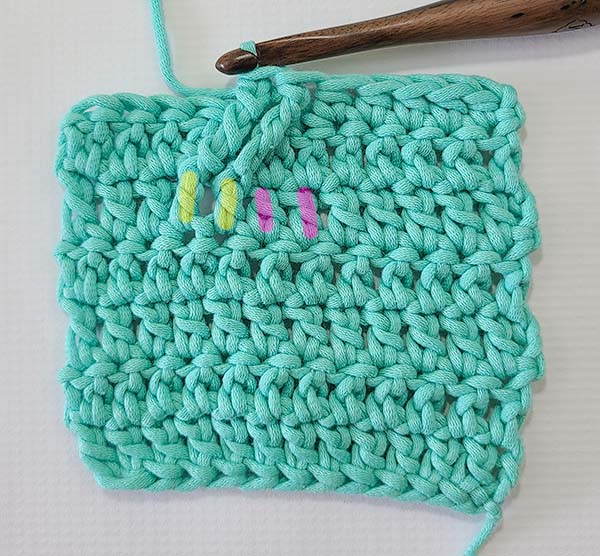
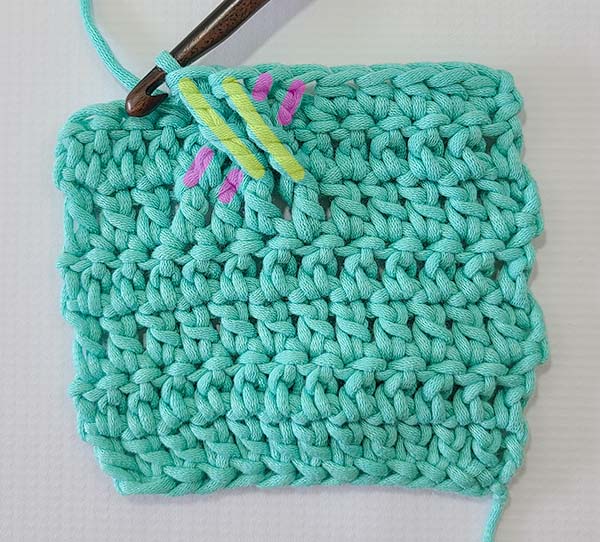
So, in this example, let’s say the pattern instructs us to put 1 half double crochet in the first stitch and a front post double crochet (click for tutorial, if needed) in the next stitch 2 rows below.
We place our 1st half double crochet in the first stitch and then identify the post of the next stitch 2 rows below.
In this image, the post of the stitch 2 rows below is highlighted yellow and the “V shape” that is the post of the single crochet is highlighted pink.
A black arrow shows how we will work around the post of the stitch 2 rows below.
This image shows how it would look if we alternated 1 half double crochet and 1 front post double crochet 2 rows below.
We can see how the front post double crochets completely skip the single crochet row and work around the posts of the double crochet stitches in the row below.
What if I have to skip stitches and then work a stitch 2 rows below?
A lot of the fun and interesting textures created using this technique involve skipping stitches and then working into a stitch 2 rows below.
This may or may not be accompanied by crossed stitches in which we cross back over the work and place stitches in the skipped stitches.
So, what do we do if we have to skip stitches?
Let’s say a crochet pattern is asking us to skip 2 stitches and then place 1 front post double treble crochet in each of the next 2 stitches 2 rows below.
We will skip the next 2 stitches as we would if we were skipping stitches as normal and then identify the first post of the stitches we will work into 2 rows below using the same method as we have been through this tutorial.
In this example, you can especially see how the post of the stitch 2 rows below leans and can be difficult to find.

Once we have identified the post, we can place our front post double treble crochet into it.
In this image, I’ve marked the two skipped stitches with black dots. I have also marked the corresponding posts 2 rows below with yellow dots.
Note: If we were to place only this 1 front post double treble crochet and place 1 half double crochet in the next stitch, we would still “skip” the first stitch and we would place 1 half double crochet in the next stitch (left most black dot).
We would skip the first stitch because this front post double treble crochet counts as that stitch being worked. This ensures that we do not accidentally increase the number of stitches in our work.
Now, let’s place our second front post double treble crochet in the post of the next stitch as the “pattern” instructs.
We know that the next stitch 2 rows below will be directly next to the post of the stitch we just worked around, so we can place our front post double treble crochet in that stitch.
Here we have the 2 front post double treble crochets completed. You can see how they lean like a forward slash ( / ) but they do not pull or warp the work. This is why such a tall stitch would be used.
In this image, the posts we worked the front post double treble crochets around are highlighted yellow and the posts 2 rows below the skipped stitches are highlighted pink.
Note: If the pattern instructed us to place 1 half double crochet in the next stitch, we would still “skip” the 2 stitches and we would place 1 half double crochet in the next stitch.
We would skip the 2 stitches because these front post double treble crochets count as those stitches being worked. This ensures that we do not accidentally increase the number of stitches in our work.
What if the pattern is now instructing me to place front post stitches 2 rows below the stitches we skipped?
Working front post stitches into the skipped stitches 2 rows below sounds even more intimidating than working just into a stitch 2 rows below, but it doesn’t have to be!
All we have to do is cross back over the front of the work and place a front post stitch around the post stitches 2 rows below the stitches we skipped. We will place 1 stitch in the first skipped stitch and then 1 stitch in the second skipped stitch.
The most confusing part of this is that we can no longer really see the stitches we skipped because the front post stitches cross over them in front. So, how do we identify these stitches?
Let’s say the pattern now wants us to put 1 front post double treble crochet in each of the two stitches we skipped.
This is the same image as above, but let’s look at it a little differently.
Here we can see that the tops of the stitches we skipped are almost completely hidden by the two front post double treble crochets that we’ve placed.
The posts of the stitches we worked into are highlighted yellow and the posts 2 rows below the skipped stitches are highlighted pink.
We know that these two pink highlighted posts are the two stitches we skipped because they are directly before the two posts we worked around.
While we absolutely could use the method we have been using in this tutorial to find this stitch, we don’t really need to because we know these are the two stitches we need.
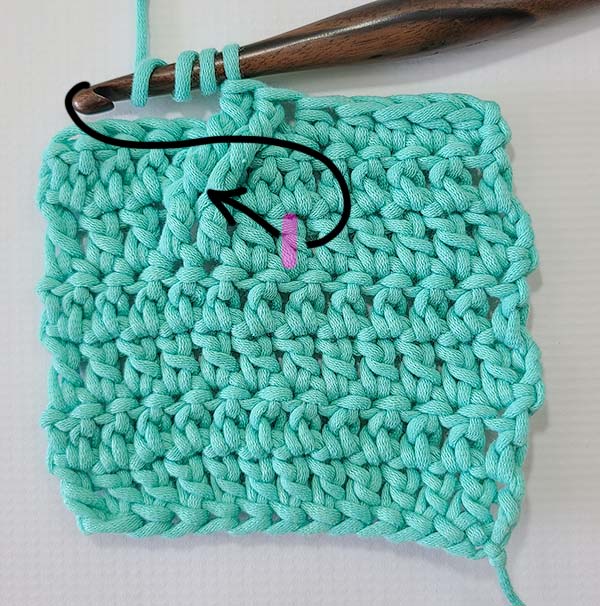
To work 1 front post double treble crochet into each of the two skipped stitches, we will go all the way back to the first skipped stitch and place our front post stitch.
In the image above, this stitch is the rightmost pink highlighted stitch.
In this image, the stitch post is still highlighted pink.
An arrow shows how we will need to maneuver our hook all the way back to the post to insert our hook around it.

This will feel like your work is pulling weird and like it doesn’t make sense.
See how in this image, the two front post stitches that are already worked are pulled a bit to allow the hook to come all the way back to the skipped stitch?
That’s okay! They’ll work themselves out.
Follow through with placing the front post stitch and once complete, you’ll see that it works out fine.
Just like all other front post stitches, make sure that everything is behind your hook except for the post of the stitch we are working around.
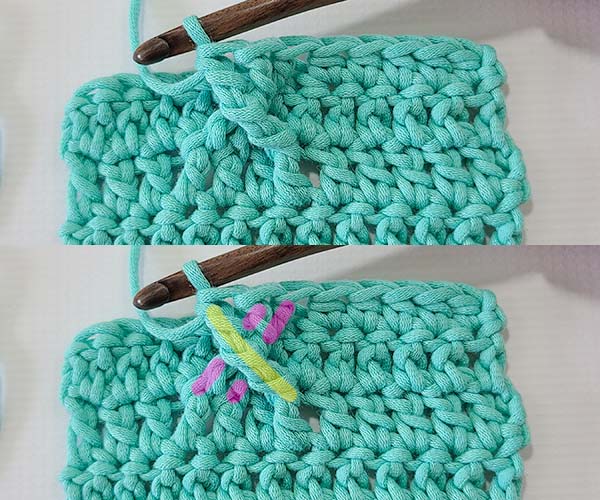
Here’s how the work will look with this stitch completed.
These two images are the same however I’ve highlighted the bottom image for clarity.
You can see how this new front post stitch crosses over the two previous front post stitches.
The first two front post stitches are highlighted pink and the new front post stitch we worked in highlighted yellow.
See how it’s making an “x”?
Finally, we place our last front post stitch in the last stitch that was skipped.
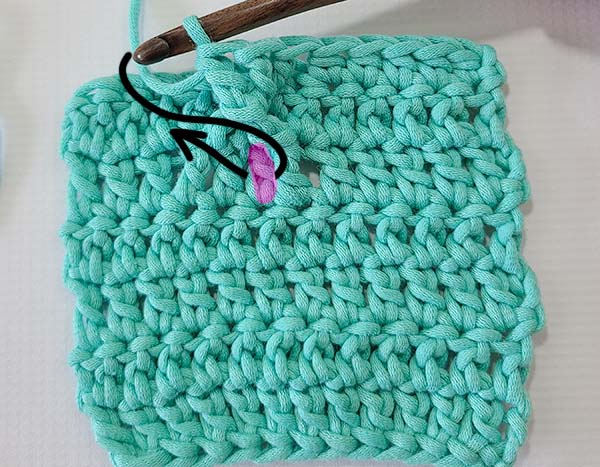
The post of the final skipped stitch is highlighted pink in this image. You can see it in between the first two front post stitches and the most recent front post stitch.
An arrow shows how we will maneuver the hook back to this stitch post.
Don’t be afraid to push the stitches out of the way to work around this post. You won’t hurt anything!
Go ahead and place the last front post stitch in this highlighted stitch.
With this last stitch placed, you will now have completed the crossed over stitches!
I’ve highlighted the crossed stitches as they have been in this image. The first two stitches that we placed are highlighted pink and the last two that we placed are highlighted yellow.
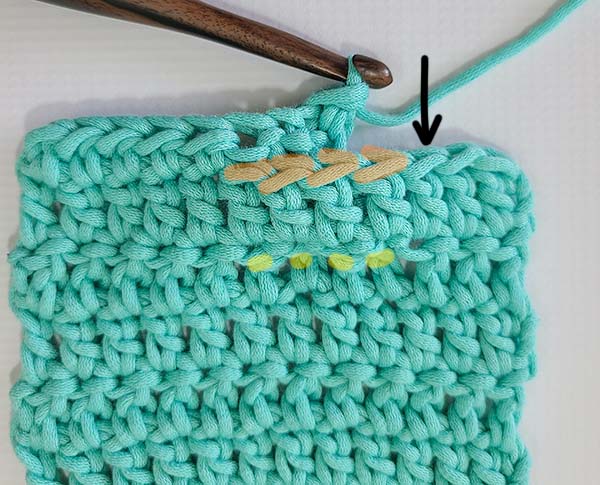
It’s important to know where we would place our next standard stitch, so let’s look at the back of the work.
Because we have worked a total of 4 front post stitches, we will need to skip the tops of the 4 stitches in the row to make sure we don’t unnecessarily increase our work.
The tops of these 4 stitches are highlighted orange. Where the post stitches were worked 2 rows below are highlighted yellow.
The next stitch we would work a standard stitch into has a black arrow pointing to it.

In this image, a black arrow points to the next stitch we would work a standard stitch into.
As you build confidence using this technique, I would recommend always looking at the back of the work to make sure that you are “skipping” the necessary amount of stitches so that the work doesn’t accidentally become increased.
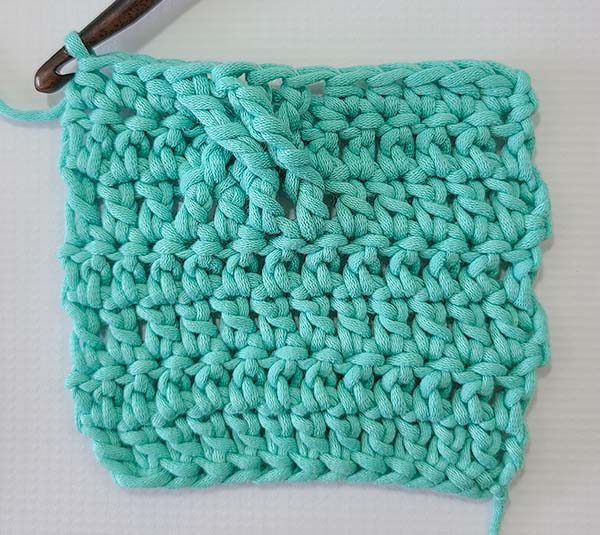
Here is what the row looks like with the last 3 standard half double crochets placed.
Notice that despite crossing stitches, the stitches in this row we have worked are all even and are one after another.
They aren’t twisted or out of place. You can now very easily make a turning chain, turn and place 1 stitch in each stitch across.
Cool, right?
So, what do I do now?
From here, you can practice identifying stitches 2 (or 3!) rows below by making swatches of double crochets and/or single crochets so that you can grow your confidence identifying them.
Once you are confident crocheting 1 stitch 2 rows below, try skipping a few stitches to see if you can still identify the appropriate post to work around. Continue practicing until you are confident with skipping stitches.
Then, practice placing stitches around the skipped stitches 2 rows below!
Everything will feel a bit weird and wonky as you get used to this technique but once you’ve practiced it a bit, it will click and you’ll be unstoppable!
I hope you’ve enjoyed this tutorial and that you can move forward crocheting all your favorite patterns that use the technique of placing a crochet stitch 2 rows below with confidence. Thanks so much for hanging out with me today!
Don’t forget to join my Facebook Group so we can chat all about your creations! We are a group for crocheters of all experiences, all interests and love to hang out together. Come join the fun!

Shannon | Designer & Editor
Shannon helps crocheters find their next project and build their skills with in depth tutorials and crochet patterns on her blog, theloopholefox.com.
With more than a decade of crochet experience, Shannon knows that understanding why we do something matters just as much as how we do it. She teaches new techniques and crochet stitches in depth so you can crochet with confidence.
Looking for more Crochet Stitch Tutorials? Try these!
How to Crochet the Suzette Stitch
How to Crochet the Even Moss Stitch
How to Crochet the Arcade Stitch
How to Crochet the Linked Double Crochet
How to Front Post Double Crochet
How to Back Post Double Crochet
The Magic Circle: How and Why it Works
Foundation Single Crochet and Why It’s Awesome
Foundation Half Double Crochet and Double Crochet and Why They’re Also Awesome