
Avery Blanket – A Striped Crochet Baby Blanket Pattern
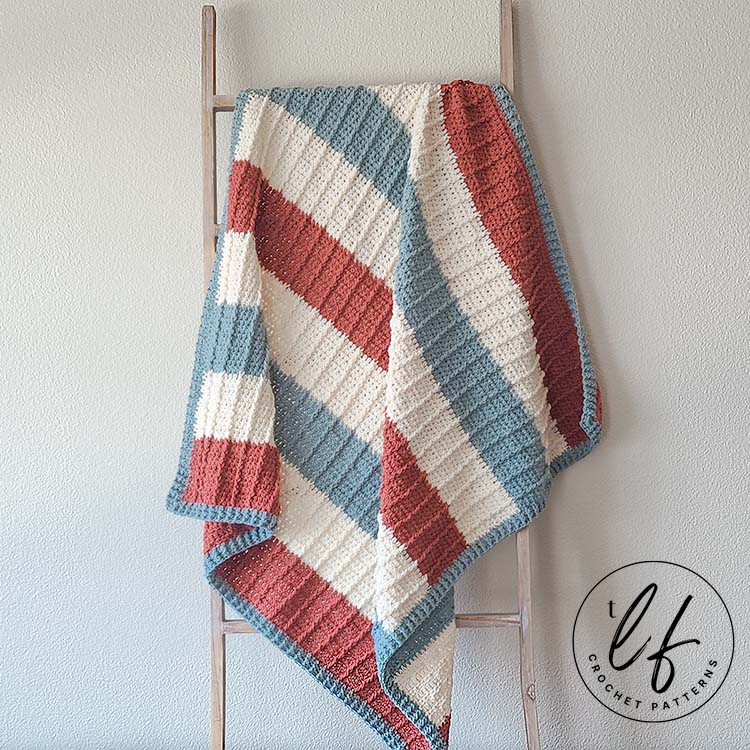
There’s nothing better than welcoming a new addition to the family than with something they can be totally cozy in. This striped crochet baby blanket pattern features thick stripes of color, simple columns of post stitches for texture and, of course, a ribbed border.
DISCLAIMER: This post includes affiliate links. This means, should you decide to purchase a product via one of these links, I will receive a small commission at no extra cost to you. I only recommend products I use and love (Or products I know others love, have heavily researched, know have good ratings and plan to purchase myself). These small commissions help to support this blog and continue keeping most of my patterns free. You can read more on my Privacy Policy, if you prefer.
I’m a big fan of stripes. If I can make it striped or I can buy it striped, it will probably be striped. That’s just how it is.
Originally I had a ton of inspiration to design a totally different baby blanket pattern but I absolutely fell in love with some yarn at Joann and happily took it home none-the-wiser.
When I started swatching, though, I quickly realized that Lion Brand Color Theory just didn’t have the stitch definition I wanted for the original baby blanket idea.
Never one to give up on yarn, though, I came up with the Avery Baby Blanket after some swatching and thinking through ideas. I wanted something that was simple and classic so that the yarn could shine but still be interesting to crochet, feel and look at.
I absolutely loved the design of my Kelly Kindle Cover and decided it would make a fantastic baby blanket. Thus, this crochet baby blanket pattern came to be!
While at first it was a bit of a disappointment that the yarn didn’t work out as originally intended, I’m glad it happened because I’m absolutely in love with this striped crochet baby blanket and I hope that you will be, too.
This Striped Baby Blanket Pattern was designed specifically for the
2023 Preemie Crochet Challenge
Every year when my designer friend Helen of Sunflower Cottage Crochet asks for designers to participate in her Preemie Crochet Challenge, I do not hesitate to join.
This event means a lot to me because my darling “niece” was a Preemie and I will always remember all of the emotions and concerns that my best friend went through when she was born. She is a happy and healthy 10 year old now and I couldn’t be more proud of her or my best friend for all they have accomplished together. I am so lucky to be considered her Aunt.
She is why I always participate in this challenge. While I likely would participate anyway because it’s for a good cause and for charity, both of which I feel strongly about, my niece really solidifies my participation each year.
While she may be too big for one now, this striped crochet baby blanket was designed in her honor and I couldn’t be happier to release the pattern with this event.
If you haven’t already, check out all of the other designs that are featured in the 2023 Preemie Crochet Challenge hosted by Helen of Sunflower Cottage Crochet.
If you prefer a premium, ad-free PDF version of this pattern, you can grab one on in my Etsy shop by clicking the button below!
Let’s Talk about Yarn
For this striped crochet baby blanket pattern, I used Lion Brand Color Theory in colorways Canyon (Color A, reddish color), Ivory (Color B, cream/white color) and Tourmaline (Color C, blueish color).
Color Theory is a Medium (4), 100% acrylic yarn and it is impossibly soft. Honestly, crocheting this baby blanket with this yarn was a total dream in terms of softness.
But…
This yarn is spun looser than other yarns and can have a tendency to split which I wasn’t expecting when I fell in love with it at the store. This didn’t bother me through crocheting, but I think it’s a fair warning to give as yarn that splits can be very frustrating, especially if you weren’t expecting it to.
It didn’t split enough for me to have any issues and I happily crocheted the entire blanket just fine. I would still recommend the yarn, especially for the Avery Baby Blanket, but if yarn that splits even slightly really frustrates you, I’d probably look into something else.
In terms of what type of yarn to use, you can use any yarn you like. This is a fairly simple pattern that doesn’t require any specific fiber or yarn weight.
While this striped crochet baby blanket is designed to use Medium (4) weight yarn, you can use a different weight. Thicker weights will make a bigger baby blanket and thinner weights will make a smaller one, of course.
Keep in mind, this pattern was designed and tested only in Medium (4) weight acrylic yarn. All yarn usage is for this weight and fiber. If you change fiber or weight, your yarn usage may not match.

How to Customize the size of this Striped Crochet Baby Blanket
I designed this striped crochet baby blanket to be approximately 36 inches by 36 inches. I know this is a larger size of baby blanket and isn’t the most common size for preemie babies.
I designed the baby blanket this way because I think it’s fantastic when babies can grow to children and still get use out of their crochet baby blankets.
Designed to be big enough for the baby to grow into as they become a child, the Avery Baby Blanket will be there for them through everything.
Even so, you may wish to alter the size of the Avery Baby Blanket. You’re more than welcome to do so.
How to customize the width: This baby blanket has a stitch multiple of 4 stitches + 3 stitches. This does NOT include the turning chains, if you start on a base of chains.
You will need to find a multiple of 4 stitches that works for you. Let’s say that’s 24 stitches. Then, add 3 stitches (for the +3 stitches). This is 27.
This means you will either Foundation Double Crochet 27 stitches OR Chain 29, place 1 double crochet in the 3rd chain from the hook and each across.
How to customize the length: There are 9 stripes in this baby blanket and to make the baby blanket approximately the size you’d like it to be, you will want to divide your desired length by 9.
Let’s say you’d like your baby blanket to be about 27 inches in length. Divide 27 by 9 (stripes) = 3. This means each stripe should be approximately 3 inches tall. You will want to stop repeating rows when you’ve reached approximately 3 inches per stripe.
Where to get this Striped Crochet Baby Blanket Pattern
The Avery Baby Blanket is a free crochet pattern in this blog post. Scroll down to view the free version.
However, if you’d like a more robust pattern with photo tutorials, the steps for the photo tutorial written out in full sentences and a printer friendly version of the PDF, I recommend you purchase the PDF pattern.
With the PDF pattern, you will receive photo tutorials for the special stitches as well as a detailed photo tutorial for each row which will set you up to work this crochet baby blanket pattern with confidence. The photos include details with arrows and dots to help identify all the stitches and their placement.
The PDF pattern has detailed photo tutorials for the special stitches (Front and Back Post stitches), Rows 1 through 6 which set you up to work this striped crochet baby blanket with confidence and, of course, a photo tutorial for the border.
SKILL LEVEL
Advanced Beginner/Light Intermediate. Crocheters looking to follow this pattern should know how to:
- Read a crochet pattern – There is NOT a video tutorial for this striped crochet baby blanket pattern.
- Work the basic stitches – Chain, half double crochet and double crochet
- Know how to identify right and wrong side of rows
- Be familiar with crocheting around the sides of a project to create a border
- Be familiar with or interested in learning special stitches:
- Front Post Half Double Crochet
- Back Post Half Double Crochet
- Front Post Double Crochet
- Front Post Treble Crochet.
The Front Post and Back Post Half Double Crochet stitches are used in the border to create the ribbing.
The Front Post Double Crochets are used in Row 3 to set up the columns and the Front Post Treble Crochets are used beyond Row 3 to continue the columns.
I have photo tutorials for Front Post Double Crochet and Back Post Double Crochet here on my blog. All post stitches are worked in the same technique of placing the hook around the post of the stitch instead of into the top of the stitch.
If you are unfamiliar with any of the special stitches, you could use the linked tutorials to learn how to Front Post and Back Post Double Crochet. From there, you’ll have the knowledge of how to work around the post and can easily change to a half double crochet or a treble crochet instead of a double crochet.
MATERIALS
Medium (4) weight acrylic or acrylic blend yarn of your choice. You will need 3 colors:
Color A: 180 g / 6.5 oz / 443 yds
Color B: 240 g / 8.5 oz / 590 yds
Color C (Stripes): 120 g / 4.3 oz / 296 yds
Color C (Border): 65 g / 2.3 oz / 160 yds
Color C (Total): 185 g / 6.5 oz / 456 yds
Yarn Used
Lion Brand Color Theory in colorways Canyon (Color A), Ivory (Color B) and Tourmaline (Color C).
Colors used will be noted in the pattern as Color A (reddish color), Color B (cream/ivory color) and Color C (blueish color).
TOOLS
5 mm (H-8) hook
Scissors
Tapestry needle
Stitch markers, if you prefer them
GAUGE
14 double crochet by 7 rows is approximately 4 inches by 4 inches.
Gauge won’t make or break this pattern. Baby blankets are perfect regardless of their size.
Note: I am a tight crocheter, so my tension is usually tighter than others. Learn more about gauge and what this means here. As long as you’re in the approximate range of gauge, you should be fine.
FINISHED SIZE
Approximately 36 inches x 36 inches.
If you prefer to change the size, you can! Scroll up to “How to customize the size of this striped crochet baby blanket” for detailed information on how to change the size.
ABBREVIATIONS (US TERMS)
- Ch – Chain
- Sl St – Slip Stitch
- Hdc – Half Double Crochet
- Dc – Double crochet
- BPhdc – Back Post Hdc**
- FPhdc – Front Post Hdc**
- FPdc – Front Post Dc**
- FPtr – Front Post Treble Crochet**
- St(s) – Stitch(es)
- Spc – Space
- RS – Right Side
- WS – Wrong Side
- **See description of Special Stitch
NOTES
- This baby blanket is worked in rows. After the first 6 rows, the pattern will begin to repeat.
- Each stripe will be represented in the row repeats with the color required for the stripe.
- Chain 1 and chain 2 to turn do not count as stitches. Always place your first stitch of the row in the first stitch.
- […] – Repeats are listed inside brackets
- (…) – Instructions within parenthesis should all be worked in the same indicated stitch or space.
- (…) – Stitch counts are listed at the end of the row in parentheses and italics.
Special Stitch – Front Post Half Double Crochet (fphdc)
To create the ribbed border on this baby blanket, we utilize both Front Post and Back Post half double crochet.
To Front Post Half Double Crochet, you will: Yarn over, insert your hook from front of work to back of work between the posts of the previous stitch and current stitch and maneuver the hook back to the front of the work on the other side of the stitch post. Your hook should now sit horizontal with the post of the stitch on the front of the hook. Yarn over, pull a loop through. Yarn over, pull through all 3 loops.
Special Stitch – Back Post Half Double Crochet (bphdc)
To Back Post Half Double Crochet, you will: Yarn over, insert your hook from back of work to front of work between the posts of the previous and current stitch and maneuver the hook back to the back of the work on the other side of the stitch post. Your hook should now sit horizontal with the post of the stitch on the back of the hook. Yarn over, pull a loop through. Yarn over, pull through all 3 loops.
Special Stitch – Front Post Double Crochet (fpdc)
We use Front Post Double Crochet in Row 3 to set up the bars that run the length of this striped crochet baby blanket.
To work a FPdc, you will: Yarn over, insert your hook from front of work to back of work between the posts of the previous and current stitch and maneuver the hook back to the front of the work on the other side of the stitch post. Your hook should now sit horizontal with the post of the stitch on the front of the hook. Yarn over, pull a loop through. 3 loops on hook. Yarn over, pull through 2 loops. Yarn over, pull through 2 loops.
Special Stitch – Front Post Treble Crochet (fptr)
We use Front Post Treble Crochet to make the bars that run the length of this baby blanket.
To work a FPtr, you will: Yarn over twice and insert your hook from front of work to back of work between the posts of the previous and current stitch and maneuver the hook back to the front of the work on the other side of the stitch post. Your hook should now sit horizontal with the post of the stitch on the front of the hook. Yarn over, pull a loop through. 4 loops on hook. [Yarn over, pull through 2 loops] Repeat inside brackets 3 times.
All FPtr’s are worked on either the previous FPdc (from Row 3) or previous FPtr from all other RS rows.
If you’ve never worked post stitches before, you can review my Front Post Double Crochet and Back Post Double Crochet photo tutorials to learn the technique of working on the post. From there, you’ll know how to work a post stitch and can easily work half double crochet, double crochet or treble crochet as post stitches
Avery – A Striped Crochet Baby Blanket Pattern
With Color A:
Row 1 (WS) – Foundation Double Crochet (click for tutorial, if needed) 115 sts OR Chain 117, place 1 dc in 3rd ch from hook and each ch across. (115)
Row 2 (RS) – Ch 1 (does not count as a stitch here or throughout), turn. 1 hdc first st and each of the next 2 sts. [FPdc next st, 1 hdc each of the next 3 sts]. Repeat inside brackets to end of row. (115)
Row 3 (WS) – Ch 2 (does not count as a stitch here or throughout), turn. 1 dc in first st and 1 dc in each st across. (115)
Row 4 (RS) – Ch 1, turn. 1 hdc first st and each of the next 2 sts. [FPtr the FPdc 2 rows below (from Row 2), 1 hdc each of the next 3 sts]. Repeat inside brackets to end of row. (115)
Row 5 (WS) – Ch 2, turn. 1 dc in first st and 1 dc in each st across. (115)
Row 6 (RS) – Ch 1, turn. 1 hdc first st and each of the next 2 sts. [FPtr the FPtr 2 rows below (from previous RS row), 1 hdc each of the next 3 sts]. Repeat inside brackets to end of row. (115)
Rows 7 through 10 – Repeat Rows 5 and 6 in sequence. In last st of Row 10, switch to Color B.
Rows 11 through 20 – Repeat Rows 5 and 6 in sequence with Color B. In last st of Row 20, switch to Color C.
Rows 21 through 30 – Repeat Rows 5 and 6 in sequence with Color C. In last st of Row 30, switch to Color B.
Rows 31 through 40 – Repeat Rows 5 and 6 in sequence with Color B. In last st of Row 40, switch to Color A.
Rows 41 through 50 – Repeat Rows 5 and 6 in sequence with Color A. In last st of Row 50, switch to Color B.
Rows 51 through 60 – Repeat Rows 5 and 6 in sequence with Color B. In last st of Row 60, switch to Color C.
Rows 61 through 70 – Repeat Rows 5 and 6 in sequence with Color C. In last st of Row 70, switch to Color B.
Rows 71 through 80 – Repeat Rows 5 and 6 in sequence with Color B. In last st of Row 80, switch to Color A.
Rows 81 through 90 – Repeat Rows 5 and 6 in sequence with Color A.
In last st of Row 90, switch to Color C or your chosen border color.
Do not cut yarn. Continue on to crocheting the border.
Border
You should have Color C (or your chosen border color) already attached to the blanket from finishing Row 90. The right side of the blanket should be facing you.
Round 1 (RS) – Ch 1 and do not turn but rotate the blanket 90 degrees to work along the side of the blanket. Place 1 hdc in the side of each hdc and 2 hdc in the side of each dc along the side to the end. (135 sts on this side)
At the end, ch 2 and rotate to work along the bottom of Row 1. Place 1 hdc in each st across. (115 sts on this side)
At the end, ch 2 and rotate to work along the next side. Place 2 hdc in side of each dc and 1 hdc in side of each hdc. (135 sts on this side)
At the end, ch 2 and rotate to work along the last row. Place 1 hdc in each st across. (115 sts on this side)
At the end, ch 2 and sl st to the first hdc made to close. (500 sts total in border for Round 1)
Round 2 (WS) – Ch 1, turn. * In ch 2 spc, place (1 hdc, ch 2, 1 hdc). 1 bphdc next st, [1 fphdc next st, 1 bphdc next st]. Repeat inside brackets to the next ch 2 spc ;
Repeat from * to ; around the remaining 3 sides of the blanket. The last stitch placed is a bphdc from the repeat in brackets. At the end of the round, sl st to the first hdc made to close. (508)
Round 3 – Ch 1, turn. 1 fphdc the bphdc from Round 2, [1 bphdc the fphdc from Round 2, 1 fphdc the bphdc from Round 2]. Repeat inside brackets until 1 st remains prior to corner ch 2 spc. 1 bphdc the last st. (1 hdc, ch 2, 1 hdc) in ch 2 spc. 1 bphdc the next st.
* 1 fphdc the bphdc from Round 2, [1 bphdc the fphdc from Round 2, 1 fphdc the bphdc from Round 2]. Repeat inside brackets until 1 st remains prior to corner ch 2 spc. 1 bphdc the last st. (1 hdc, ch 2, 1 hdc) in ch 2 spc, 1 bphdc the next st ;
Repeat from * to ; around the remaining 2 sides of the blanket. The last stitch placed is a bphdc in the last st just after the last ch 2 spc of the round. At the end of the round, sl st to the first fphdc made to close. (516)
Cut your yarn and weave in all ends. Block the blanket if desired. You’re done!
Want to get the PDF version of this striped crochet baby blanket pattern? Get your copy on Etsy by clicking the button below!

Did you love this striped crochet baby blanket pattern? Make sure to share the love and Pin it to Pinterest!
That’s it for the Avery crochet baby blanket pattern! Isn’t it classic?
One of my greatest joys is seeing your finished crochet projects from my patterns or tutorials, so when you post to Instagram, don’t forget to tag me so I can show you some love! I’m @theloopholefoxcrochet. You can also share pictures on my recent posts on Facebook or within my Facebook group!
And don’t forget to pin this to your Pinterest boards, so you can remember it for later!
Don’t forget to join my Facebook Group so we can chat all about your creations! We are a group for crocheters of all experiences, all interests and love to hang out together. Come join the fun!

Shannon | Designer & Editor
Shannon helps crocheters find their next project and build their skills with in depth tutorials and crochet patterns on her blog, theloopholefox.com.
With more than a decade of crochet experience, Shannon knows that understanding why we do something matters just as much as how we do it. She teaches new techniques and crochet stitches in depth so you can crochet with confidence.
If you loved this striped crochet baby blanket pattern, why not check out some of my other crochet baby blanket patterns?
Something New Baby Blanket – Uses Crossed Double Crochet!
The Fledgling Baby Afghan – Has mirrored stripes and uses a beautiful, easy stitch!
Rising Star Baby Blanket – Looking for another modern crochet baby blanket that is easy to crochet but has an interesting finish? You’ll love this one!
Piper Baby Blanket – Want another blanket with classic, pretty cables and color blocking? Piper is a great fit for you!