
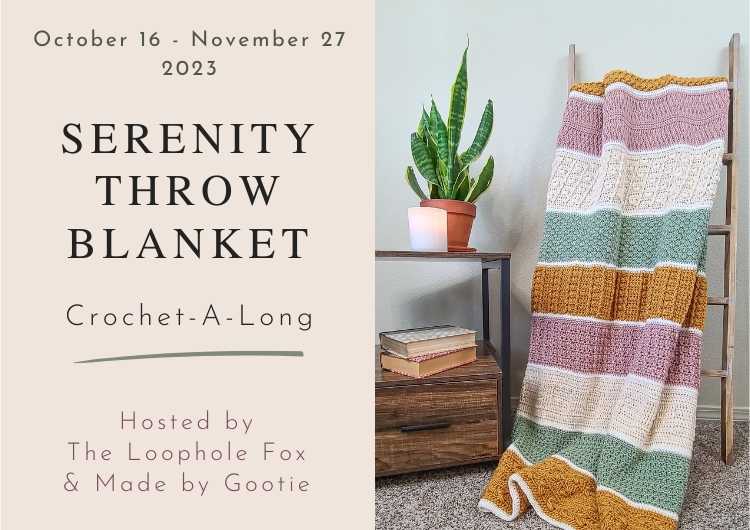
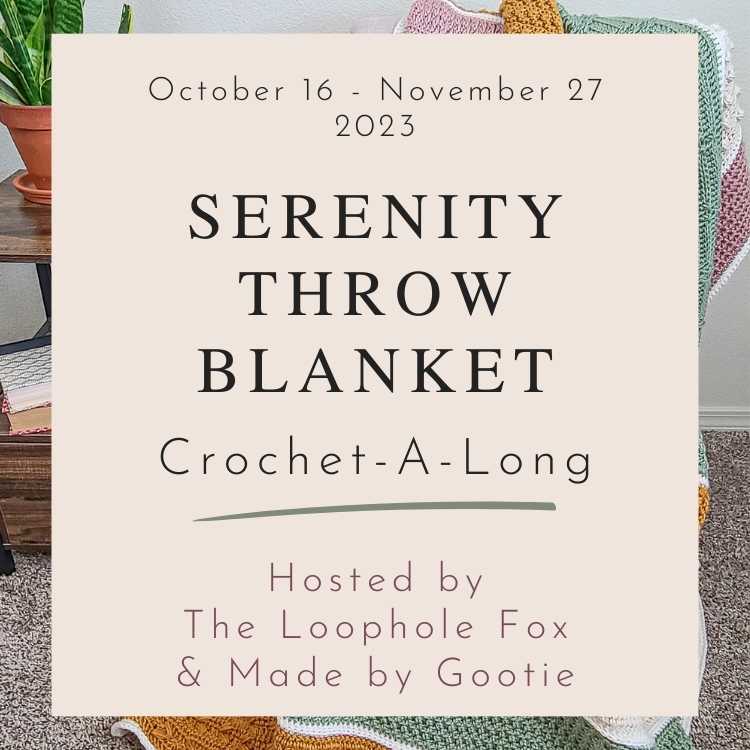
Serenity Throw Blanket CAL
If you’re looking for an interesting crochet sampler blanket, look no further than the Serenity Throw Blanket!
Unlike typical stitch sampler blankets, this crochet throw blanket samples interesting crochet patterns dreamed up by different designers.
The best part about this crochet sampler blanket is that it’s a collaborative crochet-a-long (CAL) designed by 12 different designers who all have an eye for texture and interesting stitch work.
Hosted by myself and my lovely friend Agat of Made by Gootie, we cannot wait for you to start crocheting, sampling designer patterns and learning new skills along the way.
My absolutely lovely friend Agat of Made by Gootie and I began planning this crochet sampler blanket right as our previous crochet blanket CAL ended. The Harmony Throw Blanket was so loved and is still quite popular today, so we knew we couldn’t let crocheters end 2023 without a new one.
Our ultimate goal for the CAL and this crochet sampler blanket is that has loads of texture, interesting stitch work and, of course, is super cozy.
Each designer who joined us in designing this crochet throw blanket has made our dreams come true. The Serenity Throw Blanket is just as unique and gorgeous as Harmony was.
We couldn’t be happier with the resulting blanket pattern and we hope that you love it as much as all 12 of us do.
What is a Crochet-a-long (CAL)?
Simply stated, a CAL (crochet-a-long) is a crochet pattern that is released in parts over a time period and crocheters make each part as it is released. Typically the parts of the pattern are released once or twice per week.
A CAL is so much more than that, though. Events like these allow crocheters to follow along with a pattern at the same time as others, be a part of a community of people all crocheting the same thing at the same time, ask questions and possibly learn new stitches, skills and techniques with the support of others.
While this blanket CAL event has officially ended, you can still check out all of the free versions of the patterns hosted on the designers blogs.

How does the Serenity CAL Crochet Sampler Blanket Pattern Work?
The Serenity Throw Blanket is a 50 inch x 60 inch crochet blanket pattern that was designed in 12 parts (or strips).
Each part was designed by a different crochet designer who is as lovely as they are talented.
Unlike other collaborative blanket CALs you might have seen or been a part of, each part of this CAL is worked directly on top of the previous part so there is no seaming or fancy work involved in finishing the crochet sampler blanket.
So you’ll be able to pick up the next part of the blanket pattern and continue working as if it was one pattern designed by one designer.
We have included transition rows between each part so that there is a small border between each. This makes it so that you have a “clean” border to work the next part on and makes it so each design shines as much as possible.

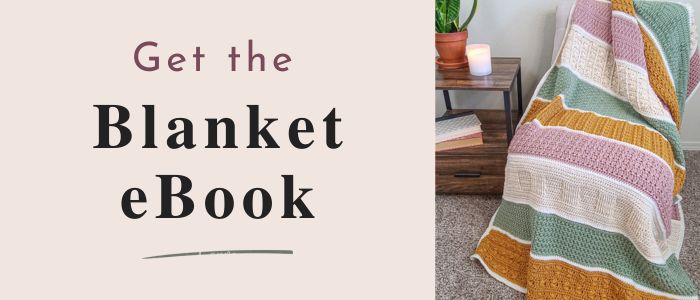
What if I want all of the patterns as PDFs?
If you’d like to receive all of the patterns for this crochet sampler blanket in one place, you can purchase the Serenity Throw Blanket eBook!
If you purchase the eBook, you will receive a formatted eBook where all of the patterns are laid out the same, all of the technical information, links to any tutorials necessary, photo tutorials, etc.
This makes it so you don’t have to wait and can happily crochet along at your pace.
Purchasing the e-Book not only gives you the entire textured crochet blanket pattern all at once but it also helps support the designers who helped to make this lovely blanket CAL possible.
DISCLAIMER: This post includes affiliate links. This means, should you decide to purchase a product via one of these links, I will receive a small commission at no extra cost to you. I only recommend products I use and love (Or products I know others love, have heavily researched, know have good ratings and plan to purchase myself). These small commissions help to support this blog and continue keeping most of my patterns free. You can read more on my Privacy Policy, if you prefer.
Serenity Throw Blanket CAL Materials, Notes & Transition Row Instructions
Here’s everything you need to know before you get started on your Serenity Throw Blanket!
SKILL LEVEL
The skill level for this crochet blanket CAL ranges from Confident Advanced Beginner to Intermediate. It is likely that you will learn a new stitch or technique with this CAL and all of us designers will be right here to support you!
MATERIALS (Yarn, Tools & Notions)
YARN
- You will need Medium (4) Worsted Weight Yarn.
- We used Sirdar Country Classic Worsted for our sample blanket.
- Sirdar Country Classic is 50% wool, 50% acrylic.
- We received yarn support from the absolutely lovely Helen of Sunflower Cottage Crochet and yarn store, Caterpillar Yarns. We are honored to have been able to receive yarn support from Helen!
- The total amount of yarn needed is approximately: 2,120 grams / 4,635 yards / 4,240 meters
- Please see the breakdown of yarn and colors below.
If you’d like to substitute yarn, here are some good options:
Lion Brand’s Basic Stitch (100% Acrylic), Re-Spun (100% Recycled Polyester) or Color Theory (100% Acrylic) yarns.
Love Crafts Paintbox Simply Aran (100% Acrylic) or Paintbox Wool Mix Aran (50% Wool, 50% Acrylic).
We Crochet’s Shine Worsted (60% Pima Cotton, 40% Modal natural beech wood fiber).
Yarn and Colors We Used
For this crochet throw blanket pattern, we used Sirdar Country Classic in 5 colors. 4 of the colors were used for the different parts of the blanket (as you can see in stripes) and each color was used for 3 parts.
The 5th color we used for our transition rows and the border.
Here is the break down of our yarn and color usage (all usage is approximate):
- Color A – Golden (Golden color; Parts 1, 5, 9):
- 490 grams / 1,070 yards (980 meters), 5 skeins
- Color B – Moss (Sage green color, Parts 2, 6, 10):
- 420 grams / 918 yards (840 meters), 5 skeins
- Color C – Clotted Cream (Cream color, Parts 3, 7, 11):
- 490 grams / 1,070 yards (980 meters), 5 skeins
- Color D – Oyster (Soft pink color, Parts 4, 8, 12):
- 460 grams / 1,005 yards (920 meters), 5 skeins
- Color E – White (Transition rows & border):
- 260 grams / 570 yards (520 meters), 3 skeins
You can, of course, choose any colors you like. If you’d like your blanket to have 1 color, 2 colors or multiple like ours did, that is completely up to you. Make the Serenity Throw Blanket yours!
TOOLS & NOTIONS
- 5mm (H-8) crochet hook
- At least 7 stitch markers (These will be handy for Part 12 but you may want them for other Parts as well)
- Scissors
- Tapestry Needle
FINISHED SIZE
This textured crochet blanket pattern was designed to be 50 inches wide by 60 inches tall (127 cm x 152 cm).
Each part of the blanket is designed to be 50 inches wide and 5 inches tall.
50 inches wide and 60 inches tall is the goal size for this blanket. Depending on your tension, it may end up slightly smaller or slightly larger.
Keep in mind that all designers have different gauge or tension. You can learn more about what this means by checking out my gauge master post.
TERMINOLOGY
All parts use US crochet terms.
OVERALL BLANKET NOTES
- This blanket has 192 stitches. Always make sure to count your stitches to ensure you have the correct stitch count at the end of each row and part.
- Each part is separated by 2 Transition Rows. Please review the Transition Row instructions below and make sure to work these rows between each part.
- Always finish the last stitch of your current Part with your Transition Row color.
- Always finish the last stitch of the second Transition Row with the color you’ve chosen for the next Part.
- On this blog post, you will find links for relevant stitch tutorials for each featured Part. This should help with some of the more advanced stitches.
- Be sure to read ALL Pattern Notes for each section from the designer as their notes reflect important information for their Part.

Transition Rows Instructions
Abbreviations (US)
- Ch – Chain
- Sc – Single Crochet
- Hdc – Half Double Crochet
- 3LO – 3rd Loop Only
- St(s) – Stitch(es)
Instructions
With the color chosen for your transition rows,
Row 1: ch 1 (does not count as a stitch), turn. 1 hdc in each st across. (192)
Row 2: ch 1 (does not count as a stitch), turn. 1 sc in 3LO of each hdc across (192 sc).
Serenity Throw Blanket CAL Patterns
Part 1 – Made by Gootie
The free PDF download for Part 1 expired at 7:59 AM PDT October 18, 2023. You can still view the free version of the pattern, purchase the PDF from the designers shops (if available) or purchase the eBook to receive all of the patterns at once.
Technical Information for Part 1:
- Colorway Used: Color A – Golden
- Yarn Usage: Approximately 165 grams / 360 yards (330 meters)
- Stitch Markers Required: 0
Tutorial Links for Advanced Stitches in this Part:
Special Notes for this Part:
- Part 1 begins the pattern and is the ONLY Part that starts with chains.
- Agat has included the option of using foundation stitches instead, if you prefer. If you do this, note that your foundation chains COUNT AS ROW 1 so you will not work Row 1 again.
- Agat has included both a photo tutorial and video tutorial for her part.
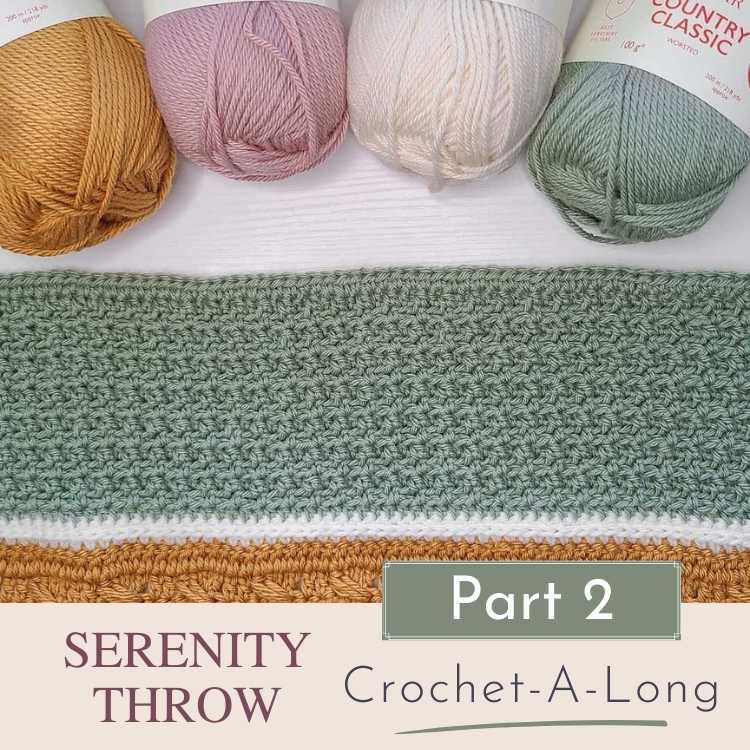
Part 2 – Hooks, Books & Wanderlust
The free PDF download for Part 2 expired at 7:59 AM PDT October 21, 2023. You can still view the free version of the pattern, purchase the PDF from the designers shops (if available) or purchase the eBook to receive all of the patterns at once.
Technical information for Part 2:
- Colorway Used: Color B – Moss
- Yarn Usage: Approximately 140 grams / 306 yards (280 meters)
- Stitch Markers Required: 0
Tutorial Links for Advanced Stitches in this Part:
Special Notes for this Part:
- I ended up having to work more rows to reach 5 inches in height for the pattern but it did not cause any problems.
- I worked 16 rows total. I followed the pattern as instructed but repeated the rows through Row 15. Then I followed Row 14’s instructions for my Row 16.
- Kristen has included both a photo tutorial and a video tutorial for her part.
Part 3 – Knitting with Chopsticks

The free PDF download for Part 3 expired at 7:59 AM PDT October 25, 2023. You can still view the free version of the pattern, purchase the PDF from the designers shops (if available) or purchase the eBook to receive all of the patterns at once.
Technical information for Part 3:
- Colorway Used: Color C – Clotted Cream
- Yarn Usage: Approximately 170 grams / 370 yards (340 meters)
- Stitch Markers Required: 0
YARN USAGE NOTE: The yarn usage listed here and the yarn usage listed on the PDF pattern for Part 3 are very different. I have made Part 3 twice and have used about the same amount of yarn and the designer also maintains that she used the amount of yarn she listed. This MAY come down to a difference in yarn brands, medium (4) weight being slightly different, etc. WHEN IN DOUBT: Assume you will use the higher amount of yarn.
Tutorial Links for Advanced Stitches in this Part:
Special Notes for this Part:
- There are no special notes for this part.
- Hortense has included a photo tutorial for her Part.
Part 4 – Fosbas Designs

The free PDF download for Part 4 expired at 7:59 AM PDT October 28, 2023. You can still view the free version of the pattern, purchase the PDF from the designers shops (if available) or purchase the eBook to receive all of the patterns at once.
Technical information for Part 4:
- Colorway Used: Color D – Oyster
- Yarn Usage: Approximately 130 grams / 385 yards (260 meters)
- IMPORTANT YARN REQIREMENT NOTE: The yarn usage listed here is HIGHER than the one listed on the designers PDF. Assume you will use the higher number. Susanna used Mercerized Cotton for her swatch and calculations. We used a wool/acrylic blend and I crocheted the full sample. Cotton VS Wool/Acrylic always has a difference as cotton yarn is typically thinner than wool/acrylic.
- Stitch Markers Required: 0
Tutorial Links for Advanced Stitches in this Part:
- Front Post Double Crochet
- Back Post Double Crochet
- Crossed Double Crochet (Video linked in this pattern post is a tutorial for this stitch)
Special Notes for this Part:
- Part 4 is very squishy and will pull in at the sides. Placing the other Parts and working a border fixed this, so you don’t need to worry about it pulling at the sides.
- Susanna has included a photo tutorial for her Part.
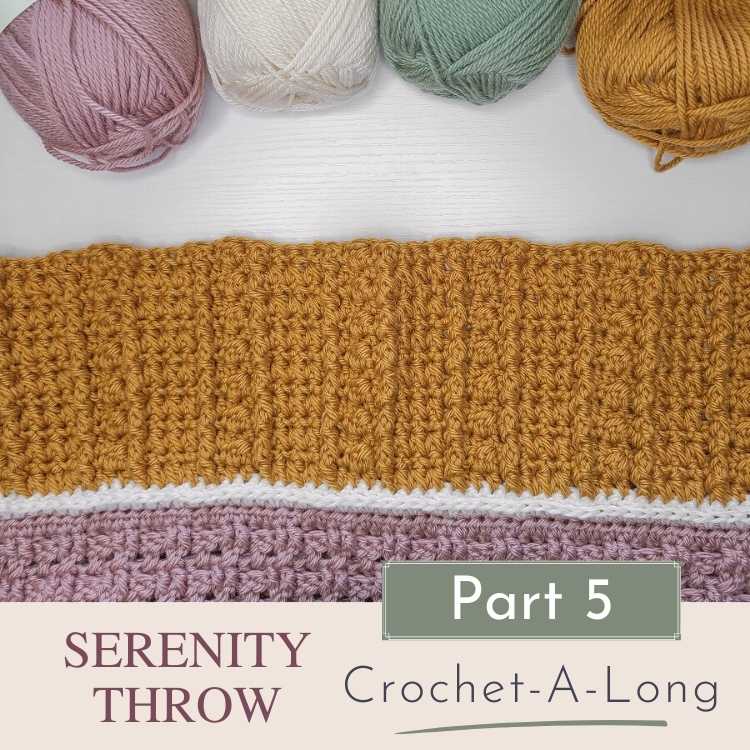
Part 5 – Clair de Lune Fiber Art
The free PDF download for Part 5 expired at 7:59 AM PDT November 1, 2023. You can still view the free version of the pattern, purchase the PDF from the designers’ Ravelry Shop or purchase the eBook to receive all of the patterns at once.
Technical information for Part 5:
- Colorway Used: Color A – Golden
- Yarn Usage: Approximately 160 grams / 350 yards (320 meters)
- Stitch Markers Required: 0
Tutorial Links for Advanced Stitches in this Part:
Special Notes for this Part:
- Stitch Count on Row 1 is more than 192 but comes back down to 192 in Row 2. No need to worry as long as the stitch count matches what Allison has listed.
- Pay attention to stitch placement on Row 2 and make sure to put the single crochets into the chain 1 spaces as Allison instructs.
- Allison has included a photo tutorial for her Part.
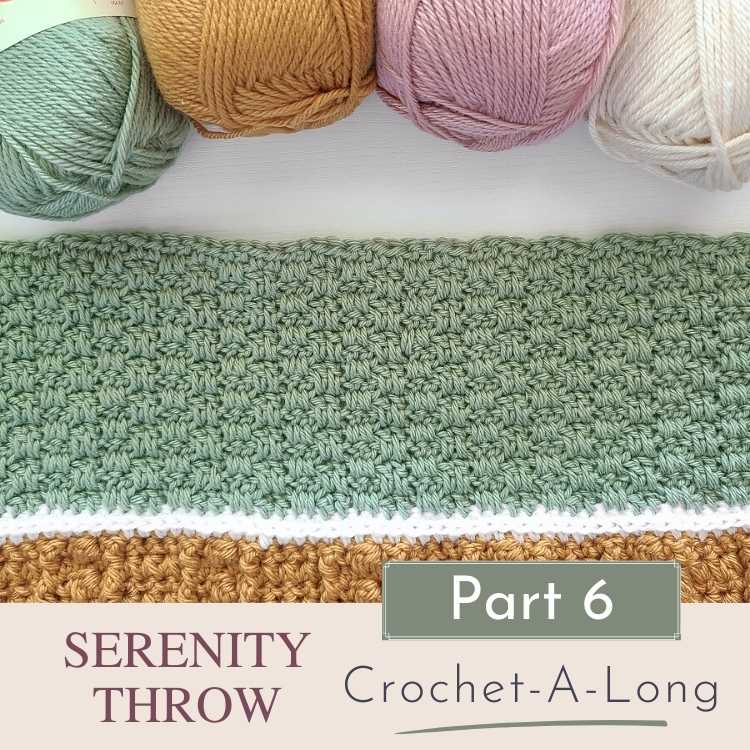
Part 6 – Raffamusa Designs
The free PDF download for Part 6 expired at 7:59 AM PDT November 4, 2023. You can still view the free version of the pattern, purchase the PDF from the designers shops (if available) or purchase the eBook to receive all of the patterns at once.
Technical information for Part 6:
- Colorway Used: Color B – Moss
- Yarn Usage: Approximately 140 grams / 306 yards (280 meters)
- Stitch Markers Required: 0
Tutorial Links for Advanced Stitches in this Part:
- There are no special stitches required for this part but be sure to check out the photo tutorial included in the pattern as it has important information for the stitch placement.
Special Notes for this Part:
- The top of the double crochet 2 rows below can be a little hidden in the dc’s from the previous rows. Push the double crochet from the previous row out of the way.
- I worked 15 rows before finishing with the last instructed row.
- This means I worked 16 rows total.
- When you are placing the double crochet 2 rows below, the chain 2 from the previous row will go over your hook and will be caught inside the new stitch. Essentially, you will crochet over the chains.
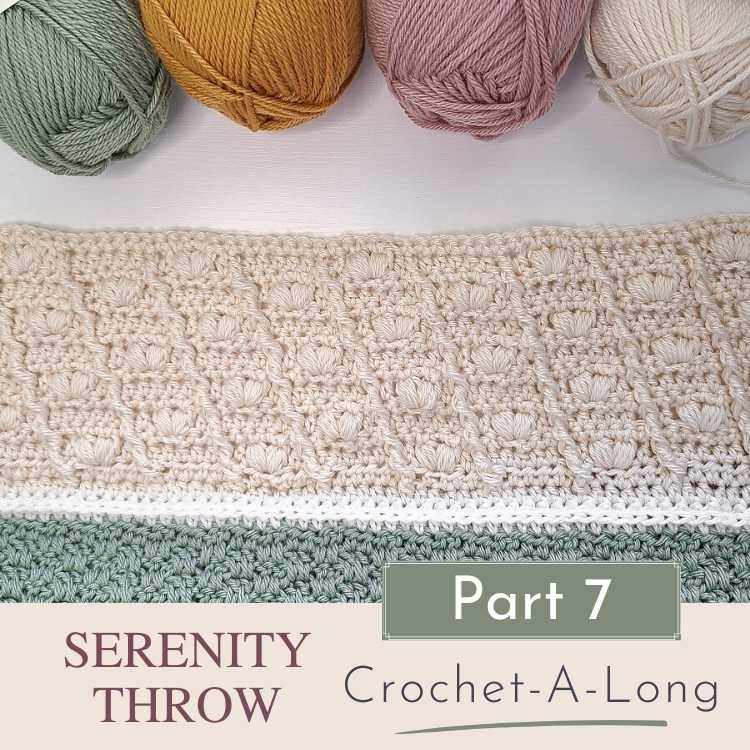
Part 7 – The Loophole Fox
The free PDF download for Part 7 expired at 7:59 AM PDT November 8, 2023. You can still view the free version of the pattern or purchase the eBook to get the PDF pattern and receive all of the patterns for the blanket at once.
Technical information for Part 7:
- Colorway Used: Color C – Clotted Cream
- Yarn Usage: Approximately 160 grams / 350 yards (320 meters)
- Stitch Markers Required: 0
Tutorial Links for Advanced Stitches in this Part:
- Back Post Double Crochet
- Front Post Treble Crochet (The linked tutorial is for Front Post Double Crochet but FP treble crochet is worked the same way, just with one additional yarn over before inserting the hook around the post).
- Puff Stitch
- Place a Front Post Stitch 2 Rows Below
Special Notes for this Part:
- Make sure to read ALL notes in my pattern before starting. The notes are important and will help you understand stitch placement.
- My pattern includes both a photo tutorial and a long video tutorial to ensure confidence while you work this pattern.
Part 8 – Juniper & Oakes

The free PDF download for Part 8 expired at 7:59 AM PDT November 11, 2023. You can still view the free version of the pattern, purchase the PDF from the designers shops (if available) or purchase the eBook to receive all of the patterns at once.
Technical information for Part 8:
- Colorway Used: Color D – Oyster
- Yarn Usage: Approximately 180 grams / 393 yards (360 meters)
- Stitch Markers Required: 0
Tutorial Links for Advanced Stitches in this Part:
- This pattern uses the Alpine Stitch and is referred to by it’s name.
- At it’s core, the Alpine Stitch uses Front Post Double Crochet and placing Front Post Stitches 2 Rows Below.
Special Notes for this Part:
- Rows 3, 5 and 7 – The repeat has “Alpine, DC”. The repeat will END on an “Alpine” (FPdc), not on a dc. This is shown in Erin’s video and she states you can do a dc at the end instead if you don’t like the FPdc at the end of the row. I ended Row 3 and all repeats of Row 3, 5 and 7 as a dc instead of FPdc because I wanted the cleaner edge.
- For Erin’s Row’s 8 through 12, I worked through Row 10 and then continued on to Row 13. Otherwise, the strip would have been too tall.
- This section WILL roll. It’s the nature of the Alpine stitch. The rolling is fixed after putting the next part on.
- Erin has included both a photo tutorial and a video tutorial for her Part.
Part 9 – Sweet Potato 3

The free PDF download for Part 9 expired at 7:59 AM PDT November 15, 2023. You can still view the free version of the pattern, purchase the PDF from the designers shops (if available) or purchase the eBook to receive all of the patterns at once.
Technical information for Part 9:
- Colorway Used: Color A – Golden
- Yarn Usage: Approximately 165 grams / 360 yards (330 meters)
- Stitch Markers Required: 0
Tutorial Links for Advanced Stitches in this Part:
- There are no special stitches required for this part but be sure to check out the photo tutorial or video tutorial included in the pattern as it has important information for the stitch placement.
Special Notes for this Part:
- This part looks harder to crochet than it actually is. Once you get into it, the stitch pattern is fairly straightforward.
- On Row 4, it helps to hold the chain 6 in place after twisting and working the first sc. It can be difficult to find the space again if you don’t hold it open.
- The sides of this part are going to feel a little wonky because of the slip stitches to start certain rows and skipping stitches at the beginning of rows. You’re not doing anything wrong, it just is the way the pattern is. This is fixed in the border.
- Christine has included both a photo tutorial and video tutorial for her part.
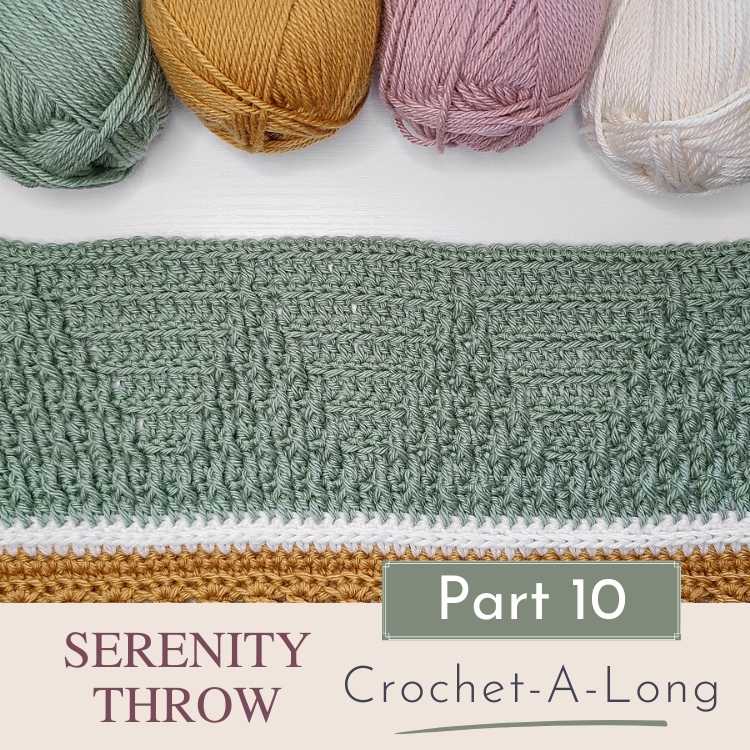
Part 10 – Remington Lane Crochet
The free PDF download for Part 10 expired at 7:59 AM PDT November 18, 2023. You can still view the free version of the pattern, purchase the PDF from the designers shops (if available) or purchase the eBook to receive all of the patterns at once.
Technical information for Part 10:
- Colorway Used: Color B – Moss
- Yarn Usage: Approximately 140 grams / 306 yards (280 meters)
- Stitch Markers Required: 0
Tutorial Links for Advanced Stitches in this Part:
- Front Post Treble Crochet (The linked tutorial is for Front Post Double Crochet but FP treble crochet is worked the same way, just with one additional yarn over before inserting the hook around the post).
- Place a Front Post Stitch 2 Rows Below
Special Notes for this Part:
- Work the repeats once and THEN repeat the indicated amount of times.
- For example “[*FPtc into Row 3, dc,* rep from * to * 4 times, dc 2]” You will work the instructions between ** a TOTAL of 5 times.
- Pay attention to when the designer says to repeat instructions until a certain number of stitches remain in the row. This instruction supersedes the repeat and the repeat will not be completely finished when you have the instructed amount of stitches remaining.
- Jamie has included a photo tutorial with her part.
Part 11 – Sunflower Cottage Crochet

The free PDF download for Part 11 expired at 7:59 AM PDT November 22, 2023. You can still view the free version of the pattern, purchase the PDF from the designers shops (if available) or purchase the eBook to receive all of the patterns at once.
Technical information for Part 11:
- Colorway Used: Color C – Clotted Cream
- Yarn Usage: Approximately 160 grams / 350 yards (280 meters)
- Stitch Markers Required: 0
Tutorial Links for Advanced Stitches in this Part:
Special Notes for this Part:
- The bobbles are worked on the right side and you may need to push them to the right side to make them pop out as they’re supposed to.
- Pay attention to when the designer says to repeat instructions until a certain number of stitches remain in the row. This instruction supersedes the repeat and the repeat may not be completely finished when you have the instructed amount of stitches remaining.
Part 12 – MadameStitch

The free PDF download for Part 12 expired at 7:59 AM PDT November 25, 2023. You can still view the free version of the pattern, purchase the PDF from the designers shops (if available) or purchase the eBook to receive all of the patterns at once.
Technical information for Part 12:
- Colorway Used: Color D – Oyster
- Yarn Usage: Approximately 150 grams / 327 yards (300 meters)
- Stitch Markers Required: 7
Tutorial Links for Advanced Stitches in this Part:
- Front Post Half Double Crochet (The linked tutorial is for Front Post Double Crochet but FP half double crochet is worked the same way, just yarn over and pull through all 3 loops on hook instead, as you would for a hdc instead of a dc).
Special Notes for this Part:
- The Front Post Half Double Crochets do squish down a bit and may be difficult to see for beginners but this part was not difficult at all.
- I did use the stitch markers as Debbie suggested. While I could count the rows without them, the stitch markers made it a lot easier. I would highly recommend using the stitch markers as she suggests, especially if crocheters are not familiar with this type of stitch pattern.
- This part is deceptive in its height because of the FPhdcs. They squish down and hide how tall the part is. Measure at the sides which are just hdc for the “real” height.
Serenity Throw Blanket BORDER
The free PDF download for the border expired at 7:59 AM PDT November 29, 2023. You can still view the free version of the pattern, purchase the PDF from the designers shops (if available) or purchase the eBook to receive all of the patterns at once.
Technical information for the Border
- Colorway Used: Color E – White
- Yarn Usage: Approximately 100 grams / 218 yards (200 meters)
- Stitch Markers Required: 0
Get all the fun sent directly to your inbox!
Sign up to my newsletter to make sure you don’t miss any future events that will be as lovely and fantastic as this one.
No spam, ever. Just crochet goodies. Pinky Promise!
Love this crochet sampler blanket pattern and want to save it for later? Pin it to Pinterest!

FAQ for the Serenity Throw Blanket
What do I need to know about gauge and tension?
This crochet blanket pattern CAL started with a swatch and my tension. I am typically a tight crocheter, so my tension is typically tighter than others. You can find out more about what this means in my gauge master post.
Each designer has listed gauge for their patterns, which is standard for all crochet patterns. However, for full transparency, when I crocheted the sample of the blanket I did not not check gauge between each pattern and the blanket turned out perfectly.
What this means is you will want to match the gauge of the first designer or, if you feel confident in your own gauge, you can follow your own. You shouldn’t have to match gauge with each designer.
Your blanket should turn out to be approximately 50 inches wide by 60 inches tall. If it is slightly too small, you can always add more of a border to increase the size. If it is slightly too large… well, who would ever deny a big ol’ blanket!?
What stitches and/or techniques should I be familiar with to feel confident following this crochet sampler blanket pattern?
As stated previously, the range of skill level for this crochet sampler blanket pattern is from Confident Advanced Beginner to Intermediate. You very likely will learn new stitches and/or techniques following this CAL.
You should be familiar and confident with all of the basic crochet stitches such as chains, slip stitch, single crochet, half double crochet, double crochet and treble crochet.
You should also be familiar with or familiarize yourself with the following stitches and techniques:
- Front Post and Back Post Double Crochet
- Puff Stitch (and it’s variants)
- Bobble Stitch
- Working Front Post Stitches 2 Rows Below
- Crossed Double Crochet (Video linked shows tutorial)
- Camel Stitch (Half Double Crochet 3rd Loop Only)
- Placing front post stitches on single crochets
This list uses US terms and each link will take you to a tutorial to learn these stitches or techniques.
Each part of the crochet sampler blanket pattern will reference which techniques you should know with links to tutorials and any other notes that might help.
Don’t forget to join my Facebook Group so we can chat all about your creations! We are a group for crocheters of all experiences, all interests and love to hang out together. Come join the fun!

Shannon | Designer & Editor
Shannon helps crocheters find their next project and build their skills with in depth tutorials and crochet patterns on her blog, theloopholefox.com.
With more than a decade of crochet experience, Shannon knows that understanding why we do something matters just as much as how we do it. She teaches new techniques and crochet stitches in depth so you can crochet with confidence.
Looking for more Crochet Blanket Patterns? Try these!
Interested in last year’s CAL blanket? The Harmony Throw Blanket is still available to work at your own pace.
Want a simple blanket to work on while you wait for more parts of the Harmony CAL to release? Try my Aspen Throw!
If you love baby blankets, you’ll love these Crochet Baby Blanket Patterns!
If you want some quick projects you can work on while waiting, you can try out some of my Crochet Blanket Squares!

This is my first CAL, I’m very excited. I have been crocheting for 40 years and I have never made a blanket, so this is a first for me. 🙂
Oh my gosh! We are honored that we will be your first blanket and so excited for you to join us! I hope you enjoy making the blanket and love the finished project! 🙂
Just signed up. I’m a real sucker for CALs and this one looks great. I like the idea of the transition rows between each section. Thanks!
Yay! I’m so excited you’ll be joining us. I’m so glad you like the transition rows in between!