
Millie Hanging Basket Crochet Pattern
The Millie Crochet Hanging Basket Pattern is a fun, textured project that provides something useful for your home: Storage space!
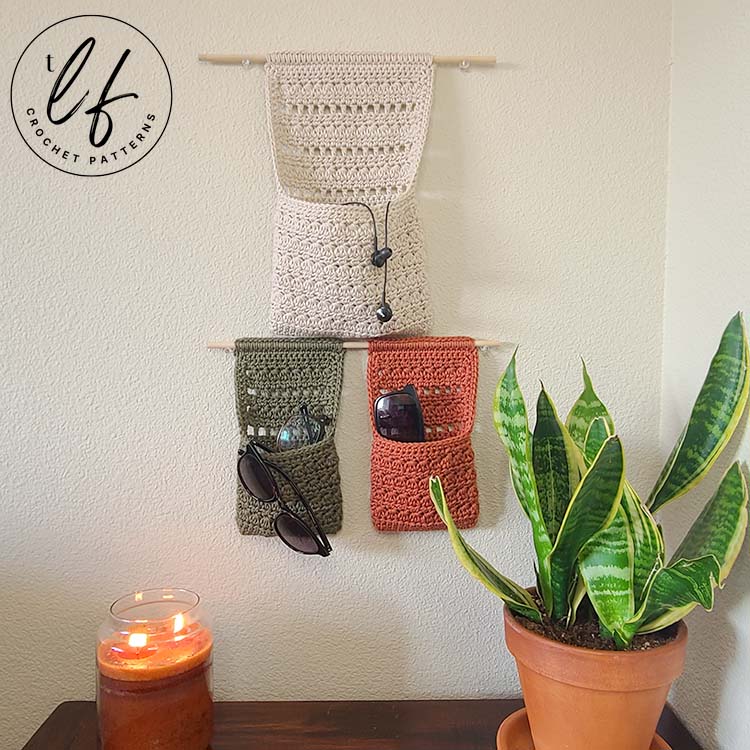
This pattern combines a wall hanging with a pouch-like basket to free up your desk or other surfaces by hanging on the wall. Perfect for those who like to keep things organized and have something pretty and fun to look at, The Millie Hanging Basket checks off all boxes.
There are three things I love: Organization, ample flat surface space and storage options that are interesting to look at.
While a set of clear plastic drawers might do the trick, why not add some style, texture and color to your home or workspace? Why not make it by hand and have it be uniquely yours?
This crochet hanging basket pattern checks all of those boxes. Even better, the design comes in two sizes so no matter what small item you’re looking to organize or have readily available in a cute crochet wall basket, you’re covered!
The Inspiration for this Crochet Hanging Basket Pattern
Beyond just liking things to be pretty and organized, I had some real life in-the-moment inspiration for the Millie Crochet Hanging Basket design.
You see… I’m one of those people. I have a place for everything important. A random cheap basket by the door for keys and sunglasses. A file organizer for important documents. A drawer for all things pet related.
Now, I’m not saying I’m completely clutter free but important things that are used daily or need to be in a safe space have special places to be.
So, when I could have sworn that I brought in an important document from the mail but couldn’t find it, I went a bit bonkers. I looked everywhere for it. It was not to be found. If you guessed that we hadn’t even received the document yet and I totally made up the vivid memory of getting it, you guessed right.
As silly as having the vivid memory being totally made up was, the entire situation inspired me to design the Millie Crochet Hanging Basket. Feeling like I had lost a piece of mail made me realize that I needed a special place to put mail before it is sorted and filed or shredded.
And, being a crochet designer, I couldn’t allow myself to just grab a random thing at some store and call it a day. That would be silly!
So, I set off designing this crochet hanging basket pattern and I have to tell you… I’m in love!
Because the inspiration came from possibly lost mail, the basket took a rectangular shape instead of a standard round shape. This is great for a few reasons.
First, this crochet hanging basket doesn’t require any increasing, decreasing or really any shaping. The basket is worked entirely seamless so it does transition from rounds to rows but it’s not difficult to do so. You’ll have the same stitch count for all of your rounds and the same stitch count for all of your rows.
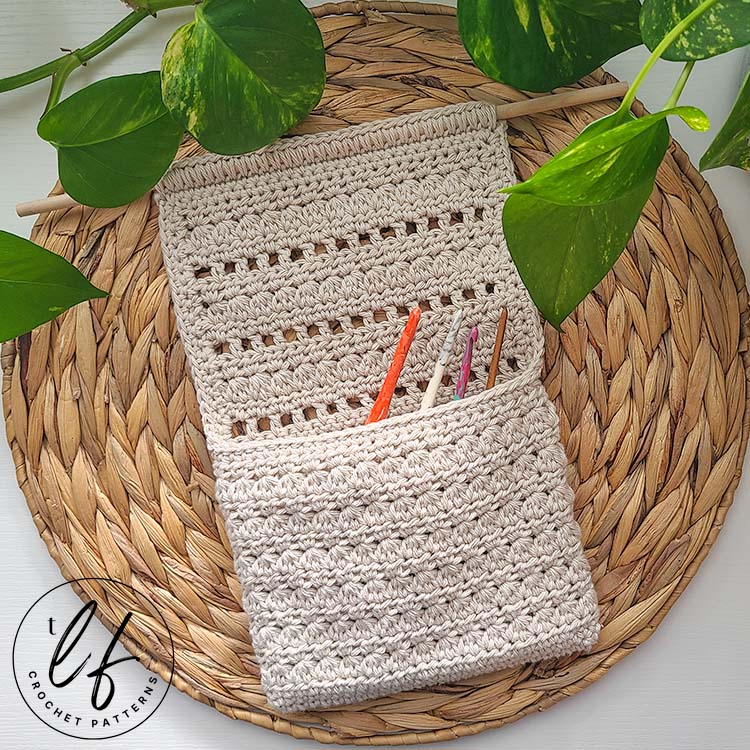
The wall hanging portion of the crochet wall basket adds some length and stability to the baskets so that longer items you’d like to store in them (like crochet hooks, glasses… mail….) will be protected and your wall will be protected from.
Together the pouch basket portion and the wall hanging portion create a home decor item that is both pretty to look at and functional. My favorite!

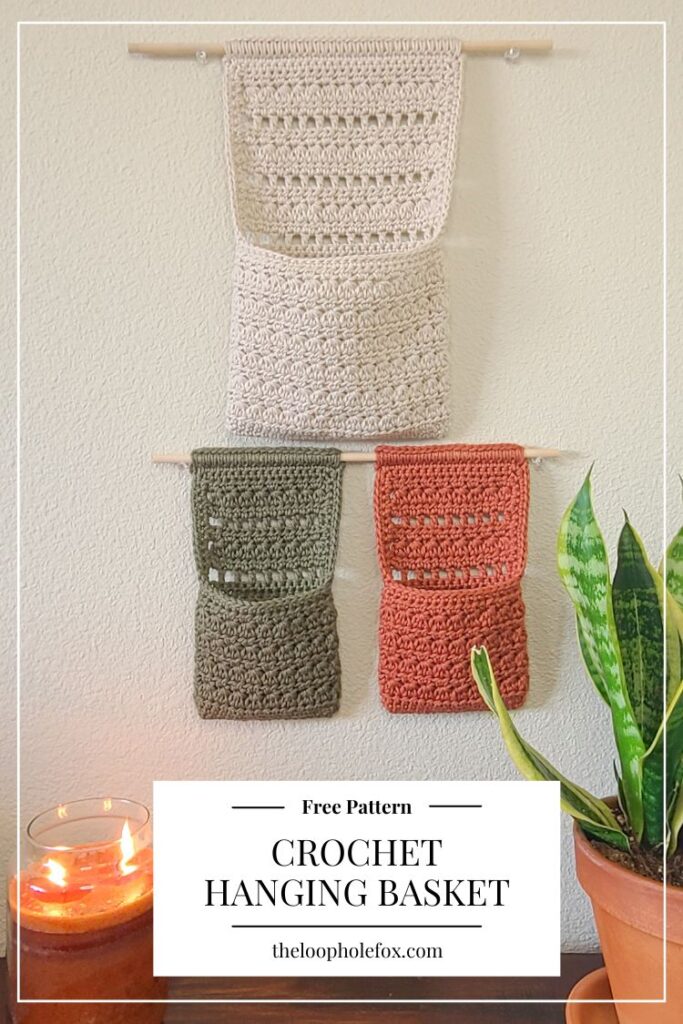
The Millie Crochet Hanging Basket pattern comes in two sizes: Large and Small.
The large size (cream in all of the pictures) is perfect as a stand alone and can store bigger items.
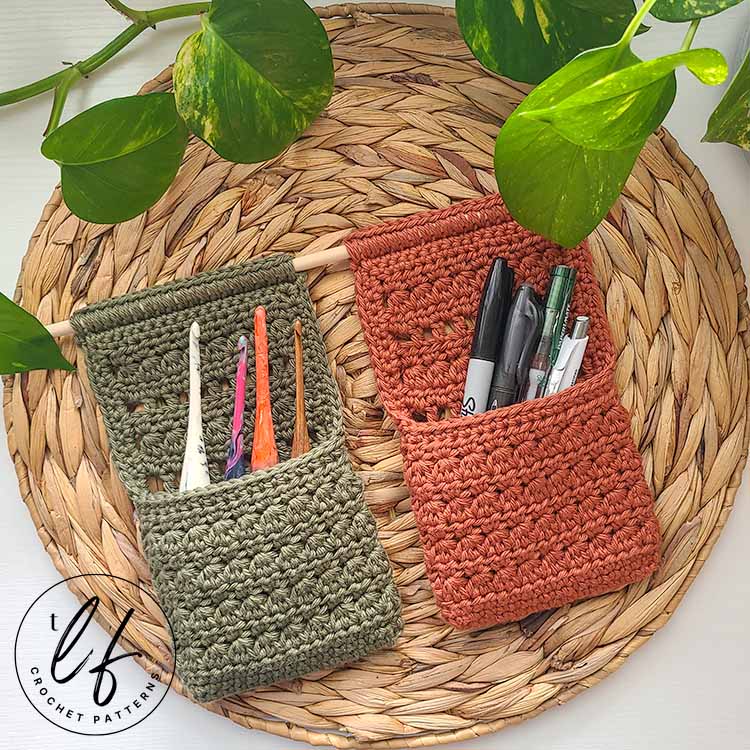
The small size (green and orange) is super cute when made in pairs (or more) and hung on the same dowel to seem like one project. You could absolutely make just one and use a smaller dowel but I loved how the pair looked together and I already had a dowel long enough for two on hand.
Hanging all together, 1 large and 2 small crochet hanging baskets made from this pattern create a ton of organizational space on your wall and, if hung on top of each other, can even look like one intentional piece.
If you prefer a premium, ad-free PDF version of this pattern, you can grab one on in my Etsy shop by clicking the button below!
DISCLAIMER: This post includes affiliate links. This means, should you decide to purchase a product via one of these links, I will receive a small commission at no extra cost to you. I only recommend products I use and love (Or products I know others love, have heavily researched, know have good ratings and plan to purchase myself). These small commissions help to support this blog and continue keeping most of my patterns free. You can read more on my Privacy Policy, if you prefer.
How do I choose the best yarn for this crochet wall basket pattern?
For this crochet hanging basket pattern, I used Lion Brand’s Pima Cotton in colorways Vintage (cream) and Spice (burnt orange). I also used another cotton yarn of the same weight but a different brand for the green basket. I lost the skein label a long time ago so I honestly couldn’t tell you what the brand or colorway is (sorry!).
Lion Brand Pima Cotton is a Medium (4) weight 100% cotton yarn which makes it fantastic for crocheting almost anything you can think of.
It works especially well for this crochet hanging basket pattern and I’ve used it previously in my Traveler’s Water Bottle Holder and my Juni Dishcloth.
You can use any brand of yarn that you like but, because this crochet wall basket pattern is meant to create items that will be heavily used to store things, you should stick with 100% cotton. Cotton has a strength and durability that is typically better for projects like these than other fibers.
Construction
This crochet hanging basket is worked from the bottom up. We begin by creating chains and working into both sides of the chains to create a long oval. This is the bottom of the basket.
From there, we work several closed rounds to create the pouch or basket portion. Once we reach the depth of the basket, we transition to rows to create the back piece. These rows are worked directly onto the basket.
We create two rounds of border to make sure that everything has a nice clean edge and is incorporated together.
Finally, we attach the basket or baskets to a dowel by single crocheting over the dowel. Don’t worry – this is easier than it sounds!
Where to Get the Millie Hanging Basket Pattern
The Millie Hanging Basket is a free crochet hanging basket pattern in this blog post. Scroll down to view the free version.
However, if you’d like a more robust pattern with a photo tutorial, the steps for the photo tutorial written out in full sentences and a printer friendly version of the PDF, I recommend you purchase the inexpensive PDF pattern.
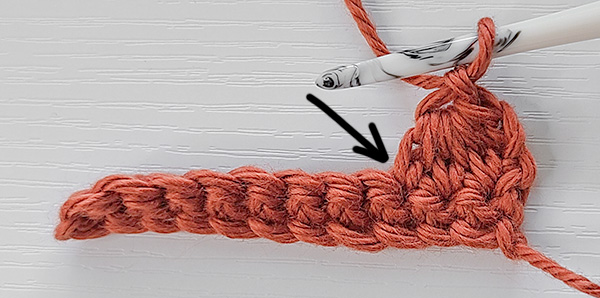
With the PDF pattern, you will receive detailed photo tutorials for the special stitches and techniques and step by step through the entire pattern which will set you up to work this crochet hanging basket with confidence. The photos include details with arrows, highlights and dots to help identify all the stitches and their placement.
SKILL LEVEL
Intermediate – Crocheters looking to follow this pattern should know how to:
- Read a crochet pattern – There is NOT a video tutorial for this pattern
- Feel confident with the standard stitches: Chain, Slip Stitch, Single Crochet, Half Double Crochet and Double Crochet
- Feel comfortable working in closed rounds and transitioning to rows from rounds.
- Create chain spaces and work into them.
- Place several stitches in the same stitch or space indicated
- Be willing to learn a new stitch: Extended Half Double Crochet 2 (or 3) Together
- Be willing to learn techniques that may be new to you (starting a stitch in the previous stitch or working into a Chain 1 “Eye” which is explained in detail)
- Feel comfortable pulling a loop through many loops on hook (or be willing to try).
While I believe an advanced beginner absolutely could follow this pattern, you will need to be familiar with these techniques and understand how to work them to feel confident doing so. The photo tutorial included in the PDF pattern will walk you through all the special stitches and techniques as well as step-by-step through the pattern with arrows and dots for further clarification, if you need it. The PDF pattern for this crochet hanging basket is available on Etsy!
MATERIALS
Medium (4) weight cotton yarn of your choice. You will need approximately:
Small – 1.2 ounces/ 35 grams/ 66 yards
Large – 2.7 ounces/ 75 grams/ 140 yards
Yarn Used
Lion Brand’s Pima Cotton in colorways Vintage (cream) and Spice (burnt orange). The olive green yarn is Medium (4) cotton as well but not Lion Brand Pima Cotton (Skein label has been lost). A good color substitute with Pima Cotton would be Pewter.
TOOLS & ADDITIONAL MATERIALS REQUIRED
4 mm (G-6) hook – I used my favorite Furls Streamline Swirl in Cookies N’ Cream
Tapestry needle
Scissors
Stitch Markers
Wooden dowel(s) for hanging the basket(s) – I used 12 inch long, ¼ inch thick dowels. 1 to hang the large basket and 1 to hang 2 small baskets.
FINISHED SIZE
Small – 7.5 inches long by 4.5 inches wide. 4 inch basket depth.
Large – 10.5 inches long by 6.5 inches wide. 5.5 inch basket depth.
GAUGE
19 sc x 23 rows = Approximately 4 inches x 4 inches.
Matching gauge perfectly isn’t required for this pattern. This crochet hanging basket will work regardless of size so there’s no reason to fret over gauge.
Note: I am a tight crocheter, so my tension is usually tighter than others. Learn more about gauge and what this means here.
ABBREVIATIONS (US TERMS)
- Ch – Chain
- Sl St – Slip Stitch
- Sc – Single Crochet
- Hdc – Half Double Crochet
- Dc – Double Crochet
- Ehdc2tog – Extended Half Double Crochet 2 Together (see special stitch)
- Ehdc3tog – Extended Half Double Crochet 3 Together (see special stitch)
- Ch 1 “eye” – Created by chaining 1 after creating Ehdc2tog or Ehdc3tog. (see special technique Ch 1 “eye”)
- Sk – Skip
- St(s) – Stitch(es)
- Spc – Space
- RS – Right Side
- WS – Wrong Side
- […] – Repeats are listed within brackets.
- (…) – Instructions within parentheses indicate to work all instructions in the same stitch.
- (…) – Stitch counts are listed at the end of the row in parenthesis and bold italics.
NOTES
- This pattern is worked in both rounds and rows. The instructions are split up so that it is clear when you are working rounds and when you are working rows.
- The two sizes of basket (small and large) are their own patterns so that the instructions are clear.
- You will always turn your work unless specifically instructed not to with “DO NOT TURN”.
- Rounds are worked in closed rounds which means you will always slip stitch to the first stitch of the round to close.
- Chain 1 and Chain 2 to begin new rounds or rows do not count as a stitch.
- Make sure to place your first stitch of the round in the first stitch, not in the slip stitch that closed your round. If you accidentally use the slip stitch instead of what is the actual first stitch, you will unnecessarily increase your stitch count.
- You will very likely learn a new stitch with this pattern.
- Please be sure to read over all descriptions for special techniques and special stitches BEFORE starting this pattern.
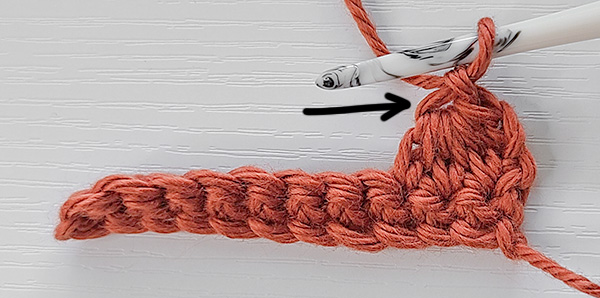
Special Stitch – Extended Half Double Crochet 2 Together (Ehdc2tog)
The Extended Half Double Crochet 2 Together makes 2 stitches into 1 stitch. While this is technically a decrease, it is used for texture as a cluster of stitches in this crochet hanging basket pattern.
To work an Ehdc2tog, you will:
Yarn over, insert hook into indicated stitch, yarn over and pull a loop through. 3 loops on hook. Yarn over, pull through the first loop on hook ONLY. You will have 3 loops on hook.
Yarn over and insert hook into the NEXT stitch, yarn over and pull a loop through. 5 loops on hook. Yarn over and pull through the first loop on hook ONLY. 5 loops on hook.
Yarn over and pull through all 5 loops. Ehdc2tog Complete!
Special Stitch – Extended Half Double Crochet 3 Together (Ehdc3tog)
The Extended Half Double Crochet 3 Together makes 3 stitches into 1 stitch and is used as a cluster of stitches in this pattern. This is similar to the Ehdc2tog above, it just has 1 more stitch.
To work an Ehdc3tog, you will:
Yarn over, insert hook into indicated stitch, yarn over and pull a loop through. Yarn over, pull through the first loop on hook ONLY. 3 loops on hook.
[Yarn over and insert hook into the NEXT stitch, yarn over and pull a loop through. Yarn over and pull through the first loop on hook ONLY.] Repeat the instructions within brackets 2 times.
You will have 7 loops on hook. Yarn over and pull through all 7 loops. Ehdc3tog Complete!
Special Technique – “Starting in Previous St”
In this crochet hanging basket pattern, you will see instructions to begin Ehdc3tog’s “starting in the previous stitch”.
What this is referencing is to use the same stitch where your previous stitch ended to begin your next Ehdc3tog. This is the “previous stitch”.
To work your next Ehdc3tog, you will yarn over, insert your hook into the “previous stitch” (the SAME stitch that your last Ehdc3tog ended in), yarn over and pull a loop through. Then continue making the Ehdc3tog in the next 2 stitches.
Special Technique – Ch 1 “Eye”
After all Ehdc3tog stitches (in rows or rounds) and after some Ehdc2tog stitches (ONLY in Rows), we chain 1 as instructed. This chain 1 secures all of the loops we have gathered to create the stitch so that they aren’t able to slide around. This is referred to as the Ch 1 “Eye” in the pattern.
This is important for the crochet hanging basket pattern. This chain 1 and “starting in the previous stitch” is what keeps our work from decreasing.
We will work into these chain 1 spaces (“eye”s) on the next row or round. All of the loops from the Extended Half Double Crochet (2 or 3) Together stitches help keep these chain 1’s open so that they are easy to work into.

Millie Crochet Hanging Basket Pattern – Small Size
BASKET PORTION – WORKED IN ROUNDS
Ch 19
Round 1 (RS) – 1 sc 2nd ch from hook and 1 sc each ch across. Turn to work along bottom of chains. Place 1 sc in bottom of each st across. Sl st to first sc made to close. (36 sts in oval)
Round 2 (RS) – Ch 1 (does not count here or throughout), do not turn. 1 sc in each st around. Sl st to first sc to close. (36)
Round 3 (WS) – Ch 2 (does not count here or throughout), turn. 1 hdc in each st around. Sl st to first hdc to close. (36)
Round 4 (RS) – Ch 2, turn. Ehdc2tog. [Ehdc3tog starting in previous st, ch 1]. Repeat inside brackets 17 times. 1 dc in same st last ehdc3tog ended in. Sl st to first st to close. (36, including ch 1’s)
Round 5 (WS) – Ch 2, turn. Sk first st, [2 hdc in ch 1 “eye”, sk ehdc3tog]. Repeat inside brackets 17 times. 2 hdc last st. Sl st to first st to close. (36)
Rounds 6 through 11 – Repeat Rounds 4 and 5 in sequence.
For example, Round 6 will be a repeat of Round 4 and Round 7 will be a repeat of Round 5. Round 11 will be a repeat of Round 5.
WALL HANGING PORTION – TRANSITION TO ROWS
Row 1 (WS) – Ch 1, turn. 1 sc in first st and 1 sc in each of the next 16 sts. (17)
Row 2 (RS) – Ch 2, turn. 1 dc first st. [Ch 1, sk 1, 1 dc next st]. Repeat inside brackets 8 times. (17 sts total – 9 dc, 8 ch 1 spcs)
Row 3 (WS) – Ch 2, turn. 1 hdc first st. [1 hdc in ch 1 spc, 1 hdc next st]. Repeat inside brackets 8 times. (17)
Row 4 (RS) – Ch 2, turn. Ehdc2tog, ch 1. [Ehdc3tog starting in previous st, ch 1]. Repeat inside brackets 7 times. 1 st remains. 1 dc in last st. (17, including ch 1’s)
Row 5 (WS) – Ch 2, turn. Sk 1st st, [2 hdc in ch 1 “eye”, sk ehdc3tog]. Repeat inside brackets 8 times. 1 hdc last st. (17)
Rows 6 through 9 – Repeat Rows 2 through 5 in sequence.
For example, Row 6 will be a repeat of Row 2 and Row 7 will be a repeat of Row 3. Row 9 will be a repeat of Row 5.
Do not cut yarn. Continue to Border Instructions.
BORDER INSTRUCTIONS
Round 1 – Ch 1. Do not turn but rotate to work along the side of rows. WS of rows will be facing you. [1 sc in side of hdc, 2 sc in side of ehdc2tog, 1 sc in side of hdc, 2 sc in side of dc] Repeat inside brackets 2 times. 1 sc in side of sc. (13 sts so far)
Rotate to work along Round 11 (last round worked prior to rows). The RS (outside of basket) will be facing you. 1 sc in each of the 19 unworked stitches from Round 11 (19 + 13 = 32 sts so far)
Rotate to work along the side of rows. WS of rows will be facing you. 1 sc in side of sc, [2 sc in side of dc, 1 sc in side of hdc]. Repeat inside brackets 4 times. (13 + 19 + 13 = 45 sts so far)
Ch 2. Rotate to work along the final row worked. 1 sc in each st across. Ch 2, sl st to first st made in Round 1 to close. (17 + 13 + 19 + 13 = 62 sts total in Round 1)
Round 2 – Ch 1, turn. In ch 2 spc, place (1 sc, ch 2, 1 sc). 1 sc in each of the next 17 sts. In ch 2 spc, place (1 sc, ch 2, 1 sc). 1 sc each of the next 13 sts. 1 sl st each of the next 19 sts. 1 sc each of the next 13 sts. Sl st to first sc to close. (66 sts)
Do not cut yarn. Continue to Attaching the Dowel.
ATTACHING THE DOWEL
If you haven’t crocheted over an object before, this is going to feel strange. We are essentially placing 1 single crochet in each stitch and ch 2 space across the row but we are crocheting over the dowel so that the dowel is captured in the stitches for hanging.
To attach the dowel: Sl st into ch 2 spc. Ch 2. Align the dowel so that it is parallel to the top of Row 9 with the end of the dowel sitting OVER the Ch 2.
Bring your hook over the dowel (hook will be on top, make sure the ch 2 is still behind the dowel). Insert hook into the ch 2 spc (Hook will be inserted into stitch as normal but the dowel will be on top of the stitch the hook is inserted into). Yarn over, pull a loop through. Pull this loop up a bit to give room for the dowel. Yarn over and pull through the 2 loops on the hook. The dowel should be “captured” within the single crochet just made.
Continue placing 1 sc around the dowel in each of the next 19 sts. Place 1 sc around the dowel in the next ch 2 spc.
Ch 2. Bring the ch 2 behind the dowel and sl st into the ch 2 spc.
Cut yarn and weave ends. You’re done!
*You can alternatively cut the yarn after Round 2 of the border and use a tapestry needle and extra yarn to sew the dowel on to the stitches, if you like.

Millie Crochet Hanging Basket Pattern – Large Size
BASKET PORTION – WORKED IN ROUNDS
Ch 29
Round 1 (RS) – 1 sc 2nd ch from hook and 1 sc each ch across. Turn to work along bottom of chains. Place 1 sc in bottom of each st across. Sl st to first sc made to close. (56 sts in oval)
Round 2 (RS) – Ch 1 (does not count here or throughout), do not turn. 1 sc in each st around. Sl st to first sc to close. (56)
Round 3 (WS) – Ch 2 (does not count here or throughout), turn. 1 hdc in each st around. Sl st to first hdc to close. (56)
Round 4 (RS) – Ch 2, turn. Ehdc2tog. [Ehdc3tog starting in previous st, ch 1]. Repeat inside brackets 27 times. 1 dc in same st last ehdc3tog ended in. Sl st to first st to close. (56, including ch 1’s)
Round 5 (WS) – Ch 2, turn. Sk first st, [2 hdc in ch 1 “eye”, sk ehdc3tog]. Repeat inside brackets 27 times. 2 hdc last st. Sl st to first st to close. (56)
Rounds 6 through 15 – Repeat Rounds 4 and 5 in sequence.
For example, Round 6 will be a repeat of Round 4 and Round 7 will be a repeat of Round 5. Round 15 will be a repeat of Round 5.
WALL HANGING PORTION – TRANSITION TO ROWS
Row 1 (WS) – Ch 1, turn. 1 sc in first st and 1 sc in each of the next 26 sts. (27)
Row 2 (RS) – Ch 2, turn. 1 dc first st. [Ch 1, sk 1, 1 dc next st]. Repeat inside brackets 13 times. (27 sts total – 14 dc, 13 ch 1 spcs)
Row 3 (WS) – Ch 2, turn. 1 hdc first st. [1 hdc in ch 1 spc, 1 hdc next st]. Repeat inside brackets 13 times. (27)
Row 4 (RS) – Ch 2, turn. Ehdc2tog, ch 1. [Ehdc3tog starting in previous st, ch 1]. Repeat inside brackets 12 times. 1 st remains. 1 dc in last st. (27, including ch 1’s)
Row 5 (WS) – Ch 2, turn. Sk 1st st, [2 hdc in ch 1 “eye”, sk ehdc3tog]. Repeat inside brackets 13 times. 1 hdc last st. (27)
Rows 6 through 13 – Repeat Rows 2 through 5 in sequence.
For example, Row 6 will be a repeat of Row 2 and Row 7 will be a repeat of Row 3. Row 13 will be a repeat of Row 5.
Do not cut yarn. Continue to Border Instructions.
BORDER INSTRUCTIONS
Round 1 – Ch 1. Do not turn but rotate to work along the side of rows. WS of rows will be facing you. [1 sc in side of hdc, 2 sc in side of ehdc2tog, 1 sc in side of hdc, 2 sc in side of dc] Repeat inside brackets 3 times. 1 sc in side of sc. (19 sts so far)
Rotate to work along Round 15 (last round worked prior to rows). The RS (outside of basket) will be facing you. 1 sc in each of the 29 unworked stitches from Round 11 (29 + 19 = 48 sts so far)
Rotate to work along the side of rows. WS of rows will be facing you. 1 sc in side of sc, [2 sc in side of dc, 1 sc in side of hdc]. Repeat inside brackets 6 times. (19 + 29 + 19 = 67 sts so far)
Ch 2. Rotate to work along the final row worked. 1 sc in each st across. Ch 2, sl st to first st made in Round 1 to close. (27 + 19 + 29 + 19 = 94 sts total in Round 1)
Round 2 – Ch 1, turn. In ch 2 spc, place (1 sc, ch 2, 1 sc). 1 sc in each of the next 27 sts. In ch 2 spc, place (1 sc, ch 2, 1 sc). 1 sc each of the next 19 sts. 1 sl st each of the next 29 sts. 1 sc each of the next 19 sts. Sl st to first sc to close. (98 sts)
Do not cut yarn. Continue to Attaching the Dowel.
ATTACHING THE DOWEL
If you haven’t crocheted over an object before, this is going to feel strange. We are essentially placing 1 single crochet in each stitch and ch 2 space across but we are crocheting over the dowel so that the dowel is encapsulated in the stitches for hanging.
To attach the dowel: Sl st into ch 2 spc. Ch 2. Align the dowel so that it is parallel to the top of Row 13 with the end of the dowel sitting OVER the Ch 2.
Bring your hook over the dowel (hook will be on top, make sure the ch 2 is still behind the dowel). Insert hook into the ch 2 spc (Hook will be inserted into stitch as normal but the dowel will be on top of the stitch the hook is inserted into). Yarn over, pull a loop through. Pull this loop up a bit to give room for the dowel. Yarn over and pull through the 2 loops on the hook. The dowel should be “captured” within the single crochet just made.
Continue placing 1 sc around the dowel in each of the next 29 sts. Place 1 sc around the dowel in the next ch 2 spc.
Ch 2. Bring the ch 2 behind the dowel and sl st into the ch 2 spc.
Cut yarn and weave ends. You’re done!
*You can alternatively cut the yarn after Round 2 of the border and use a tapestry needle and extra yarn to sew the dowel on to the stitches, if you like.
Want to get the PDF version of this crochet hanging basket pattern? Get your copy on Etsy by clicking the button below!
Did you love this free crochet hanging basket pattern? Make sure to share the love and Pin it to Pinterest!
I hope you love the Millie Crochet Hanging Basket as much as I do! Enjoy!
Don’t forget to join my Facebook Group so we can chat all about your creations! We are a group for crocheters of all experiences, all interests and love to hang out together. Come join the fun!

Shannon | Designer & Editor
Shannon helps crocheters find their next project and build their skills with in depth tutorials and crochet patterns on her blog, theloopholefox.com.
With more than a decade of crochet experience, Shannon knows that understanding why we do something matters just as much as how we do it. She teaches new techniques and crochet stitches in depth so you can crochet with confidence.
Looking for more Useful Items to Crochet for Your Home or Home Decor? Check these out!
Radiance Bath Set
Farmhouse Hand Towel
Mitered Square Kitchen Towel
Juni Dishcloth
Marguerite Wall Hanging
Aura Wall Hanging
Woodland Pumpkins

I love these. Thank you so much for sharing your design.
Thank you so much! I’m so glad you like them. 🙂
I am working on the small basket and am loving it. But I think there us an error, on the Wall Hanging Portion, row 5, at the end, it says to sl st to first st yo close. Aren’t we just turning on this row.
Thanks for such a cute and easy pattern.
Hi there! Thank you so much for your compliment on my pattern and for seeing that. I’m surprised it didn’t get caught in testing! Thank you so much, the pattern is updated now. 🙂