
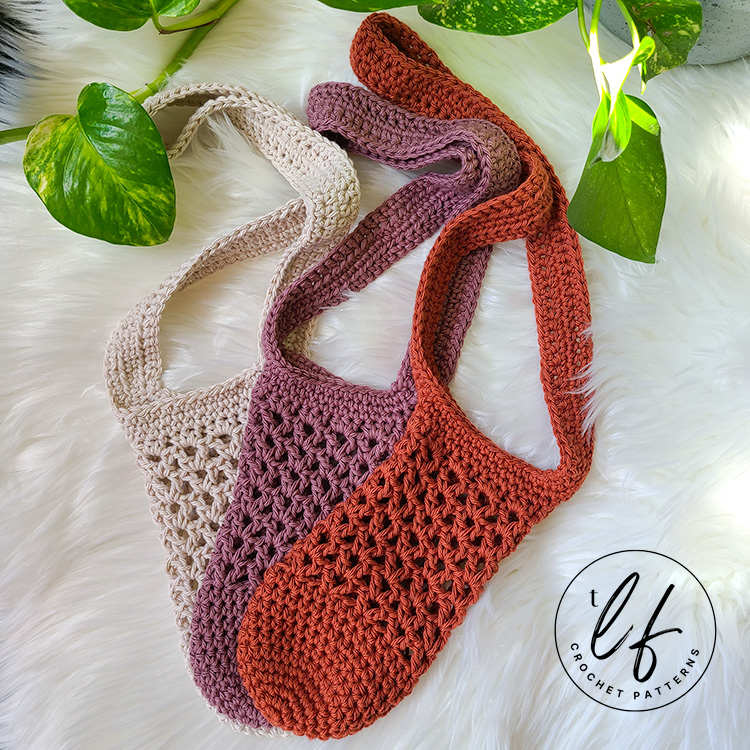
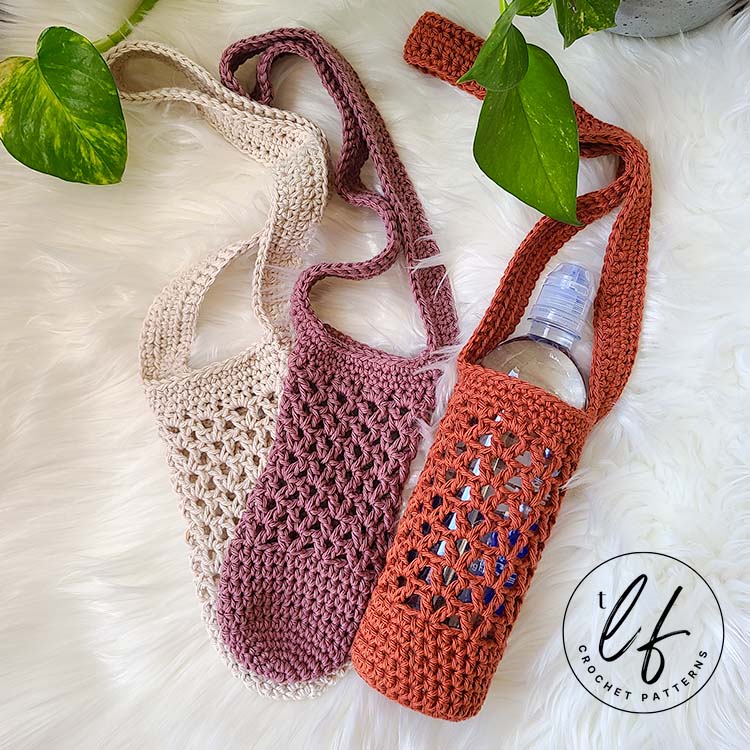
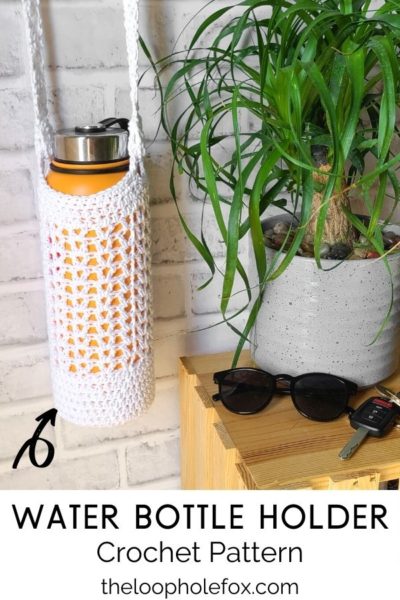
Traveler’s Water Bottle Bag Pattern
It’s finally spring and that means it’s time to go out traveling and adventuring. Whether that means hiking in the wilderness or going to the beach, you’ll of course need to bring water with you. Stay hands free on your adventures with the Traveler’s crochet water bottle bag pattern. Easy, adorable and you’ll have your hands free to take pictures of all the marvels, climb over rocks or build sand castles.
This pattern was updated on November 15, 2022. The major change in the pattern is the strap, which has been updated to be a seamless strap which will be much stronger than the previous version.
Why I Love This Crochet Water Bottle Bag
My husband and I recently took a weekend trip to the Sequoia’s with our pup. We both have large, reusable water bottles that we like to carry with us when we go on longer walks.
We were going to be doing a lot of hiking (and hike straight up hill we did!) while having our dog with us, so I knew that having our hands free and water close for easy access was absolutely necessary.
Between the two of us, we need to be able to carry enough water for two adults and our dog, so this crochet water bottle bag came in handy. Keeping our dog secure and safe while keeping ourselves alert as we went off trail – carrying the water bottle was the last thing on our mind.
It’s so important to be able to be hands free on your adventures. Regardless of if you’re hiking straight up a slippery hill in the snow to see the redwoods while holding onto your dogs leash for dear life or taking a comfortable walk around, you never know what might happen. Let this crochet water bottle bag give you peace of mind.
Or, you might be like me and just can’t stand the idea of carrying something. That’s fine, too!
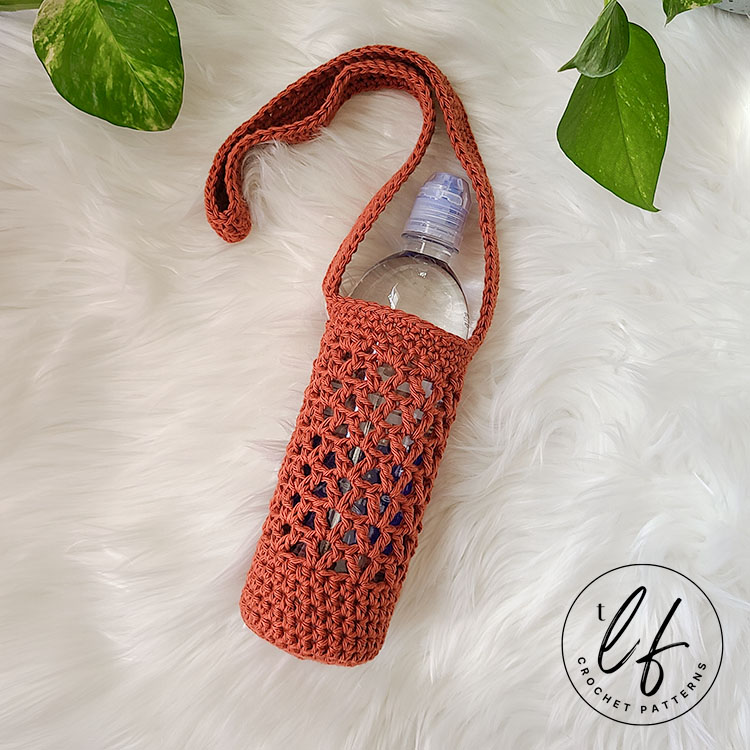
The Traveler’s crochet water bottle bag pattern was designed to be a snug fit on the water bottle so it doesn’t slide around or fall out. With this crochet water bottle bag, you’ll pick up the entire apparatus to take a drink versus sliding your bottle in and out of the holder. That doesn’t mean you can’t do it that way, but it is designed to be a snug fit to keep everything secure and to keep your water drinking easy – no fumbling around with the bottle and the holder and the strap and… Just pick it up and drink.
In this blog post, I’ll walk you through how to create the Traveler’s Water Bottle Bag crochet pattern in the “Standard” size. This size will fit most 16 oz water bottle sizes (like a Smart Water bottle you can pick up at any store).
If you’d prefer other sizes, or if you’d like to make your own size, I would recommend grabbing the inexpensive PDF pattern. In the PDF, you’ll receive a picture tutorial as well as instructions on how to create the standard size, the large size and how to create your own size.
The create your own size will walk you through creating the size for you step by step and includes a table to help you increase to the necessary size. Fun!
If you prefer a premium PDF version of this pattern, you can grab one on either my Ravelry or my Etsy shop by clicking the buttons below.
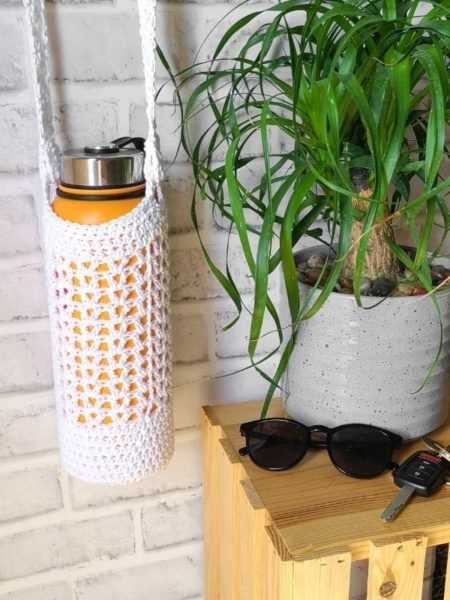
The large size fits the orange water bottle seen above, which is a 32 oz Mira thermal water bottle. This water bottle is AMAZING. If you’re looking for an awesome water bottle that keeps your water ice cold for long durations of time, I can’t recommend this one enough. This is my husbands and he uses it constantly.
Using cotton yarn, this crochet water bottle bag is light weight, easy to wash and sturdy against even the most adventurous of people. Let’s get to it!
DISCLAIMER: This post includes affiliate links. This means, should you decide to purchase a product via one of these links, I will receive a small commission at no extra cost to you. I only recommend products I use and love (Or products I know others love, have heavily researched, know have good ratings and plan to purchase myself). These small commissions help to support this blog and continue keeping most of my patterns free. You can read more on my Privacy Policy, if you prefer.
Where to Get this Crochet Bottle Bag Pattern
The Traveler’s Water Bottle Bag is a free crochet bottle bag pattern in this blog post. Scroll down to view the free version.
However, if you’d like a more robust pattern with a photo tutorial, the steps for the photo tutorial written out in full sentences and a printer friendly version of the PDF, I recommend you purchase the PDF pattern.
The PDF pattern also comes with instructions on how to customize the size of the crochet bottle bag, if needed, which is not included in the free crochet pattern.
With the PDF pattern, you will receive a detailed photo tutorial for all of the bag, which will set you up to work this crochet bottle bag pattern with confidence. The photos include highlighted stitches and details with arrows or dots, when necessary.
SKILL LEVEL
Advanced Beginner/Light Intermediate – This crochet bottle bag requires knowledge of how to single crochet, half double crochet and double crochet. You will also need to understand how to work in the round. This crochet water bottle holder also uses “wide” V stitches, so you’ll want to be familiar with skipping stitches and working in chain spaces.
The most advanced portion of this pattern is the handle but it’s easier than it sounds. Take it one step at a time. A full photo tutorial of the bag is available in the PDF pattern.
MATERIALS
Medium (4) weight cotton yarn of your choice.
Standard Size: Approx 100 yards or 2 oz
Yarn Used
Lion Brand Pima Cotton in colorways Spice (burnt orange), Vintage (white) and Rose Taupe (purple)
TOOLS
4 mm (G-6) hook – I used my favorite Furls Streamline Swirl
Tapestry needle
Scissors
Stitch Markers
GAUGE
You will check gauge after round 5. After completing round five, you should have a diameter of approximately 2.25 inches.
FINISHED SIZE
Sizes fit snug, but not too tight.
Standard Size Finished: 2.5 inch diameter/6 inches tall
Strap: Approximately 28 inches total, 14 inches from hanging point. This length can be easily customized.
The premium PDF includes both a large size water bottle cover (3.5 inch diameter/9 inches tall) AND instructions on how to make your own size. If the size listed in this free pattern doesn’t work for you, I would suggest checking out the inexpensive PDF on Etsy or Ravelry.
ABBREVIATIONS
- Ch – Chain
- Sl st – Slip stitch
- Sc – Single crochet
- Hdc – Half double crochet
- Dc – Double crochet
- Sts – Stitch(es)
- Sk – Skip
- V-Stitch – Double crochet V stitch. (dc, ch 2, dc) all in the same stitch or indicated space. This is a “wide” V stitch but for the sake of brevity in the pattern, it is called V Stitch.
NOTES
- Chain 4 to start a V stitch row always counts as a dc and 2 chains.
- Chain 1 to start a row never counts as a stitch. Always place your first stitch in the same stitch you chained out of.
- This pattern is worked completely in closed rounds. There will be reference of where to slip stitch to to close.
- The written pattern for the strap is seamless and therefore worked onto the bag. Please read the Seamless Strap Notes below. If you prefer a different strap or would like to use something that isn’t crocheted for the strap, go for it!
- This pattern calls for usage of a magic circle. You can use the magic circle or you can chain 4 and slip stitch to the first chain made to create a circle to work into. Your choice!
- There’s information at the end on how to “create your perfect size”. With so many of us using reusable water bottles these days, I wanted to make sure that you are able to create a water bottle bag that works best for you.
- If you wish to work the pattern as written but, for example, need the length to be longer, you can simply add additional rows as you see necessary.
- […] – Repeats are listed inside brackets
- (…) – Stitch counts are listed at the end of the row in parentheses and bold italics.
SEAMLESS STRAP NOTE
This pattern includes written instructions to create a “seamless” strap. This means that the strap is worked directly onto the body of the bag.
This strap is worked in 3 parts. The first part creates a base of chains to work the handle onto. Then, we work in 2 parts on the body of the bag and on the chains, so that both sides of the chains are worked and the strap is “seamless” and secure.
This sounds more intimidating than it is. You can do it!
A seamless strap is a great option for bags that carry heavier items (like water bottles). They are secure to the actual bag and have less of a tendency to go wonky.
The specific construction of the strap included in this bag stretches less than other straps might. It will still have some stretch, of course, but the length of the strap and the weight of the bottle will all be on the length of chains. This means that your strap will only stretch as far as the chains allow. This is a significantly less stretchy option than working a strap in short rows to achieve length.
You can, of course, make your own strap if you prefer!
You can also read more about how I like to reinforce my bag straps and the testing I did to find the least stretchy strap on my Non-Stretchy Strap Tutorial.
How to Make This Crochet Water Bottle Holder
Create a Magic Circle (click for tutorial) or chain 3, sl st to first ch made to form a circle.
Round 1 – In Magic Circle, chain 1 and place 6 sc. Sl st to first sc to close. (6)
Round 2 – Ch 1, place 2 sc in each st around. Sl st to first sc to close. (12)
Round 3 – Ch 1, [1 sc in first st, 2 sc in next]. Repeat inside brackets 6x. Sl st to first sc to close. (18)
Round 4 – Ch 1, [1 sc in each of the next 2 sts, 2 sc in next]. Repeat inside brackets 6x. Sl st to first sc to close. (24)
Round 5 – Ch 1, [1 sc in each of the next 3 sts, 2 sc in next]. Repeat inside brackets 6x. Sl st to first sc to close. (30)
Measure your work once you’ve completed Round 5. Your work should measure approx 2.25 inches across.
Rounds 6 through 11- Ch 1, place 1 hdc in each stitch around. Sl st to first hdc to close. (30)
Round 12 – Ch 4 (counts as dc + ch 2 here and throughout) and dc in the same stitch (this makes your first V-stitch). [Sk 2 sts, V-stitch next]. Repeat inside brackets until 2 sts remain. Sk 2 sts and sl st into the ch 4 space to close. (10 V-stitches – 10 ch 2 spaces, 20 dc)
Note: Slip stitching into the ch 4 space puts us “in” the “chain 2” space to start our new row.
Rounds 13 through 18 – Ch 4 and dc in same ch 1 space (first V-stitch). In each ch 2 space, place a V-stitch. At the end of the round, sl st into the ch 4 space to close. (10 V-stitches – 10 ch 2 spaces, 20 dc)
Round 19 – Ch 1, place 3 hdc in first ch 2 spc and each ch 2 spc around. Sl st to first hdc to close. (30)
Round 20 – Ch 1, place 1 sc in each stitch around. Sl st to first sc to close. (30)
Do not cut yarn. Continue on to creating your Seamless Strap.
SEAMLESS STRAP
Before we actually begin to crochet the strap, we want to mark 2 stitches. These 2 stitches help us place the long chains accordingly to make sure the strap is even and correct.
Place 1 stitch marker in the first stitch of the round (this is the stitch we slip stitched into to close Round 20). This is our first stitch marker. Then, not including the stitch we just marked, count 15 stitches across the row and place another stitch marker. This is our second stitch marker.
You should have 14 stitches between each stitch marker.
Now, chain 100. If you want a longer or shorter strap, chain more or less here. The more you chain, the longer your strap will be.
Being careful not to twist your chains, gently rotate the body of the bag until your second stitch marker is facing you, with the right side of the bag facing up. Slip stitch into the stitch with the second stitch marker, inserting your hook into the stitch from the front of work. Ignore the stitch with the first stitch marker for now.
Your chains will now resemble a strap (albeit a flimsy one!). We will now work 2 rounds on both sides of the bag and chains to make a sturdy strap.
Round 1 – Ch 1, place 1 sc in the first stitch (the same stitch we slip stitched the ch 100 into) and in each of the next 14 sts along the body of the bag. Then, rotate to work along the 100 chs. Place 1 hdc in each chain across. Sl st to the first sc made to close. (115)
You will now have 1 “round” created out of 1 half of the body of the bottle bag and the chains in which we have placed half double crochets.
Round 2 – Ch 1, place 1 sc in the first st and each of the next 114 sts. Sl st to first st to close. (115)
Tie off and cut yarn. Join yarn in the stitch with the first stitch marker that we previously ignored. This will be the unworked side of the handle.
Once your yarn is joined, continue:
Round 1 – Ch 1, place 1 sc in the first stitch (the same stitch we started our chain 100 from) and in each of the next 14 sts along the body of the bag. Then, rotate to work along the bottom of the 100 chs. Place 1 hdc in the bottom of each chain across. Sl st to the first sc made to close. (115)
You will now have 1 “round” created out of 1 half of the body of the bottle bag and the chains in which we have placed half double crochets.
Round 2 – Ch 1, place 1 sc in the first st and each of the next 114 sts. Sl st to first st to close. (115)
Cut yarn, weave ends. Your Standard Size Traveler’s Water Bottle Bag is complete!
That’s all there is to it!
Now you can go on your adventures with peace of mind knowing that you can carry all the water you need with this crochet water bottle bag and keep your hands free to take photos, pick flowers or build sand castles.
(Or to catch yourself from falling over, like I did!).
One of my greatest joys is seeing your finished crochet projects from my patterns or tutorials, so when you post to Instagram, don’t forget to tag me so I can show you some love! I’m @theloopholefoxcrochet. You can also share pictures on my recent posts on Facebook or within my Facebook group!
And don’t forget to pin this to your Pinterest boards, so you can remember it for later!
Don’t forget to join my Facebook Group so we can chat all about your creations! We are a group for crocheters of all experiences, all interests and love to hang out together. Come join the fun!

Shannon | Designer & Editor
Shannon helps crocheters find their next project and build their skills with in depth tutorials and crochet patterns on her blog, theloopholefox.com.
With more than a decade of crochet experience, Shannon knows that understanding why we do something matters just as much as how we do it. She teaches new techniques and crochet stitches in depth so you can crochet with confidence.
Looking for more Crochet Accessories like this Crochet Bottle Bag? Check these out!
Camden Can Cozy – Two toned and classic, you’ll love it!
Cactus Can Cozy – For all the desert lovers in your life.
Brivet Bag – Sometimes you just need a little bag to take your necessities with you. Allow this one to be your sidekick!
Halcyon Tote – Love Gingham? Me, too! You’ll love this tote bag.
Summer Tote – Did you enjoy the technique of making the strap for this project? The Summer Tote has the same strap technique!

One Comment
Comments are closed.