
Juni Crochet Reversible Dishcloth
Want to add a bit of pizazz to your cleaning routine? You’ll love the Juni dishcloth! With “reversible” texture, this crochet dishcloth pattern is fun to crochet and a pretty addition to your kitchen or bathroom.
Reversible texture? You heard that right!
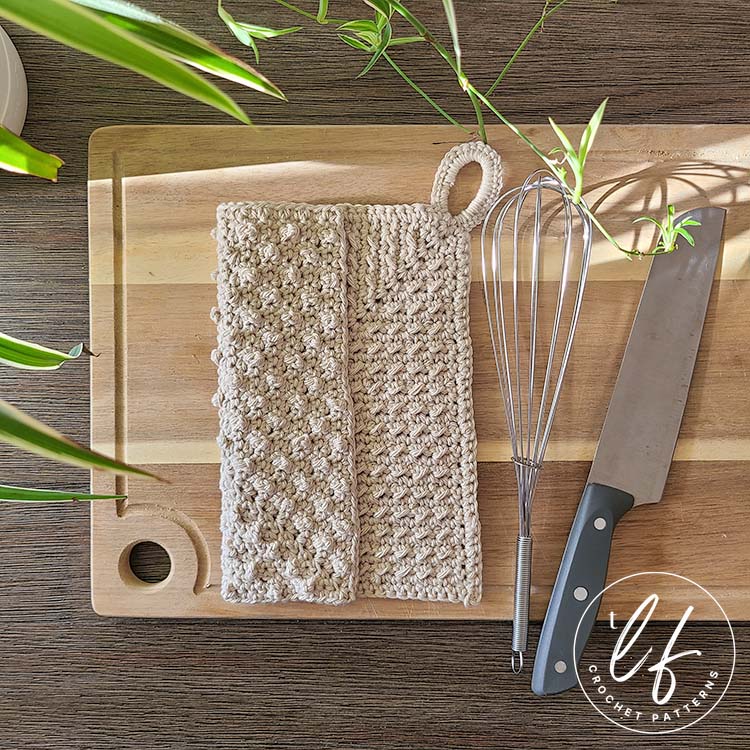
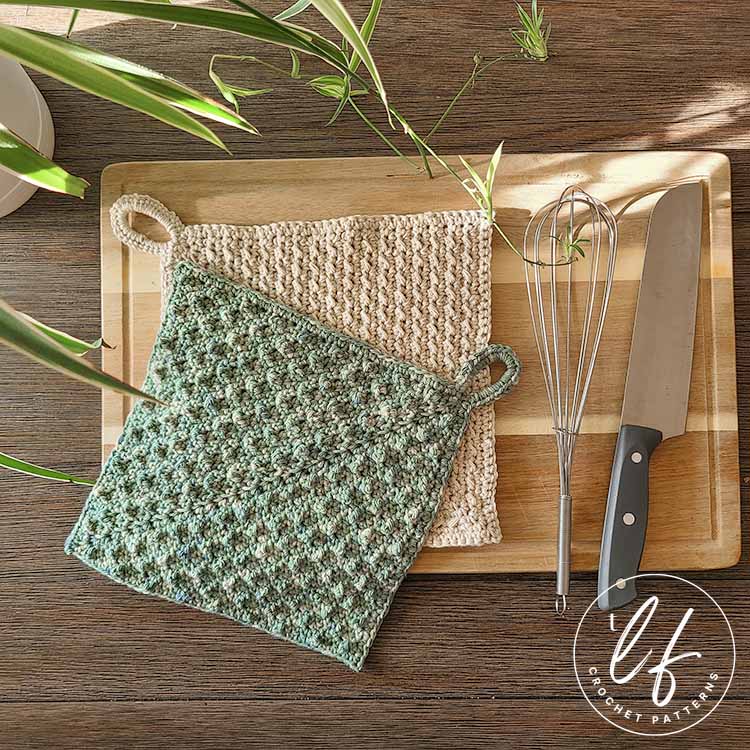
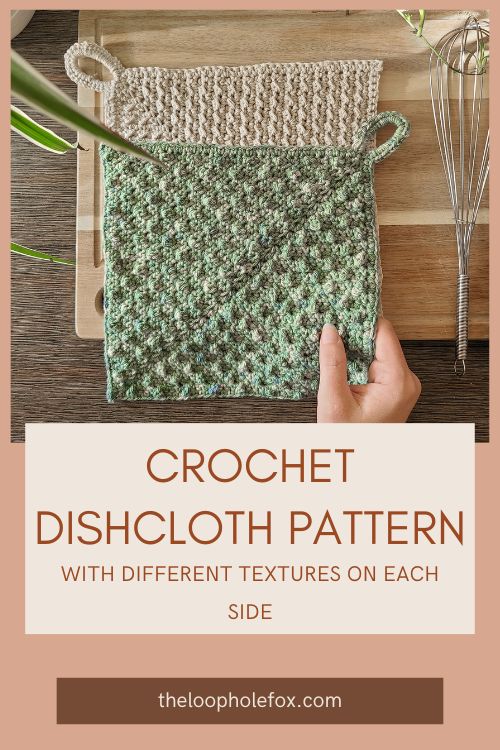
This crochet dishcloth pattern has two totally different textures on either side of the work. The best part? You don’t have to create two parts and sew them together! The textures are created row by row as one piece.
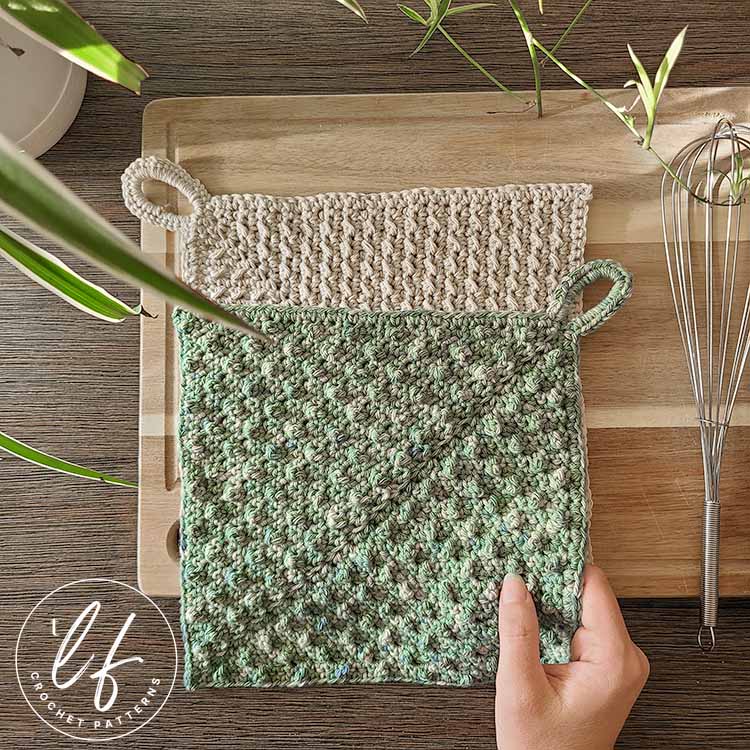
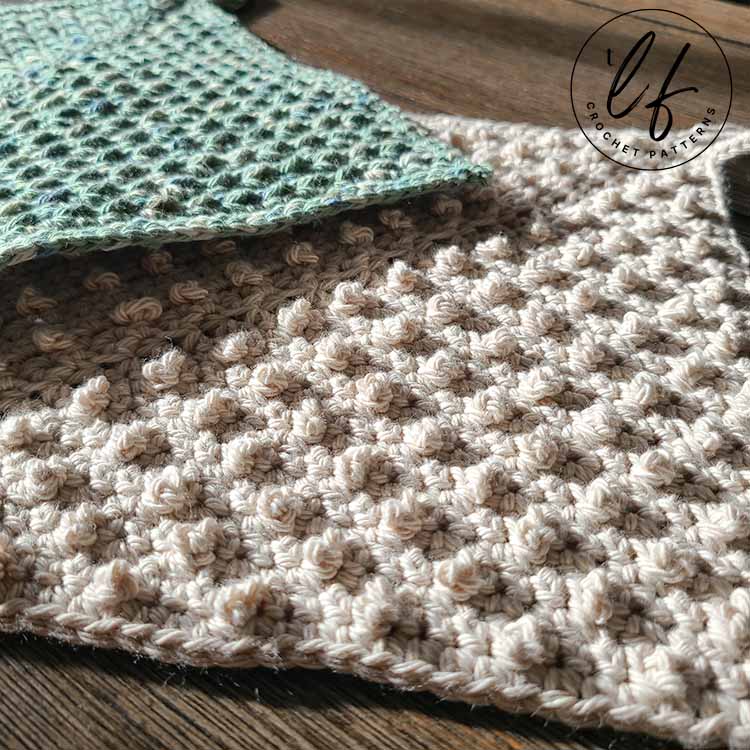
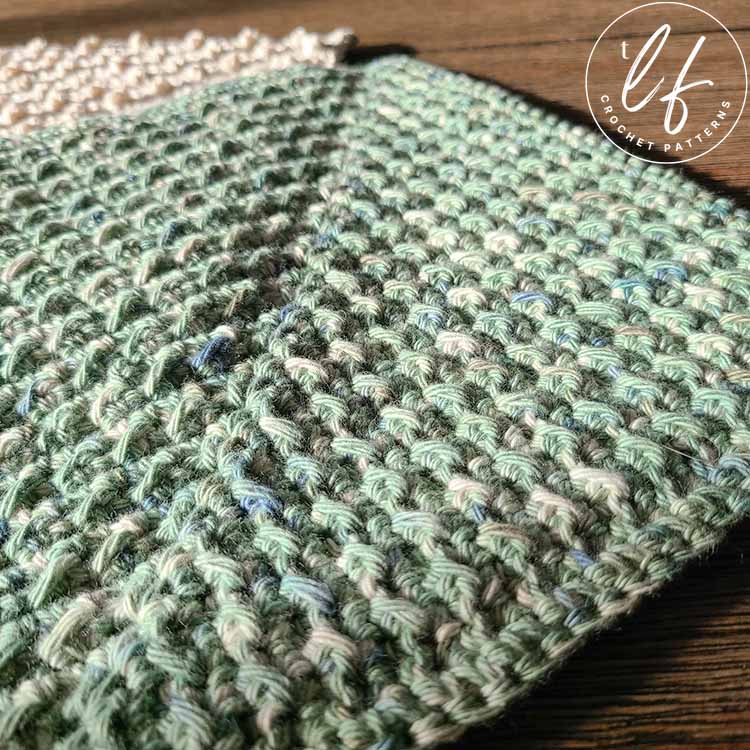
On one side of this crochet dishcloth pattern, we’ll be making what look like little bobbles. You can see the texture in the green dishcloth in the image above.
On the other side, we’ll be making a flat, wavy texture, like this:
The Inspiration for this Crochet Dishcloth Pattern
“Inspiration” for a crochet dishcloth pattern might sound like a bit much, but hear me out!
There’s no denying that all of us have to clean things. Whether that be our faces or the dishes, cleaning is a part of life. No one said that our cleaning products have to be boring, though!
When I think about the types of crochet patterns that I want to design so that you and I can create things for our homes, I want them to feel fun to make and be pretty to use. I could use that same old tea towel that has holes in it and is a solid color I’ve had forever…
Or, I could make a pretty crochet dishcloth that makes me smile when I use it.
When I set out to design the Juni crochet dishcloth pattern, I knew I wanted it to have a bunch of texture and be interesting to crochet. No more chain a number, single crochet in each stitch across. Not for this crochet dishcloth!
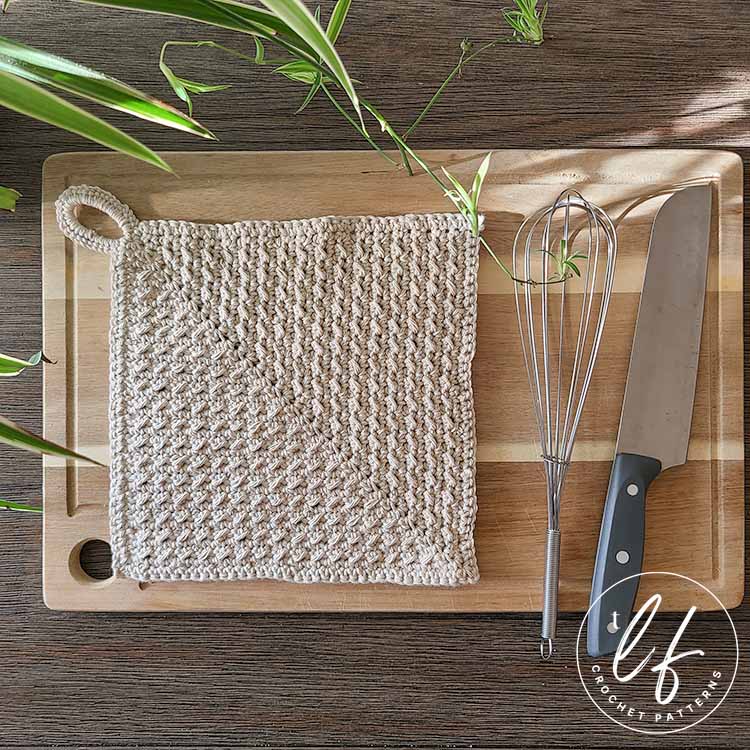
I was dead set on two things: Using the mitered square construction technique and what look like little mini bobbles as the texture. You can really see the mini bobble texture in the cream colored crochet dishcloth in the image above.
So, I wrote a pattern with just bobbles and created a sample. Now, while I liked the first take of this crochet dishcloth pattern with just the mini bobbles, I knew it needed something more.
I added the second texture on the other side of the crochet dishcloth and it was a match made in heaven. I absolutely love the two different textures together and that you can use one side or both for whatever you need to.
While this is technically a crochet dishcloth pattern, you absolutely can use it for other things! It would make a fantastic washcloth, too.
If you prefer a premium, ad-free PDF version of this pattern, you can grab one on in my Etsy shop by clicking the button below!
DISCLAIMER: This post includes affiliate links. This means, should you decide to purchase a product via one of these links, I will receive a small commission at no extra cost to you. I only recommend products I use and love (Or products I know others love, have heavily researched, know have good ratings and plan to purchase myself). These small commissions help to support this blog and continue keeping most of my patterns free. You can read more on my Privacy Policy, if you prefer.
How do I choose the best yarn for this crochet dishcloth pattern?
For this crochet dishcloth pattern, I used Lion Brand’s Pima Cotton in colorways Patagonia (variegated green) and Vintage (cream/white).
This yarn is a Medium (4) weight 100% cotton yarn which makes it fantastic for crocheting almost anything you can think of.
It works especially well for this crochet dishcloth pattern and I’ve used it previously in my Traveler’s Water Bottle Holder and my Millie Hanging Baskets.
You can use any brand of yarn that you like but, because this crochet dishcloth pattern is mean to create items that will be heavily used and be used with water, you should stick with 100% cotton.
100% cotton yarn is the best choice for items like this dishcloth because it dries well and can stand up to being washed frequently.
I especially like Lion Brand’s Pima Cotton because it’s soft and that makes it a fantastic cotton yarn to work with. Some cotton yarns feel rough and don’t feel great when running over your finger while crocheting.

Construction of this Crochet Dishcloth Pattern
As I mentioned earlier, this crochet dishcloth pattern is worked with a mitered square construction. This means that the work begins in one corner and grows in size with each row.
The really cool thing about mitered squares is that they always maintain the square shape (when crocheted correctly, of course!) so you can easily alter this crochet dishcloth pattern up or down in size simply by adding or subtracting rows from the pattern.
This construction is similar to how you would crochet a triangle shawl from the center wingspan out. With a triangle shawl, you increase the start and end of each row and work stitches into the chain 2 space which creates the point. All of these things increase the shawl’s size while maintaining the triangle shape.
The difference between a mitered square and a triangle shawl is simple. For mitered squares, you don’t increase the start or end of each row. You only increase into the chain 2 space that creates the point.
So, if you’ve never worked a project using the mitered square technique, don’t worry. It’s easier than it sounds!
Where to Get this Crochet Dishcloth Pattern
The Juni Dishcloth is a free crochet dishcloth pattern in this blog post. Scroll down to view the free version.
However, if you’d like a more robust pattern with a photo tutorial, the steps for the photo tutorial written out in full sentences and a printer friendly version of the PDF, I recommend you purchase the PDF pattern.
With the PDF pattern, you will receive a detailed photo tutorial for Rows 1 through 11 which will set you up to work this crochet dishcloth with confidence. The photos include details with arrows and dots to help identify all the stitches and their placement.
The PDF pattern also includes photo tutorials for the special stitches and for placing a border and finishing the hanging loop.
SKILL LEVEL
Light Intermediate – Crocheters looking to follow this pattern should know how to:
- Read a crochet pattern – There is NOT a video tutorial for this pattern
- Work the standard stitches (chain, single crochet, half double crochet and slip stitch)
- Create chain spaces and work into them
- Be willing to learn a new stitch (Picot Single Crochet)
- Place several stitches in the same stitch or space indicated
- Follow along with a pattern that creates a large loop (for the hanging loop) and is worked corner-to-corner in the mitered square technique.
While I believe an advanced beginner absolutely could follow this pattern, you will need to be familiar with these techniques and understand how to work them to feel confident doing so. The photo tutorial included in the PDF pattern will walk you through all the necessary steps with arrows and dots for further clarification, if you need it. The PDF pattern is available on Etsy!
MATERIALS
Medium (4) weight cotton yarn of your choice.
You will need approximately: 2.2 ounces/ 69 grams/ 125 yards
Yarn Used
Lion Brand’s Pima Cotton in colorways Patagonia (variegated green) and Vintage (cream/white). I used less than 1 skein per crochet dishcloth.
TOOLS
4 mm (G-6) hook – I used my favorite Furls Streamline Swirl in Cookies N’ Cream
Tapestry needle
Scissors
Stitch Markers – I would recommend one stitch marker for Rows 1 and 2.
FINISHED SIZE
Approximately 9 inches by 9 inches.
GAUGE
16 sc x 17 rows = Approximately 4 inches x 4 inches. Matching gauge perfectly isn’t required for this pattern.
Note: I am a tight crocheter, so my tension is usually tighter than others. Learn more about gauge and what this means here.
ABBREVIATIONS (US TERMS)
- Ch – Chain
- Sl St – Slip Stitch
- Sc – Single Crochet
- Hdc – Half Double Crochet
- Psc – Picot Single Crochet *Special Stitch
- St(s) – Stitch(es)
- […] – Repeats are listed within brackets.
- (…) – Instructions within parentheses indicate to work all stitches in the same stitch or space.
- (…) – Stitch counts are listed at the end of the row in parenthesis and bold italics.
NOTES
- The construction for this dishcloth is “mitered”, meaning that it is worked from the corner out and gets larger with each row. Because of this, you can make yours as big as you’d like to.
- Chain 1 to begin a new row does not count as a stitch.
- Because this crochet dishcloth pattern’s finished product is reversible, there is no right or wrong side; however, there is a different texture on each side.
- For this reason, we will call one side “Side A” and the other “Side B”.
- The texture of the stitch shows on the “wrong side” of the row.
- The Picot Single Crochet (that looks like mini bobbles) texture shows on Side B and the simple texture of the Even Moss Stitch shows on Side A.
- Throughout this pattern, you will be using slip stitches and working into them for the Even Moss Stitch. These will be easier to find than normal because they will always be placed next to a half double crochet which helps keep them taller to work into. Still, though, you should be sure to make sure you don’t make your slip stitches too tight.
- This pattern begins with a Magic Circle but you can chain 3 and slip stitch to the first chain made to form a circle, if you prefer.
Construction
This crochet kitchen towel pattern uses the mitered square construction. A mitered square means that we will start in one corner and each row we work will increase evenly to create a square. The great thing about mitered squares is that it is consistently square for the entirety of the project. Because of this, you can change the size of this dish cloth by omitting rows or working more rows as you please. This works similar to a triangle shawl worked from the center out with the exception that the square is not increased at the beginning and ending of the row.
Once we have completed the square, we will place a border to clean up the edges and finish the loop to hang it from.
Special Stitch – Picot Single Crochet
A Picot Single Crochet (PSC) is a method of working a single crochet in which we create chains in the indicated stitch before finishing the single crochet. This could also be considered a very tall Extended Single Crochet.
The chains we create will stick out on the “wrong side” of the work (in this pattern’s case, Side B) to create what look like mini bobbles.
To work a Picot Single Crochet (PSC), you will: Insert your hook into the indicated stitch, yarn over and pull a loop through. There will be 2 loops on the hook, just like working a standard single crochet.
Now, [yarn over and pull through the first loop only. 2 loops on hook]. Repeat inside brackets a total of 3x.
You will have essentially made a chain 3 in this stitch, with your original loop from the previous stitch still on the hook.
Finally, yarn over and pull through both loops to finish the PSC.
The 3 chains created will push out on the back side of the work, making a picot or what looks like a mini bobble. You can push this chain 3 to the “wrong side”, if you need to.
The Juni Dischloth – Free Crochet Dishcloth Pattern
Create a Magic Circle (click for tutorial) or chain 3, sl st to first ch made to form a circle.
Row 1 (Side A) – In Magic Circle, ch 15 and sl st to first chain made (this will be the loop for the towel later). Sl st into Magic Circle. Then, place 2 sc, ch 2, 2 sc in circle. Pull tail tight. (4 sts total, 2 each side of ch 2 spc)
The chain 15 is for the hanging loop which will be finished when we work the border. Ignore it completely for now. You can put a stitch marker in the first sc made in Row 1 so that it is clear where Row 1 starts and ends for Row 2.
Row 2 (Side B) – Ch 1, turn. 1 sc in each of the next 2 sts, (1 sc, ch 2, 1 sc) in ch 2 spc, 1 sc in each of the next 2 sts. (6 sts total, 3 each side of ch 2 spc).
Row 3 (Side A) – Ch 1, turn. 1 sc first st, 1 psc next st, 1 sc next st, (1 sc, ch 2, 1 sc) in ch 2 spc. 1 sc next st, 1 psc next st, 1 sc last st. (8 sts total, 4 each side of ch 2 spc)
Row 4 (Side B) – Ch 1, turn. 1 sc first st, 1 sl st next st, 1 hdc next st, 1 sl st next st. (1 sc, ch 2, 1 sc) in ch 2 spc. 1 sl st next st, 1 hdc next st, 1 sl st next st, 1 sc last st. (10 sts total, 5 each side of ch 2 spc)
Row 5 (Side A) – Ch 1, turn. 1 sc in each of the next 3 sts, 1 psc next st, 1 sc next st, (1 sc, ch 2, 1 sc) in ch 2 spc. 1 sc next st, 1 psc next st, 1 sc each of the next 3 sts. (12 sts total, 6 each side of ch 2 spc)
Row 6 (Side B) – Ch 1, turn. 1 sc first st, [1 sl st next st, 1 hdc next st]. Repeat inside brackets until 1 st remains before ch 2 spc. Sl st in remaining st. (1 sc, ch 2, 1 sc) in ch 2 spc. [1 sl st next st, 1 hdc next st]. Repeat inside brackets until 1 st remains. 1 sc last st. (14 sts total, 7 each side of ch 2 spc)
Row 7 (Side A) – Ch 1, turn. 1 sc first st. 1 psc next st, 1 sc each of the next 3 sts, 1 psc next st, 1 sc next st. (1 sc, ch 2, 1 sc) in ch 2 spc. 1 sc next st, 1 psc next st, 1 sc each of the next 3 sts, 1 psc next st, 1 sc first st. (16 sts total, 8 each side of ch 2 spc)
Row 8 (Side B) – Ch 1, turn. 1 sc first st, [1 sl st next st, 1 hdc next st]. Repeat inside brackets until 1 st remains before ch 2 spc. Sl st in remaining st. (1 sc, ch 2, 1 sc) in ch 2 spc. [1 sl st next st, 1 hdc next st]. Repeat inside brackets until 1 st remains. 1 sc last st. (18 sts total, 9 each side of ch 2 spc)
Row 9 (Side A) – Ch 1, turn. [1 sc in each of the next 3 sts, 1 psc next st]. Repeat inside brackets until 1 st before ch 2 spc remains. 1 sc in remaining st. (1 sc, ch 2, 1 sc) in ch 2 spc. 1 sc next st, [1 psc next st, 1 sc in each of the next 3 sts]. Repeat inside brackets to end of row. (20 sts total, 10 each side of ch 2 spc)
Row 10 (Side B) – Ch 1, turn. 1 sc first st, [1 sl st next st, 1 hdc next st]. Repeat inside brackets until 1 st remains before ch 2 spc. Sl st in remaining st. (1 sc, ch 2, 1 sc) in ch 2 spc. [1 sl st next st, 1 hdc next st]. Repeat inside brackets until 1 st remains. 1 sc last st. (22 sts total, 11 each side of ch 2 spc)
Row 11 (Side A) – Ch 1, turn. 1 sc first st, [1 psc next st, 1 sc each of the next 3 sts]. Repeat inside brackets until 2 sts remain before ch 2 spc. 1 psc next st, 1 sc in remaining st. (1 sc, ch 2, 1 sc) in ch 2 spc. 1 sc next st, [1 psc next st, 1 sc each of the next 3 sts]. Repeat inside brackets until 2 sts remain. 1 psc next st, 1 sc remaining st. (24 sts total, 12 each side of ch 2 spc
Rows 12 through 35 – Repeat Rows 8 through 11 in sequence. For example, Row 12 will repeat Row 8. Row 13 will repeat Row 9. Row 35 Will be a repeat of Row 11.
Do not cut yarn yet. Continue directly to creating the border and hanging loop.
Border and Hanging Loop
Round 1 – Ch 1, turn. Place 1 sc in each st across to ch 2 spc. In ch 2 spc, place (1 sc, ch 2, 1 sc). Place 1 sc in each st across to end of row. Ch 2, rotate to work along raw edge. Place 1 sc in side of each sc to end of row and ch 15 loop.
In ch 15 loop, place 30 sc (add more or less sc in the loop if needed. Loop should be snug with stitches but not wonky). Continue to work along final raw edge. Place 1 sc in side of each sc to end. Ch 2, sl st to first sc made to close. (174)
Cut yarn, weave in ends. You may wish to block the square to ensure “perfect” square shape. You’re done!
Want to get the PDF version of this crochet dishcloth pattern? Get your copy on Etsy by clicking the button below!
Did you love this free crochet dishcloth pattern? Make sure to share the love and Pin it to Pinterest!
I hope you love the Juni Dishcloth as much as I do! Enjoy!
Don’t forget to join my Facebook Group so we can chat all about your creations! We are a group for crocheters of all experiences, all interests and love to hang out together. Come join the fun!

Shannon | Designer & Editor
Shannon helps crocheters find their next project and build their skills with in depth tutorials and crochet patterns on her blog, theloopholefox.com.
With more than a decade of crochet experience, Shannon knows that understanding why we do something matters just as much as how we do it. She teaches new techniques and crochet stitches in depth so you can crochet with confidence.
Looking for more Useful Items to Crochet for Your Home? Check these out!
Radiance Bath Set
Farmhouse Hand Towel
Mitered Square Kitchen Towel
thank you for this pattern. I love how it is reversible.
Absolutely! It’s my pleasure. 🙂 I’m so glad you like it!