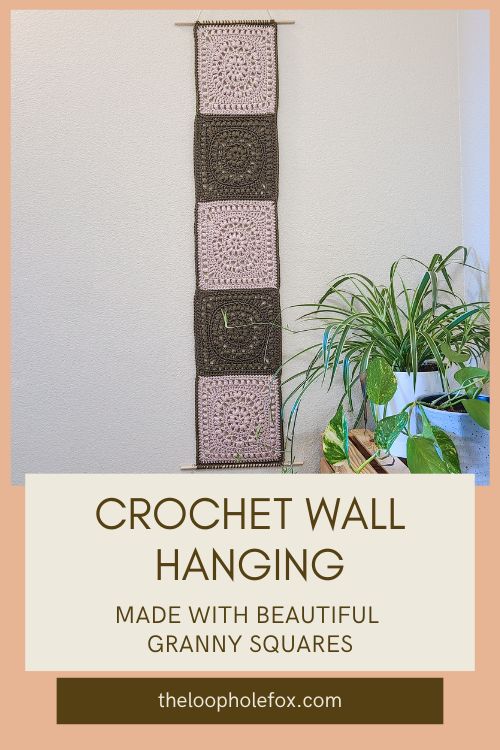
Marguerite Wall Hanging
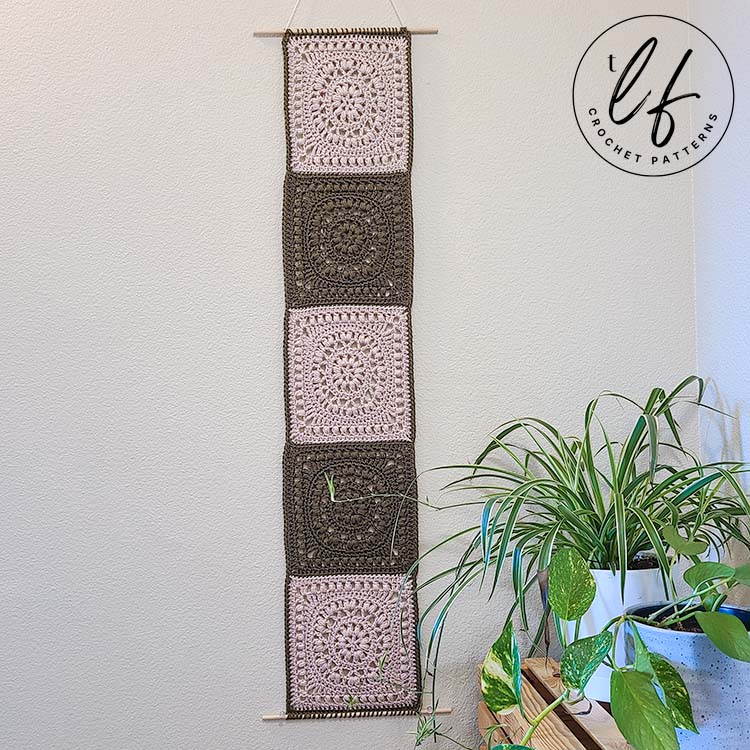
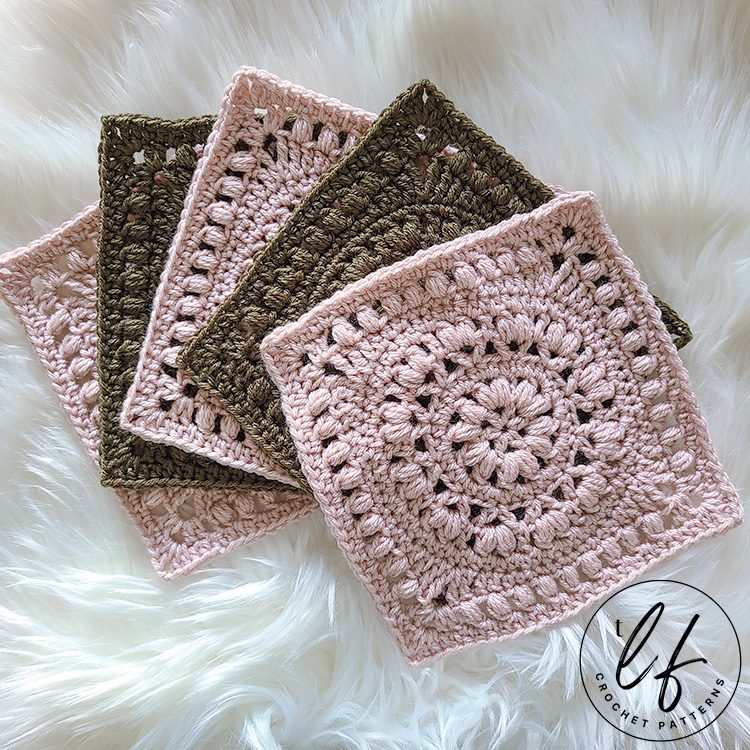
The Marguerite Wall Hanging brings a bit of warmth and whimsy into your home. Made from 5 “Marguerite’s Squares”, which are a celebration of puff stitches and lace, this granny square wall hanging is fun to make and easily customizable in length and colors.
There’s no denying that crochet granny squares are one of the most utilized types of crochet projects. Whether they are simple or complex, it’s hard to ignore the love crocheters have for these squares.
The Marguerite granny square wall hanging utilizes one crochet granny square pattern made several times to become a long, tapestry like decoration for your home. We make 5 granny squares, seam them together and place dowels on the short ends of the project.
Easily customizable, you can make as many or as few squares as you like to make your granny square wall hanging as long or as short as you like.
You can also change the colors, make every square a different color, make a rainbow of colors, make it in all one color or even crochet each square with two different colors to make this granny square wall hanging match your home.
I think this granny square wall hanging would also look great hanging horizontally instead of vertically. I considered hanging it horizontally but ultimately decided vertically because I had the shorter wooden dowels on hand.
The Inspiration for this Granny Square Wall Hanging
In 2021, I designed Marguerite’s Square for a blanket crochet-a-long in which some of the proceeds would be donated to a cancer charity. When asked to design a square for that event, I chose to celebrate the life of my beloved grandmother who unfortunately passed from cancer.
The square uses puff stitches and bits of lace structure to be a celebration of life and love. This granny square has remained super popular after all this time and I love it, too!
I wanted to use the square to make something more than just a square and not use it to make a blanket of my own (I have a lot of granny square blankets around here!). After some deliberation, I realized that a granny square wall hanging was the perfect use for Marguerite’s Square.
Just like the granny square was, I think crochet wall hangings are a celebration. We use them to decorate, to enjoy our space and to celebrate the colors we love and the textures that bring us joy.
What better inspiration for this granny square wall hanging is there?
This granny square wall hanging is displayed proudly just inside my entry way. Every time I come home and open the door, I see the celebration to welcome me home.
I hope that you are inspired to make the Marguerite granny square wall hanging for a celebration of your own and that it brings you joy and comfort.

If you prefer a premium, ad-free PDF version of this pattern, you can grab one on in my Etsy shop by clicking the button below!
DISCLAIMER: This post includes affiliate links. This means, should you decide to purchase a product via one of these links, I will receive a small commission at no extra cost to you. I only recommend products I use and love (Or products I know others love, have heavily researched, know have good ratings and plan to purchase myself). These small commissions help to support this blog and continue keeping most of my patterns free. You can read more on my Privacy Policy, if you prefer.
How do I choose the best yarn for this granny square wall hanging?
For this granny square wall hanging pattern, I used Lion Brand’s Basic Stitch in colorways Blush Heather (off white) and Olive (green).
This yarn is a Medium (4) weight acrylic yarn that is generally fantastic to work with. It has lovely stitch definition for an acrylic yarn and beautiful colors.
You can absolutely use almost any yarn you’d like, though!
This granny square wall hanging doesn’t have to be made with any certain fiber type or yarn weight. Of course, changing the yarn weight will mean that the size of the crochet wall hanging will be different than the pattern states but, as long as you enjoy the finished project, the size doesn’t matter.
I think this granny square wall hanging would be absolutely lovely in cotton or acrylic yarn or any blend of the two. Natural fibers will be totally fine as well but they may be a bit fuzzy which can take away from the stitch definition.
All of this is to say that you can absolutely make the Marguerite granny square wall hanging in almost any yarn you’d like. You could even use scrap yarn to make the squares!
Construction of this Granny Square Wall Hanging Pattern
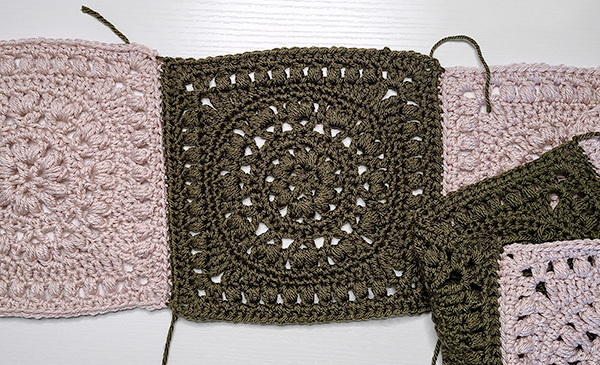
For this pattern, we will make 5 total squares. We will make 3 in our chosen Color A and 2 in our chosen Color B. Then, when the squares are complete, we will block them to make sure they’re as square as possible.
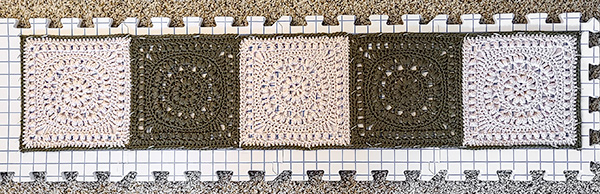
Once we have blocked all 5 squares, we will seam them together into a long rectangle in an alternating pattern. For example, we will have 1 Color A square followed by 1 Color B square followed by 1 Color A square. You can see this visually in “Part 1” of the graphic below.
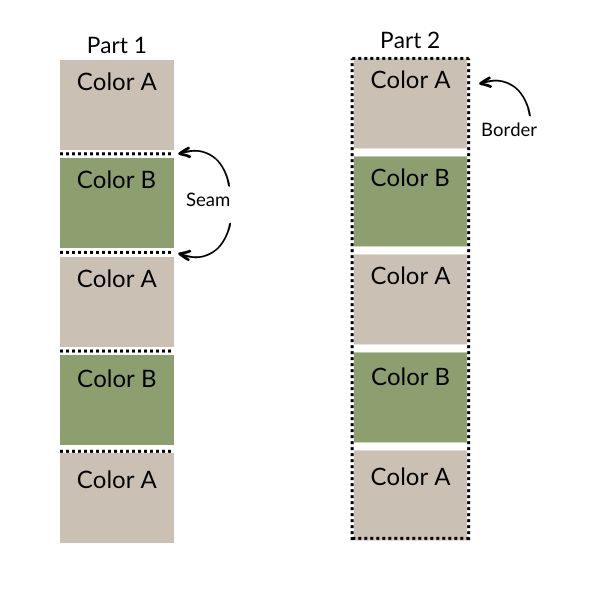
Once seamed, we will place a border around the entire long rectangle to create a clean border around the wall hanging, as seen in “Part 2” of the graphic above.

With all 5 squares seamed together and the border placed, we will block the long rectangle to ensure that it holds its shape and long edge.
Finally, we place the wooden dowels on the two short edges of the rectangle so that we can hang it. The two wooden dowels ensure that our short edges hang straight.
Where to Get this Granny Square Wall Hanging Crochet Pattern
The Marguerite Wall Hanging is a free crochet granny square wall hanging pattern in this blog post. Scroll down to view the free version.
However, if you’d like a more robust pattern with a photo tutorial, the steps for the photo tutorial written out in full sentences and a printer friendly version of the PDF, I recommend you purchase the PDF pattern.
With the PDF pattern, you will receive a detailed photo tutorial for all of the rounds of the square, which will help you feel confident making the squares. The photos include details with arrows and dots to help identify all the stitches and their placement.
The PDF pattern also includes photo tutorials for seaming the squares together to make the rectangle, placing the border on the squares and hanging it on dowels to finish the granny square wall hanging.
SKILL LEVEL
Light Intermediate – Crocheters looking to purchase and follow this pattern should know how to:
- Read a crochet pattern – There is NOT a video tutorial for this pattern
- Work the standard stitches (chain, single crochet, half double crochet, double crochet, treble crochet and slip stitch)
- Work in closed rounds
- Create chain spaces and work into them
- Be willing to learn a new stitch (Puff Stitch)
- Place several stitches in the same stitch or space indicated
- Have a basic understanding of seaming projects to follow along with my seaming instructions and/or have a preferred seaming method to use.
While I believe an advanced beginner absolutely could follow this granny square wall hanging pattern, you will need to be familiar with these techniques and understand how to work them to feel confident doing so.
MATERIALS
Medium (4) weight acrylic yarn of your choice in 2 colors (Color A and Color B). To make this pattern as written, you will need approximately:
Per Square Made: 30 g / 56 yards
Seaming, Border & Hanging: 15g / 28 yards
Total:
Color A: 90 g / 167 yards
Color B: 75 g / 139 yards
Yarn Used
Lion Brand Basic Stitch in colorways Blush Heather (off white – Color A) and Olive (green – Color B). I used 1 skein each with yarn left over from both.
TOOLS
5 mm (G-6) hook – I used my favorite Furls Streamline Swirl in Cookies N’ Cream
Tapestry needle
Scissors
Stitch Markers
2 12 inch wooden dowels for hanging
FINISHED SIZE
Approximately 8 inches wide by 42 inches long.
GAUGE
After completing Round 3, your work should be approximately 3 inches in diameter.
Note: I am a tight crocheter, so my tension is usually tighter than others. Because this pattern is a wall hanging, matching gauge perfectly isn’t a requirement. Learn more about gauge and what this means here.
GAUGE & BLOCKING NOTES
Watch your gauge between your Color A and Color B squares. Even if you use the same yarn, different colors can have slightly different gauges.
Matching my gauge is not as important as ensuring all of your squares end up the same size. You will want to block this wall hanging. I blocked the squares separately, then seamed them and then blocked it as a long rectangle before putting the dowels on for hanging. Blocking it twice helps to really ensure it holds shape.
ABBREVIATIONS (US TERMS)
- Ch – Chain
- Sl st – Slip stitch
- Sc – Single crochet
- Hdc – Half double crochet
- Dc – Double crochet
- Tr – Treble crochet
- Puff St – Puff Stitch* Special Stitch
- St(s) – Stitch(es)
- Spc(s) – Space(s)
- Sk – Skip
NOTES
- This wall hanging pattern consists of making 5 squares, seaming them into a long rectangle, placing a border and attaching it to dowels for hanging.
- The square pattern is worked in the round. It starts as a circle and then becomes a square.
- The square pattern is worked in closed rounds. You will always slip stitch to the first stitch of the round to close.
- This pattern calls for usage of a magic circle. You can use the magic circle or you can chain 3 and slip stitch to the first chain made to create a circle to work into.
- Chain 1 and chain 3 at the beginning of a round do not count as stitches. Always place your first stitch of the round in the same stitch you chained out of.
- Chain 4 at the beginning of the rounds always count as a double crochet and a chain 2.
- If you notice your square becoming larger than 8 inches x 8 inches, you can replace the half double crochet stitches with single crochets instead.
- Stitch counts are referenced at the end of each round in parentheses and italics (#).
- Repeats are listed in brackets [ ].
- Instructions within parenthesis indicate to work all instructions in the same stitch.
SPECIAL PATTERN NOTES (How to read later rounds of this pattern)
- In Round 8 of this pattern, there will be a repeat within a repeat. Throughout this pattern, you will see the repeats listed in brackets → [Repeat Instructions]. For the round that has a repeat within a repeat, you will see the full repeat in brackets and the inner repeat within braces ( {…} ) → [ Repeat Instructions {Inner repeat instructions}…].
- These instructions tell you that you will [repeat everything within the brackets a specific amount of times] and {repeat everything within braces within the bracketed repeat as instructed}.
- There is a full photo tutorial at the end of this PDF which will walk you through the rows and will visually show this round, if you need it.
- Instructions within parenthesis indicate to work all instructions into the same space. So, for example: (puff st, ch 2, puff st, ch 2). This set of instructions states to work a puff stitch, chain 2, puff stitch, chain 2 all within the same indicated space.
Construction
For this pattern, we will make 5 total squares. We will make 3 in our chosen Color A and 2 in our chosen Color B.
Once we have created all 5 squares, we will seam them together into a long rectangle in an alternating pattern.
Special Stitch – Puff Stitch
This pattern uses a puff stitch. Puff stitches are worked in a few different ways – so it is important to know which puff stitch to use.
For the purposes of this pattern, we will be working with a closed puff stitch. Check out my Puff Stitch Photo Tutorial to review images on how to work this stitch.
To work this puff stitch, you will: [Yarn over and insert your hook into the indicated stitch. Yarn over and pull up a loop.] Repeat inside of the brackets 2 more times in the same stitch. You should now have 7 loops on your hook. Yarn over and pull through 6 of the 7 loops. 2 loops on hook, yarn over, pull through 2.
Marguerite Wall Hanging – Free Granny Square Wall Hanging Pattern
Make 5 total squares using the following pattern.
Make 3 with your Color A and 2 with your Color B:
Create a Magic Circle (click for tutorial) or chain 3, sl st to first ch made to form a circle.
Round 1 – In magic circle, ch 4 (counts as dc + ch 2 here and throughout). [dc, ch 2] Repeat inside brackets 5x. Pull magic circle tail tight. Sl st into 2nd ch of ch 4 to close. (6 dc, 6 ch 2 spcs)
Round 2 – Ch 1, in each ch 2 spc, work (puff st, ch 2, puff st, ch 2). Sl st to top of 1st puff st to close. (12 puff sts, 12 ch 2 spcs)
Round 3 – Ch 1, work 1 hdc in top of each st and 2 hdc in each ch 2 spc around. Sl st to first hdc to close. (36 sts)
Round 4 – Ch 4, dc same st. Ch 1, [sk 2 sts, (dc, ch 2, dc) next, ch 1]. Repeat inside brackets 11x. Sk last 2 sts. Sl st to 2nd ch of ch 4 to close. (24 dc, 12 ch 2 spcs, 12 ch 1)
Round 5 – Ch 1, [in ch 2 spc, work (puff st, ch 1, puff st), ch 1, sk 1, dc in ch 1 spc, ch 1, sk 1] Repeat inside brackets 12x total. Sl st to 1st puff st to close. (24 puff, 12 dc, 36 ch 1)
Round 6 – Ch 1, place 1 hdc in top of each st and 1 hdc in each ch 1 spc around. Sl st to first hdc to close. (72 sts)
Round 7 – Ch 3, work [tr, dc next 2 sts, hdc next 2 sts, sc next 7 sts, hdc next 2 sts, dc 2 next sts, tr next, (tr, ch 2, tr) next st]. Repeat 4x total. Sl st to 1st tr to close. (19 sts each side, 76 sts total, 4 ch 2 spcs)
Round 8 – Ch 1, [puff st, ch 1, sk 1] Repeat inside brackets across side to ch 2 spc. In ch 2 spc, work (2 dc, ch 2, 2 dc). [Ch 1, sk 1, {puff st, ch 1, sk 1} Repeat inside braces across side to ch 2 spc. In spc work (2 dc, ch 2, 2dc)]. Repeat inside brackets 3x. Ch 1, sk 1, sl st to first puff to close. (36 puffs, 40 ch 1 sps, 4 ch 2, 16 dc)
Round 9 – Ch 1, [In each st and ch 1 spc to corner ch 2 spc, work 1 hdc. In ch 2 spc, work (2 dc, ch 2, 2dc)]. Repeat 4x total. 1 hdc last 2 sts and ch 1 spc. Sl st to first hdc to close. (27 sts each side, 108 total)
Finish off, weave ends.
Once all 5 squares are complete, prepare to seam them into 1 long rectangle.
Block your squares separately now, especially if they are slightly different sizes.
Once happy with your squares (whether or not you have chosen to block them now), move on to “Finishing Instructions: Seaming the Squares”.
Finishing Instructions – Seaming the Squares
With all 5 squares complete, we can now seam them into a long rectangle. We will seam the squares in alternating colors: Color A, Color B, Color A, Color B, Color A. Similar to how the squares are stacked in the image above.
You can use whichever seaming method you prefer to seam the squares into a rectangle. Regardless of whichever seaming method you choose, they’ll look great!
I used the Invisible Whip Stitch to seam mine together. If you’d like to use a different seaming method, that’s okay! You can skip this section, seam how you prefer and move on to the Border Instructions.
Here’s how to Invisible Whip Stitch:
Take the first two squares (1 Color A and 1 Color B) and place them together so that their right sides are facing each other and the wrong sides are facing out. Now we will seam 1 of the 4 edges together using the Invisible Whip Stitch. The seam is “invisible” because it is worked through only the Back Loop Only of both squares. This makes it so that when you turn the squares so that the right side is facing, the seam won’t be noticed.
To do this, we need to identify the back loops only of both squares.
For the square on the bottom, this will be the back loop as we normally would see it – furthest away from us.
However, for the square on the top, the back loop only is going to be what would look like the front loop only to us. This is because the right side of the square is facing away from us, not toward us.
When we create our whip stitch to seam these two squares together, we will only use these loops. This makes the seam “invisible”.
Let’s seam these two squares together: Cut a length of your Color B yarn approximately 2x longer than the side of the square and thread your tapestry needle. This will ensure you have enough yarn to both seam and weave in ends.
Start in the right chain 2 spaces of the squares and work our way across to the left (if you’re left handed, you’ll start in the left hand corner and work your way across to the right).
Beginning with the chain closest to the first stitch of this side, insert your tapestry needle into the “back loop only” of the chain on the square that’s on top, and then the back loop only of the chain of the square on the bottom. (This may seem a little fiddly. Do your best here. If it’s not perfect, that’s okay!)
Pull the yarn through the stitches until the tail sticking out is just long enough to tie off and weave in the ends (we will do this later).
Then, bring your tapestry needle over the top of the work and to the front. Insert the needle into the back loop only of the next stitch on the top square and the back loop only of the next stitch on the bottom square. Pull the yarn through.
Continue seaming the stitches in this method across. Make sure to seam the corresponding stitches together. There are 27 stitches on each side, plus the chain 2 spaces. So you will seam a total of 29 stitches together using this method.

Once you have seamed all the way across the side of the squares, you can tie off your seam and weave the ends into the square of the same color. Turn your squares right side up and lay them flat. You’ll notice that the seam is “invisible”.
Seam all 5 squares together into a long rectangle. Alternate the colors of the squares as you seam. Tie off seaming ends and weave into square of corresponding color.
Want a photo tutorial to help with all the steps of using the Invisible Whip Stitch to seam these squares? Grab a copy of the PDF pattern on Etsy!
Finishing Instructions – Border
In the 4 corners of the rectangle, you will have chain 2 spaces that have NOT been used for seaming. Along the long edges, you will have chain 2 spaces that have been used for seaming.
For the sake of clarity, I will call the 4 corner chain 2 spaces “Corner Ch 2 spcs” and the seamed chain 2 spaces “Joined Ch 2 Spcs”. Keep this in mind as we work across the row.
Let’s place the border:
Lay your long rectangle flat with the long sides horizontal. Join Color B in top right Corner Ch 2 Spc. (If you’re left handed, join in the top left corner). You will be working across the long side of the rectangle first, then turning to work along the short side.
Border Round 1 – Place 1 sc in ch 2 spc in which yarn was joined. Then, place 1 sc in each st until the Joined Ch 2 Spcs. Place 1 sc in each Joined ch 2 spc. Continue placing 1 sc in each stitch across the side and 1 sc in each of the Joined Ch 2 Spcs until you reach the Corner Ch 2 Spc. In this chain 2 spc, place (1 sc, ch 2, 1 sc).
Rotate and place 1 sc in each stitch across the short edge to the next Corner Ch 2 Spc. In this chain 2 space, place (1 sc, ch 2, 1 sc). Rotate to work along the next long edge.
Repeat the previous long edge instructions across until you reach the next Corner Ch 2 spc. In this chain 2 space, place (1 sc, ch 2, 1 sc). Rotate to work along the final short edge and place 1 sc in each st across. When you reach the final Corner Ch 2 Spc, place 1 sc in the ch spc, ch 2 and sl st to the first sc to close.
Cut yarn and weave ends. Prepare to block the rectangle.
Finishing Instructions – Blocking
With the border placed on the rectangle, I highly recommend blocking it. This will help make sure all of your edges are straight and the granny square wall hanging has a clean, professional shape. Using blocking mats (or other item that you can keep flat and pin your work to), lay the rectangle flat. Pin into shape using T-Pins, blocking combs or other pin-like item.
Because the yarn is acrylic, you will want to either: Steam block it or, if you don’t have a clothes steamer or iron with steam option, wet the project with a spray bottle and use a hair dryer to heat the fabric. Acrylic yarn needs moisture + heat to retain shape after blocking.
Leave your project to dry. Once dry, remove the pins and prepare to place the dowels on the short sides of the work so that the project can be hung.
Finishing Instructions – Placing the Dowels for Hanging
Cut a length of your Color B yarn that is approximately 3x as long as the short edge of the rectangle. This will ensure you have enough yarn to hang the project and weave in the ends.
Thread your needle and lay the dowel perpendicular to the short edge of the rectangle. Insert your tapestry needle into the corner chain 2 space and pull the yarn through until a tail just long enough to tie off and weave in is left out.
Then, bring your tapestry needle and working yarn up and over the dowel, toward you. Go under the dowel and into the next stitch from back to front and pull tight. You may have to hold your tail yarn in place this time to ensure it doesn’t slip.
Continue attaching the dowel to the short edge of the rectangle. Bring your needle and working yarn over the dowel toward you, then under the dowel and into the next stitch from back to front and pull tight. Make sure that you also pick up the chain 2 space at the end. Once at the end, flip the edge with the dowel up so that the project is folded over and you can see the backside.
Tie off the yarn and weave in the end in the Color B border stitches. Make sure to go back to the original tail yarn to tie off and weave in the ends, too.
Now attach your second wooden dowel to the other short edge.

Once both dowels are attached, your work is complete! You can attach a length of yarn to one of the dowels for the work to be hung from, you can rest the dowel on pins or hang the wall hanging however you prefer to.
You’re done! Enjoy!
Want to get the PDF version of this crochet dishcloth pattern? Get your copy on Etsy by clicking the button below!
Did you love this free crochet wall hanging pattern? Make sure to share the love and Pin it to Pinterest!
I hope you love the Marguerite granny square wall hanging as much as I do! Enjoy!
Don’t forget to join my Facebook Group so we can chat all about your creations! We are a group for crocheters of all experiences, all interests and love to hang out together. Come join the fun!

Shannon | Designer & Editor
Shannon helps crocheters find their next project and build their skills with in depth tutorials and crochet patterns on her blog, theloopholefox.com.
With more than a decade of crochet experience, Shannon knows that understanding why we do something matters just as much as how we do it. She teaches new techniques and crochet stitches in depth so you can crochet with confidence.