How to Crochet the Lemon Peel Stitch (AKA the Crochet Seed Stitch)
Whether you’re a beginner looking to advance your skills and play around with the basic stitches you already know or you’re an experienced crocheter looking for a mindless and relaxing stitch, you can’t go wrong with the crochet Lemon Peel Stitch.
The crochet Lemon Peel Stitch, also commonly known as the crochet Seed Stitch, is incredibly simple to learn and you’ll be off crocheting in no time. While it is perhaps one of the easiest “stitches”, that doesn’t mean it doesn’t boast awesome texture… It absolutely does!
This tutorial will walk you through how to crochet the Lemon Peel Stitch (AKA the Crochet Seed Stitch), including everything you need to know to create your own projects.

What is the Crochet Lemon Peel Stitch (AKA Crochet Seed Stitch)?
The Lemon Peel stitch is a deceptively simple stitch that gives a wonderful, soft pebble texture that’s fantastic for almost any project you can think of.
Using only single crochet and double crochet, the Lemon Peel Stitch is accessible to beginners who are looking to start playing around with their known stitches.
What makes this stitch special is the subtle texture it creates. The single crochet stitches, being shorter, squish down the double crochet stitches which make them pop out just slightly to create a bumpy, pebble like texture.
It’s also a wonderful stitch for experienced crocheters who’d like something simple and easy to work on while watching their favorite TV show.
While it’s not the most dense stitch out there, the Lemon Peel is still a stitch without a lot of holes or gaps. This makes it fantastic for any project that needs to have a little texture but not be “open”.
My Eunoia Cowl is a fantastic example. The cowl pattern uses this stitch to add a little bit of texture to the twisted nature of the cowl. While mainly the cowl is a Möbius cowl (an infinity twist, basically), it needed a little extra something and the Lemon Peel Stitch (or Crochet Seed Stitch) was a fantastic addition.
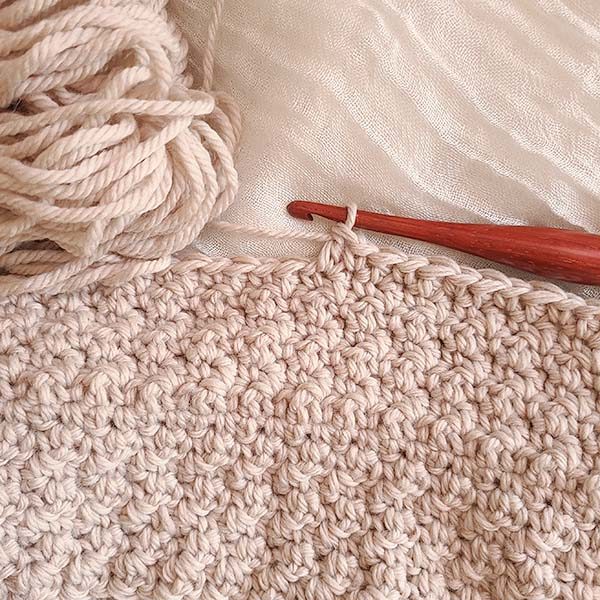
You can see the texture of the Lemon Peel Crochet Stitch in this work in progress photo of my Eunoia Cowl.
What stitches should I know before I try the Crochet Lemon Peel Stitch?
Before you try this crochet stitch, you should know the basic crochet stitches. This means you should know and feel confident creating chains, single crochets and double crochets.
You will also need to know how to work in rows. If you’re far enough along in your crocheting journey that you can work in rows and have your work look like a square – not a Dorito (it’s a rite of passage!), you’re all set to follow this Lemon Peel Stitch Crochet Tutorial.
This tutorial assumes that you have basic understanding of chains, single crochet and double crochet. If you don’t know these stitches yet, you’ll need to learn them first.
What yarn is best for the Lemon Peel Stitch?
Any yarn. Seriously!
This stitch looks fantastic in any yarn, any weight, any fiber. Play around with different fibers, hook sizes and yarn weights to see how each could affect the texture of the stitch.
How is this stitch abbreviated?
I have never seen the Lemon Peel Stitch or the crochet Seed Stitch abbreviated in patterns. That’s not to say that it isn’t, but I think it’s unlikely to see it.
Typically, this stitch is easier to write out in repeats or even as “alternated” stitches. It’s probably unlikely you’ll see it with an abbreviation in a pattern.
You’ll see an example of how the crochet Lemon Peel Stitch would be written in one of my patterns below.

Lemon Peel Stitch Crochet Photo Tutorial
This tutorial will walk you through how to crochet the Lemon Peel Stitch (or Crochet Seed Stitch) step-by-step with photos along the way. There will be arrows and dots to help identify the steps as clearly as possible.
Ready to get started? Let’s go over the technical stuff first.
DISCLAIMER: This post includes affiliate links. This means, should you decide to purchase a product via one of these links, I will receive a small commission at no extra cost to you. I only recommend products I use and love (Or products I know others love, have heavily researched, know have good ratings and plan to purchase myself). These small commissions help to support this blog and continue keeping most of my patterns free. You can read more on my Privacy Policy, if you prefer.
YARN AND HOOK USED IN THIS TUTORIAL
In my tutorial photos, I’m using Bernat Maker Home Dec in colorway Aqua and my Furls Ebony Streamline Wood 8mm (L-11).
To practice the crochet Lemon Peel Stitch, you can use any yarn and hook you like. I like to use big yarn so it’s easy to see in tutorials, but you can use whatever you like for practice.
STITCH MULTIPLE (& WHAT THIS MEANS IN PRACTICE)
The crochet Lemon Peel Stitch requires a stitch multiple of 2 stitches. This is the stitch multiple, not the starting amount of chains.
What this means is you will need to create an ODD amount of chains to include 1 turning chain. This will give you an EVEN amount of stitches.
This means you can create any odd amount of chains and it will work with this stitch. You can even work with 3 chains but your project would be quite small. 😉
For example: If you chain 21, you will have 20 stitches.
WRITTEN PATTERN EXAMPLE
Earlier in this post, I stated that most designers would likely write out the instructions instead of saying “Crochet the Lemon Peel Stitch across the row”. It makes more sense to write it out in pattern shorthand, I think, and I’ve never seen it not written out.
Here’s an example of how I would write the crochet Lemon Peel Stitch in one of my patterns:
Row 1 – 1 sc 2nd ch from hook, 1 dc next ch. [1 sc next ch, 1 dc following ch]. Repeat inside brackets to the end of the row. Your last stitch will be a dc.
Row 2 – Ch 1, turn. 1 sc first st. 1 dc next st. [1 sc next st, 1 dc following st]. Repeat inside brackets to the end of the row. Your last stitch will be a dc.
Then, unless I was doing something fancy, Row 2 would be repeated throughout the project.
Step by Step Instructions – Row 1
Now that we have the technical stuff out of the way, let’s walk step by step through how to work the crochet Lemon Peel Stitch.
A note about this tutorial: I work in the back bump of the chains almost always. This technique gives projects a much more professional finish, the bottom of the chains are easier to work into for borders, etc. You will see me working in the back bump of the chains for Row 1. If you don’t know how to do this, you can check out my Crochet in Back Bump of Chains tutorial.
You can work into the chains as you normally would without messing anything up, though. 🙂
Chain any odd amount. In this tutorial, I have chained 11. This means I will have 10 stitches across the row.

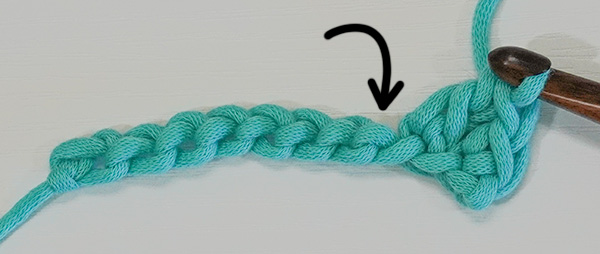
Begin Row 1 of the crochet Lemon Peel Stitch by placing 1 single crochet in the second chain from the hook. In the image above, a black arrow points downward to this stitch. You can see the single crochet made in the image below.

Next, we place 1 double crochet in the next chain. In the image above, a black arrow points downward to the next chain. You can see the double crochet made in the image below.

Next, we place 1 single crochet in the next chain. In the image above, a black arrow points downward to the next chain. You can see the single crochet made in the image below.

Then, we place 1 double crochet in the next chain. In the image above, a black arrow points downward to the next chain. You can see the double crochet made in the image below.

All we have essentially done so far is alternate 1 single crochet and 1 double crochet across the row.
In the image above, you can see my first 4 stitches of Row 1. Black and pink dots are over the remaining 6 chains of my small swatch.
We will continue to alternate placing 1 single crochet in the next chain (black dots in image above) and 1 double crochet in the following chain (pink dots in the image above) to the end of the row.

Here I am at the end of my Row 1 and I have 1 chain left. A black arrow points down to this last chain. The last chain can be easy to miss for beginners, so I wanted to be sure to include an image of it.
In this last chain, we will place a double crochet as shown in the image with the black and pink dots.
The last stitch of this row, and all rows, should always be a double crochet.

The image above shows Row 1 complete. Row 1 starts with a single crochet and ends with a double crochet.
This happens because we have an even amount of stitches and we alternate 2 stitches. Regardless of the amount of stitches you have, provided you have an even number of stitches as required, your row will always start with a single crochet and end with a double crochet.
You might be wondering… Won’t this throw off the height of the sides? Wouldn’t this make the project wonky?
Don’t worry! You’ll see how it works out when we work the next row.
Crochet Lemon Peel Stitch Row 2 (and all following rows)
Row 2 (and all following rows) is worked the same as Row 1 but it looks different because now we are working into stitches and not chains.
The main thing to note about Row 2 (and all following rows) is: You will always place a single crochet into the double crochet from the previous row and you will always place a double crochet into the single crochet from the previous row.
To begin Row 2, chain 1 and turn your work. This chain 1 does not count as a stitch, so we will always place our first stitch into the first stitch of the row (or the last stitch placed in the previous row).

Place 1 single crochet in the first stitch of the row, as a black arrow pointing downward indicates in the image above.
Notice that the stitch we’re placing our single crochet into is the last double crochet placed from the previous row.
You can see the first single crochet of the row made in the image below.

Now, just like with Row 1, we will place 1 double crochet in the next stitch. A black arrow points downward to the next stitch in the image above.
Notice that the stitch we’re placing our double crochet into is a single crochet from the previous row.
You can see the double crochet placed in the image below.

Next, place 1 single crochet in the next stitch. A black arrow points downward to this stitch, a double crochet from the previous row.
You can see the single crochet placed in the image below.

Next, place 1 double crochet in the next stitch. A black dot is over this stitch, a single crochet crochet from the previous row.
You can see the double crochet placed in the image below.

For Row 2, all we have essentially done so far is alternate 1 single crochet and 1 double crochet across the row – The same as in Row 1!
In the image above, you can see my first 4 stitches of Row 1. Black and pink dots are over the remaining 6 stitches of my small swatch.
We will continue to alternate placing 1 single crochet in the next stitch (black dots in image above, double crochet stitches from the previous row) and 1 double crochet in the following stitch (pink dots in the image above, single crochet stitches from the previous) to the end of the row.

Here I am at the end of Row 2 and I have 1 stitch left. A black arrow points down to this last stitch. The last stitch can be easy to miss for beginners, so I wanted to be sure to include an image of it.
In this last stitch, we will place a double crochet as shown in the image with the black and pink dots.
The last stitch of this row, and all rows, should always be a double crochet.

The image above shows Row 2 complete. Row 2 starts with a single crochet and ends with a double crochet, just like Row 1.

Here I’ve worked 5 rows on a small swatch of the Lemon Peel Crochet Stitch. You can see how the texture really starts to stand out after a few rows.
So, what do I do now?
To continue practicing the crochet Lemon Peel Stitch, you can simply continue crocheting Row 2 for practice.
You can easily make washcloths, hand towels, baby blankets or anything else you can think of using this stitch.
If you’re feeling a little adventurous and have the skills to work in the round, you can try my Eunoia Cowl! This is NOT a beginner pattern and absolute beginners will find this pattern out of their skill level. But it is a fun way to see how this stitch can be used for those who are at least advanced beginners.
If you’re a beginner, alternating between single crochet and double crochet stitches might feel a bit strange and therefore throw off your tension. Don’t worry – this is normal!
Any time you learn a new stitch, you’ll be super focused which can create a tighter tension. As you get used to the new stitch, your tension will loosen. You’ll know this is the case for you if you continue working rows and the rows start bowing out a bit.
It’s just your tension loosening as you get used to this stitch. You can unravel your swatch and start over. You’ll notice now that you’re comfortable with the stitch, your project will go straight up instead of bowing outward.
Did you enjoy this tutorial on the crochet Lemon Peel Stitch?
Share it with others and Pin it to Pinterest!
Thanks so much for hanging out with me today!
Don’t forget to join my Facebook Group so we can chat all about your creations! We are a group for crocheters of all experiences, all interests and love to hang out together. Come join the fun!
Shannon | Designer & Editor
Shannon helps crocheters find their next project and build their skills with in depth tutorials and crochet patterns on her blog, theloopholefox.com.
With more than a decade of crochet experience, Shannon knows that understanding why we do something matters just as much as how we do it. She teaches new techniques and crochet stitches in depth so you can crochet with confidence.
Looking for more Crochet Stitch Tutorials? Try these!
How to Crochet the Trinity Stitch
How to replace turning chains with Stacked Single Crochet
How to Crochet the Suzette Stitch
How to Crochet the Even Moss Stitch
How to Crochet the Arcade Stitch
How to Crochet the Linked Double Crochet
The Magic Circle: How and Why it Works
Foundation Single Crochet and Why It’s Awesome
Foundation Half Double Crochet and Double Crochet and Why They’re Also Awesome


