
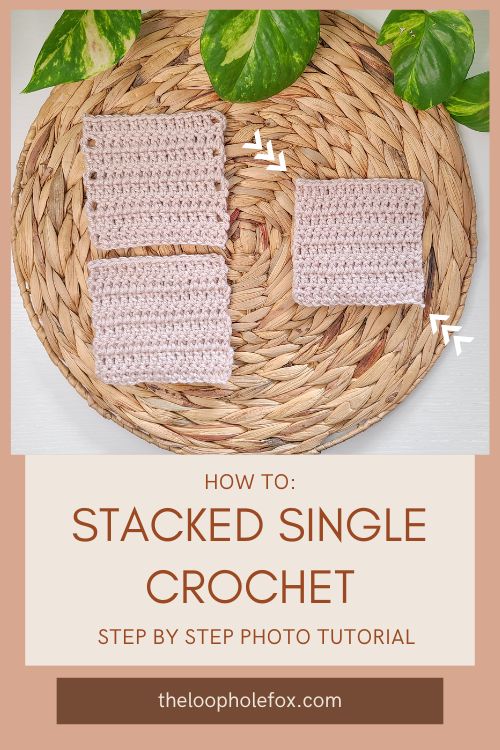
How to Stacked Single Crochet
If you’ve ever crocheted a project with a tall stitch like a double crochet that has big “gaps” on the sides or has bumpy sides that you don’t like, your crocheting-life will be changed by the Stacked Single Crochet. This stitch eliminates the turning chains for new rows which means that you don’t have to battle with the chain 2 bump or wonky chain 3 gap. Amazing!
Just the term Stacked Single Crochet can sound intimidating but there’s no reason to worry. This technique is much simpler to work than it sounds. In this tutorial, we will walk step by step through how to work the Stacked Single Crochet with highlights and arrows for clarity. Once you’ve learned how to use this technique, you can learn how to increase and decrease when you start a row with the Stacked Single Crochet.
The Stacked Single Crochet is also commonly known as the “Stacked Double Crochet”. This can be a little confusing, so let’s clarify this up front. For the technique, we will be stacking single crochets to create the height of taller stitches, like double crochets. “Stacked Double Crochet” is essentially referring to the finished stitch made of 2 stacked single crochets.
It’s 2 ways to say the same thing. I prefer Stacked Single Crochet because that’s what the technique actually is: We stack single crochets to become a double crochet or a taller stitch. We don’t stack double crochets. The name doesn’t matter, though. Regardless of what you want to call it, the technique is the same.
What is the Stacked Single Crochet (STsc)?
The Stacked Single Crochet (typically abbreviated to STsc) is a technique in which we stack single crochets on top of each other to achieve the height of the stitch we want to start a row with. Typically this is double crochet but you can absolutely use the STsc for taller stitches like a treble crochet.
What this specific technique does is makes it so that we don’t use any turning chains at all and this helps to keep our sides straight.
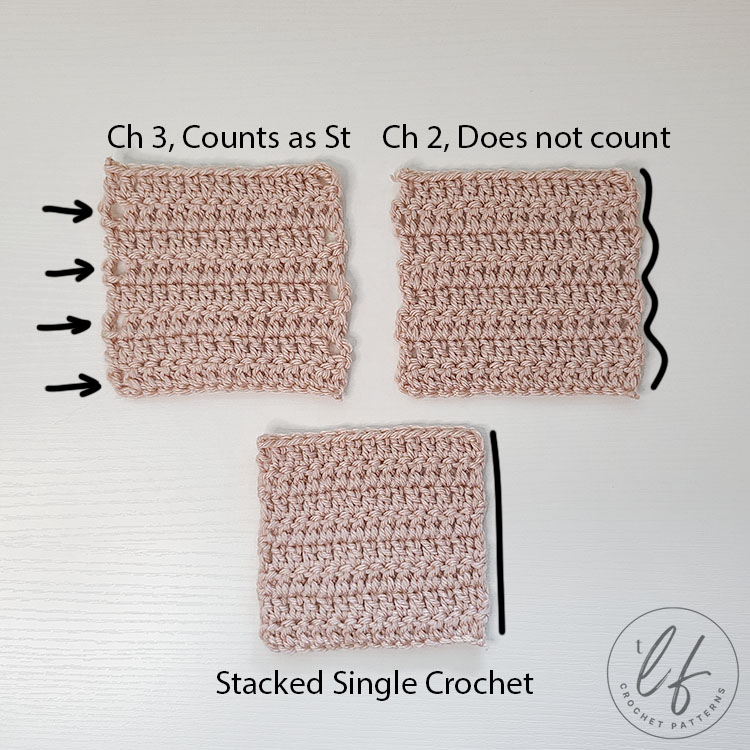
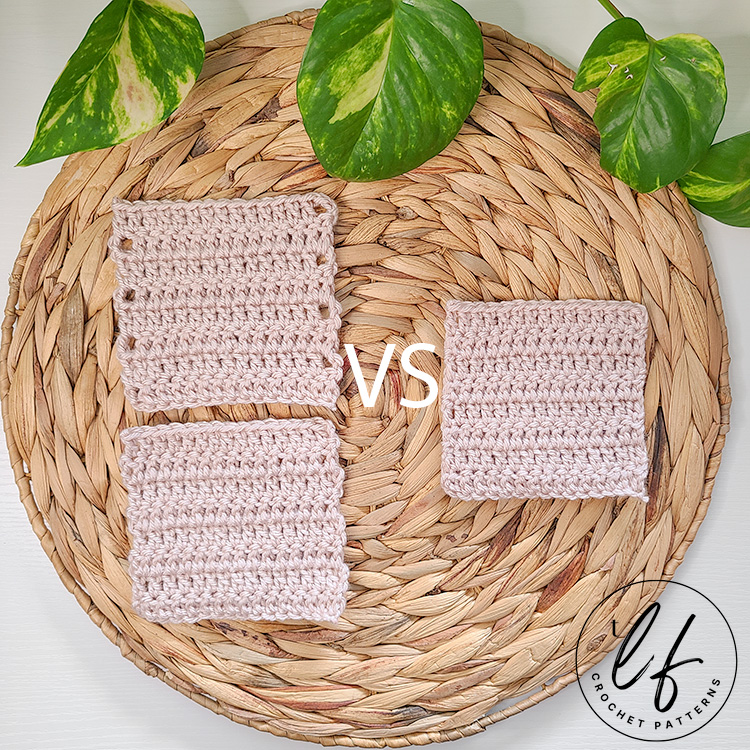
In the infographic I’ve created above, you can see the differences between the different techniques or styles of starting a new row of double crochet: Chain 3 that counts as a stitch, chain 2 that doesn’t count as a stitch and Stacked Single Crochet.
While I will go over these differences more in depth in a blog post about straight edges (coming soon!), it’s good to see visuals on what the Stacked Single Crochet will accomplish once you learn the technique and utilize it.
What stitches should I know before I try this technique?
This is a slightly more advanced technique, so you should be fairly comfortable with crochet in general. Before you try this crochet stitch, you should know the basic crochet stitches. This means you should know and feel at least somewhat confident creating chains and working single crochet and double crochet stitches.
Essentially what this means is as long as you can chain, create single crochets and double crochets, and understand the technical parts to how they’re created (yarn over, inserting your hook into certain stitches or places, etc.), you can follow this tutorial.
There’s nothing super advanced or fancy to the Stacked Single Crochet but knowing how to crochet these stitches will help with this technique.
How is the Stacked Single Crochet abbreviated?
This technique is typically abbreviated to STsc (Stacked Single Crochet). Some designers may use other abbreviations but they will include a definition so you’ll know what the special stitch or technique is.
How to Crochet the Stacked Single Crochet
This Stacked Single Crochet tutorial will show you step-by-step how to work this techniques with photos along the way. There will be highlights and arrows to help identify the steps as clearly as possible.
First we will walk step by step through how to create a Stacked Single Crochet. This tutorial will go the most in depth in creating a Stacked Single Crochet to the double crochet height but will also include photos for how to make a treble crochet height.
Then, once you’ve learned how to create a Stacked Single Crochet, you can continue on to the next tutorial regarding how to Increase and Decrease. In that tutorial, we will walk step by step through how to increase (make 2 stitches out of 1 stitch) and decrease (make 2 or 3 stitches into 1 stitch) the Stacked Single Crochet.
Note: This tutorial will show you how to work a STsc on an established row. You absolutely can use this technique on chains. Follow the tutorial as written but start in the second chain from the hook instead of a stitch.
DISCLAIMER: This post includes affiliate links. This means, should you decide to purchase a product via one of these links, I will receive a small commission at no extra cost to you. I only recommend products I use and love (Or products I know others love, have heavily researched, know have good ratings and plan to purchase myself). These small commissions help to support this blog and continue keeping most of my patterns free. You can read more on my Privacy Policy, if you prefer.
YARN AND HOOK USED IN THIS TUTORIAL
To practice the STsc technqiue, you can use any yarn you like! Choose a hook size that corresponds with the yarn weight you’re using and you’re good to go.
In my tutorial photos, I’m using Bernat Maker Home Dec in colorway Aqua and my Furls Ebony Streamline Wood 6.5 mm (K).
How to Stacked Single Crochet (Double Crochet Height)
Written Stacked Single Crochet Instructions: Turn your work. Do not create any turning chains. Insert hook into first stitch, yarn over and pull up a loop. 2 loops on hook. Yarn over, pull through both loops. 1 loop on hook. (All we have done so far is make a single crochet in the first stitch without chaining 1). Now, insert your hook into the left leg (right leg, if you’re left handed) of the single crochet. Yarn over and pull up a loop. 2 loops on hook. Yarn over and pull through both loops. STsc complete!
Step by Step Instructions
For this tutorial I am working on a swatch that has 3 rows and 15 stitches. We will work 2 additional rows. The first row, we will walk step by step through creating a Stacked Single Crochet to the double crochet height. On the second row, we’ll go over how to identify and work into the STsc as the last stitch.
Let’s begin:
Turn your work but do not make any turning chains.
If you’ve only ever made turning chains and/or make your turning chains before turning your work, this is going to feel very weird and tight.
Proceed to turn your work without turning chains anyway. While this feels different, there’s nothing wrong with doing it.
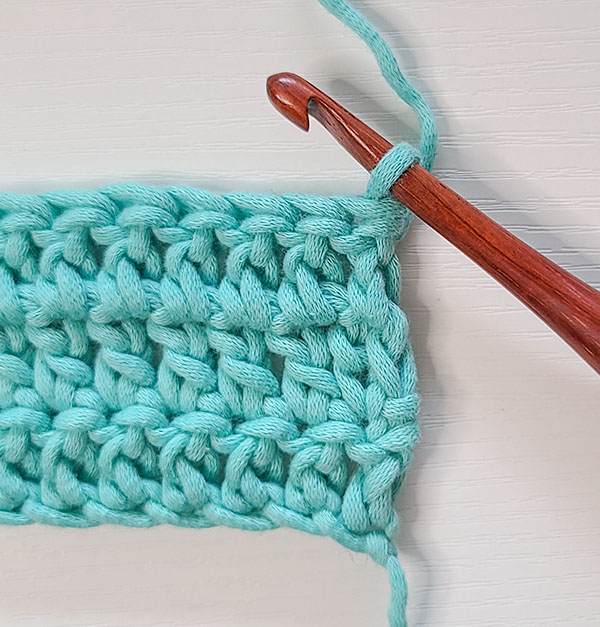
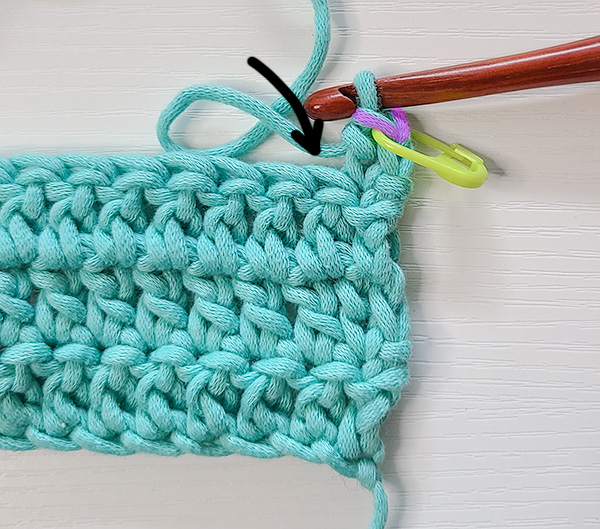
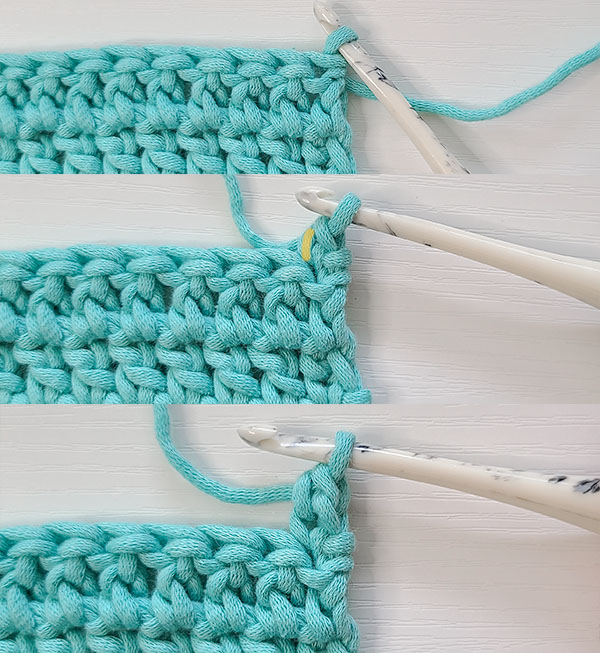
Insert your hook into the very first stitch, yarn over and pull up a loop. This is exactly the same as a single crochet, we just haven’t chained 1.
Here I have inserted my hook into the first stitch, yarned over and pulled up a loop. I have 2 loops on my hook.
Now, just like a normal single crochet, we will yarn over and pull through the 2 loops on the hook.
An arrow shows how we will pull a loop through both loops.
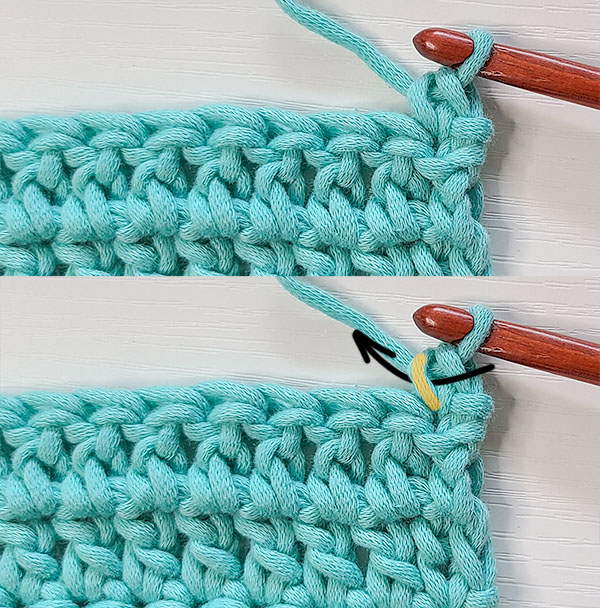
The two pictures in this image are the same, but I’ve used a highlight and an arrow for clarity. This way, you can see the image both ways.
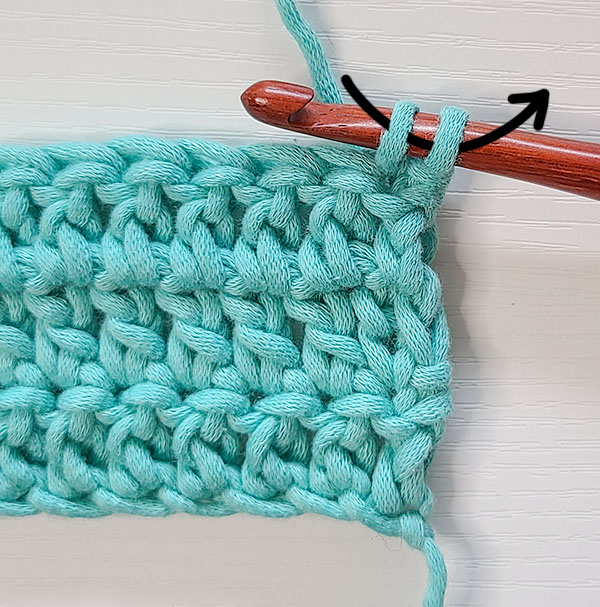
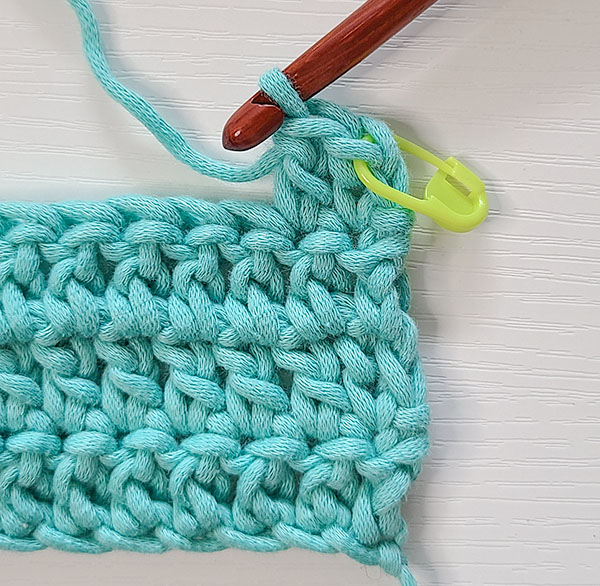
We have created a single crochet without a turning chain, as seen in the top picture of this image. Now we begin to “stack” another single crochet on top, which is what makes this a Stacked Single Crochet.
To do this, we will locate the left leg of the single crochet (right leg if you’re left handed).
In the bottom picture, I’ve highlighted this leg yellow. An arrow goes through this leg from right to left (If you’re left handed, this will be left to right).
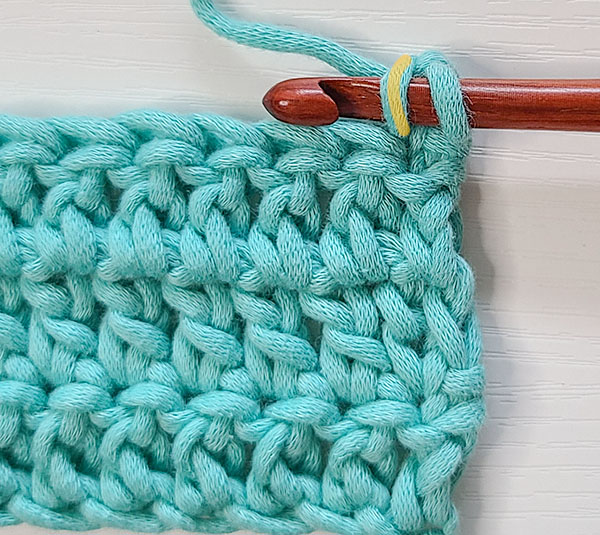
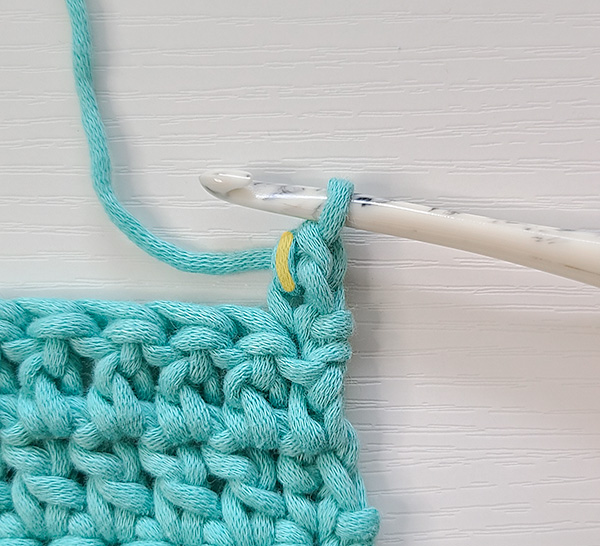
Insert your hook into the leg of the single crochet as indicated.
In this image, you can see my hook inserted into the leg and the leg is still highlighted yellow for consistency and clarity.
Yarn over and pull a loop through.
You will now have 2 loops on your hook.
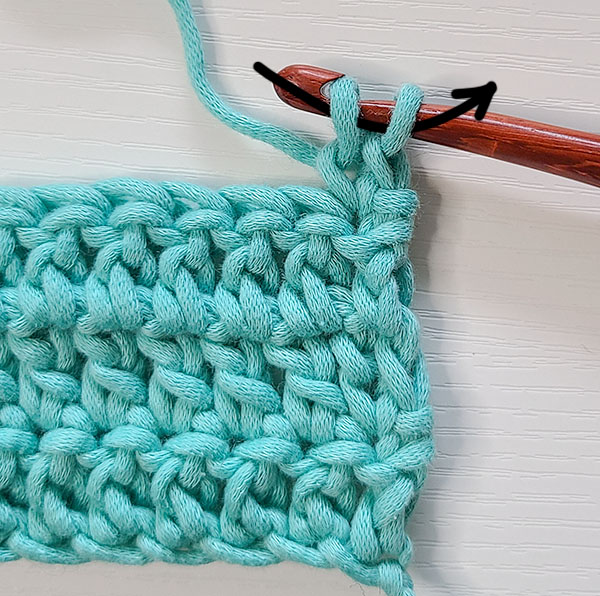
Yarn over and pull through both loops, as shown by the black arrow in this image.
This creates a second single crochet stacked on top of the first single crochet.
You have now completed a Stacked Single Crochet made of 2 single crochet and acts as your first double crochet of the row.

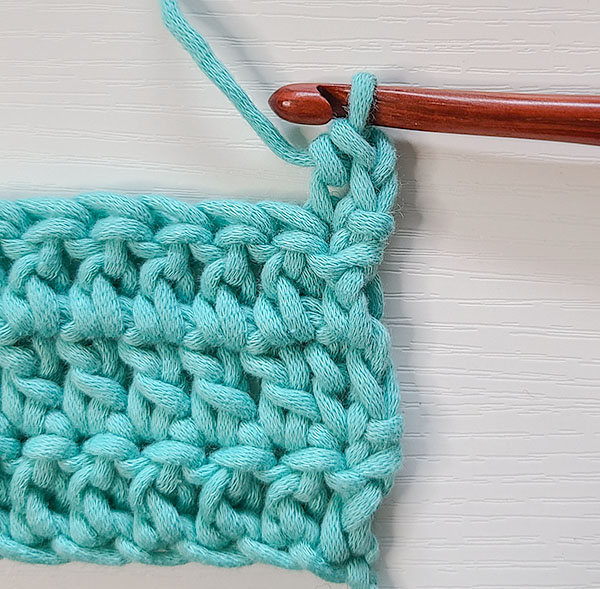
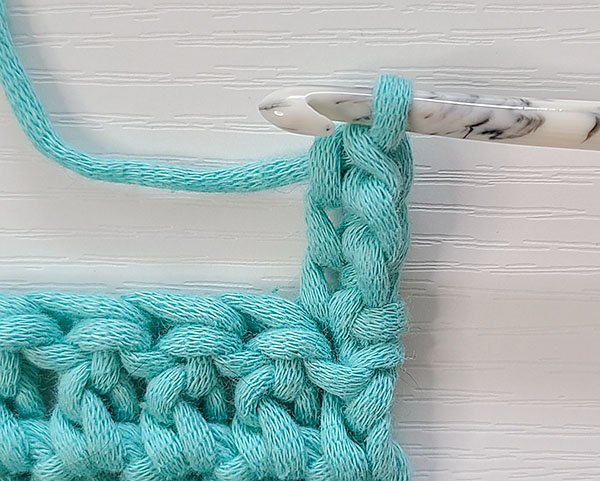
This image is the same as the image above but is highlighted with yellow and pink to clarify.
The hardest thing about the Stacked Single Crochet is that it has what looks like two stitches to work into. While it looks like it does, it technically doesn’t and this is important to know.
In this image, the yellow highlighted portion which looks like a top of a stitch should be completely ignored. This is the top of the first single crochet we made and is only used to add height, not to be worked into.
The pink highlighted portion of the STsc is the actual top of the stitch and where you will place your stitch when finishing the next row.
I would recommend placing a stitch marker into the actual top of the stitch (highlighted pink in the previous image) so that you don’t forget where the top of the stitch is. Over time you’ll get used to this but you can accidentally increase your work if you aren’t used to it.
You’ll see what I mean a little later in this tutorial.
Now that you’ve created the STsc, you can continue working across the row as normal. You would place your next double crochet in the next stitch as an arrow indicates and so on.
Here you can see a double crochet worked into the next stitch.
This helps to visualize how the Stacked Single Crochet creates the height of the double crochet and looks fairly similar to a double crochet but not exactly the same.
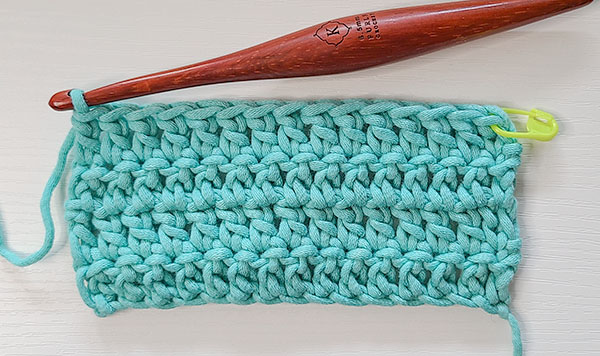
Here’s how the row looks completed. Let’s work another row together so that we can identify the correct part of the Stacked Double Crochet we will work into to finish the row.
Here you can see I have started my next row with a STsc and a double crochet. If you need a refresher on how to work the STsc, start the tutorial from the beginning again.
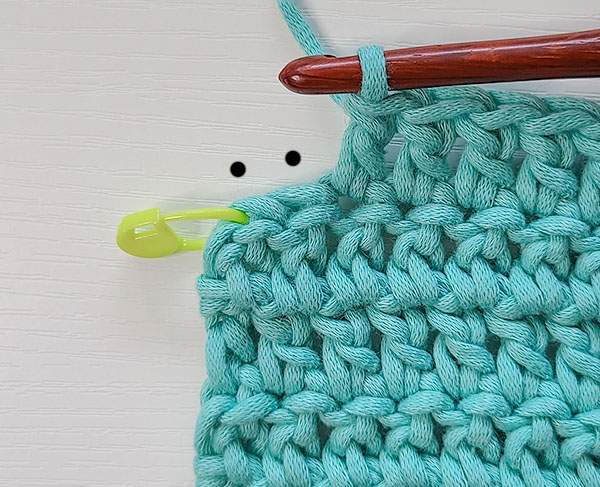
This image shows 2 stitches remaining in this row to be worked. We know the Stacked Single Crochet is the last stitch in this image because there’s a stitch marker in it.
Stitch markers are great tools for identifying stitches for all sorts of reasons but it’s always good to know the stitch anatomy of your crochet stitches so that you can work without them if you need to.

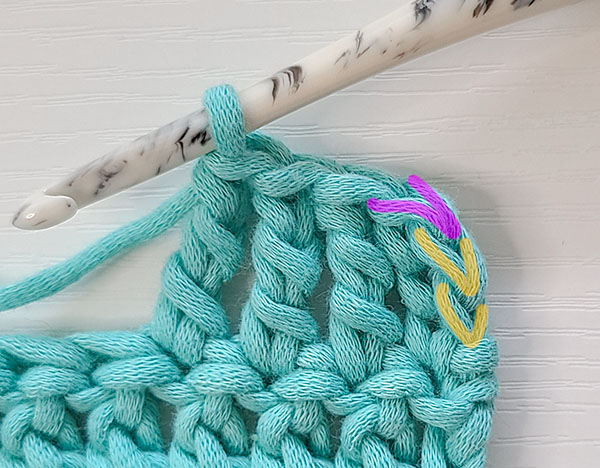
This image has the same picture twice. We are looking down at the top of the Stacked Single Crochet with a stitch marker in the top of the STsc.
The bottom image is highlighted yellow and pink for clarity. The yellow V indicates the second to last stitch of the row and the pink V indicates the top of the STsc which ends the row.
With the stitch marker this is easy to identify so let’s remove the stitch marker and take a look.
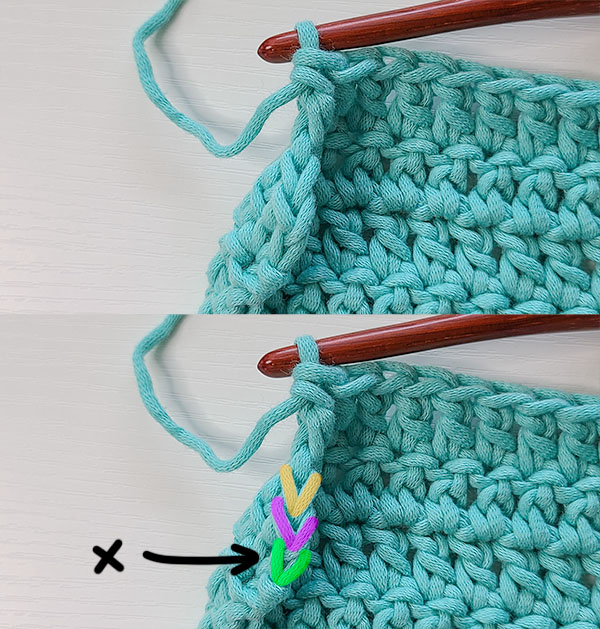
This image also has the same picture twice. We are still looking down at the top of the Stacked Single Crochet but this time we do not have a stitch marker in the top of the STsc.
The bottom image is highlighted for clarity. The yellow V indicates the second to last stitch of the row and the pink V indicates the top of the STsc which ends the row, just like in the previous image.
There is now a green V which indicates what looks like the top of a stitch but isn’t. To further clarify, an arrow points to the green V and has an X next to it. Do not work into this.
This is the top of the first single crochet we made in the Stacked Single Crochet of the previous row and is not considered a stitch in the STsc. Working into this will accidentally increase your work. You should always ignore this.
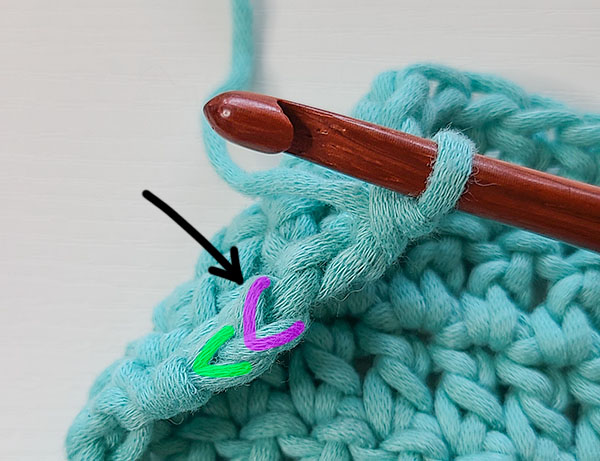
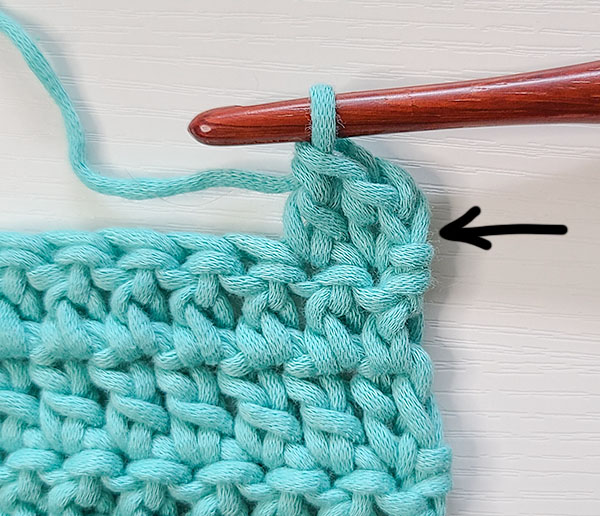
This image shows the second to last stitch worked and now there is only a pink V and a green V. You will place your final double crochet of the row into the top of the stitch that is highlighted pink. Ignore the green highlighted portion completely.

Here’s how it will look as if you are holding the project to crochet. From this angle, it looks more obvious that this is the top of the last stitch but it can be confusing if you’re new to this technique.
The part of the STsc we are completely ignoring is still highlighted green.
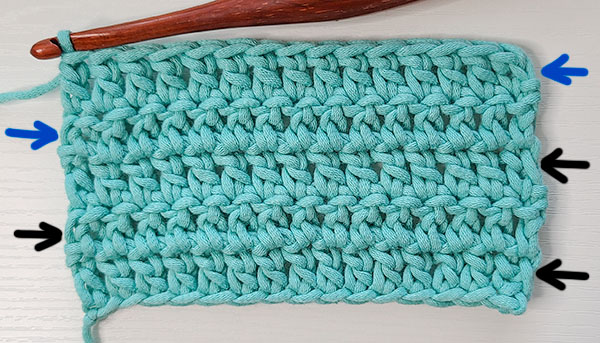
Here’s the swatch after all the work we have completed in this tutorial. I started with 3 rows to begin with and worked 2 in this tutorial. The black arrows point to the rows worked prior to the tutorial and the blue arrows point to the rows we have worked together.
Using Stacked Single Crochet for Taller Stitches (Like Treble Crochet)
Stacked Single Crochet doesn’t stop just with creating a double crochet height. You can absolutely use it for taller stitches, like a treble crochet or US double treble crochet. Essentially you just continue stacking single crochets on top of each other to the required height. We will create a STsc to treble crochet height together for visuals.
A double crochet will require 2 single crochets in the stack. A treble crochet requires 3 single crochets in the stack. A US double treble crochet requires 4 single crochets in the stack and so on.
To create a Stacked Single Crochet to the height of a treble crochet (or an even taller stitch), we begin the same way we did in the tutorial above.
These images show us creating a Stacked Single Crochet with 2 single crochets to the double crochet height, which we went over in detail.
To add a third single crochet to the stack, we will look for the left leg (right leg, if you’re left handed) of the second single crochet made.
In this image, a yellow highlight shows the left leg of the second single crochet.
This is basically the same as the first time we inserted the hook into the leg, it’s just one stitch higher now.
We will insert our hook into this stitch, yarn over and pull a loop through. 2 loops will be on hook. Yarn over and pull through the 2 loops, just like before.
Here you can see 3 stacked single crochets creating a starting treble crochet.
With the 3 stacked single crochets, we will make sure we completely ignore the 2 yellow V’s that look like the top of the stitch and only work into the pink V. This ensures that we don’t accidentally increase our work.
This is the same as it was with 2 single crochets in the STsc. We are just ignoring 2 instead of 1 now.
Use a stitch marker in the top of the stitch as you’re learning this technique so that you can clearly identify the top of the stitch.
You can continue stacking single crochets as high as you like to accomplish the height needed. There’s no real limit to how high they can be stacked. I think it is most likely that you’ll use a STsc with 2 single crochets for a double crochet and a STsc with 3 single crochets for a treble crochet.
So, what do I do now?
Continue practicing the Stacked Single Crochet technique! Practicing on small swatches is a great idea as you won’t feel pressured for perfection following a pattern or making a project. You’ll have a chance to really look at the stitch anatomy and practice tension. After a few practice swatches, you should feel confident with the STsc.
After that, you can learn how to Increase and Decrease using the Stacked Single Crochet – both of which will come in handy if you’re working on a project that requires increasing and decreasing but you still want to use this technique. You totally can!
You can head to the Stacked Single Crochet Increase and Decrease Tutorial by clicking the blue hyper link.
Once you’re confident with the technique, you can use it to replace the starting chains for almost any project. There will be times where using the original chains will make more sense (particularly in lacy patterns where the chains count as a stitch and a chain space) but you’ll be able to fairly quickly identify what patterns this technique won’t work for.
You can also read more about my deep dive into How to Keep Edges Straight, what techniques I tried, how they compared to each other and, ultimately, why the Stacked Single Crochet was the best option.
I hope you’ve enjoyed this tutorial and that you have the straightest edges on your crochet projects after using the Stacked Single Crochet. Thanks so much for hanging out with me today!
Did you find this tutorial helpful? Make sure to Pin it to Pinterest!
Don’t forget to join my Facebook Group so we can chat all about your creations! We are a group for crocheters of all experiences, all interests and love to hang out together. Come join the fun!

Shannon | Designer & Editor
Shannon helps crocheters find their next project and build their skills with in depth tutorials and crochet patterns on her blog, theloopholefox.com.
With more than a decade of crochet experience, Shannon knows that understanding why we do something matters just as much as how we do it. She teaches new techniques and crochet stitches in depth so you can crochet with confidence.
Looking for more Crochet Stitch Tutorials? Try these!
How to Crochet the Suzette Stitch
How to Crochet the Even Moss Stitch
How to Crochet the Arcade Stitch
How to Crochet the Linked Double Crochet
The Magic Circle: How and Why it Works
Foundation Single Crochet and Why It’s Awesome
Foundation Half Double Crochet and Double Crochet and Why They’re Also Awesome
Very nice, easy-to-understand tutorial. Thank you for explaining it so well.
Thank you so much for your kind comment! I’m glad you think it was explained well. 🙂