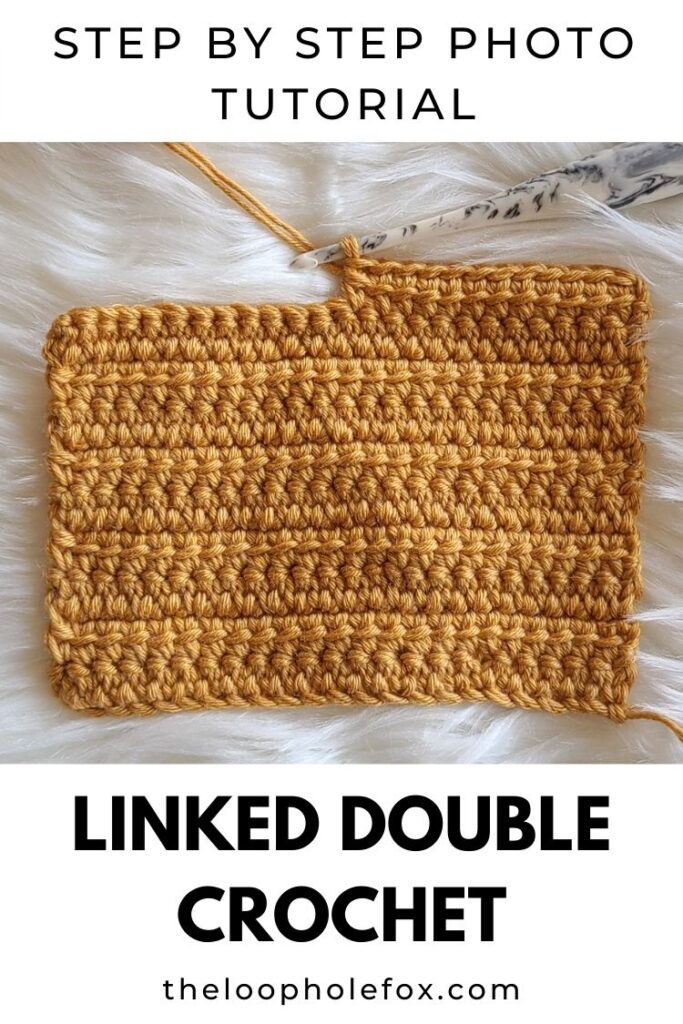
How to Linked Double Crochet – Stitch Tutorial
Love double crochets but want a fabric that doesn’t have the gaps between stitches? You need the Linked Double Crochet stitch! The Linked Double Crochet (abbreviated to LDC) is worked similar to the standard double crochet but with the fabulous addition of the stitch posts being linked which results in a solid fabric that is free of gaps.
What is the Linked Double Crochet (LDC)?
The short way of explaining a Linked Double Crochet is simply to say that it’s a double crochet without the gaps between the stitches. The stitches are “linked” by working the stitch slightly differently than a regular double crochet.
Because the standard double crochets are taller stitches, they leave a bit of space between each stitch post. Using a Linked Double Crochet instead of a regular double crochet will result in a dense fabric with minimal holes because we are linking (or, in a way, joining) the posts of each stitch together.
The result of working LDC is similar to working rows and rows of single crochets to achieve a piece with no holes but it’s a bit more flexible, has an interesting texture and is, of course, faster!
What stitches should I know before I try this stitch pattern?
Before you try working this crochet stitch pattern, you should know how to chain and double crochet (US terms).
Essentially what this means is as long as you can work a double crochet and understand the technical parts to working a double crochet (how to insert your hook into a stitch, how to yarn over, how to pull through loops, etc.), you can work a Linked Double Crochet.
There’s nothing super advanced or fancy to this crochet stitch. It’s easier than it sounds!

What can I use the Linked Double Crochet for?
The Linked Double Crochet is a great stitch to choose for almost anything you can think of. This stitch can be increased, decreased, worked in rows or in the round and with any fiber of yarn you prefer. It’s as versatile as the standard double crochet is!
As long as it makes sense for your project to have a very dense fabric with minimal holes, you can use the Linked Double Crochet.
Does this stitch look best with any specific yarn?
Nope! This crochet stitch looks fantastic and lovely in any yarn fiber or yarn weight. Seriously!
Make sure to use a yarn that makes sense for the project you’re wanting to create and choose the color(s) that look best to you and you’re all set!
How to Crochet the Linked Double Crochet Stitch
This tutorial for the crochet Linked Double Crochet stitch will show you step-by-step how to work this stitch with photos along the way.
First, I’ll show you how you’d find the stitch written in one of my patterns for each row and then I’ll break down the steps in full sentence instructions.
Ready to get started? Let’s go over the technical stuff first.
DISCLAIMER: This post includes affiliate links. This means, should you decide to purchase a product via one of these links, I will receive a small commission at no extra cost to you. I only recommend products I use and love (Or products I know others love, have heavily researched, know have good ratings and plan to purchase myself). These small commissions help to support this blog and continue keeping most of my patterns free. You can read more on my Privacy Policy, if you prefer.
YARN AND HOOK USED IN THIS TUTORIAL
To practice the Linked Double Crochet, you can use any yarn you like! Choose a hook size that corresponds with the yarn weight you’re using and you’re good to go.
In my tutorial photos, I’m using Bernat Maker Home Dec in colorway Aqua and my Furls Ebony Streamline Wood 8mm (M).
STITCH MULTIPLES AND ROW REPEATS
This crochet stitch, when used by itself, can be created from any number of chains. This means you can choose 5 chains, 67 chains or 1,892 chains – Doesn’t matter! The stitch pattern will still work. (Okay, 1,892 is an exaggerated amount of chains, I know! Haha).
It also doesn’t technically have a row repeat because it’s a stitch in itself. You’ll simply just keep creating LDC’s across your rows and for as many rows as you like!
TERMS & ABBREVIATIONS
- Ch – Chain
- Dc – Double Crochet
- LDC – Linked Double Crochet
- St(s) – Stitch(es)
In my crochet patterns, you will also find the following symbols:
- […] – Repeats are listed inside brackets
- (…) – Stitch counts are listed at end of row in ( ) and bold italics.
LINKED DOUBLE CROCHET NOTES
- The Linked Double Crochet stitch uses chains to begin each row but the chains are worked into. You don’t have to worry about whether or not to skip the chains because they’ll be used!
- I use 2 chains to begin each row of the linked double crochet. Some designers use 3.
- This is a matter of preference, similar to how some designers will count a chain 2 or 3 as a double crochet and some won’t.
- Designers will often instruct to “LDC across the row”. It’s important to remember that your first LDC of the row is worked using the turning chains and the rest of the LDCs are worked off the post of the previous stitch.
Step by Step Instructions
Now that we have the technical stuff out of the way, let’s walk step by step through how to work the Linked Double Crochet.
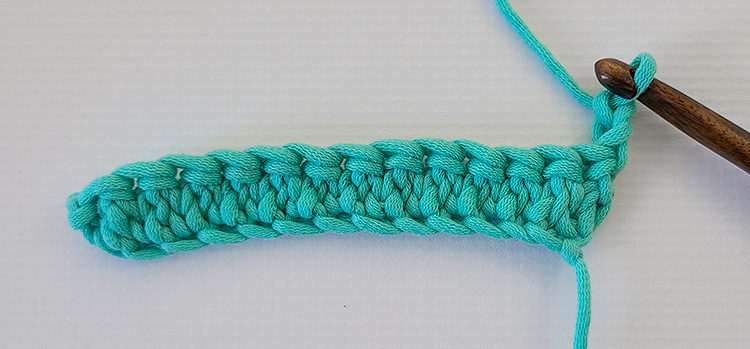
For this practice swatch, chain 15. This will give us 13 stitches.
ROW 1 – The Foundation Row
Working stitches for Row 1 or your Foundation Row using the Linked Double Crochet means we will be working into chains instead of into the tops of stitches. It’s important to note how the first LDC works when you’re starting with chains.
Written in one of my patterns, this row will look like this:
Row 1 – Place 1 LDC in each ch across. (13)
Note: To place your first LDC in this row, insert your hook into the 2nd ch from hook, yarn over and pull up a loop. Then, insert your hook into the third chain from the hook, yarn over and pull up a loop. You will have 3 loops on your hook. Finish the stitch as you would a standard dc (yarn over and pull through 2, yarn over and pull through 2).
Here’s how to follow this row step by step:
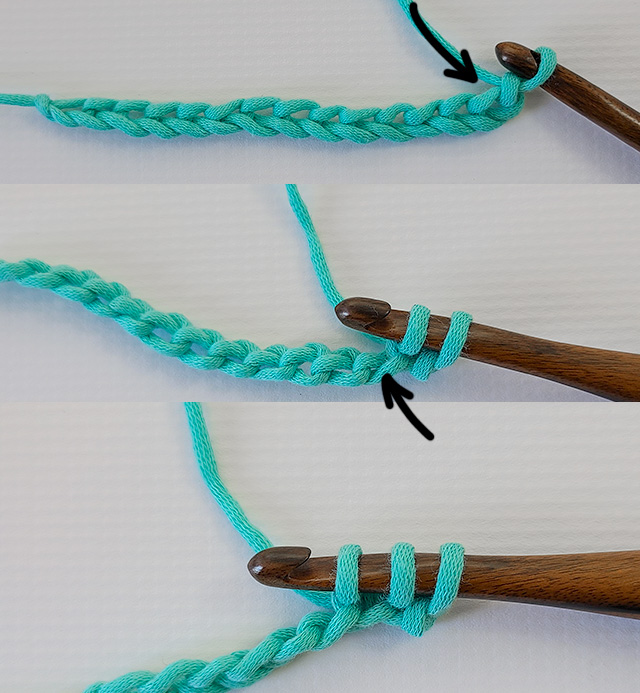
For Row 1, we are working entirely on chains.
We will insert our hook into the second chain from the hook, yarn over and pull up a loop. A black arrow points to the indicated chain in the top picture.
Then, insert your hook into the 3rd chain from the hook, yarn over and pull up a loop.
You will now have 3 loops on your hook, just as you would with a standard double crochet.
Finish your Linked Double Crochet as you would a standard double crochet.
This means you will yarn over and pull through the first 2 loops on your hook. 2 loops remain on hook. Yarn over, pull through 2.
You now have one LDC completed!
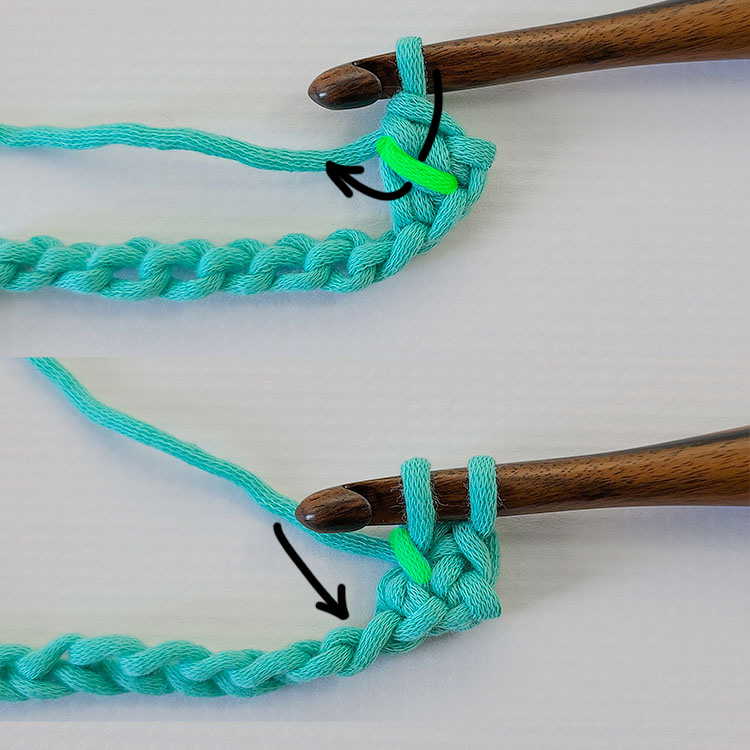
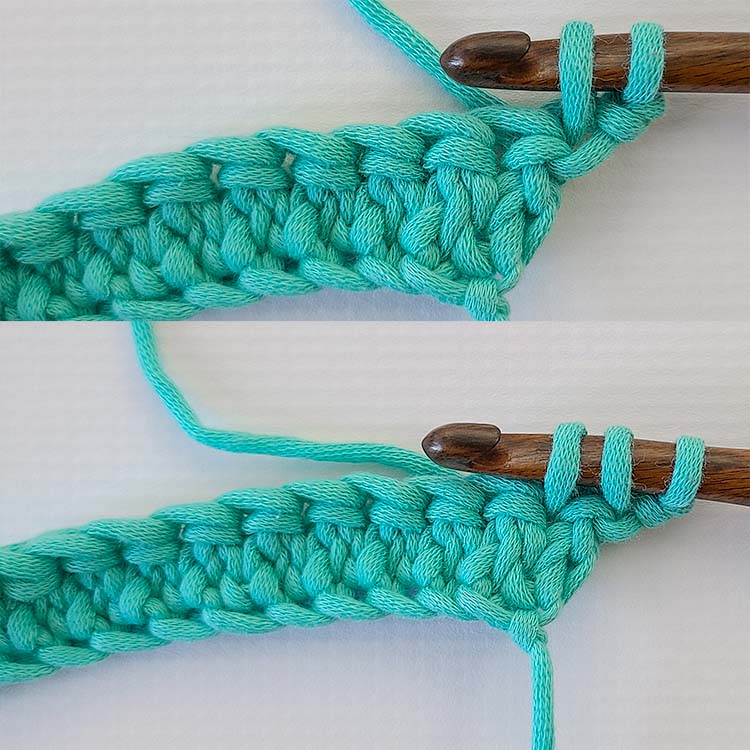
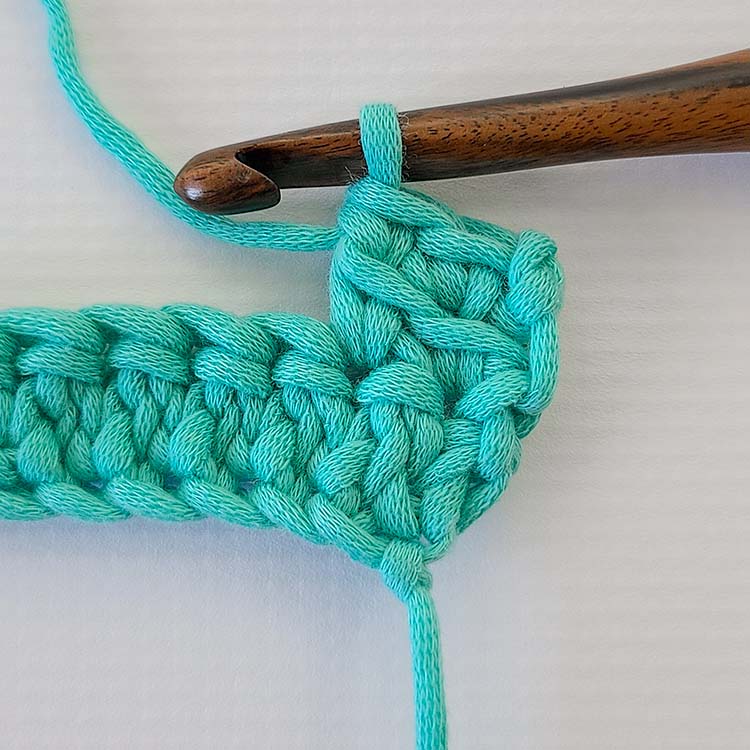
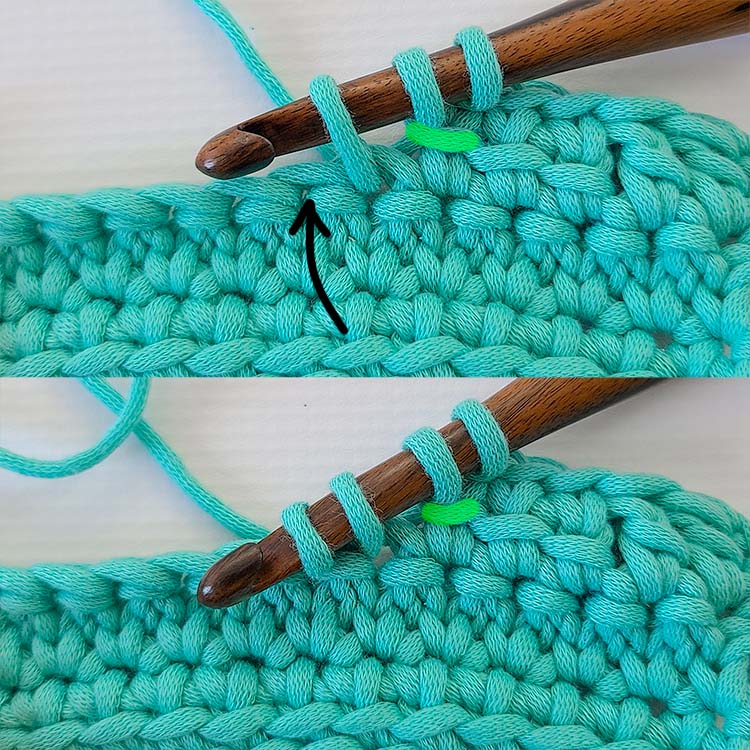
Now we work our next Linked Double Crochet. This is where the LDC differs from the standard double crochet.
To begin, find the horizontal bar of the first LDC we just made. In the top image, this horizontal bar is highlighted green.
Insert your hook into this bar from the top (in the direction of the black arrow in the same image) Then, yarn over and pull up a loop.
Next, insert your hook into the next chain, yarn over and pull up a loop. A black arrow points to the next chain in the bottom image.
The bottom image also has the horizontal bar highlighted so that you can be aware of the stitch anatomy of the LDC.
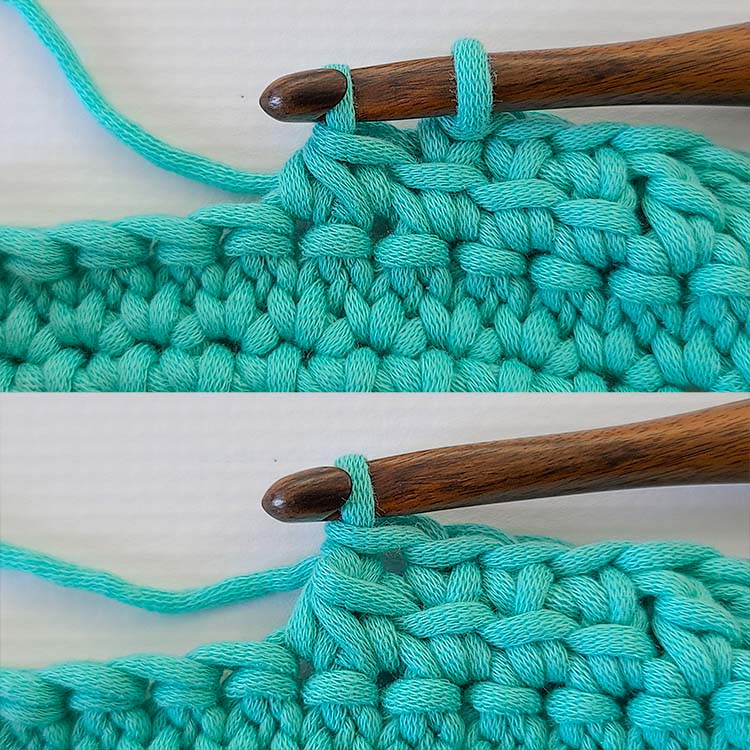
You should now have 3 loops on your hook.
Finish your Linked Double Crochet as you would a standard double crochet.
This means you will yarn over and pull through the first 2 loops on your hook. 2 loops remain on hook. Yarn over, pull through 2.
Our second Linked Double Crochet is complete!
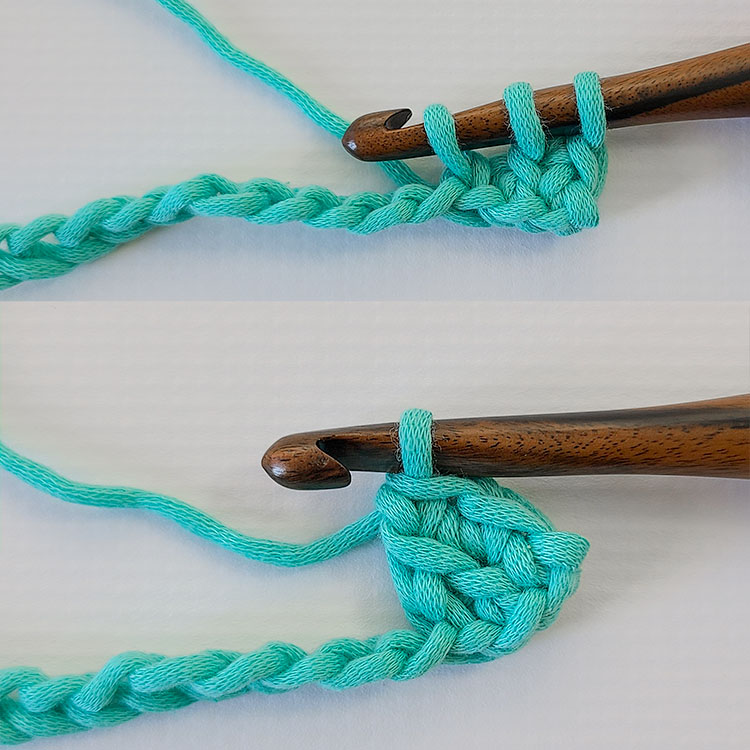
Now you can continue working Linked Double Crochets across the row.
So you will: insert your hook into the horizontal bar (highlighted green), yarn over and pull up a loop.
Then, insert your hook into the next chain, yarn over and pull up a loop.
You will have 3 loops on your hook.
Finish your LDC like you would a normal double crochet.
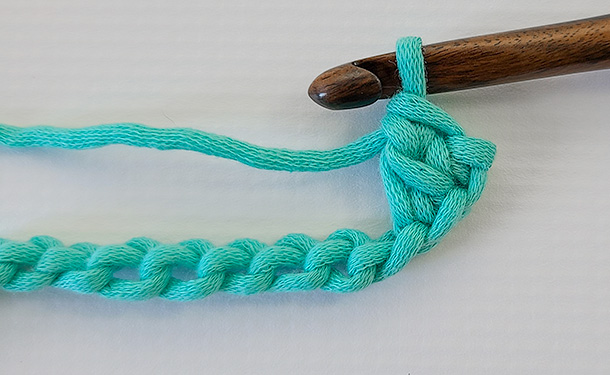
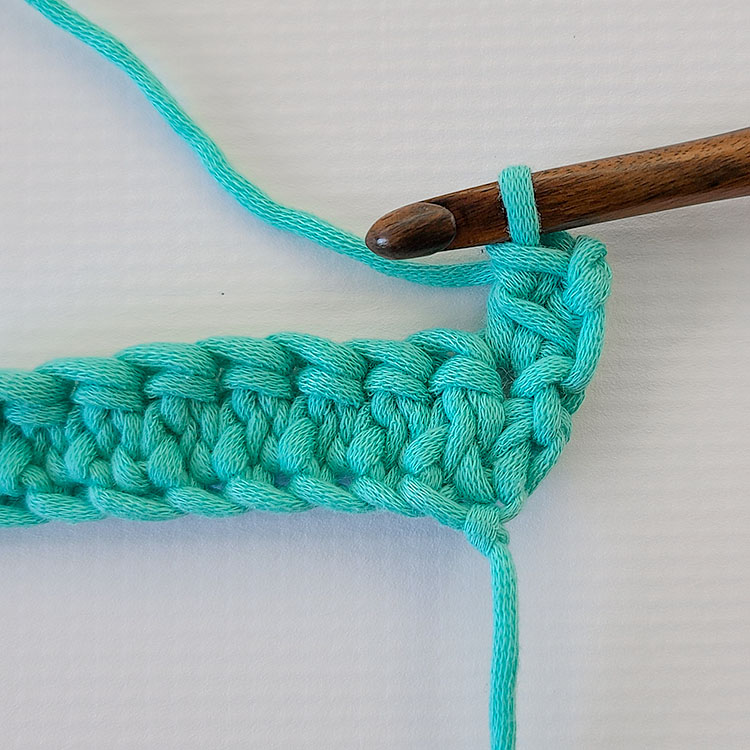
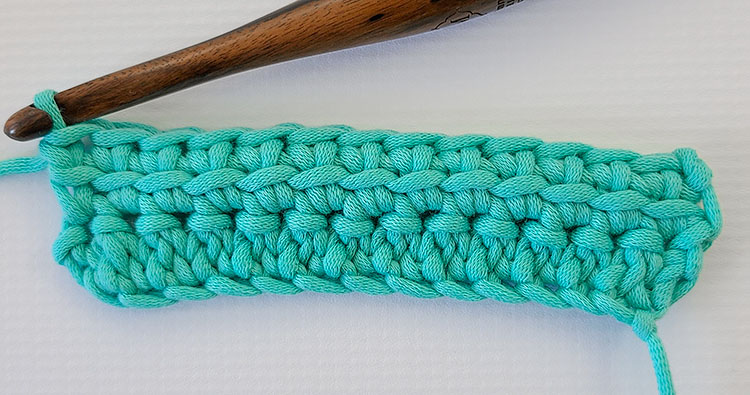
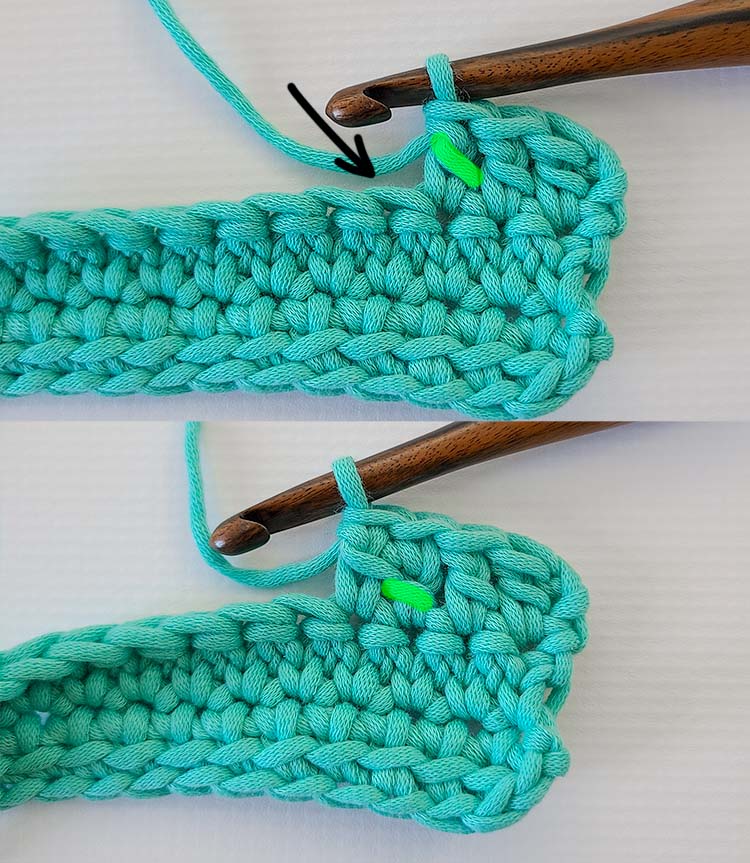
Continue working across the row to the end, placing 1 Linked Double Crochet in each chain across.
When you reach the end of the row, your work will look like the bottom picture.
ROW 2 (And all rows)
We can now begin our second row of the project.
Written in one of my patterns, this row will look like this:
Row 1 – Ch 2, turn. Place 1 LDC in each st across . (13)
Note: To place your first LDC in this row, insert your hook into the 2nd ch from hook, yarn over and pull up a loop. Then, insert your hook into the first stitch of the row, yarn over and pull up a loop. You will have 3 loops on your hook. Finish the stitch as you would a standard dc (yarn over and pull through 2, yarn over and pull through 2).
Here’s how to follow this row step by step:
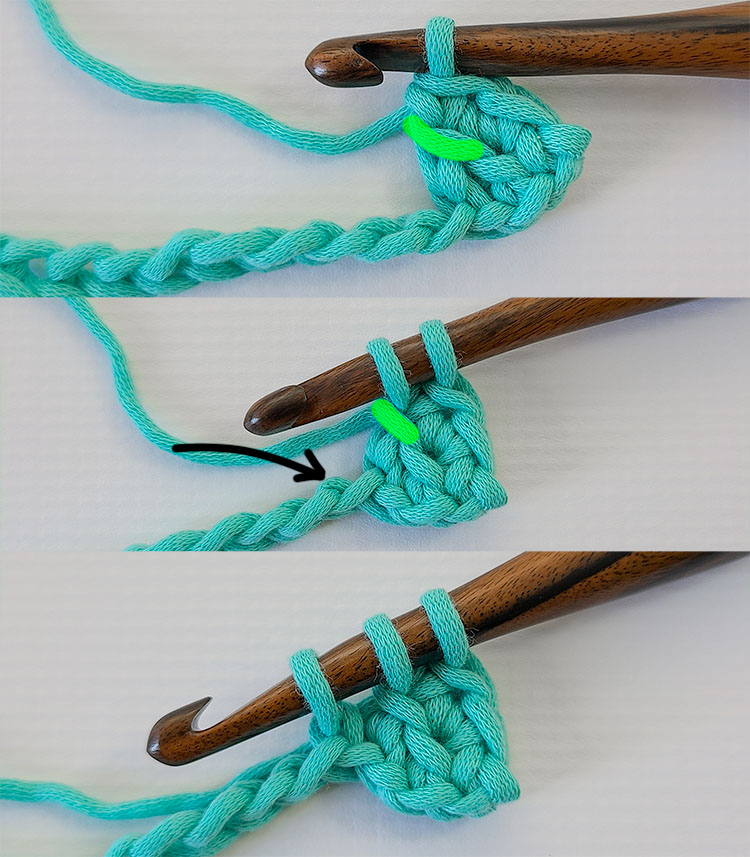
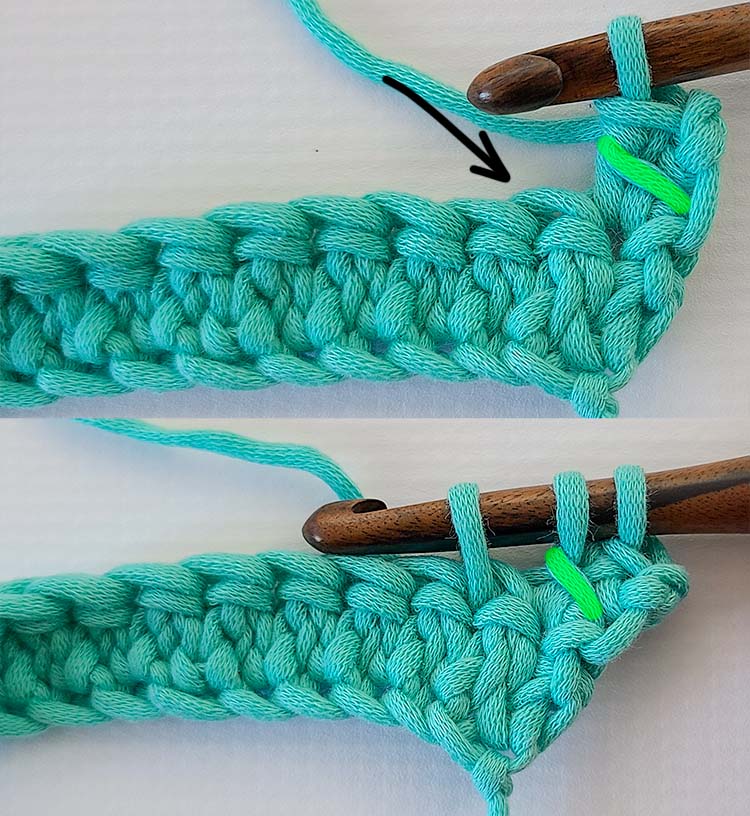
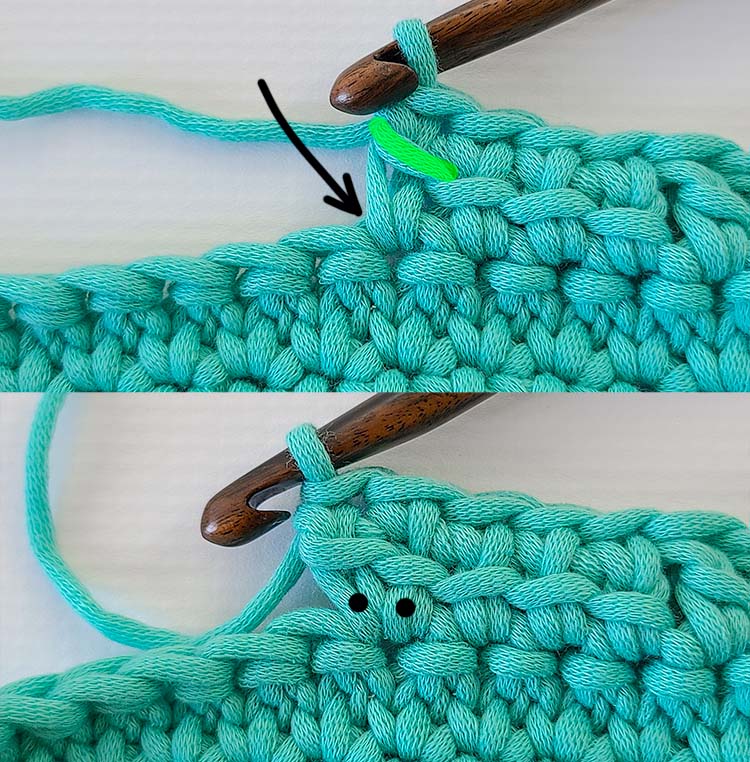
To begin this row, we will chain 2 and turn.
Notice on the “wrong side” of the stitches, there isn’t a horizontal bar and the stitch posts are close together with no gaps!
Now that we have chained 2 and turned, we will insert our hook into the second chain from the hook, yarn over and pull up a loop.
Next, we will insert our hook into the first stitch of the row, yarn over and pull up a loop.
We will have 3 loops on our hook.
Finish your Linked Double Crochet as you would a standard double crochet.
This means you will yarn over and pull through the first 2 loops on your hook. 2 loops remain on hook. Yarn over, pull through 2.
Your first LDC of the row is complete!
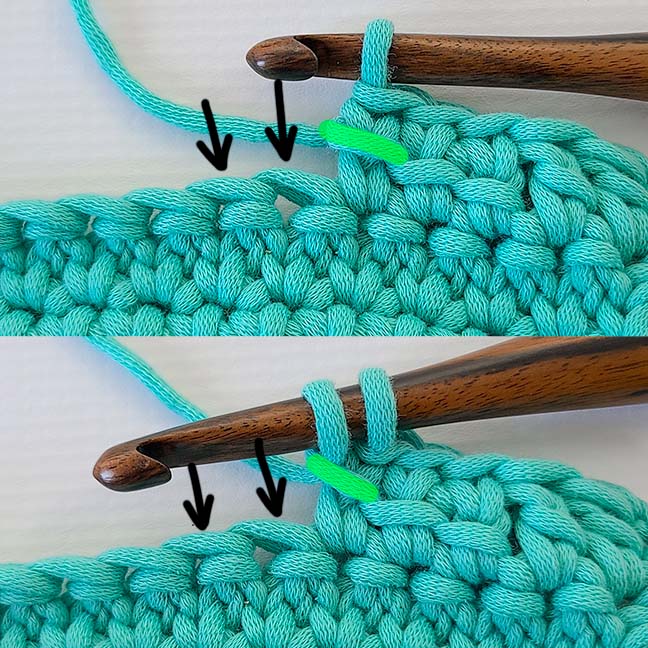
Now you can continue working Linked Double Crochets across the row.
So you will: insert your hook into the horizontal bar (highlighted green), yarn over and pull up a loop.
Then, insert your hook into the next stitch, yarn over and pull up a loop.
You will have 3 loops on your hook.
Finish your LDC like you would a normal double crochet.
Continue working across the row to the end, placing 1 Linked Double Crochet in each chain across.
When you reach the end of the row, your work will look like this!
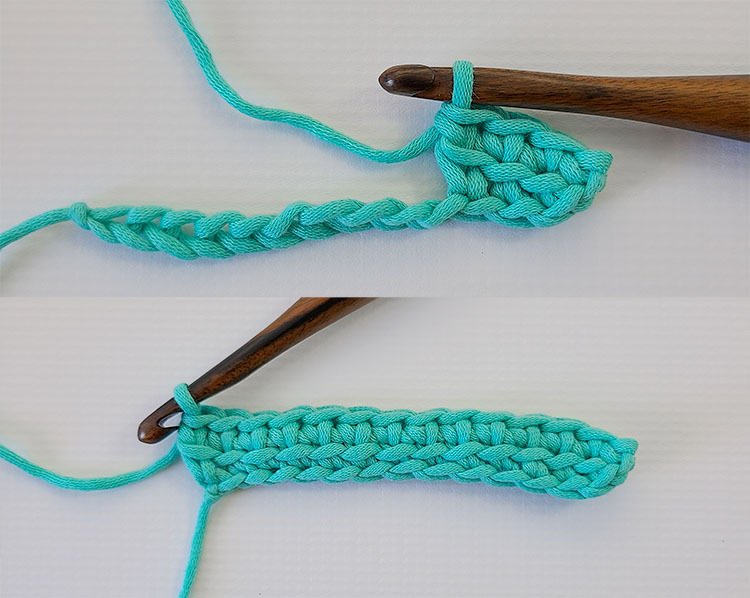
This completes both the foundation row (worked on chains) and one row crocheting the Linked Double Crochet! Super simple and pretty, right?
So, what do I do now?
To continue practicing the Linked Double Crochet, you can simply continue placing 1 LDC in each stitch across the row for as many rows as you like until your work reaches your desired size.
Easy peasy!
How do I increase the Linked Double Crochet?
Good question! There will come a time where you either want to increase the Linked Double Crochet (LDC INC or 2 LDC in same stitch) or you’ll need to for a pattern. Here’s how you’d Increase Linked Double Crochet:
To increase a Linked Double Crochet , you’ll begin your stitch as you always would. Find the horizontal bar (highlighted green) and insert your hook into it. Yarn over and pull up a loop.
Now, instead of inserting your hook into the next stitch, insert your hook into the SAME stitch as your previous LDC. Yarn over, pull up a loop. Finish the LDC as normal.
You have now increased the LDC by placing 2 stitches in the same stitch!
How do I decrease the Linked Double Crochet?
I’ve got you! I’m sure there are a few different ways that designers or crocheters like to decrease their LDCs, but here’s my favorite way. In my opinion, this way is easier and has less bulk, so the decrease doesn’t stand out as much. Here’s how you’d Linked Double Crochet Decrease (LDC2TOG – Linked Double Crochet 2 Together):
To decrease a Linked Double Crochet , you’ll begin your stitch as you always would. Find the horizontal bar (highlighted green) and insert your hook into it. Yarn over and pull up a loop. 2 loops on hook.
In a LDC2TOG, we are going to use the next 2 stitches instead of just the next stitch (black arrows point to these stitches in the images).
So, insert your hook into the next stitch, yarn over and pull up a loop. 3 loops on hook.
Then, insert your hook into the following stitch, yarn over and pull up a loop. 4 loops on hook.
To finish the Linked Double Crochet Decrease, yarn over and pull through 3 of the 4 loops. You will have 2 loops remaining.
Yarn over, pull through the 2 remaining loops.
Your decrease (LDC2TOG) is complete!

To place a Linked Double Crochet after your decrease, you’ll use the horizontal bar that goes across the entirety of the LDC2TOG.
The horizontal bar is highlighted in green in the top image.
Then, place your LDC as normal!
What if I need to put a Linked Double Crochet next to a regular Double Crochet?
You can absolutely switch to a Linked Double Crochet from a double crochet and vice versa! Of course, to place a standard double crochet after a Linked DC, you’d just place the double crochet as normal.
To switch from a standard double crochet to a Linked Double Crochet, the process is basically the same as working LDCs in a row.
Here I have 3 standard double crochets in the row and I want to switch to a Linked Double Crochet for the next stitch.
To do this, find the horizontal bar of the last double crochet. This horizontal bar is highlighted in green in the image.
Insert your hook into the bar, yarn over and pull up a loop.
Then, insert your hook into the next stitch, yarn over and pull up a loop.
Finish the LDC as normal. You’ve switched from regular dc to LDC!
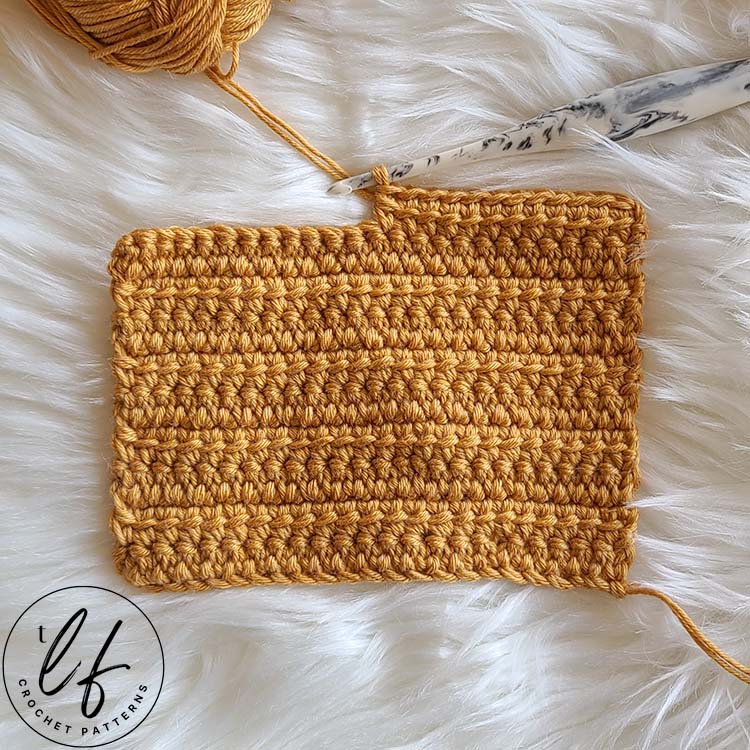
If you’re ready to try out some patterns that use the Linked Double Crochet Stitch, I’ve got you covered!

If you’re ready to practice this stitch with a pattern, this crochet kitchen towel is a quick and fun make! Designed specifically to accompany this stitch tutorial, this pattern uses mostly LDC. Plus, it’s something you can put to use almost immediately and you can use up some scrap cotton yarn you have laying around!
That’s all there is to the LDC!
You should now feel confident working the LDC stitch and using it in almost any pattern that calls for it!
With the addition of how to increase and decrease the Linked Double Crochet in this stitch tutorial, no one can stop you!
Want to keep this tutorial? Pin it to Pinterest!
I hope you’ve enjoyed this tutorial and that you can move forward crocheting all you can think of with the LDC in confidence. Thanks so much for hanging out with me today!
Don’t forget to join my Facebook Group so we can chat all about your creations! We are a group for crocheters of all experiences, all interests and love to hang out together. Come join the fun!

Shannon | Designer & Editor
Shannon helps crocheters find their next project and build their skills with in depth tutorials and crochet patterns on her blog, theloopholefox.com.
With more than a decade of crochet experience, Shannon knows that understanding why we do something matters just as much as how we do it. She teaches new techniques and crochet stitches in depth so you can crochet with confidence.
Looking for more Crochet Stitch Tutorials? Try these!
How to Crochet the Suzette Stitch
How to Crochet the Even Moss Stitch
How to Crochet the Arcade Stitch
The Magic Circle: How and Why it Works
Foundation Single Crochet and Why It’s Awesome
Foundation Half Double Crochet and Double Crochet and Why They’re Also Awesome