
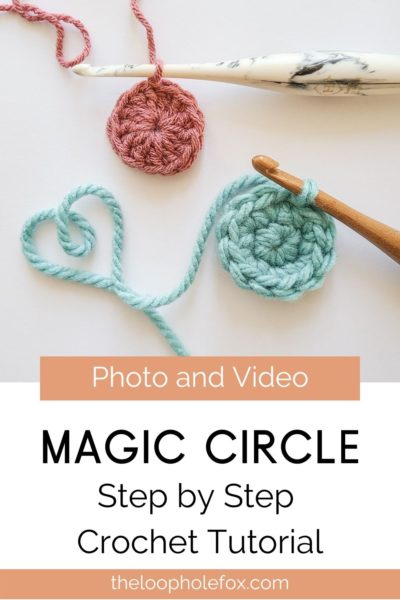
How to Crochet a Magic Circle – How & Why it Works
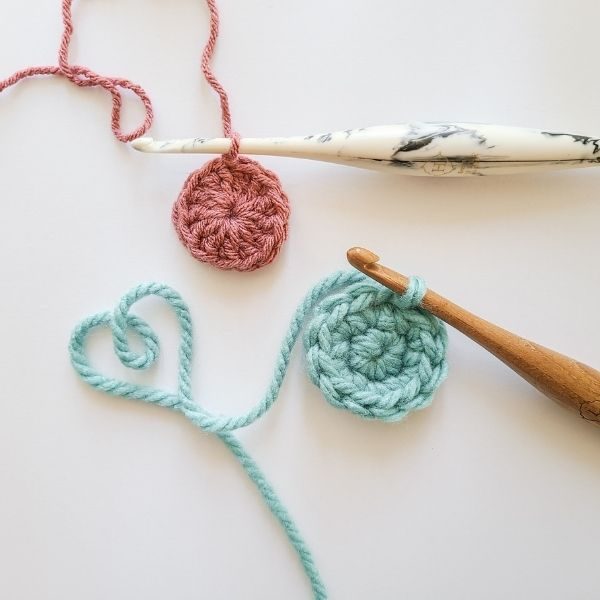
The crochet magic circle (also known as magic ring or adjustable loop) is a fantastic technique to use when starting any crochet project in the round. The magic circle gives a tight center without a hole or gap that brings an extra level of professionalism to your finished projects.
The magic circle is a technique that can be difficult to master – but it doesn’t have to be! Once you know not only how to crochet a magic circle but also why it works, the technique is much more likely to click.
If you’re here to learn how to crochet a magic ring, you’re in the right place! This tutorial will walk you step by step through making a magic circle for your crochet projects and explain why we do it.
What is a Magic Circle in crochet?
The magic circle (or magic ring / adjustable loop) is a technique used for starting crochet projects in the round.
This technique replaces foundation circles, such as chain 4 and slip stitch to first chain made, and eliminates unsightly holes in the center of projects.
It’s often referred to as an adjustable loop because it is, in fact, adjustable. There will be a tail that will be pulled snug to close the circle and accomplish a clean, tight start to the project.
Why use the Crochet Magic Ring?
You might be wondering why you should bother learning a new technique for crocheting in the round if you’re already familiar and comfortable with foundation circles.
While creating a chain 4 and slip stitching to the first chain to create a foundation circle works totally fine, it lacks the added benefits that a magic ring provides.
When using this modern technique, you gain the ability to pull the tail tight and create projects that don’t have a hole or gap in the center.
By pulling the tail of the crochet magic circle, you’re able to ensure your first row is nice and tight so there is no unsightly hole in the center.
Additionally, you’ll have more control at the start of your project. A magic circle provides more room to maneuver your hook to place the first round of stitches and allows you to make the circle as tight or as loose as needed.
How to crochet a Magic Circle (Step-by-Step)
In this step-by-step tutorial, I’ll show you my preferred way to make a magic circle. There are many ways to make a magic ring and, while any way that makes sense for you is best, they’re not all as easy as tutorials make them seem.
I’ve found it’s best to start and secure the magic circle on your fingers as opposed to laying the yarn flat on a table, as it keeps everything secure and tight, seeming like much less of a tangled mess and more like a legitimate crochet technique.
This step-by-step crochet magic circle tutorial includes both a photo tutorial and a video tutorial, so you can use the learning option that works best for you.
In both tutorials, we’ll go over not only how to work this crochet technique but also the stitch anatomy so you can understand why it works.
Magic Circle Crochet Tutorial Photos (Step by Step)
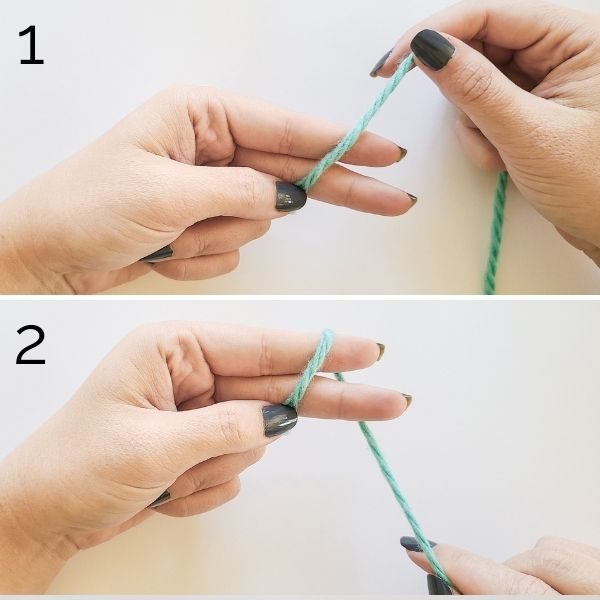
Image 1: With your palm facing you, drape the tail end of your yarn over the inside of your pointer and middle finger. The tail of your yarn should be pointing “down” toward your ring and pinky finger. Hold it on place with your thumb.
Tip: Make sure that you leave a decent length of tail when you drape the yarn over your fingers. You will use this to weave in the ends and secure your project. 4 or 5 inches should suffice.
Image 2: Wrap your yarn over the top of your pointer finger and back behind both fingers.
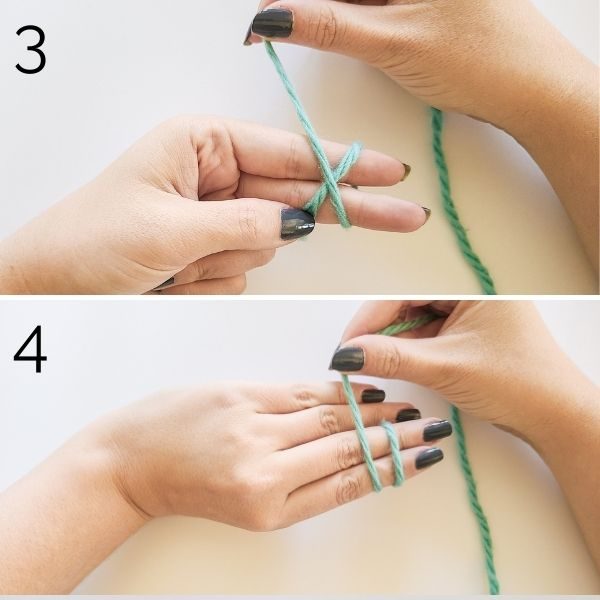
Image 3: Now, with your palm facing you, wrap the yarn back over the back of your fingers, making sure to cross the yarn over the original tail of the yarn. This will create an “X”.
Image 4: Wrap the yarn back over the top of your pointer finger and toward the top of your knuckles.
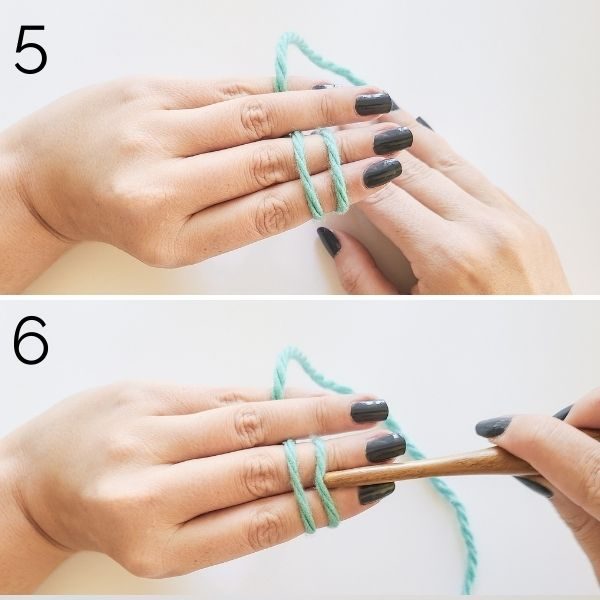
Image 5: Hold the yarn you’ve just crossed over your knuckles by weaving it between your ring finger and your pinky finger. This will hold everything secure for now. You should now have an “X” made out of yarn if your palm is facing you and, if your palm is facing away, two strands that are NOT crossed.
Fun Tip: These first few steps can be fun to refer to as “Drape, swoop, cross and hold”. Something quick and simple to say can help us remember the steps – like a child learning how to tie their shoes!
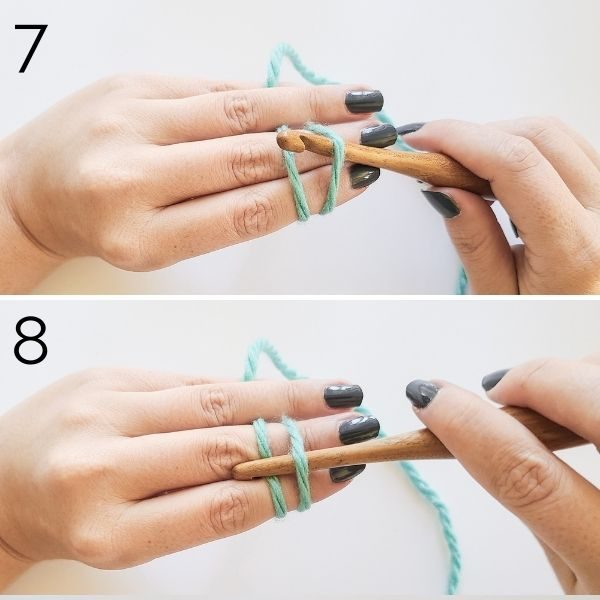
Images 6, 7 and 8: Place your hook under the first strand and, with the nose of the hook, grab the second strand and pull it under the first. Pull this strand up like you would a loop in a stitch. You may have to twist this loop a bit to get it to come up, that’s totally fine.
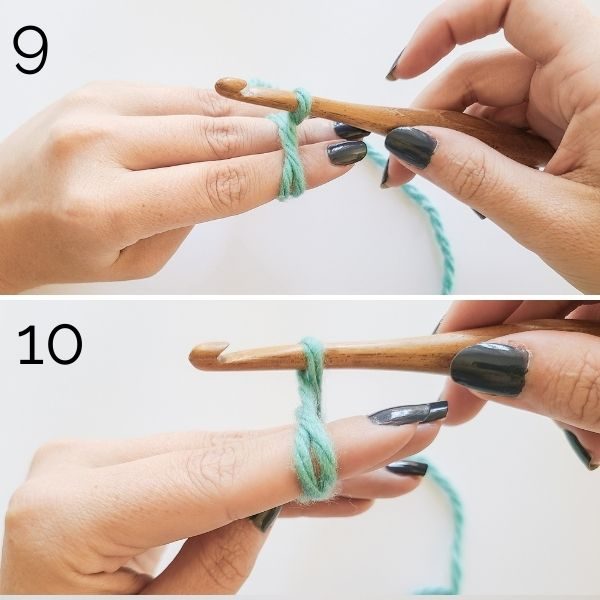
Images 9 and 10: You will now have a loop pulled up on your hook as if you’ve pulled up a loop with working yarn through a stitch – because that’s exactly what you’ve done. In these images you can see the loop pulled up from two different picture angles.
Quick stitch anatomy lesson for this magic circle crochet tutorial: From here, you could technically remove this from your fingers while leaving the hook in this loop. Then, pull on the tail end of the yarn to tighten.
This would create a slip knot. The magic circle is essentially one big slip knot. Once that piece of information makes sense, the crochet magic circle becomes much easier to understand.
Back to the magic circle crochet tutorial:

Images 11 and 12: Now we need to secure this loop with a chain, otherwise when we pull it off our fingers it can fall apart.
To do this, carefully yarn over with your working yarn (the yarn that you’ve tucked under your ring finger), and pull a loop through the loop you created just before. Once this is complete, you can remove the entire circle from your fingers.
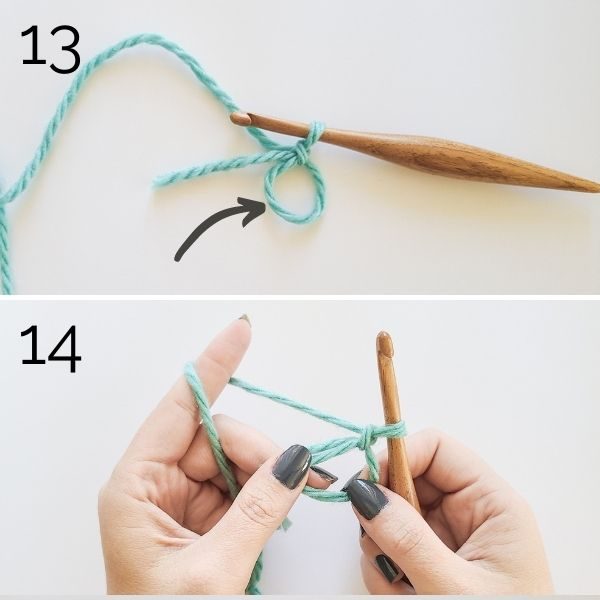
Image 13 and 14: You now have a secured crochet magic circle! In image 13, an arrow is pointing to the loop that we will work in.
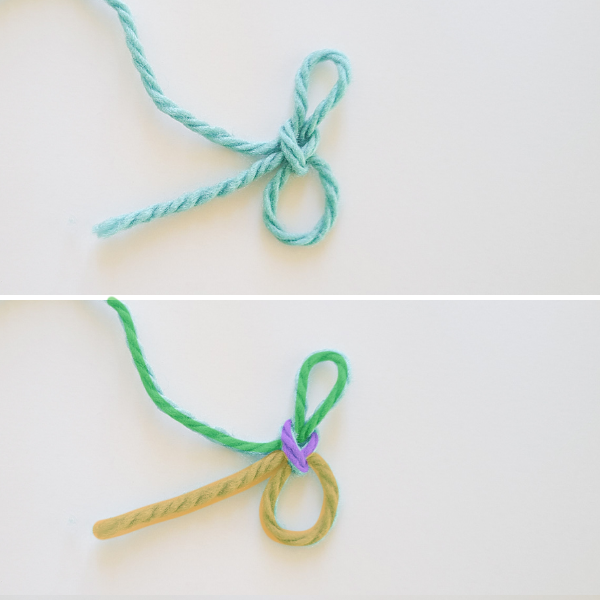
Here’s a close up of the magic circle. Both of these images are exactly the same, I’ve just put a color overlay over certain parts of the yarn for the second picture. We’re going to do another quick anatomy lesson before we continue to working stitches into the circle.
You can see that I’ve broken this magic circle into 3 different colors and I’ve done this because I want you to not only know how to make a crochet magic circle, but also why this works.
First, you’ll see yarn that has an orange/yellow overlay. This yarn is your tail yarn AND your circle. If you were to pull on the tail, your loop would get smaller. If you were to pull on the circle, it would get bigger and the tail of the yarn would get shorter.
Second, you’ll see yarn that has a purple overlay. This yarn is the chain that you’ve created just before removing the whole thing from your fingers. This is what secures the magic ring and makes sure that it doesn’t come unraveled while you work. This chain also acts as the starting chain for the round.
Finally, you’ll see yarn that has a green overlay. This yarn is your working yarn. Both the long strand of the working yarn plus the loop are colored green. This is because you can pull and work with both the yarn and this loop without losing your circle.
Interesting, right? You can see now what I mean by “one big slip knot”. If you hooked your yarn back into that green working yarn and pulled the yellow tail tight, you’d have a slip knot.
Now, let’s put some stitches in this magic circle!
For the purposes of this magic circle crochet tutorial, I’m showing you single crochet. You can work any other stitch into this ring as you have the single crochet. After all, this is one “big chain” we are working into. 🙂
Images 15 and 16: To put a stitch into the magic circle, you’ll insert your hook into the circle (which was indicated by the orange/yellow overlay in the previous picture). Keep in mind, this is just like working into a chain or a stitch.
Make sure that when you insert your hook into this circle, you are also going UNDER the tail. The grey arrow points to the tail yarn, the orange arrow points to the loop.
It is imperative that you crochet over the tail in the first round not only so that the tail can be pulled to tighten the circle but also so the circle doesn’t come undone.
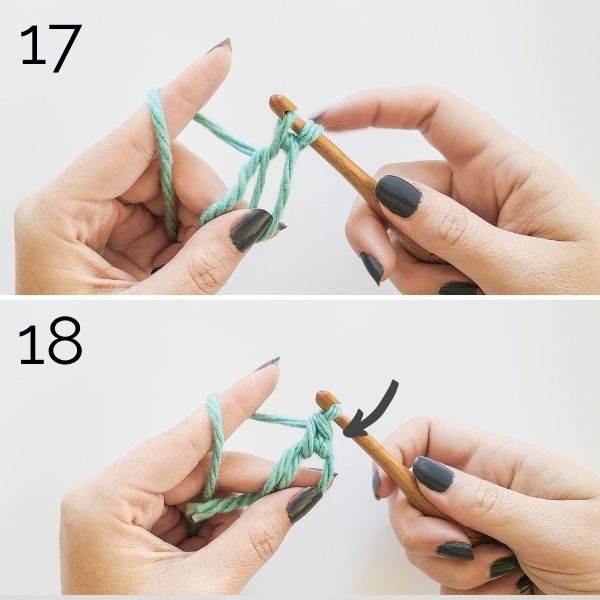
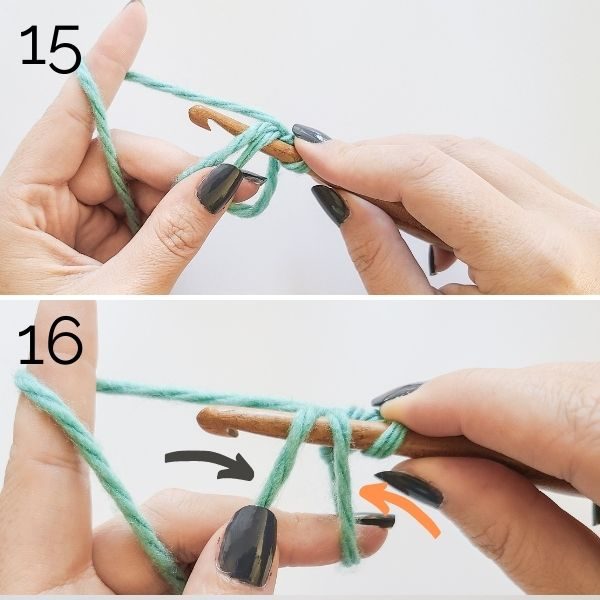
Images 17 and 18: Now, yarn over, pull up a loop, yarn over and pull through two just like you would a single crochet. The grey arrow points to the first single crochet. For all additional stitches, work Images 15 through 18.
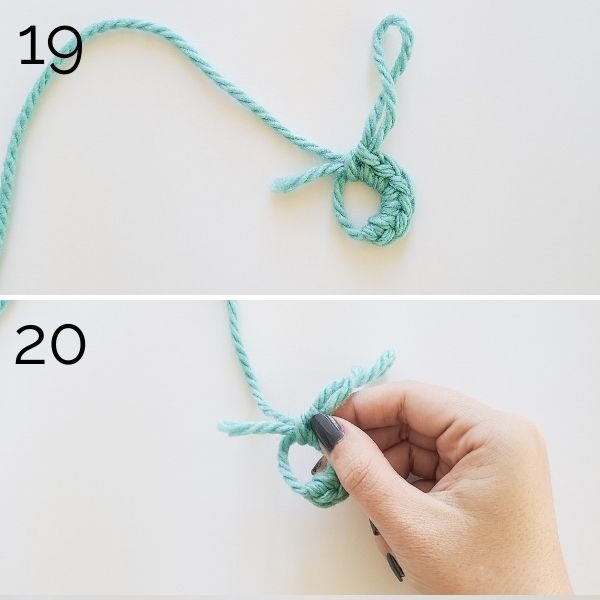
Image 19: Here I have put 6 single crochet into the crochet magic circle. You can see the single crochet stitches lined up and the magic circle is still open. We need to tighten it to finish it off.
Image 20: Hold the circle by pinching the last stitch or two you made to keep everything secure and prepare to tighten the magic ring.
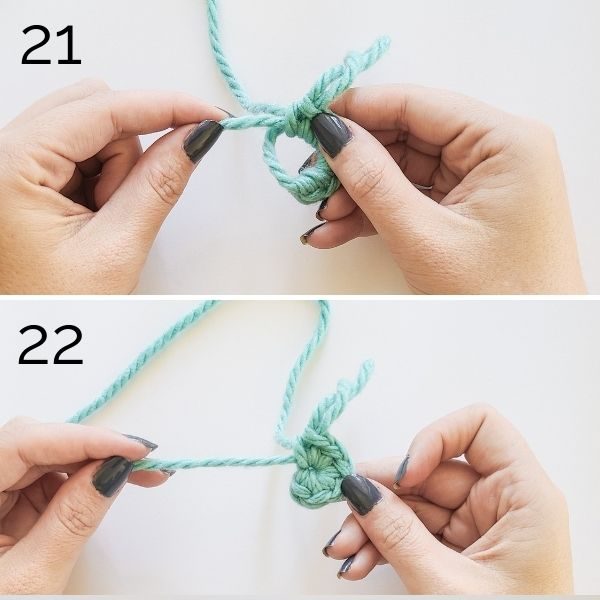
Images 21 and 22: Grab the tail of the magic circle and firmly pull the tail tight. You can pull on this tail as much as you want, it won’t ruin the integrity of your crochet magic circle.
When we started our magic circle, we made sure to leave a long tail so that we can weave in the ends and make sure everything is secured when our project is finished. Now that you have your “first round” completed, you can either drop the tail to weave it in later, crochet over the tail for a few stitches to make sure it’s extra secure before moving on or crochet over the tail completely.
For magic circles, I prefer to crochet over the tail for a couple of stitches and then weave in the tail end. This feels and has proven to be the most secure for me.
And there you have it! You now have created a crochet magic circle using this tutorial. You can continue on creating your crochet project in the round as you normally would.
You can either slip stitch to close and then chain to start your next round or you can continue placing stitches on top of the single crochets you’ve just made in a spiral. That part is up to you (or the pattern you’re following)!
I know when it’s broken down into steps and images, it can seem like a really long and daunting process. I promise, though, that with each time you create a crochet magic circle, it will get faster and easier.
With this photo and video tutorial, you should now be able to practice the crochet magic circle with confidence and have an understanding of the anatomy of the stitch. I think when learning how to do something new, it’s better to know not only HOW by also WHY. Hopefully this helped you through learning both!
Magic Circle FAQ
Is the magic circle beginner friendly?
The magic circle is absolutely accessible to advanced beginners. Someone who has never ever picked up a yarn and hook before will likely find this technique out of their skill level.
However, beginners who understand how to slip stitch, chain, work the basic stitches such as single crochet and double crochet, and have some experience working in the round will find the crochet magic circle technique in their skill level.
When can I use a magic ring in my crochet projects?
You can use a magic circle for almost any project that is worked in the round or has several stitches placed into a foundation circle to begin, like half circles or mitered squares.
You wouldn’t use this technique for anything worked in rows or long ovals worked on a base of chains.
What if the designer says to chain 4 and slip stitch to the first chain made?
You can switch out the foundation circle of 4 chains with the magic circle in any crochet project. There’s no reason a magic ring would do any damage to the integrity of the pattern versus using the traditional chain 4 foundation circle.
You wouldn’t use this technique for anything worked in rows or long ovals worked on a base of chains.
How do I make sure my adjustable loop doesn’t come undone?
By nature, the magic circle should not unravel as long as you placed the first round of stitches over the tail of yarn. This secures the tail so that it does not come loose while crocheting.
I always recommend leaving a tail to weave in with a needle so that everything is extra secure. You can certainly do this after a few rounds of crocheting, if you’re worried about the project coming undone.
It is imperative that you crochet over the tail in the first round not only so that the tail can be pulled to tighten the circle but also so the circle doesn’t come undone.
Can I put other stitches into a magic circle?
Yes, absolutely! The magic circle is not just for single crochet. You can generally put any stitch into a magic circle and you can even create chain spaces in them, like chain 2 corner spaces for granny squares.
Can the tail of the magic ring be pulled too tight?
While you do want to pull the tail of the adjustable loop tight, there can be a time where you’ve pulled it too tight. You will know you’ve done this if the circle seems to lift up off the work compared to later rows or looks puckered.
You do want the tail of your magic circle to be snug and you can pull it generally as tight as you want. But don’t pull it so tight that it seems to warp the stitches.

Shannon | Designer & Editor
Shannon helps crocheters find their next project and build their skills with in depth tutorials and crochet patterns on her blog, theloopholefox.com.
With more than a decade of crochet experience, Shannon knows that understanding why we do something matters just as much as how we do it. She teaches new techniques and crochet stitches in depth so you can crochet with confidence.
Looking for more Crochet Technique Tutorials to increase your skills and help your projects look professional? Check these out:
- How to Crochet in the Back Bump of the Chain (and why you might want to)
- How to Stacked Single Crochet (to eliminate turning chains and accomplish straight edges)
- Foundation Single Crochet (and why it’s absolutely awesome)
- Foundation Half Double and Double Crochet (and why they’re also awesome)
- Crochet Gauge: What it is and why it matters
- How to Crochet a Non-Stretchy Crochet Strap for bags
Ready to test out your magic circle skills? Check out my patterns that include the crochet magic circle technique:
Crochet Patterns for Blankets:
Crochet Shawl Patterns:
- Blooming Square
(For the In Bloom Ruana CAL) - In Bloom Ruana
- Northern Coast Shawl
- Thursday Shawl
Crochet Patterns for Kitchen & Bath:
Crochet Patterns for Granny Squares:
Crochet Accessories:
Great video! Thanks for the lesson, I learned something new & valuable 😉
I’m so glad you enjoyed it! Thank you. 🙂