
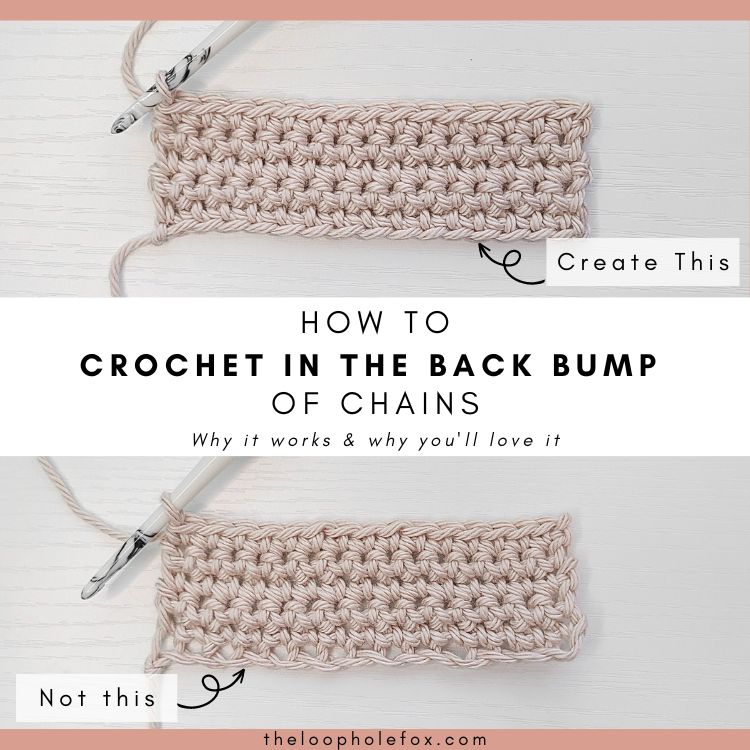
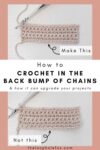
How to Crochet in Back Bump of Chain (& Why You Might Want to)
If you’ve noticed gaps between your first row and your chains, had your first row seem sloppy or wider than the rest of your rows or ever struggled to find the bottom of a chain to work your border into, you’re not alone.
The good news is there’s a way to avoid these struggles and it’s a super easy switch. If you struggle with your chains looking wonky in your crochet projects, you’ll love the crochet in the back bumps of chains technique.
What does it mean to crochet in back bump?
When it comes to the starting chain in crochet, there are a few different ways to work into it to crochet your first row. Crocheting into the back bump of the chains is one of them.
The back bump is on the back side of the chains or, essentially, behind the “V” that looks like the top of a stitch. It can be over looked as a place to put your crochet stitch into but it shouldn’t be.
When you work into only one loop of the chain, it pulls on the other side of the loop. This is what creates the big gaps that makes it look like your stitches are floating.
Crocheting in the back bump of the chains pulls on both sides of the loop. This means that both sides of the loop stay the same size and don’t allow the stitches to pull up or create gaps.
This technique is a simple change to your usual routine that can pretty significantly change the finished look of your projects.
Why choose to crochet in the back bump of chains & what this technique is good for:
Working your first row of crochet stitches in the back bump of the starting chains can totally change the finished look of your project.
Instead of unsightly gaps that can make your stitches look like they’re floating or your border like it’s falling off (even though it isn’t), the stitches stay snug against the chains and those gaps are eliminated.
The chains will also look significantly more like the top of a crochet stitch, which means that they’re easier to find and work into.
In general, the first row looks better when crocheted in the back bumps. It is usually more uniform, easier to find for working borders and is especially great for working in the round off of chains.
I would suspect that once you learn and get used to crochet in the back loop of the chain, you’ll likely always use it unless you’re specifically told not to for whatever reason.
While I can sit here and say that working into the back loop is great for everything, it is especially good for a few different situations:
- Eliminating gaps between the chains and Row 1
- Clean and uniform borders that are snug against the first row instead of “floating”.
- Projects that require chains to create big loops or handles on crocheted bags, neck line openings in rectangle Ruanas that are worked as one piece or the opening for a heel in a Christmas stocking.
- Working in the round on a long base chain for projects that are bags or pouches or hanging baskets.
- Honestly, in my opinion, it’s especially good for everything.
How do I know if the designer used this technique?
Designers should let you know if they used this technique in their patterns. Sometimes they don’t or they leave it up to you to decide if you’d like to.
If they used it for the pattern AND it’s integral to the design, they will be sure to inform you.
What if the designer didn’t use this technique but I want to?
Go for it!
There’s nothing stopping you from using the crochet in back bump technique on chains, even if the designer doesn’t specifically state that they used it.
What stitches can be worked in the back bump of the chains?
All of them. I mean it!
Unless a pattern specifically tells you not to use the crochet in back bump technique, you absolutely can with any stitches – Even stitch patterns that require you to skip chains, like the Moss Stitch or the Treble Cross Stitch.
How to Crochet in the Back Bump of Chains
This tutorial will walk you through how to crochet in the back bump of chains step-by-step with photos along the way. There will be highlights and arrows to help identify the steps as clearly as possible.
You can crochet any stitch into the back bump of the chains. For this tutorial, I’ll be using single crochet.
It’s the quickest and fastest stitch to practice with, so I’d recommend using the single crochet for practice, too.
Crochet Chain Anatomy
First things first, we need to understand the anatomy of crochet chains before we learn how to crochet in the back bump.
Of course, you could just be told where to put the hook but knowing the anatomy of a crochet chain will help you understand how the chains even work and why crocheting in the back bump can be beneficial.
So let’s talk about crochet chain anatomy and how the back bump is created when we create chains.
When we create chains, we begin with a slip knot on our hook. Then, we yarn over and pull a loop through the slip knot.
We continue doing this for as many chains as we will need for our project. This is, in simple terms, creating a series of slip knots.
Let’s take a moment to talk about what happens when we yarn over and pull through.
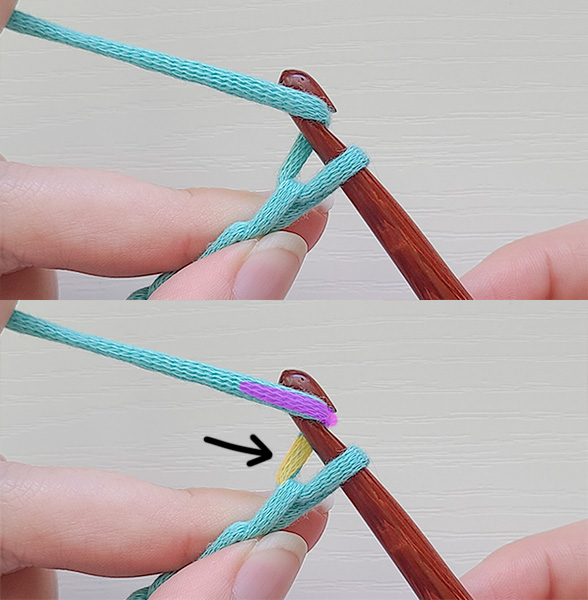
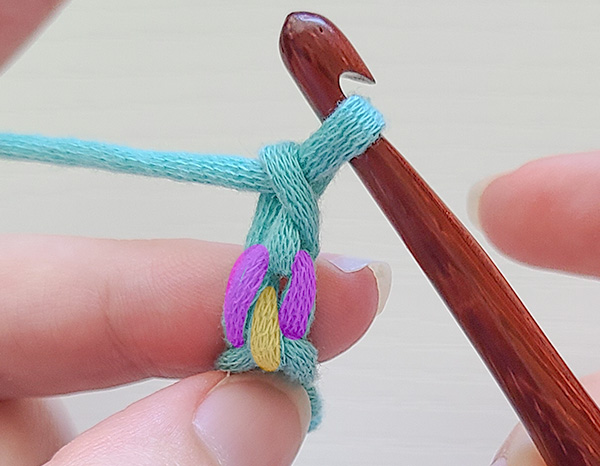
In the image above, I have yarned over and I am prepared to pull the yarn through the loop that is already on the hook. Let’s pause and look at what is happening here so we can understand the anatomy of crochet chains.
When we yarn over, one strand of yarn loops over the hook. This makes a new loop which is the “V” shape of the chain. This will be pulled through the loop that is on the hook.
What is left on the back of the chain (or “V”) is the single strand of yarn between the previous chain and our hook when we yarned over.
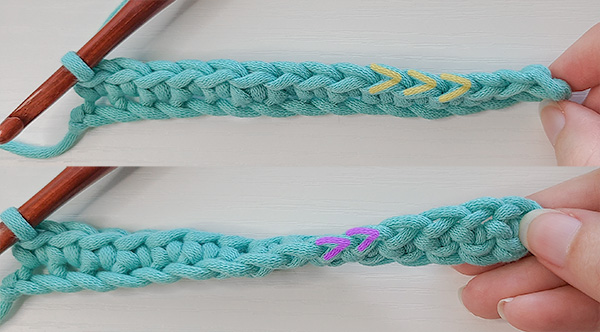
In the image above, this strand is highlighted yellow and an arrow points to it. The yarn that is wrapped over the hook to create the new loop is highlighted pink.
The pink highlighted yarn becomes the new loop or “V” of the chain. The yellow highlighted loop remains on the back side.
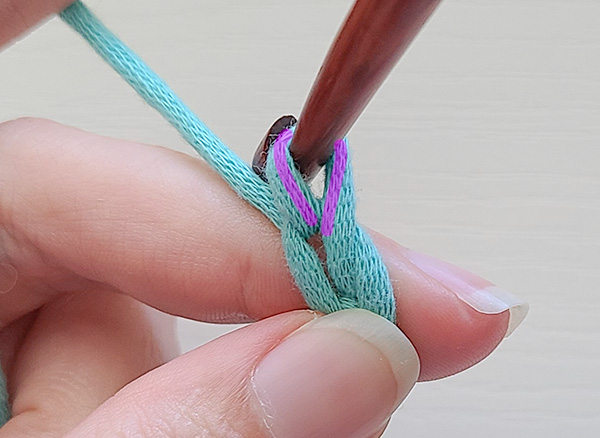
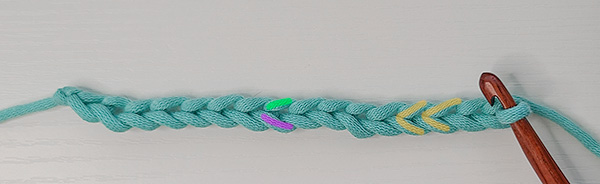
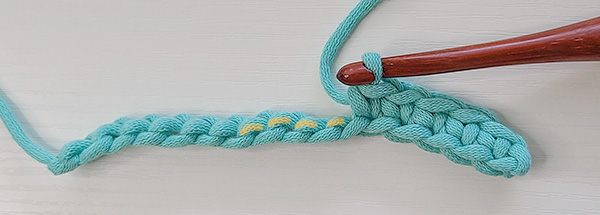
This image shows the yarn pulled through and the chain finished. We are looking at the front or top of the chain. The yarn is highlighted pink just like before.
When we look at the back side of the chain, we can see the two sides of the “V” that create the loop of the chain.
Between these two sides of the loop that make the “V” is the yarn that does not become a loop. This is highlighted yellow.
This is the “back bump” and how the back bump is created.
TIP: You might find it helpful to crochet a length of chains yourself slowly and pay attention to how the yarn is manipulated by the hook. This can help you visualize the anatomy of the chains. This can be helpful even if you’ve been crocheting for years.
Once you have a length of chains created, try pulling at the different parts of the chain and see what happens:
- When you pull on the back loop, what happens?
- The front loop gets smaller.
- The front loop gets smaller.
- When you pull on the front loop, what happens?
- The back loop gets smaller.
- The back loop gets smaller.
- When you pull on the back bump, what happens?
- Both the back loop and front loop get smaller. The length of each side of the loop stays uniform.
In this image, I’ve created 16 chains. We are looking at the chains from the “top down”, meaning that the front of the chains are facing us.
I’ve highlighted the “V” shape the chains create in yellow. This is the same as the top of a stitch (like a single crochet).
I’ve also highlighted the “back loop” of the chain in bright green and “front loop” of the chain in bright pink.
When you’re learning to crochet, you typically learn to insert your hook either into one or two chains with the front of the chains facing you. This is easiest for absolute beginners because it generally doesn’t ask them to learn anatomy and lets them get to practicing.
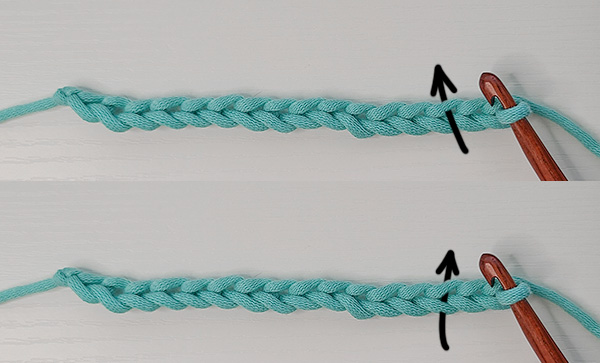
The arrows in this image show how one would insert their hook into only the “back loop” of the chain (most common) or under both loops of the chain (less common).
Both of these are valid ways to work into the chain but neither are placing a crochet stitch in the back bump of the chains.
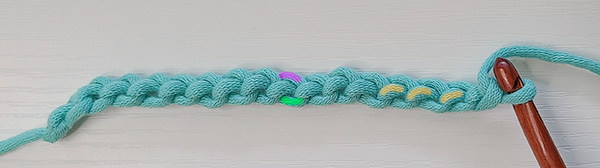
Flip your chains over to look at the back side of the chains. We can see that the chains look completely different.
The back bumps that are created by the yarn between our hook and the previous chain are now visible. They are the little bumps running horizontally along the chains. I’ve highlighted the back bumps in yellow.
These are the back bumps in which we would place a crochet stitch for the crochet in back bump technique.
I’ve also highlighted the front and back loops of the chain in bright pink and green again. Notice that these loops are upside down to how they were previously. This is because we’ve flipped the chains over.
All 3 ways of working into the chain are valid. It’s important to consider what you want out of your crochet project and how the chains will look in different portions of a project when deciding on which method to use.
Crochet in Back Bump of Chains
When we crochet into what is the back bump of the chain, we achieve a different look and feel to our first row.
Using the technique of crochet in the back bump will help our first row and chains be more uniform and snug and eliminate the starting chain gap.
To crochet in the back bump of the chain, we would insert our hook only into the yellow highlighted bumps and ignore the other two loops completely.
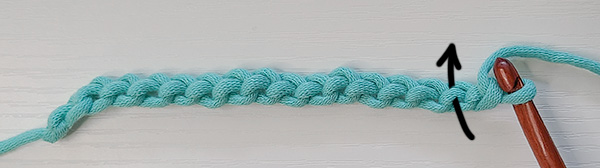
A black arrow goes through the back bump of the chain to further clarify that we will insert our hook only into this bump or loop.
As you learn this technique, you may have to use your finger to hold the back bump in place to get your hook in. That’s okay! The back bump of the chain is tighter than the other two loops in general. Don’t worry too much about having to hold the bump in place.
NOTE: If you are a tight crocheter, this might feel a bit tight. It might almost feel impossible. If this is the case, try crocheting your starting chain slightly more loose than you usually do. If your yarn is squeaking against your hook and you are struggling significantly to do this, your tension is too tight. (Don’t worry, I’m a tight crocheter, too!)
Insert your hook into the back bump, yarn over and pull a loop through. Then, yarn over and pull through 2 loops. Single Crochet complete!

Here you can see my completed single crochet.
Now, locate the next back bump and insert your hook. A black arrow goes through the back bump in the image.
Insert your hook into the next back bump of the chain, yarn over and pull a loop through. Then, yarn over and pull through 2 loops. Your second single crochet is complete.
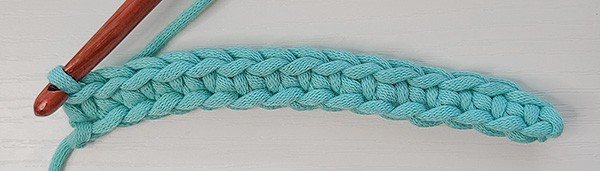
Here I have 5 single crochets completed. This is so you can see how the row would look partially worked.
Continue placing single crochets in the back bump of the chains all the way across the row.
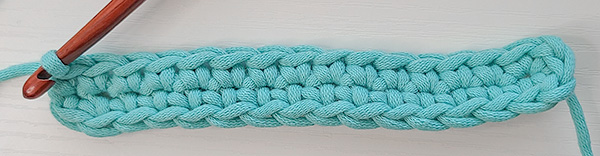
At the end of the row, you’ll have what looks like a normal first row of crochet…
…Because it is! The difference is that we don’t have the big gaps between the chains and posts of the stitches.
Take a moment to look at both the top of the row and the bottom of the chains. The tops of the single crochets are highlighted yellow. The two loops left over on the bottom of the chain are highlighted pink.
Notice how the bottom of the chains look just like the tops of the stitches we just worked?
They’re the same on both top and bottom.
What’s the Difference?
Crochet in Back Bumps VS. Back Loop of Chains
The biggest difference between the crochet in back bumps technique and crocheting in the back loop of the chains is the elimination of gaps between the chains and stitches that make it look like your first row is floating.
Eliminating these gaps can significantly improve your finished project, regardless of what the project is.
Let’s take a look:
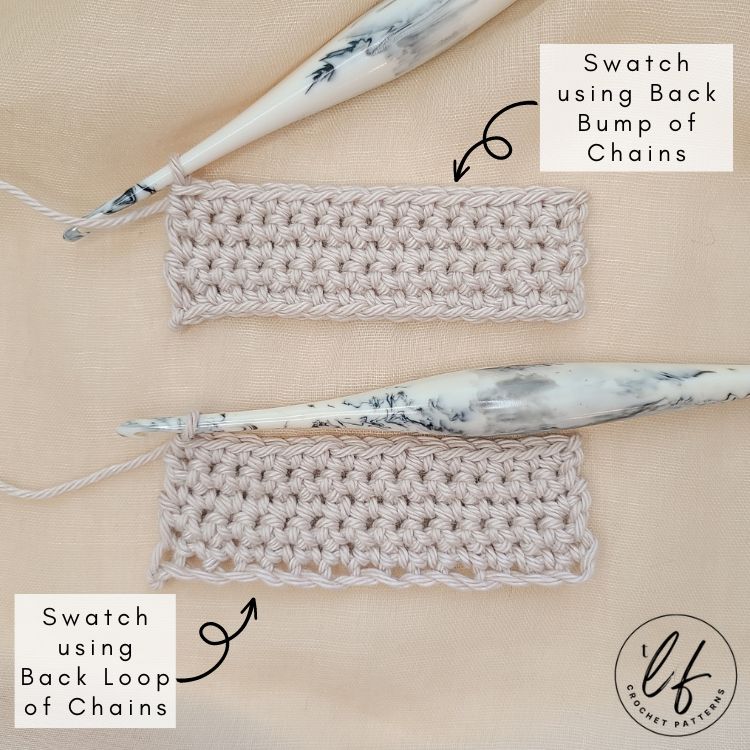
This image shows one row completed placing single crochet in back bump of the chain.
Notice how the stitches in the sit snug and uniform against the chains.

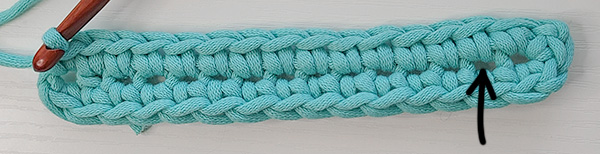
This image shows one row completed placing single crochets in the back loop of the chain.
Notice how the stitches float up off the chains a bit and create gaps at the bottom of the single crochet post. If you’ve ever crocheted before, you’ve absolutely seen this (and maybe it has driven you a bit crazy).
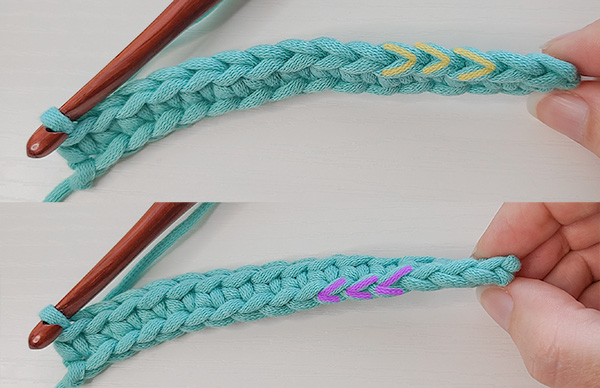
Now let’s take a closer look at the row worked in the back loop of the chains. Specifically, let’s look at the difference between the tops of the stitches and the bottom of the chains.
The tops of the stitches are highlighted yellow and look like uniform V’s.
The bottom of the chains are highlighted pink and, while they still sort of look like V’s, they’re less uniform and more difficult to find than when we worked in the back bump.
When you work into only one loop of the chain, it pulls on the other side of the loop. This is what creates the big gaps that makes it look like your stitches are floating.
Crocheting in the back bump of the chains pulls on both sides of the loop. This means that both sides of the loop stay the same size and don’t allow the stitches to pull up or create gaps.
Another way to see the difference between crocheting in the back loop of the chain versus crochet in back bump is when you work in the round or place a border.
The image above shows a round worked as if we are creating a long oval off of a base of starting chains. We can also pretend that this is a border on a project like a crochet blanket.
When you crochet in the back bump of the chains, the bottom of the chains easier to find and work into because they look like the top of stitches.
The stitches are again more snug and uniform against the bottom of the first row.
Here’s the same type of swatch but the original stitches were worked in the back loop instead of the back bump.
The gap that is apparent from the row also shows in this mini swatch that could be an example of working in the round or as a border.
An arrow points to the gap between the first row and the border or second part of the round.
These gaps are apparent because once again we are pulling on one side of the chain.
These gaps likely aren’t something that you’d want in a project and may derail the point of certain projects like bags. You wouldn’t want these small openings at the bottom of a bag, for example.
Practicing Crochet in Back Bump on Chains
From here, I’d recommend practicing placing crochet stitches in the back bump of the chains BEFORE you try to to employ this method on a big project.
When you aren’t used to a method or technique, going head first into a big project using it can make the entire project seem frustrating – even if the technique is technically “easy”.
Practice the Crochet in Back Bumps technique:
Practice by making about 20 or so chains, finding the back bump of the chains and placing crochet stitches into them.
Then, pull the row and chains apart and start again. There’s no need to cut the yarn for this practice!
Get to Know the Stitch Anatomy:
When you make a length of chains, create them slowly. Like, super slow. Pay attention to how the yarn is manipulated by the hook and what parts of the yarn create the different parts of the chain. This can be helpful even if you’ve been crocheting for years.
Once you have a length of chains created, try pulling at the different parts of the chain and see what happens:
- When you pull on the back loop, what happens?
- The front loop gets smaller.
- The front loop gets smaller.
- When you pull on the front loop, what happens?
- The back loop gets smaller.
- The back loop gets smaller.
- When you pull on the back bump, what happens?
- Both the back loop and front loop get smaller. The length of each side of the loop stays fairly uniform.
Does this mean that when stitches are placed in the back bump only, it’ll make all of my chains smaller? Nope!
Practice the technique and pay close attention to what happens when you crochet in the back bump.
Because the previous back bump of the chain will already be filled with the post of a crochet stitch, crocheting in the back bump can’t pull your chain tighter than it needs to be.
It will loosen itself to accommodate the post of the stitch that is placed there.
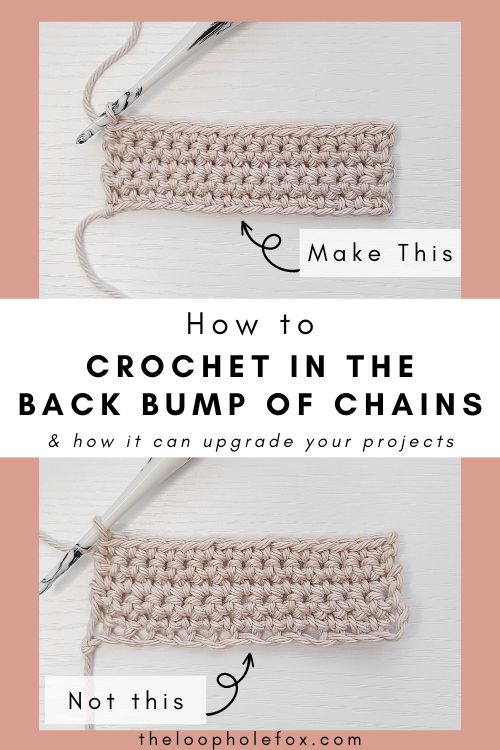
Did you enjoy this crochet tutorial on how to Crochet in the Back Bump of chains?
Share it with others and Pin it to Pinterest!
Thanks so much for hanging out with me today!
Don’t forget to join my Facebook Group so we can chat all about your creations! We are a group for crocheters of all experiences, all interests and love to hang out together. Come join the fun!

Shannon | Designer & Editor
Shannon helps crocheters find their next project and build their skills with in depth tutorials and crochet patterns on her blog, theloopholefox.com.
With more than a decade of crochet experience, Shannon knows that understanding why we do something matters just as much as how we do it. She teaches new techniques and crochet stitches in depth so you can crochet with confidence.
Looking for more Crochet Stitch Tutorials? Try these!
How to replace turning chains with Stacked Single Crochet
How to Crochet the Suzette Stitch
How to Crochet the Even Moss Stitch
How to Crochet the Arcade Stitch
How to Crochet the Linked Double Crochet
The Magic Circle: How and Why it Works
Foundation Single Crochet and Why It’s Awesome
Foundation Half Double Crochet and Double Crochet and Why They’re Also Awesome
Thanks for the pep talk about using the back bump on our foundation chain. I’ve done it a few times and yes it was frustrating. After reading this article, I will be using it consistently from now on. The picture were very helpful in encouraging me to continue this method. Thank you Shannon.
Oh my gosh, of course! I’m glad that you found it helpful. It can definitely be frustrating to change what is “normal”. It took me a while to get used to it and I’ll admit that I was a “go head first” type of person and tried using this method on several hundred chains without practicing. Being a tight crocheter in general, it was not a fun time. This is why I recommend practicing it before actually using it. I hope that with practice it becomes less frustrating and I’m always here to help if you come across any thoughts or questions. 🙂