
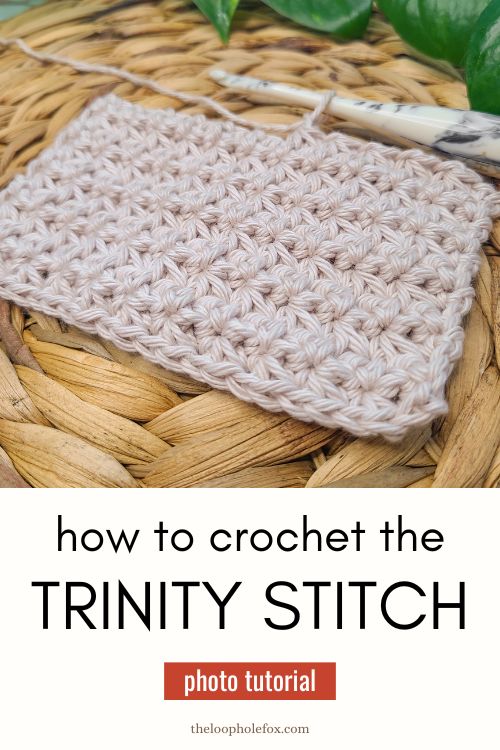
Crochet Trinity Stitch Tutorial
The Crochet Trinity Stitch has texture that is absolutely gorgeous, simple to create and is fun to crochet. Fantastic for almost any project you can think of from scarves to household items, the Trinity Stitch is a dense stitch without gaps or holes, is a strong stitch and, best of all, it’s beautiful!
This stitch is one of those crochet stitches that looks a lot harder than it is. Trying to figure out how to create this stitch just from a picture of a swatch might drive one mad. The reality of this stitch, though, is that it’s a lot easier than it looks.
What is the Crochet Trinity Stitch?
The crochet Trinity Stitch uses decreases as a cluster of stitches to create gorgeous woven texture that looks like stars or flowers.
This stitch is named “trinity” because it uses the decrease sc3tog: Single Crochet 3 Together. This creates 3 spokes and 3 = trinity, of course!
The crochet Trinity Stitch is one of the most dense crochet stitches out there. With this stitch, there’s no lacy structure, no gaps or holes and short stitches are used to create it.
This makes it a great stitch to use for projects that need to be warm, usable or protect something. It would be fantastic for scarves, hats, placemats…. you name it.
What stitches should I know before I try the Trinity Stitch?
Before you try this crochet stitch, you should know the basic crochet stitches. This means you should know and feel confident creating chains and single crochets.
It will be helpful to also know what it means to single crochet 3 stitches together (abbreviated to “sc3tog”). The crochet Trinity Stitch will be a breeze for you if you already know this decrease technique.
Don’t worry if you don’t know how to sc3tog! We will go over this decrease as it pertains to this specific stitch.
This tutorial assumes that you have basic understanding of chains and single crochets, what it means to yarn over, etc.
How is this stitch abbreviated?
I have seen this stitch abbreviated to “TS” a couple of times but honestly most designers, myself included, would more likely write out the row of instructions instead as it just makes more sense to have it written out.
You’ll see an example of how this stitch would be written in one of my patterns below.
Crochet Trinity Stitch Photo Tutorial
This tutorial will walk you through how to crochet the Trinity Stitch step-by-step with photos along the way. There will be highlights and arrows to help identify the steps as clearly as possible.
Ready to get started? Let’s go over the technical stuff first.
DISCLAIMER: This post includes affiliate links. This means, should you decide to purchase a product via one of these links, I will receive a small commission at no extra cost to you. I only recommend products I use and love (Or products I know others love, have heavily researched, know have good ratings and plan to purchase myself). These small commissions help to support this blog and continue keeping most of my patterns free. You can read more on my Privacy Policy, if you prefer.
YARN AND HOOK USED IN THIS TUTORIAL
In my tutorial photos, I’m using Bernat Maker Home Dec in colorway Aqua and my Furls Ebony Streamline Wood 6.5mm (M).
To practice the crochet Trinity Stitch, you can use any yarn you like! You can use the recommended hook size for your yarn but you may want to practice with a hook that is a half size or full size bigger.
The crochet Trinity Stitch can be a tight stitch so it’s important to watch your tension and make sure that you aren’t pulling things too tight. As you’re learning this stitch, the bigger hook may be helpful.
Once you’re comfortable with the crochet Trinity Stitch, you can go back to the recommended hook size.
Special Tip: If the yarn is squeaking on the hook or you’re finding it incredibly difficult to get your hook into stitches or chain spaces, your tension is too tight.
STITCH MULTIPLE (& WHAT THIS MEANS IN PRACTICE)
The crochet Trinity Stitch requires a stitch multiple of 2 stitches + 1 stitch. This is the stitch multiple, not the starting amount of chains.
What this means is you will need to crochet an EVEN amount of chains to include 1 turning chain. This will give you an odd amount of stitches. Any multiple of 2 stitches + 1 stitch will work with the Trinity Stitch, provided it’s more than 2 stitches. 🙂
You can chain any even amount that you’d like to achieve the 2+1 stitch multiple, the odd stitch count and have 1 turning chain to begin your first row.
For example: If you chain 20, you will have 19 stitches.
WRITTEN PATTERN EXAMPLE
Earlier in this post, I stated that most designers would likely write out the instructions instead of saying “Crochet the Trinity Stitch across the row”. It makes more sense to write it out, I think and I’ve very rarely seen it not written out.
Here’s an example of how I would write the crochet Trinity Stitch in one of my patterns:
Row 1 – 1 sc 2nd ch from hook. Starting in previous chain, sc3tog. [Ch 1, sc3tog starting in previous st]. Repeat across the row to the end. 1 sc in same ch as last sc3tog ended in.”
Row 2 – Ch 1, turn. 1 sc first st. Starting in previous stitch, sc3tog. [Ch 1, sc3tog starting in previous stitch]. Repeat across the row to the end. 1 sc in same st as last sc3tog ended in.
Then, unless I was doing something fancy, Row 2 would be repeated throughout the project.
Step by Step Instructions – Row 1
Now that we have the technical stuff out of the way, let’s walk step by step through how to work the crochet Trinity Stitch.
Chain any even amount. In this tutorial, I have chained 16. This means I will have 15 stitches across the row.
Begin Row 1 of the crochet Trinity Stitch by placing 1 single crochet in the second chain from the hook. You can see the single crochet created in the image below.
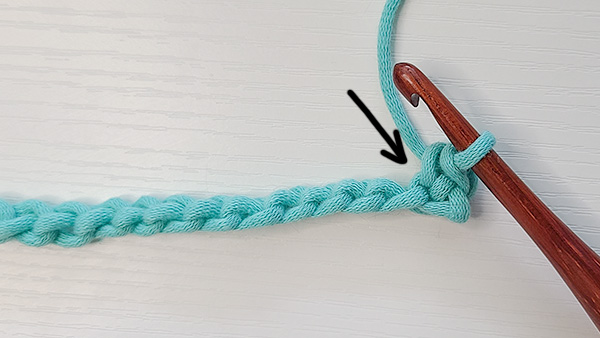
Next, we are going to Single Crochet 3 Together (sc3tog) beginning in the “previous stitch”. This is the chain we have just placed our single crochet into and a black arrow points to it in the image above.
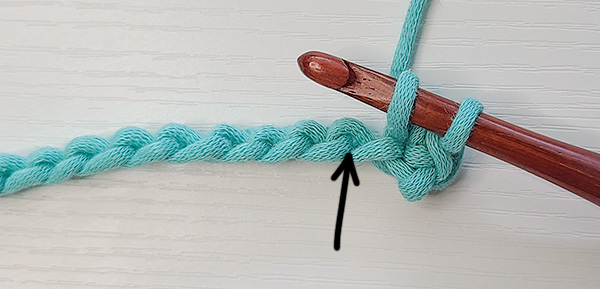
To begin your sc3tog, insert your hook into the “previous stitch” as indicated. Yarn over and pull up a loop.
You can see the loop pulled through the stitch in the image below.
TIP: Pull this loop (and the following loops) of the sc3tog up just slightly. Not so much that they feel incredibly loose on your hook, but enough to give the loop a little extra room. This will help make sure that your tension doesn’t get so tight that it’s difficult to work. This is especially helpful if you’ve never worked a sc3tog before.
This creates the 2nd of 4 loops that will be on your hook for the sc3tog. The first loop is the loop that was already on the hook prior to starting this stitch.
Now, insert your hook into the next chain as indicated by a black arrow in the image above. Yarn over and pull a loop through.
You can see the loop pulled through the stitch in the image below.

This creates the 3rd of 4 loops that will be on your hook for the sc3tog.
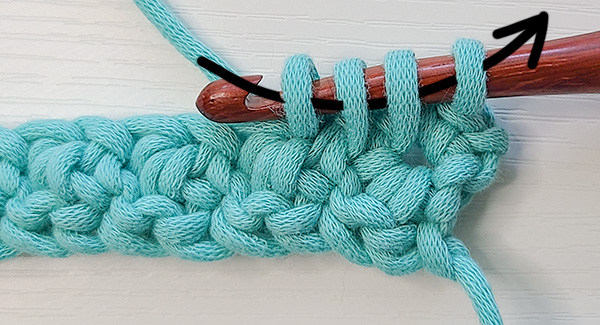
Now, insert your hook into the next chain as indicated by a black arrow in the image above. Yarn over and pull a loop through.
You can see the loop pulled through the stitch in the image below.
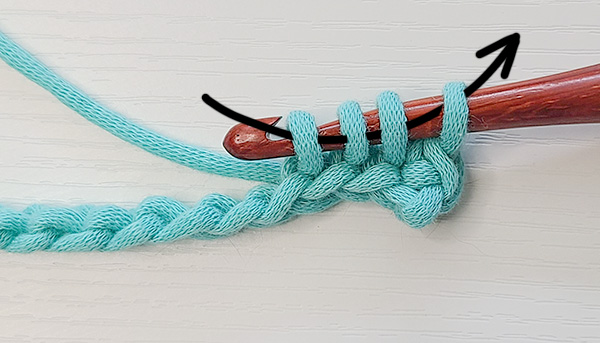
We now have 4 loops on our hook. 3 of these loops are created by yarning over and pulling a loop through 3 separate stitches. The first loop is the loop that was already on our hook before we started the sc3tog.
To finish creating the single crochet 3 together, yarn over and pull through all 4 loops on the hook as indicated by a black arrow in the image above.
TIP: When you have multiple loops on your hook in stitches like the Trinity Stitch or the Puff Stitch, it can help to rotate your hook so that the opening that grabs the yarn is facing down toward your previous row (or chains). This makes it so that the actual hook portion of the hook doesn’t grab the loops while you pull through.
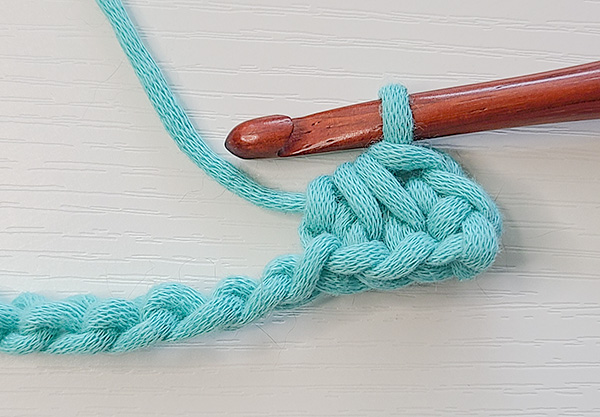
We have now completed a sc3tog starting in the previous stitch.
Now, we secure the stitch and bring the stitch count back up by creating a chain 1. Don’t pull this chain 1 tight! We will need to work into it in the next row, so make sure that you don’t pull it unnecessarily tight.
Note on Anatomy for this Stitch:
Creating the chain 1 is very important for the crochet Trinity Stitch. This stitch uses a decrease, the sc3tog, to create beautiful and interesting texture.
However, because it is a decrease, we need to make sure the stitch count stays the same throughout the project and doesn’t decrease in number of stitches over time.
While the crochet Trinity Stitch does use the single crochet 3 together which technically makes 3 stitches into 1 stitch, we only have to create 1 chain to bring the stitch count back up. This is because we started in the “previous stitch” and the sc3tog is only worked over 2 open or unworked stitches.
You can see the chain 1 created in the image below.
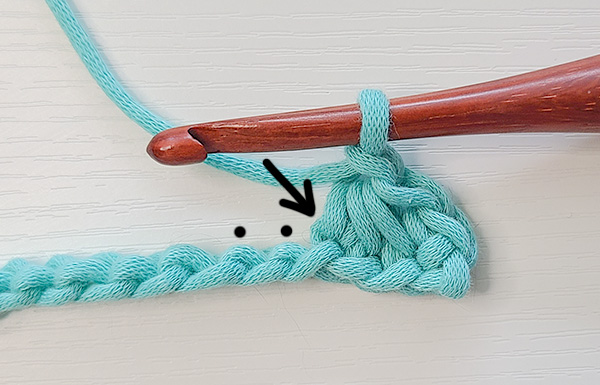
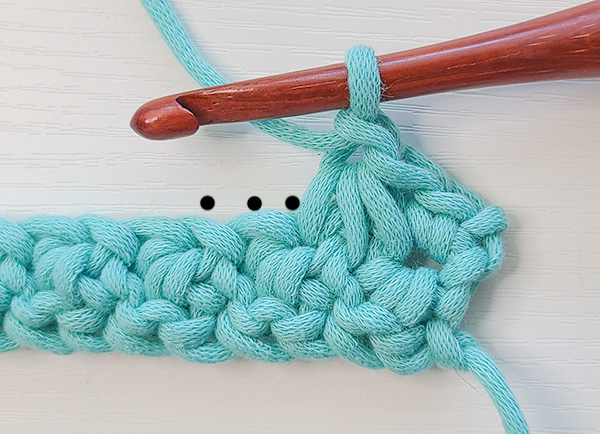
Now, we will create another sc3tog (single crochet 3 together) starting in the previous stitch and using the next 2 stitches (or chains).
You will: Insert your hook into the same chain that the previous sc3tog ended in, yarn over and pull up a loop (black arrow points to this chain in the image above). 2 loops on hook.
Then, insert your hook into the next chain, yarn over and pull up a loop (rightmost black dot in image above). 3 loops on hook.
Then, insert your hook into the next chain, yarn over and pull up a loop (leftmost black dot in image above). 4 loops on hook.
Remember: Pull these loops up just slightly so that they aren’t so tight that it’s difficult to pull yarn through them.
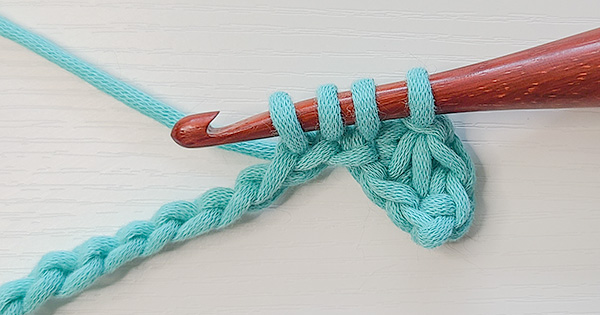
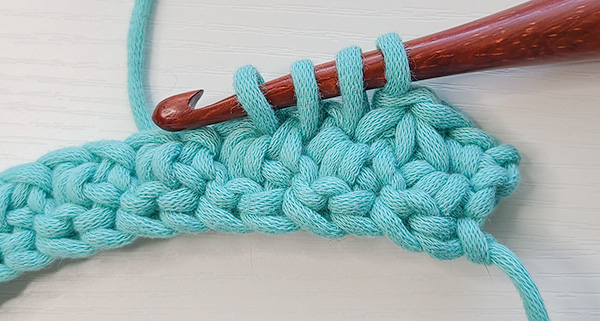
This image shows all of the above steps completed.
Now, yarn over and pull through all 4 loops on hook.
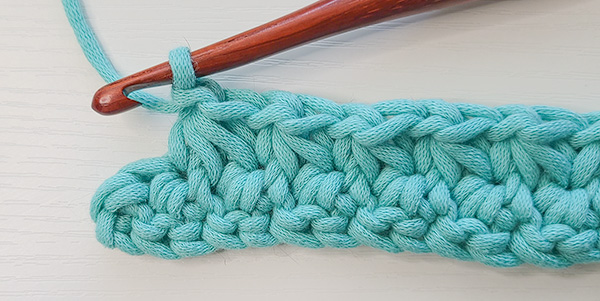
This completes another sc3tog starting in the previous stitch. Now, we chain 1 to secure the stitch and bring the stitch count back up.
Here you can see the chain 1 created.
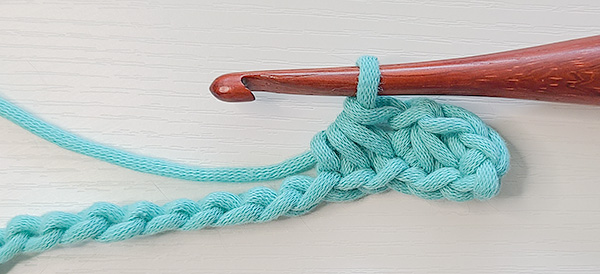
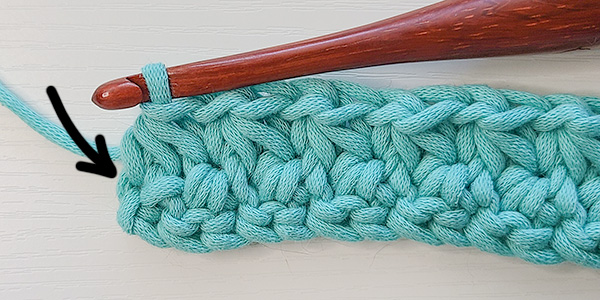
Continue creating sc3tog’s starting in the previous stitch and then chaining 1 all the way across the row until you’ve made the final sc3tog.
Here you can see I have worked most of the way across the row. I have 2 chains remaining. I will create one more sc3tog using the stitch my previous sc3tog ended in and the remaining 2 chains.
We are now at the end of the row.
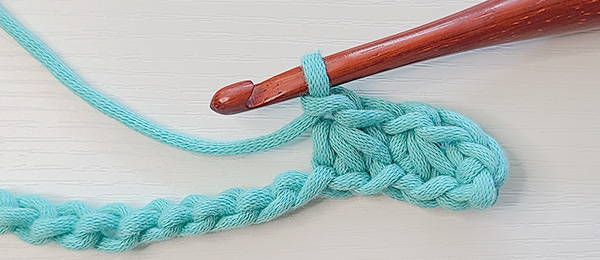
DO NOT create a chain 1 after this final sc3tog of your row.
Instead, place 1 single crochet in the same chain that your sc3tog ended in.
This maintains the stitch count and ends the row on a single crochet instead of a chain.
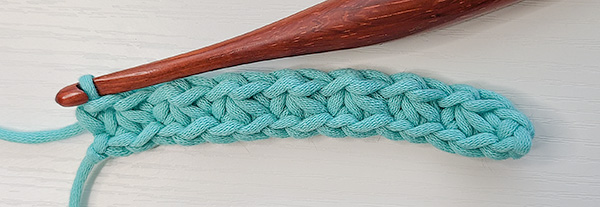
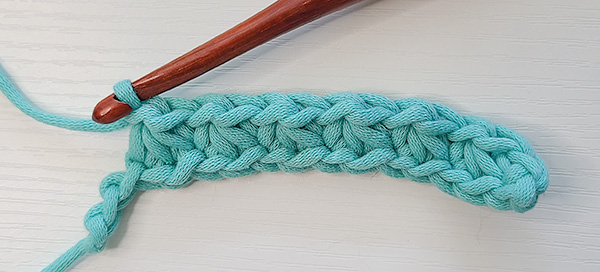
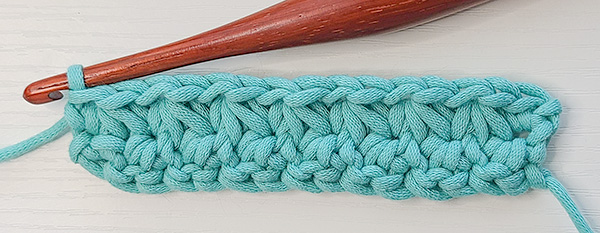
We have now completed 1 row using the crochet Trinity Stitch. I have 15 stitches.
You will have an odd stitch count that is 1 less than the amount of chains you created.
Crochet Trinity Stitch Row 2 (and all following rows)
Row 2 (and all following rows) is worked the same as Row 1 but it looks different because now we are working into stitches and not chains.
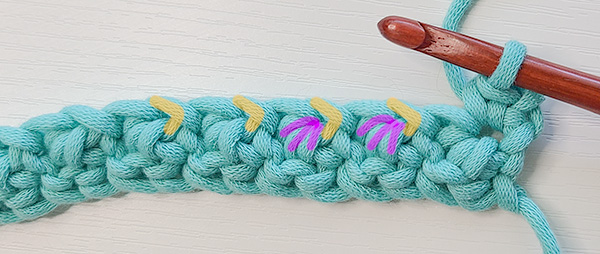
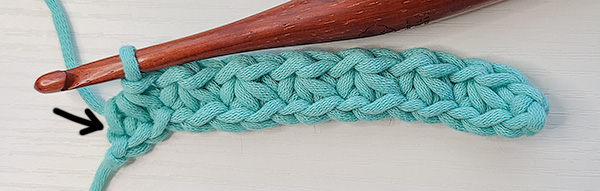
Before we continue on, it’s important to understand the anatomy of Row 1 and, specifically, what it looks like on the wrong side. This is where the crochet Trinity Stitch might throw crocheters off.
In the crochet Trinity Stitch, we count the chain 1’s as stitches which means we will work into them. If you’re not used to working into chain 1’s in stitch patterns like the one used in my Millie Hanging Baskets or Bookmark, these may not be super apparent.
In the image above, the chain 1’s are highlighted in yellow and look like sideways V’s, like this: >
The 3 loops we picked up to create the single crochet 3 together are highlighted in pink.
If you look at the work from the top of the stitches downward, you can see each stitch more clearly:
Don’t be afraid to take a good look at your stitches and how they come together so that you know the anatomy and what you’re looking for.
To begin Row 2, chain 1 and turn your work.

Place 1 single crochet in the first stitch of the row, as an arrow pointing downward indicates. You can see the first single crochet of the row made in the image below.
Now, just like with Row 1, we will create a single crochet 3 together (sc3tog) starting in the previous stitch, which is the stitch we just placed our single crochet in.
You will: Insert your hook into the same stitch that the single crochet was placed in, yarn over and pull up a loop (black arrow points to this stitch in the image above). 2 loops on hook.
Then, insert your hook into the next stitch, yarn over and pull up a loop (rightmost black dot in image above). 3 loops on hook. This stitch is the top of the last sc3tog worked in the previous row.
Then, insert your hook into the next stitch, yarn over and pull up a loop (leftmost black dot in image above). 4 loops on hook. This stitch is the chain 1 created between the second to last and last sc3tog of the previous row.
We now have 4 loops on our hook. Finish the sc3tog by yarning over and pulling through all 4 loops as the black arrow in the image above indicates.
Then, just like before, chain 1 to secure the stitch and bring the stitch count back up. You can see the chain 1 created in the image below.
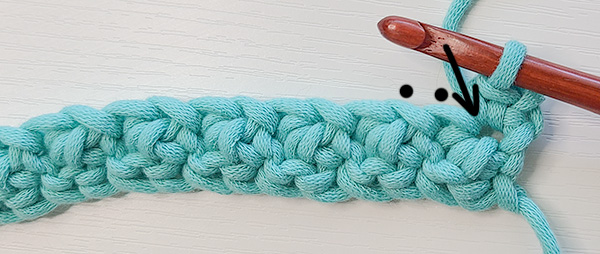
Now, we will create another sc3tog starting in the previous stitch and using the next 2 stitches.
You will: Insert your hook into the same stitch that the previous sc3tog ended in, yarn over and pull up a loop (rightmost black dot in the image above). 2 loops on hook. This is the same chain 1 stitch that the previous sc3tog ended in.
Then, insert your hook into the next stitch, yarn over and pull up a loop (middle black dot in image above). 3 loops on hook. This stitch is the top of the sc3tog from the previous row.
Then, insert your hook into the next stitch, yarn over and pull up a loop (leftmost black dot in image above). 4 loops on hook. This is the next chain 1 stitch.
We now have 4 loops on our hook. Finish the sc3tog by yarning over and pulling through all 4 loops.
Then, just like before, chain 1 to secure the stitch and bring the stitch count back up. You can see the chain 1 created in the image below.

Continue creating sc3tog’s starting in the previous stitch and then chaining 1 all the way across the row until you’ve made the final sc3tog.
Here you can see I have worked most of the way across the row. I have 2 stitches remaining. I will create one more sc3tog using the stitch my previous sc3tog ended in and the remaining 2 stitches.
We are now at the end of the row.
DO NOT create a chain 1 after this final sc3tog of your row.
Instead, place 1 single crochet in the same stitch that your sc3tog ended in.
This maintains the stitch count and ends the row on a single crochet instead of a chain.
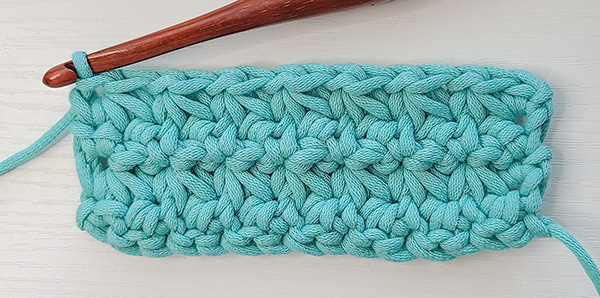
We have now completed a second row using the crochet Trinity Stitch. Your stitch count should be the same as before. For me, this is 15 stitches.
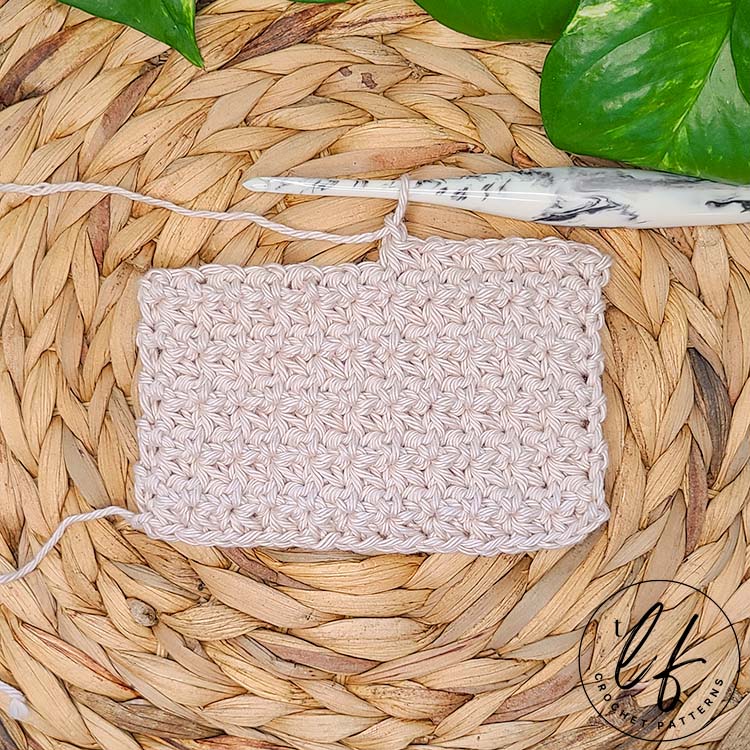
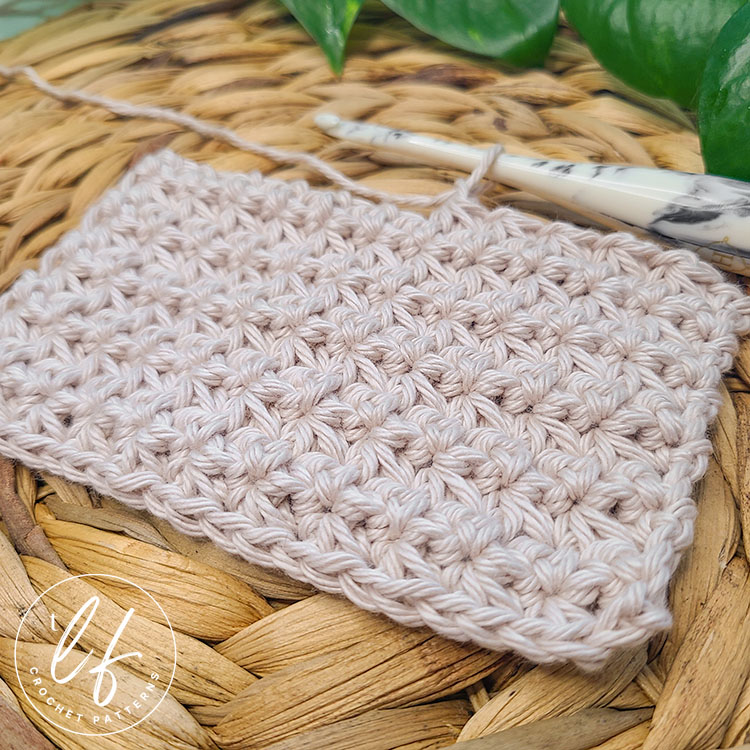
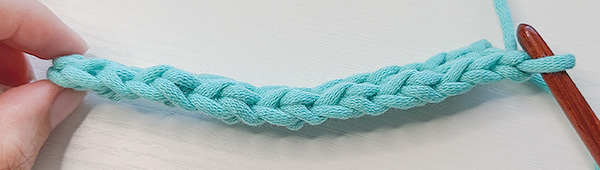
It can take some time to see the texture of the crochet Trinity Stitch. After 3 or 4 rows, the stitches texture will be much more noticeable, like this:
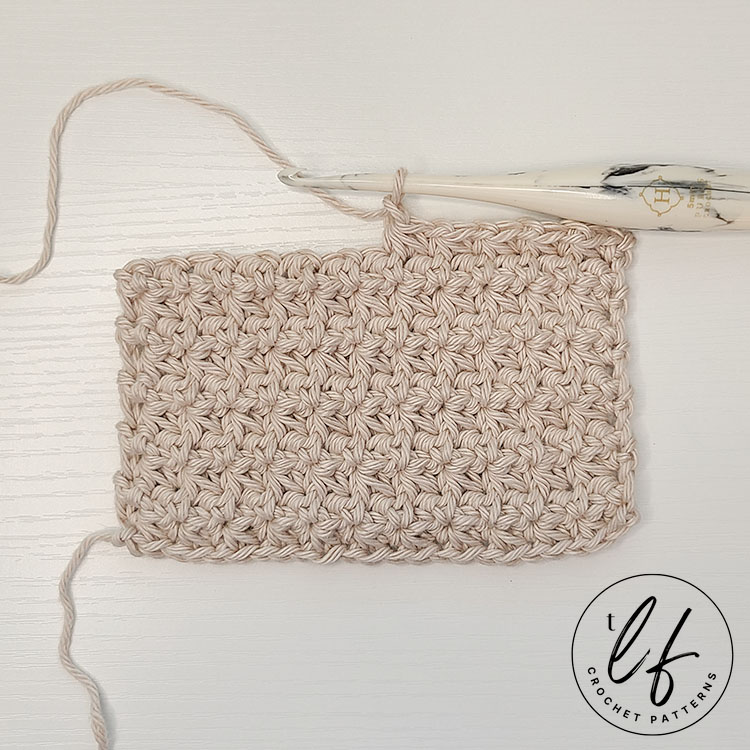
Here’s what the crochet Trinity Stitch looks like with a cream colored cotton yarn and several rows worked:
So, what do I do now?
To continue practicing the crochet Trinity Stitch, you can simply continue creating swatches of the stitch until you get comfortable with all of the steps.
You may find that once you’ve practiced it a few times, it’s actually quite a fun stitch to work!
Did you enjoy this tutorial on the crochet Trinity Stitch?
Share it with others and Pin it to Pinterest!
Thanks so much for hanging out with me today!
Don’t forget to join my Facebook Group so we can chat all about your creations! We are a group for crocheters of all experiences, all interests and love to hang out together. Come join the fun!

Shannon | Designer & Editor
Shannon helps crocheters find their next project and build their skills with in depth tutorials and crochet patterns on her blog, theloopholefox.com.
With more than a decade of crochet experience, Shannon knows that understanding why we do something matters just as much as how we do it. She teaches new techniques and crochet stitches in depth so you can crochet with confidence.
Looking for more Crochet Stitch Tutorials? Try these!
How to replace turning chains with Stacked Single Crochet
How to Crochet the Suzette Stitch
How to Crochet the Even Moss Stitch
How to Crochet the Arcade Stitch
How to Crochet the Linked Double Crochet
The Magic Circle: How and Why it Works
Foundation Single Crochet and Why It’s Awesome
Foundation Half Double Crochet and Double Crochet and Why They’re Also Awesome
