
How to Crochet the Bobble Stitch
Looking to add some fun and funky texture to your crochet projects? You’ll love the Bobble Stitch! Created by placing many half-finished stitches into one, the crochet Bobble Stitch creates a round, raised texture and looks like, well, a bobble!

What is the crochet Bobble Stitch?
Technically, the Bobble Stitch is a cluster of 5 double crochet (that’s US double crochet!) all worked into the same stitch. The crochet Bobble Stitch is worked on the wrong side of the work.
What this technique does is create a big cluster of stitches which, when worked next to very short stitches like the single crochet, push out to the right side of the work.
Because so many stitches are worked together in one stitch, there isn’t enough room for them to lay flat so they push out to the right side of the work like little orbs. Cool, right?
What stitches should I know before I try this stitch?
Before you try this crochet stitch, you should know the basic crochet stitches. This means you should know and feel at least somewhat confident creating chains and working single crochet, half double crochet and double crochet stitches.
Essentially what this means is as long as you can work a double crochet and understand the technical parts to working a double crochet (how to insert your hook into a stitch, how to yarn over, how to pull through loops, etc.), you can work a Bobble Stitch.
There’s nothing super advanced or fancy to this crochet stitch. It’s easier than it sounds!
What can I use the crochet Bobble Stitch for?
There are a ton of different uses for the crochet Bobble Stitch. You can “write” words or “draw” shapes with them, create them as textured polka-dots or just use them for a bit of fun texture. The possibilities really are endless!
How is the Bobble Stitch abbreviated?
The Bobble Stitch is most usually abbreviated as BO. You might also see it abbreviated as BS. It might even be listed as dc5tog (double crochet 5 together) in the same stitch!
This is why it’s always so important to check the abbreviations of a crochet pattern before you get started. Sometimes a crochet stitch is abbreviated slightly differently to other patterns you might have used.
How to Crochet the Bobble Stitch
This crochet Bobble Stitch tutorial will show you step-by-step how to work this stitch with photos along the way. There will be highlights and arrows to help identify the steps as clearly as possible.
Ready to get started? Let’s go over the technical stuff first.
DISCLAIMER: This post includes affiliate links. This means, should you decide to purchase a product via one of these links, I will receive a small commission at no extra cost to you. I only recommend products I use and love (Or products I know others love, have heavily researched, know have good ratings and plan to purchase myself). These small commissions help to support this blog and continue keeping most of my patterns free. You can read more on my Privacy Policy, if you prefer.
YARN AND HOOK USED IN THIS TUTORIAL
To practice the crochet Bobble Stitch, you can use any yarn you like! Choose a hook size that corresponds with the yarn weight you’re using and you’re good to go.
In my tutorial photos, I’m using Bernat Maker Home Dec in colorway Aqua and my Furls Ebony Streamline Wood 8mm (M).
WRITTEN BOBBLE STITCH INSTRUCTIONS
To work a Bobble Stitch (BO or BS), you will:
[Yarn over, insert your hook into the indicated stitch, yarn over and pull up a loop. 3 loops on hook. Yarn over, pull through 2 of the 3 loops.]
Repeat the instructions inside brackets 4 MORE times in the same stitch. You will have 6 loops on hook. Yarn over, pull through all 6 loops.
You’ve created a crochet Bobble Stitch!
Step by Step Instructions
Now that we have the technical stuff out of the way, let’s walk step by step through how to work a crochet Bobble Stitch.

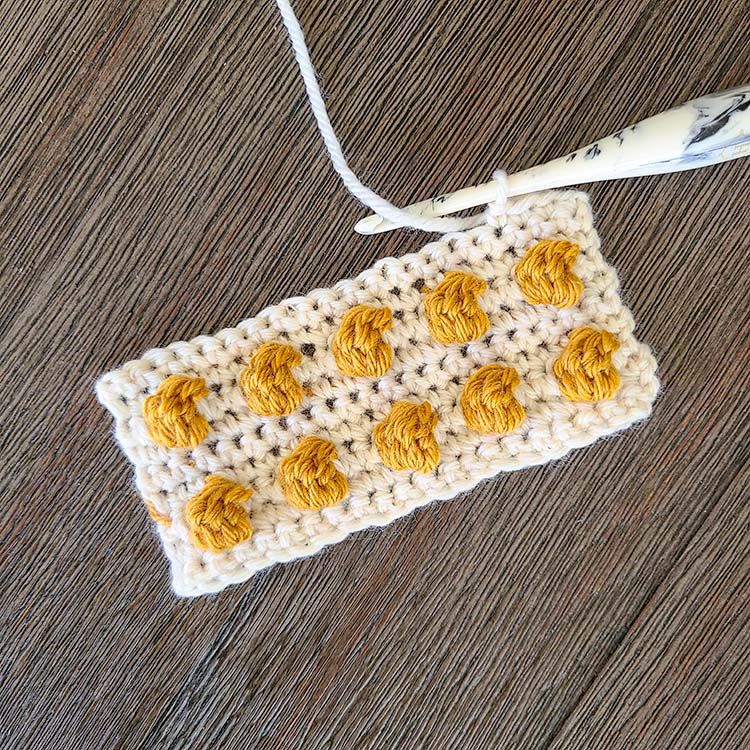
For this tutorial, I am using a swatch of 5 rows of 12 single crochet. You will most often see Bobble Stitches worked next to single crochets, as it needs the short stitch to help it puff up.
I have placed 2 single crochets in this row so far. Typically most patterns will have you start with 1 or 2 single crochet in the row before working a Bobble Stitch.

To begin our crochet Bobble Stitch, we will yarn over and insert our hook into the indicated stitch.
We will then yarn over and pull up a loop.
We will have 3 loops on our hook.

Now we yarn over and pull through 2 loops. We have 2 loops remaining on the hook.
We have now created 1 half-finished double crochet.
We need to create 4 MORE half-finished double crochets.

So, we will yarn over and insert our hook into the same stitch.
In this image, an arrow points to the stitch in which we will insert our hook. This is the same stitch we just completed 1 half of a double crochet in.

Then we yarn over and pull up a loop. There will now be 4 loops on our hook.
We yarn over and pull through the first two loops. 3 loops remain on the hook.
We now have 2 half-finished double crochets in one stitch!

We repeat these instructions 3 more times (a total of 5 times) until there are 5 half-finished double crochets all in the same stitch.
There will be 6 loops on your hook. These loops are marked with black dots in this image.
Yarn over and pull through all 6 loops.

We have now completed a crochet Bobble Stitch!
While that technically is all there is to a Bobble Stitch, it’s always good to know what comes next.

Typically the crochet Bobble Stitch is accompanied by a single crochet (and sometimes a slip stitch). These shorter stitches are what pull down the Bobble Stitch and make it puff up on the right side of the work.
You’ll place a single crochet in the next stitch to continue crocheting.
It can be difficult to see the next stitch because of all the half-finished double crochets. They have a tendency to cover the next stitch a little bit. Don’t be afraid to push or pull them out of the way, if you need to!
The next stitch has an arrow pointing to it in this image. This is where we will place our single crochet.

Notice how when we place the hook into the next stitch, the Bobble Stitch rotates downward with the hook.
This tension is what causes the stitch to puff up on the other side.

With the single crochet placed, we can now take a look at the tops of the stitches and see how they differ.
In this image, both of the pictures are the same. The bottom image is highlighted for clarity.
I’ve highlighted the tops of the single crochets in pink and the tops of the Bobble Stitch in yellow.
Notice how much more elongated the top of the crochet Bobble Stitch is? The top of this stitch is longer than the tops of the single crochets because it has wrapped around so many half-finished double crochets.
Interesting, right?

With the Bobble Stitch completed and it pulled down by the single crochet, we can now flip our work over and see what it looks like from the right side of the work.
From the wrong side, it doesn’t look like it’s doing much but now, from the right side, we can see just how much this stitch puffs up.

Here is how it would look if we placed another bobble stitch in the next stitch.
Let’s pause here and talk about spacing when it comes to the crochet Bobble Stitch.
The amount of single crochets you work between the Bobble Stitches will increase the amount of space between them. So, if you want virtually no space like in the image above, you’d work only 1 single crochet. If you wanted more space, you’d work more single crochets.
The more single crochets you place between each Bobble Stitch will increase the space between them.

Here I have finished the row by alternating 1 Bobble Stitch and 1 single crochet.
It’s important to see how this row leans and how you’ll identify the tops of the stitches to work into for the next row before you head off to practice.
This image has the same picture twice, but the bottom picture is highlighted. I have highlighted the tops of the bobble stitches in yellow and the tops of the single crochets in pink.
Notice how the tops of these stitches lean backward and how it could be very easy to accidentally skip a stitch when working the next row.

So let’s chain 1 and turn. Here we can see why the tops of the stitches lean backward. The crochet Bobble Stitches have so much “pouf” to them that they naturally push the tops of the stitches backward.
In this image, looking straight down at the swatch, we can’t even really see the tops of the stitches.
How do we make sure we don’t accidentally skip a stitch?

When you turn your work, the first stitch will usually be a single crochet. This single crochet is going to be a bit more stretched than normal if it is next to a Bobble Stitch.
The pictures in this image are the same but I have highlighted the bottom picture for clarity.
The top of the single crochet stitch is highlighted in a bright pink.
This is where we will place our first stitch of the new row.

Now with the single crochet placed, the next stitch will go in the top of the Bobble Stitch.
In this image, you can see I’ve highlighted the top of the Bobble Stitch in the bottom picture.
It can be a little difficult to see and, until you are comfortable with the stitch, it may be easier to look at it from the top down to ensure that you’re placing your hook into the correct place.

When you look at the work from the top down, you can see the top of the bobble stitch much easier.
After some practice, you’ll be able to find the top of the Bobble Stitch without having to look at the top down.
It is an easy way to identify the tops of the stitches to make sure that you’re placing the stitches of your next row correctly.
So, what do I do now?
To continue practicing the crochet Bobble Stitch, you can simply continue creating swatches of single crochets to work Bobble Stitches into. Then you can move on to using the stitch in patterns or even creating your own words or shapes with them!
You can even practice making the crochet bobble stitch using treble crochets instead of double crochets!
To work a Treble Bobble Stitch, you will:
[Yarn over twice, insert your hook into the indicated stitch, yarn over and pull up a loop. 4 loops on hook. Yarn over, pull through 2, yarn over, pull through 2 loops].
Repeat the instructions inside brackets 4 MORE times in the same stitch. You will have 6 loops on hook. Yarn over, pull through all 6 loops.
You’ve created a treble crochet Bobble Stitch!
You should now feel confident working the crochet Bobble Stitch and using it in almost any pattern that calls for it!
I hope you’ve enjoyed this tutorial and that you can move forward crocheting all your favorite patterns that use Front Post Stitches with confidence. Thanks so much for hanging out with me today!
Don’t forget to join my Facebook Group so we can chat all about your creations! We are a group for crocheters of all experiences, all interests and love to hang out together. Come join the fun!

Shannon | Designer & Editor
Shannon helps crocheters find their next project and build their skills with in depth tutorials and crochet patterns on her blog, theloopholefox.com.
With more than a decade of crochet experience, Shannon knows that understanding why we do something matters just as much as how we do it. She teaches new techniques and crochet stitches in depth so you can crochet with confidence.
Looking for more Crochet Stitch Tutorials? Try these!
How to Crochet the Suzette Stitch
How to Crochet the Even Moss Stitch
How to Crochet the Arcade Stitch
How to Crochet the Linked Double Crochet
The Magic Circle: How and Why it Works
Foundation Single Crochet and Why It’s Awesome
Foundation Half Double Crochet and Double Crochet and Why They’re Also Awesome
