
How to Place a Front Post Stitch on a Single Crochet
When working post stitches, you’ll usually find them worked on stitches that are taller like the double crochet. It’s fairly rare that you’ll see crochet patterns instructing you to place front post stitches on a single crochet. It’s not completely unheard of, though and if you love working post stitches, you’ll love being able to place them on single crochets.

The thing about single crochets is they don’t have anywhere near as tall of a post as a double crochet, so it’s difficult to know where it is and how to work around it. It may even look like they don’t have a post at all though technically they do.
This makes working front post (or back post) stitches into single crochets a uniquely different experience than it is to work one around a double crochet or other taller stitch.
For this tutorial, we will focus on how to place Front Post Double Crochet stitches into a single crochet stitch. We will talk about the anatomy of single crochets, how to figure out where the post is and, of course, go step by step through how to place a stitch around the post.
What stitches should I know before I try placing a front post stitch on a single crochet?
Before you try this technique, you should know the basic crochet stitches. This means you should know and feel confident creating chains and working single crochet, half double crochet and double crochet.
You should also be familiar with working the Front Post Double Crochet before trying this stitch. Knowing how to work a front post stitch in general will greatly help you understand and follow this tutorial.
This tutorial assumes that you have some basic understanding of what the post of the stitch is and/or that you are familiar with Front Post Double Crochet, as this is a slightly more advanced technique.
Working around the post of a single crochet is what I would consider more advanced than working around the post of a double crochet, so I definitely recommend you follow the Front Post Double Crochet tutorial I have linked above before following this tutorial, if you aren’t already familiar with front post stitches.
How to Place a Front Post Stitch on a Single Crochet
This crochet technique tutorial will show you step-by-step how to work around the post of a single crochet with photos along the way. There will be highlights and arrows to help identify the steps as clearly as possible.
For this tutorial, I am using a swatch of 4 rows of 12 single crochet. The front post stitch I have chosen to use in this tutorial is the Front Post Double Crochet.
Single Crochet Anatomy
First thing’s first, we need to talk about the anatomy of a single crochet and what the post of a single crochet even is.
As you know from your crocheting experience, single crochets are short stitches that are very dense and don’t leave a bunch of space between stitches like double crochets do.
We need to understand the anatomy of a single crochet before we can understand how to work around it’s post.
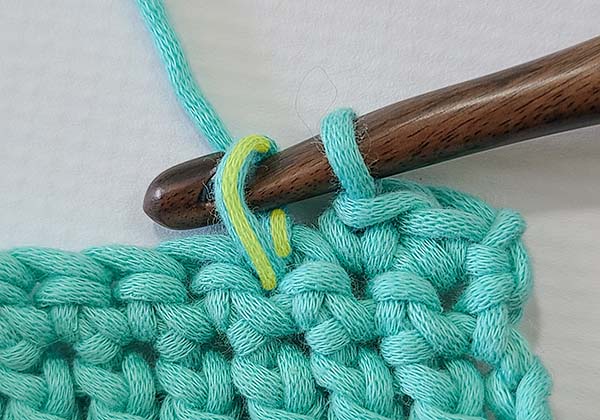
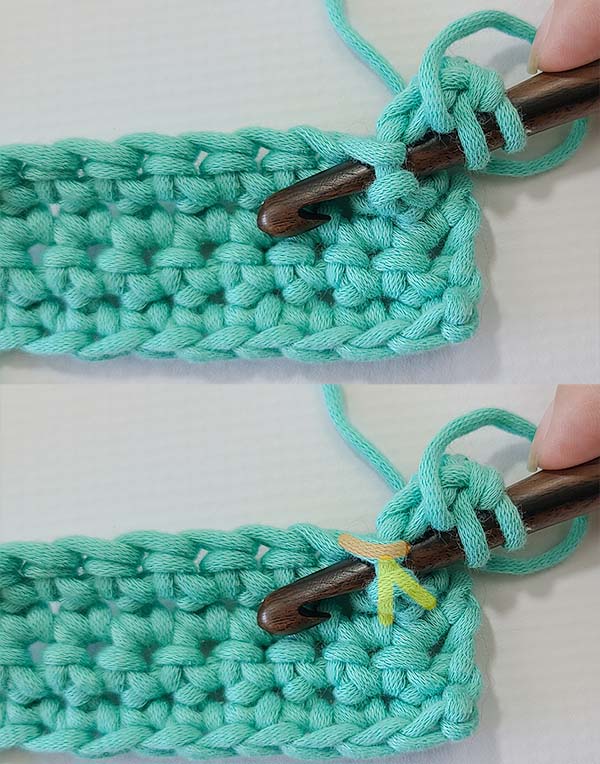
The first thing we do when we create a single crochet is we insert our hook into the stitch, yarn over and pull up a loop.
I’ve highlighted the loop yellow here.
When we pull this loop through, you can see how it is an upside down tear shape because the two sides of the bottom of the loop are held together in the top of the stitch below.
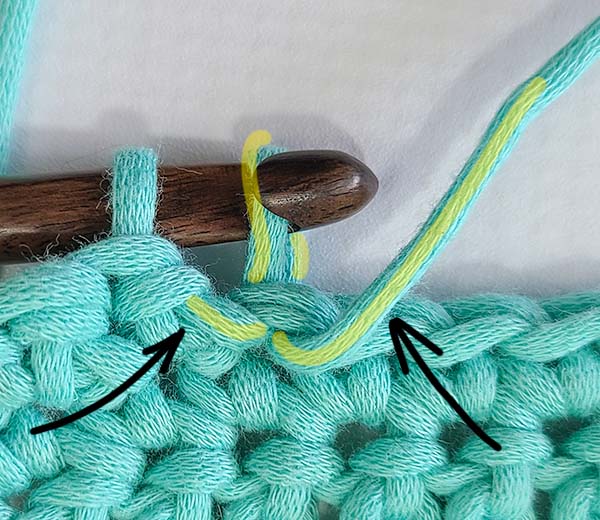
When we look at the back side, we can see how the yarn that makes up the bottom of that tear shape go in opposite directions.
The side that is held tight by the previous stitch leans backward like a back slash ( \ ) and the side that is our working yarn leans forward like a forward slash ( / ).
See how these two parts create what looks like a very wide V?
Let’s finish the single crochet as we normally would by yarning over with the working yarn and pulling a loop through both of the loops on our hook.
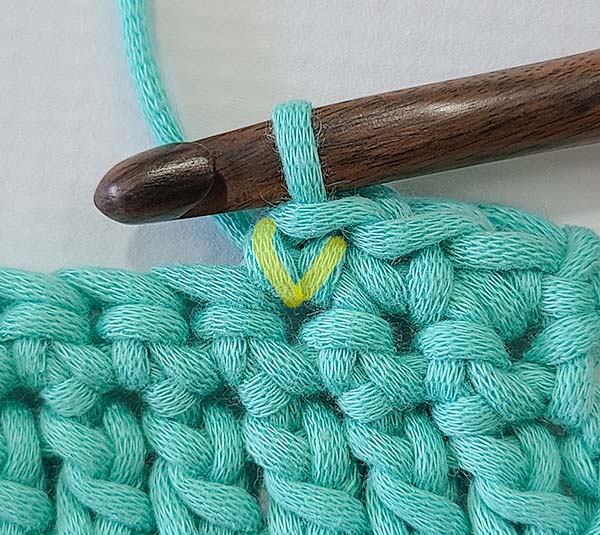
Looking at the finished single crochet from the right side, we can clearly see the loop (or upside down tear drop shape, highlighted yellow) that was in the first image of this tutorial.
It is now topped with the top of the stitch and, of course, a loop is pulled through it to secure it and start the next stitch.
This highlighted portion of the single crochet is technically it’s post.
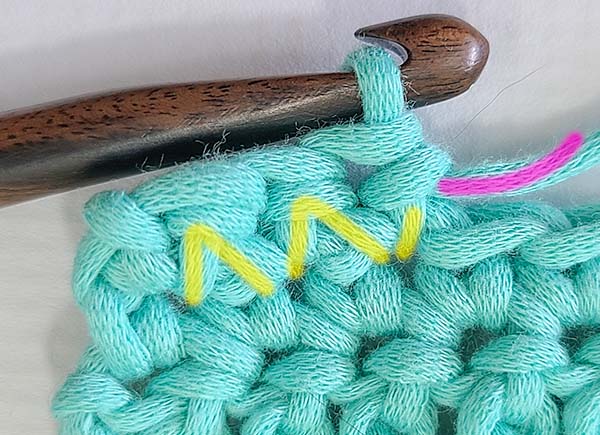
Now, let’s look at the wrong side, which is what we would look at if we work in rows. The wrong side of a single crochet looks different than the right side.
First, let’s look at the stitch anatomy in terms how the yarn was manipulated in order to make the single crochet.

These two images are the same, but I’ve highlighted the bottom image for clarity. You can see the work as you would on your own project on the top image and, on the bottom image, I’ve highlighted stitches yellow and pink.
Looking at the wrong side of these stitches, we can see “V”s. The yellow V is the stitch we just worked and the pink V’s are the 2 previous single crochets.
When we view these stitches from the wrong side, notice how the post is a V instead of an upside down tear drop shape.
These V’s are where we have placed our single crochet’s but they are NOT the post.
The “post” is technically made up of 1 half of each V, despite the fact that a “whole” V is where the stitch was worked.
For example, take the right most bar of the pink V and the left most bar of the yellow V. That’s technically the post.
Now, let’s look at the actual post of the stitch!
Let’s look at the same image a different way. The V’s are now upside down under the top of the stitch.
Imagine that we have taken the right bar of the pink and the left bar of the yellow V’s above and made them into an upside down V.
This is the post of the single crochet!
Clear as mud, right?
This is where the single crochet differs the most from the taller stitches, like the double crochet. The post of the double crochet is very clearly worked and stands above the top of the stitch it was worked into. Double crochets have a very clear post of the stitch and it’s much easier to understand where the post is and how to work around it.
The post of the single crochet looks incredibly different depending on what side you work it on.
So, what does this all mean? Why is all of this knowledge important to understanding how to work a front post stitch on a single crochet?
Well, in my opinion, we must know and understand how the stitches are made and what their anatomy is to truly understand why we work a stitch or technique the way we do. When we know why we do something, it makes it that much easier to learn and understand a new stitch or technique.
So, let’s place a front post stitch on a single crochet.
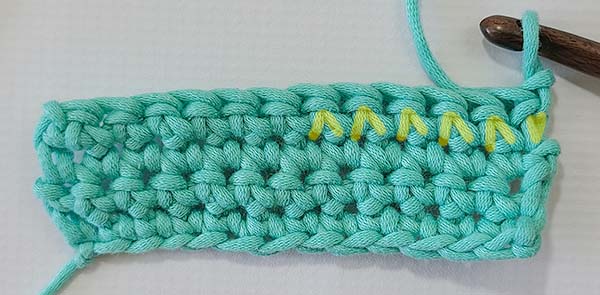
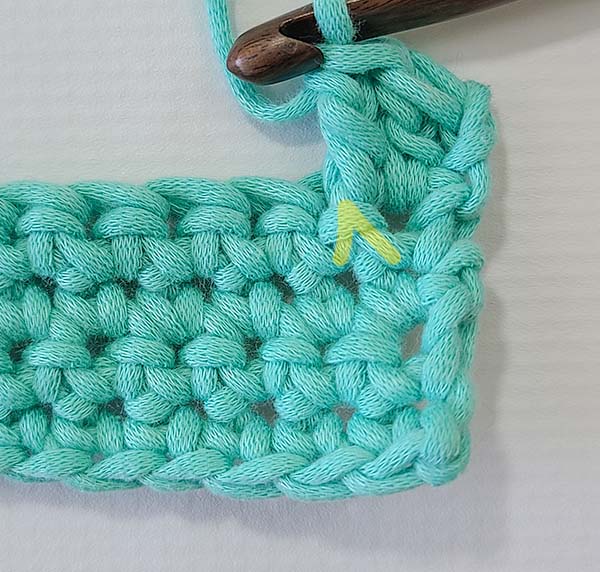
Here is my swatch of 12 single crochet in 4 rows. We are ready to work our next row so I have highlighted the posts of these stitches with upside down V’s in yellow.
Let’s say that we are following a pattern that asks us to place 1 double crochet in the first stitch and 1 front post double crochet in the next stitch.
We will place our double crochet in the first stitch as normal.
Now we need to place our front post double crochet.
This is where the stitch anatomy knowledge is important. We will go in through the top of the first single crochet and come out through the top of the next single crochet to properly wrap around the post.
This is why it’s important to not only know what the post of the single crochet is but also how the single crochet is made and to understand that where the stitch was worked does not equal the post of the stitch, like it does with the taller stitches.
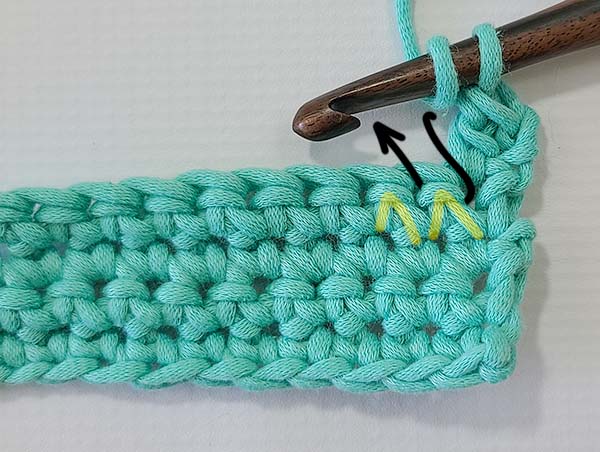
To place 1 front post double crochet around the post of the next single crochet, we will follow the direction of the black arrow in the image above.
We will: Yarn over, insert our hook into the SAME stitch that we just placed a double crochet in and, instead of yarning over and pulling a loop through, we will bring the hook back to the front of the work through the next stitch.
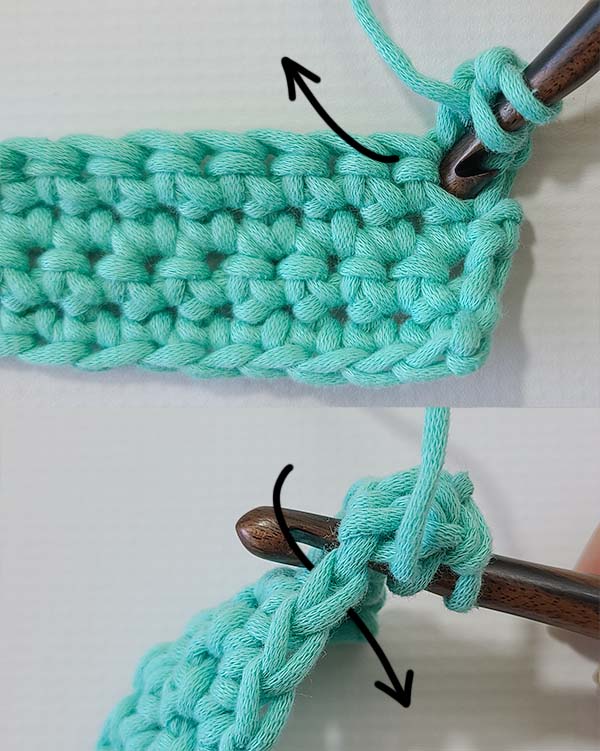
So we will yarn over and insert our hook into the same stitch we just placed a double crochet in.
And, when the hook is inserted into the stitch, we will then insert our hook from back to front through the top of the next stitch.
With the hook inserted from front to back in the first stitch and back to front in the next stitch, it it will look a bit wonky. Don’t worry, this is how it’s supposed to look!
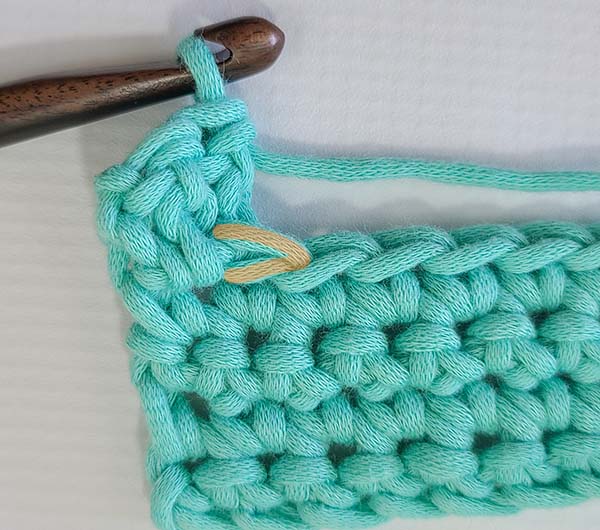
In this image, I have highlighted the tops of both of the single crochets we have inserted our hook into with orange.
The top of the stitch that has already had a double crochet placed into it has the highlight broken where the double crochet is.
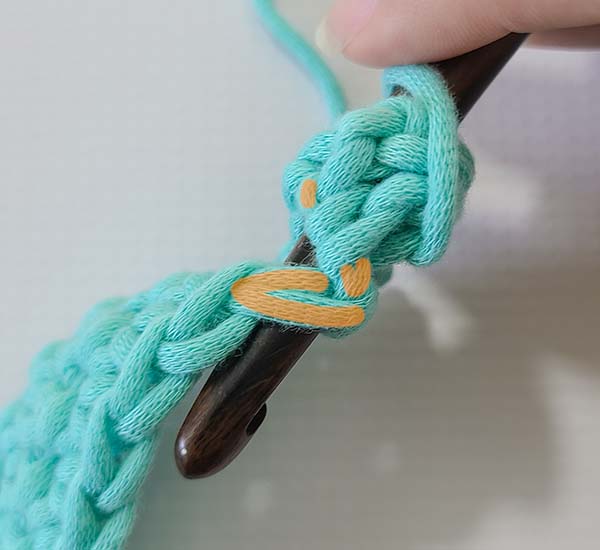
With the hook inserted properly around the stitch, your work should look like this.
In the bottom image, I’ve highlighted the post of the single crochet in yellow and the top of the stitch in orange.
If we were to turn our work around and look at it on the backside, we would notice that we have wrapped our hook around the upside down tear drop shape (as shown in the third image of this tutorial).
From here, we finish our front post double crochet as we normally would. We yarn over, pull up a loop. Yarn over, pull through 2 loops and yarn over, pull through 2 loops.
Here is our finished front post double crochet!
You can see how it is wrapped around the post of the single crochet below.
Just like all other front post stitches, we make sure that we “skip” the top of the stitch we just worked around to make sure we don’t unnecessarily increase our work.
In this image, we can see the work from the back or “wrong” side to clearly identify the top of the stitch that will not be worked into. It is highlighted orange.
If you were instructed to place another front post stitch around the next single crochet instead of a regular double crochet, you would insert your hook into this highlighted stitch. It would still technically count as not worked (as it should) but you’d need to utilize the top of this stitch to wrap around the post of the next single crochet.
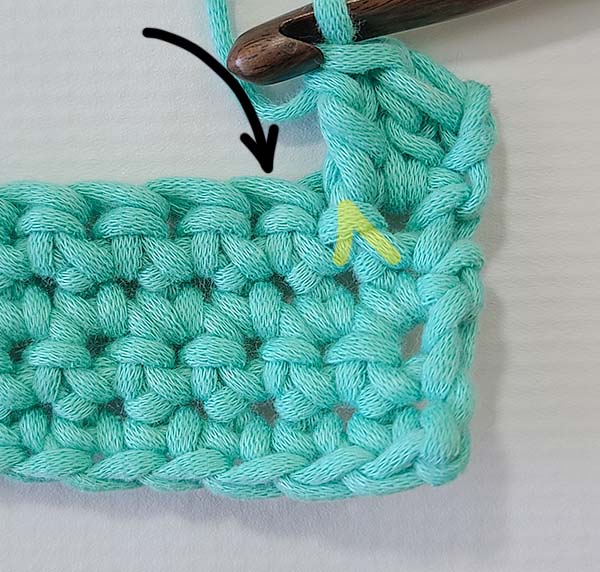
If we wanted our next stitch to be a standard double crochet, we would place it in the next stitch.
An arrow points to the next stitch in this image.
The hardest part of crocheting a front post stitch on a single crochet is understanding that we have to utilize the top of the stitch that we just worked into as well as the top of the next stitch to ensure that we wrap around the post. Unlike working front post stitches which are much easier to identify.
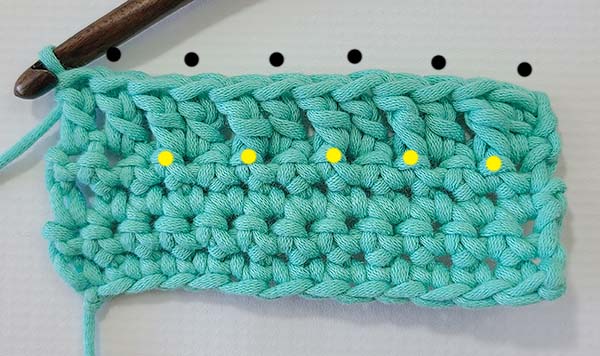
Here is a completed row placing 1 double crochet, 1 front post double crochet on the single crochets across the row. The regular double crochets have black dots over them and the front post double crochets have yellow dots where they were worked.
You can see that I still have 12 stitches, so my work did not increase despite the odd sort of way we have to work around these posts.
What if I wanted to do a back post stitch on a single crochet?
You can certainly do that, too! A back post stitch is worked by placing your hook into the SAME stitch as the previous stitch from the back side to the front side and then inserting your hook into the next stitch from front to back.
So essentially the same as a front post stitch, just backward! 🙂
So, what do I do now?
To continue practicing how to place front post stitches on single crochets, you can simply continue creating swatches of single crochets to practice placing the front post stitches on. You could do a row of single crochets, a row alternating regular double crochets and front post double crochets and then a row of single crochets.
Practice as much as necessary so that the technique “clicks”!
I hope you’ve enjoyed this tutorial and that you can move forward crocheting all your favorite patterns that use the technique of placing front post stitches in single crochets with confidence. Thanks so much for hanging out with me today!
Don’t forget to join my Facebook Group so we can chat all about your creations! We are a group for crocheters of all experiences, all interests and love to hang out together. Come join the fun!

Shannon | Designer & Editor
Shannon helps crocheters find their next project and build their skills with in depth tutorials and crochet patterns on her blog, theloopholefox.com.
With more than a decade of crochet experience, Shannon knows that understanding why we do something matters just as much as how we do it. She teaches new techniques and crochet stitches in depth so you can crochet with confidence.
Looking for more Crochet Stitch Tutorials? Try these!
How to Crochet the Suzette Stitch
How to Crochet the Even Moss Stitch
How to Crochet the Arcade Stitch
How to Crochet the Linked Double Crochet
The Magic Circle: How and Why it Works
Foundation Single Crochet and Why It’s Awesome
Foundation Half Double Crochet and Double Crochet and Why They’re Also Awesome