
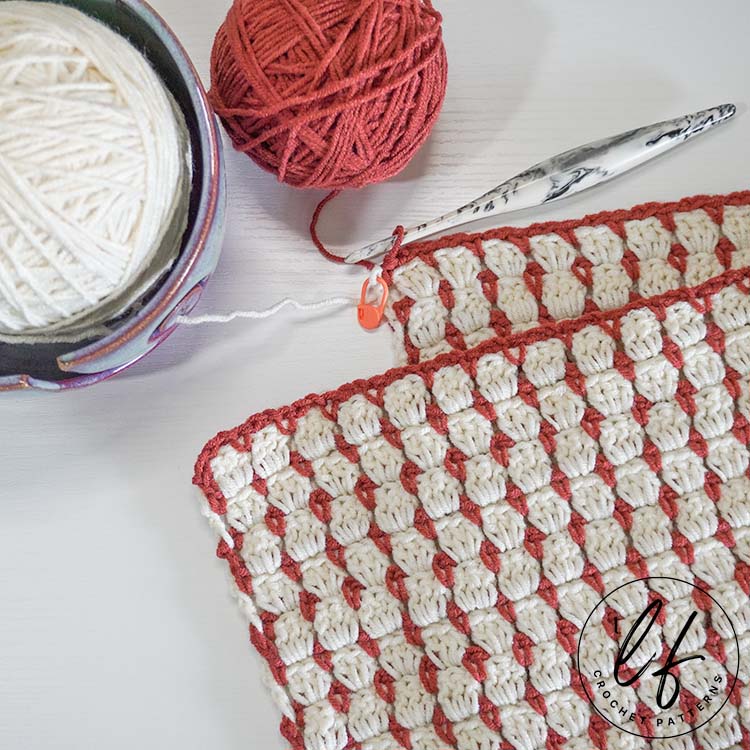
Crochet Block Stitch Tutorial – 2 Color Technique without cutting yarn each row!
The Crochet Block Stitch is a wonderful stitch that provides a lot of depth and interest to a project without being too difficult. It can be made in one color or multiple colors, though the general favorite of crocheters is to use 2 colors.
The biggest annoyance with the Crochet Block Stitch is that typically when you use 2 colors, you’ll have to cut the yarn every row or every other row.
Depending on the size of your project, this can leave you with hundreds of ends to weave in even if you only cut the yarn every other row.
And no one likes weaving in all those ends, am I right? Myself included!

I spent some time working on a technique for the Crochet Block Stitch using 2 colors that will make it so we have the minimum amount of ends as we can possibly achieve.
Typically, we see Crochet Block Stitch tutorials asking us to cut the yarn after every row or cut the yarn after every other row. I have never seen any tutorials for the Block Stitch that make it so we don’t have to cut the yarn at all.
So, I went ahead and figured out a technique myself!
While we try to limit the amount of ends in a Crochet Block Stitch project, we won’t have no ends whatsoever. We’ll still have a few! These ends will come from starting and ending the project and, if we need to, adding another skein to our project.
But I promise – You won’t have hundreds of ends to weave in and the technique is a lot easier than it may seem.
My Seedling Baby Blanket Pattern uses the technique described below to help us avoid hundreds of ends.
What is the Crochet Block Stitch?
The Crochet Block Stitch is a fairly simple stitch that creates clusters of 3 double crochet in chain 2 spaces.
We work one row consisting of 3 double crochets placed into chain 2 spaces and one row of single crochets and chain 2’s to create the base for the double crochet rows.
This gives a look as if the double crochets are floating and is an interesting stitch to work while still being fairly fast and pretty mindless.
Where this stitch really shines is when using 2 colors. It creates a sort of polka dot look. We work a row in our first color and then work our next row in our second color.
What stitches should I know before I try this Block Stitch technique?
This photo tutorial will go over my technique for creating the Crochet Block Stitch using 2 colors without cutting the yarn until we’re done.
This means that this stitch tutorial will look different to other Crochet Block Stitch tutorials. Additionally, this technique pushes the skill level up from Advanced Beginner to Intermediate.
This stitch tutorial is not for absolute beginners.
To follow along with this tutorial, you should at the very least know how to: Chain, single crochet and double crochet.
You will also need to be familiar with joining yarn. However you prefer to join yarn should be fine. This Crochet Block Stitch tutorial will join yarn with a chain 1.
You should also be at least somewhat familiar with what “posts” of stitches means, working with two colors and using stitch markers to hold working yarn so stitches don’t unravel.
This technique works by crocheting 2 rows on the same side without turning the work and THEN turning the work to work the next 2 rows. So, you should also have an understanding of how to work in rows and what “Right Side” and “Wrong Side” mean.
This tutorial will assume you have these skills.
Crochet Block Stitch Photo Tutorial
This tutorial will walk you through my technique for the crochet block stitch with two colors, including how I avoid as many ends as possible. The photos will take you step-by-step through the crochet block stitch with arrows, dots and tips to help it all make sense.
Ready to get started? Let’s go over the technical stuff first.
DISCLAIMER: This post includes affiliate links. This means, should you decide to purchase a product via one of these links, I will receive a small commission at no extra cost to you. I only recommend products I use and love (Or products I know others love, have heavily researched, know have good ratings and plan to purchase myself). These small commissions help to support this blog and continue keeping most of my patterns free. You can read more on my Privacy Policy, if you prefer.
YARN AND HOOK USED IN THIS TUTORIAL
In my tutorial photos, I’m using Bernat Maker Home Dec in colorways Aqua and Gold and my Furls Ebony Streamline Wood 8mm (L-11).
The Aqua yarn (blue) will be referred to as Color A. The Gold yarn (yellow) will be referred to as Color B.
REQUIRED TOOLS AND MATERIALS TO FOLLOW THIS TUTORIAL
You will need 2 colors of yarn, a crochet hook and at least 2 stitch markers.
Consider your 2 colors of yarn to be Color A and Color B for this crochet block stitch tutorial.
You can get by without the 2 stitch markers but you do run the risk of losing stitches. I highly recommend using stitch markers.
STITCH MULTIPLE (& WHAT THIS MEANS IN PRACTICE)
The crochet block stitch requires a stitch multiple of 3 stitches + 2 stitches. This is the stitch multiple, not the starting amount of chains.
To achieve a multiple of 3 stitches + 2 stitches, you can chain a multiple of 3 chains + 1 chain.
For example, 16 chains would be a multiple of 3 + 1 chains (3 x 5 = 15 chains + 1 chain = 16).
After finishing Row 1, in which we place 1 double crochet in the 4th chain from the hook and count the 3 skipped chains as a double crochet, we will have 14 stitches. 14 stitches is a multiple of 3 stitches + 2 stitches (3 x 4 = 12 stitches + 2 stitches = 14)
When you create your starting chains, create them in multiples of 3 until you reach your approximate desired size. Once there, add one chain and your stitch count will work properly.
IMPORTANT TECHNIQUE INFORMATION
To work the crochet block stitch using my technique, we will work 2 rows on the “Right Side” and 2 rows on the “Wrong Side”.
For example, Row 1 would be worked on the “Right Side”. Then, we go back to the start of Row 1, join our 2nd color of yarn (Color B), and work Row 2 with the “Right Side” facing. Once complete, Color A and Color B working yarn will be on the same side.
Then, we turn our work. Rows 3 and 4 will be worked on the “Wrong Side”. We will work Row 3 with Color A. Once Row 3 is finished, we go back to the start of the row, pick up Color B and work Row 4.

After working Rows 3 and 4 on the same side, we would turn our work. Rows 5 and 6 would be worked on the “Right Side”. We will work Row 5 with Color A. Once Row 5 is finished, we go back to the start of the row, pick up Color B and work Row 6.
ROWS TO REPEAT
Once you’ve worked through this Crochet Block Stitch tutorial with this technique, you can easily continue the pattern for as long as you’d like.
We will repeat Rows 3 and 4 until the project is as long as we’d like it to be. We will stop repeating the rows after completing a repeat of Row 3. Then we work 2 final rows that are slightly altered.
Keep in mind, the Crochet Block Stitch doesn’t have a true Right or Wrong Side. However, we ARE going to consider one side “Right” and the other “Wrong” so we can carry the Color B yarn without it being too noticeable.
Then, follow the instructions for finishing the project and placing a border.
Crochet Block Stitch Step by Step Instructions
Row 1 (Color A)
Using your Color A yarn (blue in the images below) Chain a multiple of 3 + 1. In this tutorial, I have chained 16. This means I will have 14 stitches across the row.
Row 1 written in one of my patterns would look like this:
“Row 1 (RS, Color A) – 1 dc in 4th ch from hook and 1 dc in each ch across. Pull up working loop and place stitch marker.”
Begin Row 1 of the crochet block stitch by placing 1 double crochet in the 4th chain from the hook. In the top image below, an arrow points downward to the 4th chain.
In the bottom image, an arrow points to the 3 skipped chains. These count as 1 double crochet.

Now, place 1 double crochet in each remaining chain across as the black dots in the image above indicate.

Once your final double crochet is placed, pull up your working loop and place a stitch marker.
Row 1 is complete. I have 14 stitches, which is a multiple of 3 stitches + 2 stitches.
We will consider Row 1 to be on the “Right Side”.
We will not turn our work or continue with Color A for now. We will begin Row 2 with Color B.
Row 2 (Color B)
To begin Row 2 of this crochet block stitch technique, keep the “Right Side” of the work facing you. Row 2 is also worked on the “Right Side”.
Row 2 written in one of my patterns would look like this:
“Go back to start of Row 1 and join Color B yarn between posts of 1st dc (sk’d ch 3) and next dc.
Row 2 (RS, Color B) – 1 sc in same space between posts as join. [Ch 2, sk 3 sts, 1 sc between posts of dc’s]. Repeat inside brackets until only 1 dc remains. Pull up working loop and place st marker. Ignore the 1 remaining st.”
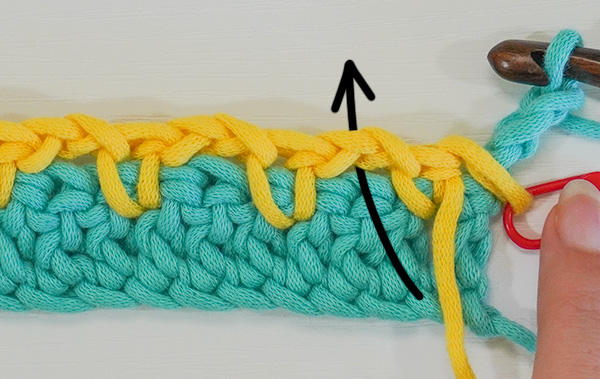
Go back to the start of Row 1.
Using Color B (yellow in images below), we will join our yarn between the posts first double crochet (3 skipped chains at start of Row 1) and the next double crochet.

Insert the hook between the posts of the stitches as the black arrow in the image above indicates or as shown with the hook.
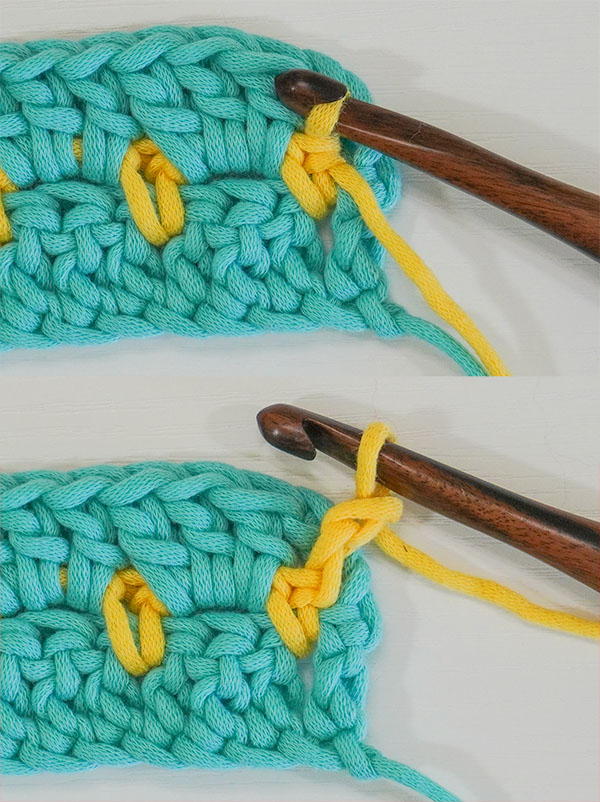
I join yarn with a chain 1, as shown in the top image of the picture below. You’re welcome to join your yarn however you like but keep in mind that a single crochet will be placed in this same space between posts.

Place 1 single crochet in the same space between posts as the join. You can see my single crochet placed in the bottom image in the picture above.
Once our single crochet is placed, we will chain 2, skip 3 stitches and place 1 single crochet between the posts of the 3rd skipped double crochet and the next double crochet.

The top picture in the image above has red dots over the 3 stitches we will skip. An arrow goes between the posts of the 3rd skipped double crochet and the next double crochet to indicate that we will place a single crochet between the posts of these stitches.

In the image above, you can see my single crochet placed between the posts.
Across the row, we will repeat the following instructions within brackets: [Chain 2, skip 3 double crochet and place 1 single crochet between the posts of the 3rd skipped double crochet and next double crochet].

We will stop repeating the instructions within brackets when only 1 double crochet remains.

In the image above, I am about to complete the last repeat. The last single crochet will go between the 3rd skipped double crochet and the last double crochet of the row as an arrow indicates.

This last single crochet completes Row 2. It seems like the row isn’t finished because there is one stitch remaining, but don’t worry. We are going to ignore it completely for now.
Once your final single crochet is placed, pull up your working loop and place a stitch marker.
Row 2 is complete. We have 5 single crochet and 4 chain 2 spaces.

The working yarn for both colors are now on the left or end of the row (right if you’re left handed).
You will notice that we have not worked any stitches in to the first double crochet (3 skipped chains of Row 1) or last double crochet from Row 1.
While we did ignore them in Row 2 (our Right Side Color B Row), we won’t ignore them in Row 3 which will be a Wrong Side, Color A row.
Row 3 (Color A)
To begin Row 3 of this crochet block stitch technique, we will turn our work. The next 2 rows will now be worked on what we will consider as the “Wrong Side”.

Row 3 written in one of my patterns would look like this:
“Turn work. Insert hook into Color A working yarn from end of Row 1.
Row 3 (WS, Color A) – Ch 3 (counts as dc here and throughout). [Sk sc, 3 dc in ch 2 spc]. Repeat inside brackets until 1 sc from previous Color B row remains. Sk the sc, place 1 dc in 3rd ch of ch 3 from previous Color A row. Pull up working loop and place st marker.”
Insert your hook into your Color A working yarn and chain 3. This chain 3 counts as a double crochet and counts as the ignored double crochet from Row 1 as worked.

TIP: Pull the Color B working yarn to the front of the work before continuing with Color A for Row 3.
This will keep the Color B working yarn on what we will consider as the “Wrong Side” of the work. When we are working rows on the “Right Side”, we will push the Color B working yarn to the back to stay on the “Wrong Side”.
I go over this in detail in “Keeping Color B Height Building Chain 2’s on the ‘Wrong Side’.” (Click hyperlink to jump to this section, if you’d like).
Once we have created 3 chains that count as a double crochet with our Color A working yarn and situated our Color B yarn as necessary, we will begin working across the row with a repeat.
For the repeat, we will [Skip the single crochet and place 3 double crochet in the chain 2 space]. This means we will skip over the single crochet of Row 2 and work directly into the chain 2 space as shown with a black arrow in the image above.
When working into the chain 2 “space”, we are working under the chains. Simply insert the hook under the 2 chains and place your double crochet.
You can see my 3 double crochet placed in the image below. The Color B working yarn is pulled to the front so it will stay on the “wrong” side.

We will repeat the instructions again: Skip the single crochet (red dot in image above) and place 3 double crochet in the chain 2 space. You can see my next 3 double crochet placed in the image below.

Continue repeating the instructions inside brackets until only 1 single crochet from the previous Color B row (Row 2) remains. In the image below, you can see I have 1 single crochet remaining.
To finish this row, we are going to completely ignore the single crochet from the Color B row (Row 2) and place 1 double crochet into the chain 3 that started the previous Color A row (Row 1 in this case).

This single crochet can hide the 3 chains that count as a double crochet. Push the single crochet to the side to expose the 3 chains as the arrow in the image above indicates. You won’t hurt anything!

Once the 3 chains are exposed, place 1 double crochet in the 3rd chain of the chain 3 (top chain) as the arrow in the image above indicates.

Once your final double crochet is placed, pull up your working loop and place a stitch marker.
Row 3 is complete and we have a total of 14 stitches.
We will not turn our work or continue with Color A for now. We will begin Row 4 with Color B.
Row 4 (Color B)
To begin Row 4 of this crochet block stitch technique, we will go back to the start of the row, pick up the Color B yarn and work in the same direction as the previous row.
Row 4 written in one of my patterns would look like this:
“Go back to start of row and insert hook into Color B working yarn from Row 2.
Row 4 (WS, Color B) – Ch 2 (does not count as a stitch here or throughout). 1 sc between 1st dc (ch 3 from previous row) and cluster of 3 dc. [Ch 2, sk 3 dc, place 1 sc between dc “clusters”]. Repeat inside brackets until only 1 dc remains. Pull up working loop and place st marker. Ignore the 1 remaining st.”
Insert your hook into your Color B working yarn and chain 2. This chain 2 does not count as a stitch at all anywhere in the pattern. This chain 2 simply builds height so that this Color B row can be worked on top of the previous Color A row.
We will now place 1 single crochet between the posts of the first double crochet and the next double crochet from the previous Row (Row 3) as the arrow in the image below indicates.

You can see my single crochet placed between the posts in the image below. If you’d like, you can place a stitch marker here to keep track of this single crochet but it isn’t necessary.

Once our single crochet is placed, we will begin our repeat for the row.
For the repeat, we will: [Chain 2, skip 3 double crochet and place 1 single crochet between the posts of the 3rd skipped double crochet and next double crochet]. We will stop repeating the instructions within brackets when only 1 double crochet remains.

The image above has red dots over the 3 stitches we will skip. An arrow goes between the posts of the 3rd skipped double crochet and the next double crochet to indicate that we will place a single crochet between the posts of these stitches.

In the image above, you can see my single crochet placed between the posts.

Just like in Row 2 (Color B), we will ignore the last double crochet.
This last single crochet completes Row 4. It may seem like it isn’t finished because there is one stitch remaining, but this will be taken care of in our next row which would be a repeat of Row 3.
Once your final single crochet is placed, pull up your working loop and place a stitch marker.
Row 4 is complete. We have 5 single crochet and 4 chain 2 spaces.

The working yarn for both colors are once again on the left or end of the row (right if you’re left handed).
Just like in our previous Color B row, we ignored the first and last double crochet of the row. These will be worked in our next row, Row 5 which is a repeat of Row 3 but worked on the Right Side.
Continuing with the Crochet Block Stitch
From here, you will repeat Rows 3 and 4 in order until the project is as large as you’d like it to be.
Make sure to end on a repeat of Row 3, which uses Color A (a double crochet row).
Despite the rows themselves not specifically having a “Right” or “Wrong” side, we will still consider the project to have a “Right” and “Wrong” side so keep the Color B height building chain 2’s to the back for a professional finish.
Consider your Right and Wrong sides like this:
- Rows 1 and 2 – Right Side
- Rows 3 and 4 – Wrong Side
- Rows 5 and 6 – Right Side
- Rows 7 and 8 – Wrong Side
- Rows 9 and 10 – Right Side
- etc.
Once you have worked a project using this Crochet Block Stitch technique to the size you’d like, you can follow the instructions for finishing off the project.
Keeping Color B Height Building Chain 2’s on the “Wrong Side”
The Crochet Block Stitch typically doesn’t have a “Right” or “Wrong” side. The project looks the same on either side.
However, because we are technically carrying yarn up the side of the project to avoid cutting ends, this “carrying” of yarn will show so we want to consider one side of the work to be the “Wrong Side”.
We carry the Color B yarn up the side of the project by starting each repeat of Row 4 (a Color B row) with a chain 2 to build height and carry the yarn.
This helps to make sure that the project doesn’t end up squishing down and stays up straight without cutting the yarn each row.
As much as possible, we want to keep these Color B chain 2’s that build height on one side of the work and call this our “wrong side”.
How to keep your Color B Chain 2’s that build height on the “Wrong Side”
Immediately when we begin using this technique, we want to choose a right or a wrong side. We will keep all ends and Color B chain 2’s that build height to the “Wrong Side”.
When you’re actively working on the “Wrong Side” in a Color A row (Repeat of Row 3), pull the Color B working yarn to the front.
We went over this a little bit in the photo tutorial for Row 3 and we’ll go over it again here.
In the image below, I am holding the Color B working yarn to the front of the project despite the fact that I’ll be working with Color A.
On “Wrong Side” rows, we want the Color B yarn to be to the front.
With the Color B yarn pulled to the front, we can continue working with Color A as we’ve gone over in this tutorial.
You can see my 3 double crochet placed in the image below. The Color B working yarn is pulled to the front so it will stay on the “wrong” side as shown in the image below.
When you’re actively working on the “Right Side” in a Color A row (Repeat of Row 3), push the Color B working yarn to the back.
In the image below, the Color B working yarn is pushed to the back of the project despite the fact that I’ll be working with Color A.

With the Color B yarn pushed to the back, we can continue working with Color A as we’ve gone over in this tutorial.
You can see my 3 double crochet placed in the image below. The Color B working yarn is pushed to the back so it will stay on the “wrong” side as shown in the image below.

Then we can continue working our Color A row, a repeat of Row 3, by placing 3 double crochet in each chain 2 space.
These Color B chain 2’s will hang out in the space between the first Color A double crochet (the chain 3) and the next double crochet through the project and will be noticeable.
However, they will be hidden after working the border.
Finishing the Crochet Block Stitch
Finishing the Crochet Block Stitch using this technique requires us to finish off (tie off and cut yarn) in our last repeat of Row 4 (a Color B row) prior to starting our last row, a repeat of Row 3 (Color A).
If we don’t secure the Color B yarn, the last single crochet placed can be a little unstable. Luckily, securing the yarn is easy.
Work through your last Color B row (whether Right or Wrong side, doesn’t matter!) to the end of the row.

Now that the row is “complete”, we can secure the row before we tie off and cut the yarn.
Instead of pulling up a loop and placing a stitch marker, we will slip stitch into the top of the “ignored” double crochet from the previous row, a Repeat of Row 3 (Color A).

In the image above, there are two pictures. The top picture has an arrow pointing to the last double crochet that we typically ignore. This time, we will place a slip stitch into this stitch.
The bottom picture shows my slip stitch completed. Make sure this slip stitch isn’t super loose.
You can now cut your Color B yarn and tie it off.
We will end the project by repeating Row 3 (Color A) again with a slight modification.
The only difference when working a repeat of Row 3 now as opposed to in the previous repeats of Row 3 (Color A) is at the very start of the row.
To start all repeats of Row 3 (Color A), we turn our work, insert the hook into the Color A working yarn, chain 3 and skip the first single crochet.
This time, though, we’re going to skip BOTH the slip stitch and the single crochet.

The image above has red dots over the slip stitch and the single crochet which we will skip. An arrow goes into the chain 2 space where we will work our 3 double crochet like every other repeat of Row 3.
We will continue working our repeat of Row 3 as normal all the way across the row and finish it just like every other repeat of Row 3.
Once the row is finished, you can cut your Color A yarn.
Putting a Border the Crochet Block Stitch
Because we did not cut our yarn every row, the Crochet Block Stitch using this technique will require a border.
Of course, you don’t have to put a border if you don’t want to, but it will further hide the chain 2’s that built height for the Color B rows.
In the image below, the wrong side of the work is showing. We know this because we can see the Color B chain 2’s to the sides of the work.
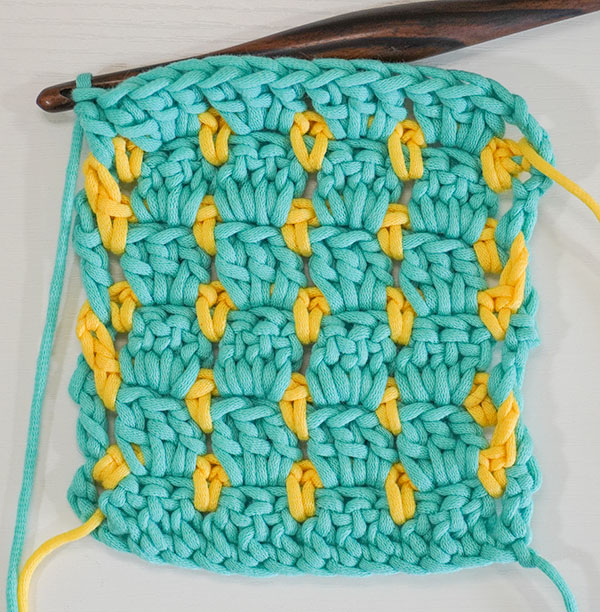
If you didn’t keep your yarn to one side, it will show on both sides. It’s not a big deal, the border will still help hide them.
Here’s what the Right Side looks like:
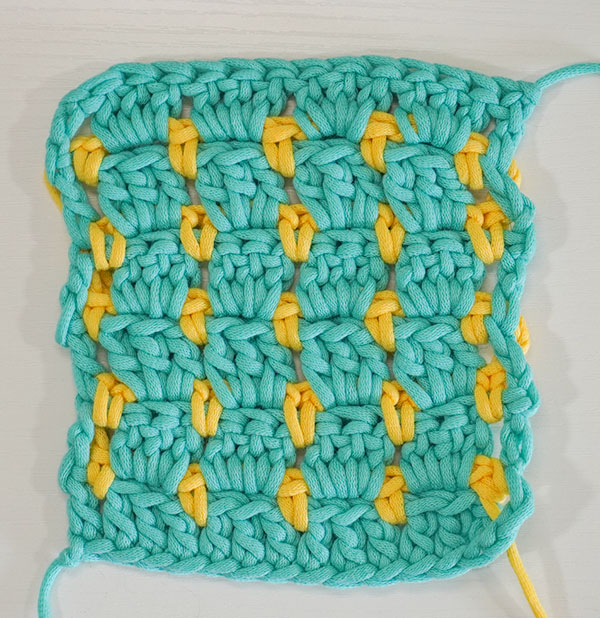
You can see that the Color B chain 2’s are hidden to the back of the project.
Placing a border on the Crochet Block Stitch project is pretty straight forward.
With the “Right Side” of the project facing, join your desired border color (whether Color A or Color B) in the first stitch of the row.
I will be using Color B and I’m going to use half double crochet’s here but you can use any stitch (single crochet, half double crochet or double crochet) that you like. It doesn’t matter.

Here you can see my Color B yarn joined and I’ve placed 1 half double crochet in the same stitch.
Continue placing 1 stitch in each stitch across the row to the end as the black arrow in the image above indicates. Make sure you don’t forget to put a stitch in the top of the chain 3 that counts as a double crochet.

Now, chain 2. This chain 2 will create a corner. Then, rotate the Crochet Block Stitch project to work down the side.

Down the side of the project, we will place 3 double crochet around each double crochet. We will skip every single crochet.
This means you don’t have to find any specific place to place the stitches. Treat these double crochets as we have the chain 2 spaces throughout the pattern. Simply insert the hook under the post of the stitch as the arrows in the image above indicate.

In the images above, you can see I have placed 1 set of 3 double crochet, skipped over the single crochet and placed 3 double crochet around the next double crochet.
When you reach double crochets that have Color B chain 2’s behind them, we’ll want to put our hook under BOTH the Color A double crochet and Color B chain 2.

This makes sure that the Color B chain 2’s are encapsulated in the border so they won’t be seen.
Continue down the side to the end.

Now you’ll chain 2, rotate to work along the bottom of the chains and place 1 stitch in the bottom of each chain. Make sure you don’t forget the bottom of the chain 3 that started Row 1.
Then, chain 2, rotate to work along the last side of the project and place 3 double crochet in each double crochet up the side. Skip over the single crochets.
Then, chain 2 and slip stitch to the first border stitch to close.

This completes one round of the border. Of course, you’re welcome to continue adding rounds to the border as you like.
When you’re finished with your Crochet Block Stitch project, go ahead and tie off your yarn, cut it and weave in your minimal ends. You’re done! 🙂

Did you enjoy this Crochet Block Stitch technique tutorial?
Share it with others and Pin it to Pinterest!
Thanks so much for hanging out with me today!
Don’t forget to join my Facebook Group so we can chat all about your creations! We are a group for crocheters of all experiences, all interests and love to hang out together. Come join the fun!

Shannon | Designer & Editor
Shannon helps crocheters find their next project and build their skills with in depth tutorials and crochet patterns on her blog, theloopholefox.com.
With more than a decade of crochet experience, Shannon knows that understanding why we do something matters just as much as how we do it. She teaches new techniques and crochet stitches in depth so you can crochet with confidence.
Looking for more Crochet Stitch Tutorials? Try these!
How to replace turning chains with Stacked Single Crochet
How to Crochet the Suzette Stitch
How to Crochet the Even Moss Stitch
How to Crochet the Arcade Stitch
How to Crochet the Linked Double Crochet
The Magic Circle: How and Why it Works
Foundation Single Crochet and Why It’s Awesome
Foundation Half Double Crochet and Double Crochet and Why They’re Also Awesome

Great tutorial, Shannon! Thanksfor sharing! Will definitely try it out first chance I get!
Thank you, Sharon! 🙂
I LOVE this stitch! This is very easy, pretty and fun. I like to try new stitches by making dishcloths or coasters. This one will most definitely also be an afghan!
Thank you for the very clear tutorial.
I like to learn new stitches the same way. Great minds think alike! 🙂 I’m so glad you enjoyed the tutorial. It would definitely make a beautiful afghan!
Thanks for posting this tutorial! I, too, had been trying to figure a way to not have all those ends to weave on the block pattern and was frustrated with how sloppy my edge was looking. That issue caused me to put that project away for awhile to work on more enjoyable blankets. I will pull back it out and use your technique. Thanks for the clear instructions!
Oh gosh, you’re welcome! The edge being a bit sloppy from all the ends (plus possibly tying them) was one of my gripes about using more than one color with this stitch, too. I’m so glad that this tutorial made you want to pull out that old WIP and give this technique a try. It may take a little getting used to but I actually found it to be much more mindless and a lot faster than cutting the yarn, tying it, weaving it in, etc. I hope it works for you! 🙂