
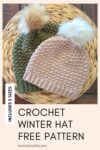
The Arctic Beanie
Fall and winter are my favorite times of year. I know, I’m one of the “weird” ones that prefer cold weather to hot weather. There are so many amazing things about the cooler seasons and one of those is cozy winter wear. I love all sorts of warm and cozy gear but I especially love beanies. This crochet winter hat pattern will keep you warm, cozy and stylish during the cooler season.
This crochet winter hat pattern was originally posted October 20, 2020. As of October 31, 2023, the beanie pattern has been updated and may look slightly different from older Pinterest Pins.
After years of wear with the original design, my husband gave me some awesome feedback on the brim. He has quite a big head (literally, not figuratively, haha) and struggles to find hats that fit him properly without being too tight.
The original brim on this crochet winter hat pattern was a bit tight for him and he wondered if I could make him one that had a little more give.
I agreed as my design style has changed and I’ve changed how I design and crochet brims for beanies in the last 3 years.
Additionally, I receive many requests for help on adjusting the pattern to smaller sizes, so I wanted to take the time to create different sizes as well.
So, the Arctic Beanie now has a different brim with a little more give and now comes with 5 sizes!
The end result of the beanie is nearly the same. The only major visual difference is the brim but I promise – it’s much more comfy because of it’s stretchy quality!
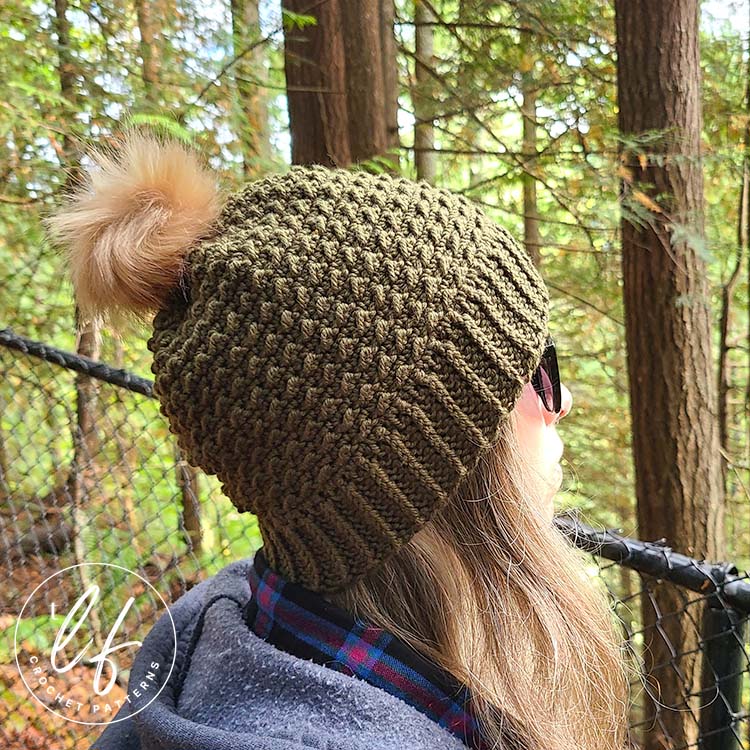
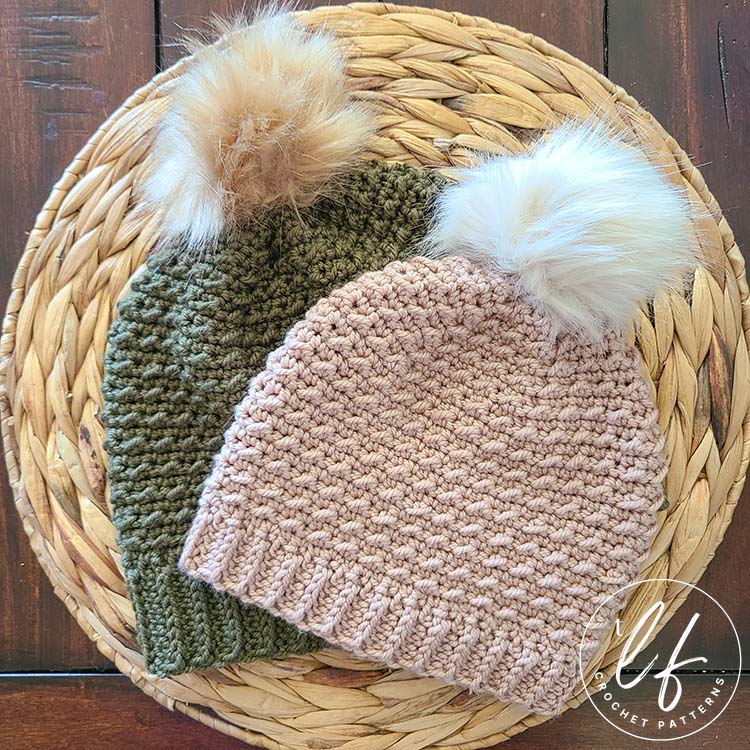
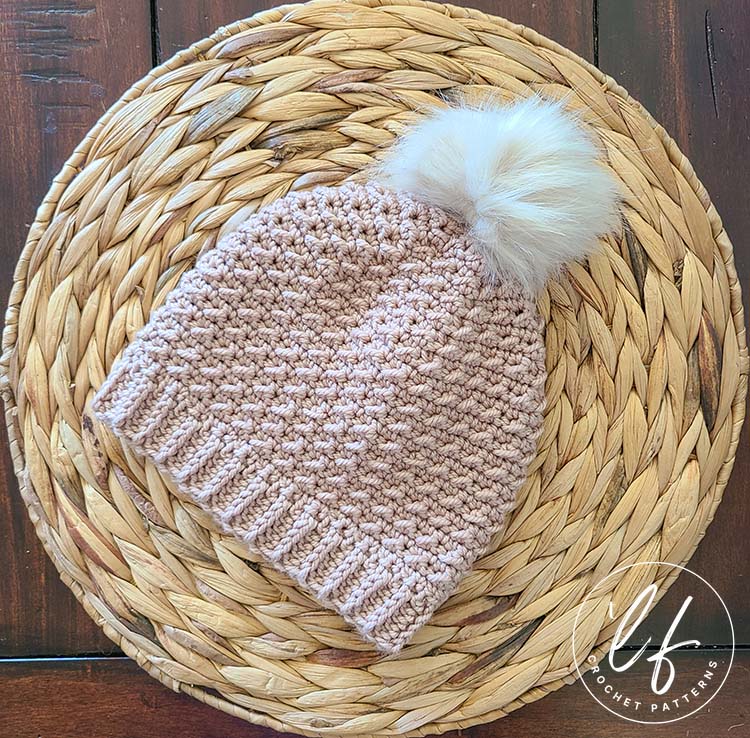
This crochet winter hat, shown in forest green, is the Adult Medium Size and is worn by me!
Why a Crochet Winter Hat Pattern
One thing that is always true in our household… We LOVE beanies.
My husband has an old beanie that has definitely seen a few things in it’s years of service to his head and I have… too many to count.
We have all sorts of beanies and crochet winter hats hanging around but… You know I needed the perfect cozy one that is perfect for any gender and style while keeping you warm and cozy.
My husband and I both have brand new Arctic Beanie’s made from the updated crochet winter hat pattern and they’ve both seen their fair share of cold, rain and adventures. They certainly stand up to cooler weather and are a fantastic accessory.
The Arctic Beanie has a lovely texture created using the Even Moss Stitch (which I have modified to work in the round).
The texture of this crochet beanie is super pleasing to look at and wear, but is a nice dense fabric that doesn’t have many holes so your head and ears will stay nice and warm.
This crochet winter hat pattern is designed to be a classic fit that isn’t too tight or too slouchy. While I probably wouldn’t technically call it a slouchy beanie, it certainly could make it into one!
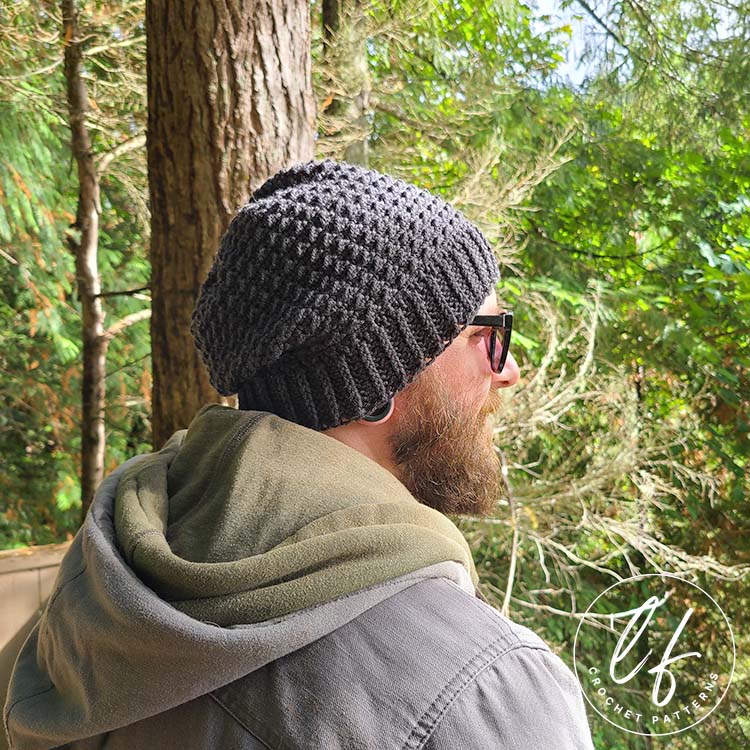
This crochet winter hat, shown in dark gray, is the Adult Large Size and is worn by my husband.
DISCLAIMER: This post includes affiliate links. This means, should you decide to purchase a product via one of these links, I will receive a small commission at no extra cost to you. I only recommend products I use and love (Or products I know others love, have heavily researched, know have good ratings and plan to purchase myself). These small commissions help to support this blog and continue keeping most of my patterns free. You can read more on my Privacy Policy, if you prefer.
Where to get this Crochet Winter Hat Pattern
The Arctic Beanie is a free crochet pattern in this blog post. Scroll down to view the free version.
However, if you’d like a more robust pattern with photo tutorials, the steps for the photo tutorial written out in full sentences and a printer friendly version of the PDF, I recommend you purchase the PDF pattern.
With the PDF pattern, you will receive photo tutorials for the special stitches and techniques as well as a detailed photo tutorial for each row or round which will set you up to work this crochet winter hat pattern with confidence. The photos include details with arrows and dots to help identify all the stitches and their placement.
The PDF pattern has detailed photo tutorials for the special stitches (Yarn Over Slip Stitch, working in the 3rd Loop Only, Single Crochet 2 Together), Rows 1 through 3 of the brim, seaming the brim, the body of the beanie and, finally, finishing the beanie.
SKILL LEVEL
Intermediate. Crocheters looking to follow this pattern should know how to:
- Read a crochet pattern – There is NOT a video tutorial for this crochet winter hat pattern.
- Work the basic stitches – Chain, slip stitch, single crochet and half double crochet.
- Understand how to work into the sides of stitches (like one would do to crochet a border).
- Work in the round and close rounds.
- Know how to Single Crochet 2 Together (sc2tog) or be willing to learn.
- Be willing to either use stitch markers or pay close attention to stitches at the beginning and end of each round.
This is NOT a beginner pattern. Absolute beginners will find this pattern outside of their skill level but adventurous beginners could be able to work through it, especially with the PDF pattern that includes a ton of photos to help you through.
If you are unfamiliar with any of these techniques or aren’t familiar with reading patterns, I highly recommend the PDF as it will walk you through everything step by step.
MATERIALS
Worsted Medium (4) weight yarn of your choice, though I would not recommend 100% cotton for the fiber. Cotton yarn is much thinner than wool, acrylic or a blend of the two and you will struggle to match gauge.
Toddler: 95 grams / 142 yards
Child: 115 grams / 172 yards
Teen/Small Adult: 130 grams / 195 yards
Adult Medium: 145 grams / 220 yards
Adult Large: 160 grams / 240 yards
Yarn Used
We Crochet’s Twill in colorway Fiddlehead (green), Oatmeal (cream) and Graphite Heather (dark gray). This yarn is 100% Superwash Merino Wool.
TOOLS & NOTIONS
5 mm (H-8) Hook – Check out my favorite crochet hooks!
Tapestry needle
Scissors
Stitch markers – At least one will be handy.
Optional – Faux fur pom pom or pom pom made from yarn. I purchased these from Amazon and I am quite happy with them! The best part is they have a little elastic loop for easy sewing!
GAUGE
15 sts x 18 rows = Approximately 4 x 4 inches
Gauge uses alternating rows of Even Moss Stitch and Single Crochet.
To check gauge, chain 16.
Gauge Row 1 – Sl st 2nd ch from hook, hdc next ch. [sl st next ch, hdc next ch]. Repeat inside brackets to end of row. (15)
Gauge Row 2 – Ch 1 (does not count as a stitch), turn. 1 sc in each st across. (15)
Gauge Row 3 – Ch 1, turn. Sl st first st, hdc next st. [sl st next st, hdc next st]. Repeat inside brackets to end of row. (15)
Repeat Gauge Rows 2 and 3 in sequence through Row 18. Measure your swatch. It should be approximately 4 inches wide and 4 inches tall.
Note: I am a tight crocheter, so my tension is usually tighter than others. Learn more about gauge and what this means here.
FINISHED SIZE
FINISHED SIZE(S)
| Size | Head CIR. | Beanie CIR. | Brim Height | Beanie Height |
| Toddler | 18 inches | 16 inches | 1.25 inches | 7 inches |
| Child | 19 inches | 17 inches | 1.5 inches | 7.5 inches |
| Teen/Adult S | 21 inches | 19 inches | 2 inches | 8 inches |
| Adult M | 22 inches | 20 inches | 2 inches | 8.5 inches |
| Adult L | 23 inches | 21 inches | 2 inches | 10 inches |
*CIR. = Circumference, S = Small, M = Medium, L = Large. Beanie Height includes Brim Height.
Most sizes of this crochet winter hat pattern are close enough in height that if you feel the head circumference would be too small, you can go one size up without the beanie being too tall.
“Negative Ease”
The brim of this crochet beanie was designed to have Negative Ease, which means the finished brim measurement will be smaller than the actual head measurement.
Because the stitches for the brim used in this beanie have a stretchy quality, Negative Ease will ensure that the beanie is not too big, stretches to fit comfortably and does not stretch out too much over time to become unwearable.
ABBREVIATIONS
This pattern is written in standard US terms.
- Ch – Chain
- Sl st – Slip stitch
- Sc – Single crochet
- Hdc – Half double crochet
- Sc2tog – Sc 2 Together **
- Yoslst – Yarn Over Slip Stitch **
- 3LO – 3rd Loop Only **
- St(s) – Stitch(es)
- RS – Right Side
- WS – Wrong Side
- **See description of Special Stitch
NOTES
- Chain 1 to begin a new row or round does not count as a stitch.
- All rounds are closed rounds. We will always slip stitch to the first stitch of the round to close.
- This beanie is constructed from the bottom up. First, we create the brim in rows. Then, the brim is seamed into a circle. We then transition to rounds where we will work several rounds for the body of the beanie. Then, we work 11 decrease rounds to shape the beanie. Finally, the top of the beanie is cinched closed and we can add a pom, if we prefer to.
- The pattern has all sizes listed in 1 set of instructions, with the chain/stitch requirements and stitch counts broken down in parenthesis. See “How to Read This Pattern” for details.
- Follow the tips regarding stitch markers if you aren’t familiar with working into slip stitches.
- The brim is designed to have 2 inches of Negative Ease. This means the finished brim circumference will be smaller than your actual head size. Please see “Negative Ease” notes below.
- […] – Repeats are listed inside brackets
- (..(…)) – Stitch counts are listed at the end of the row in parentheses and bold italics, for example: (6 (8, 10, 10, 10))
Even Moss Stitch Tutorial
The body of this beanie uses the Even Moss Stitch which I have a photo and video tutorial for. This stitch gives this crochet winter hat pattern a gorgeous texture.
The Even Moss Stitch is created by alternating a slip stitch and a half double crochet across the round. Because of this, some rounds start with a slip stitch, and that slip stitch must be slip stitched into to close the round.
This can get a little confusing to identify which slip stitch is the one to work into on the next round. I would recommend marking the first slip stitch of WRONG SIDE rounds with a stitch marker so you don’t accidentally drop a stitch.
You can leave this stitch marker on through the next round, too. This will help you identify the last stitch to work into for the round. There will be a note in the pattern when this becomes important.
SPECIAL STITCHES
Single Crochet 2 Together
The sc2tog, or Single Crochet 2 Together, is a decrease stitch that makes 2 stitches into 1 and lowers our stitch count. this helps shape this crochet winter hat pattern so it doesn’t have a ton of bulk at the crown.
To sc2tog, you will: Insert your hook into the first indicated stitch, yarn over and pull up a loop. 2 loops on hook. Insert your hook into the next stitch, yarn over and pull up a loop. 3 loops on hook. Yarn over and pull through all 3 loops.
Yarn Over Slip Stitch
The yoslst, or Yarn Over Slip Stitch, is a fun stitch that can help us create a ton of texture while maintaining the height of a single crochet. You may have heard this stitch called a half double slip stitch. This stitch is similar to a half double crochet in that it creates a 3rd loop we can work into to create simple, classic ribbing.
To yoslst, you will: Yarn over, insert hook into indicated stitch (or loop), yarn over and pull a loop through. 3 loops on hook. Do not yarn over again. Instead, pull the first loop (the loop closest to the tip of your hook) through the 2 other loops on your hook – just like a slip stitch, just with 2 loops instead of one.
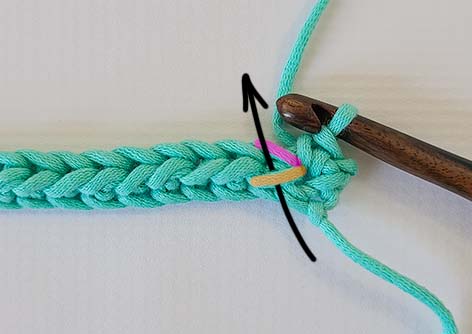
3rd Loop Only
In the brim of this beanie pattern, we use 3LO with both half double crochets and yarn over slip stitches to create ribbing for the brim.
It is very important to understand where the third loops of the stitches are to ensure the brim of your beanie turns out correctly.
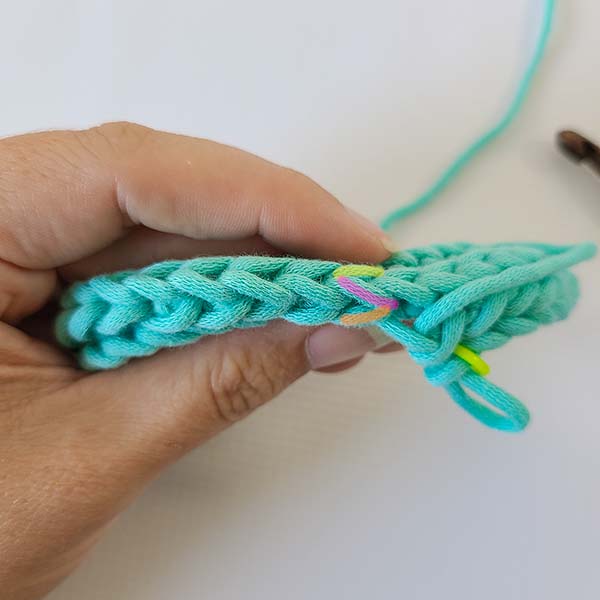
In this image, I’ve highlighted all 3 loops of the yoslst after starting a new row. Hdc’s will have the same 3 loops, they’ll just be slightly taller.
The back loop of the stitch is highlighted yellow.
The front loop of the stitch is highlighted pink.
The 3rd loop of the stitch is highlighted orange.
The third loop will always be the closest loop to you and sits directly below the front loop of the stitch somewhat diagonally.
When instructed to work in “3LO”, work only in this loop (highlighted orange in the image below, a black arrow goes upward through this loop to indicate how we will insert our hook into the loop).
How to Read This Pattern
All 5 sizes for this beanie pattern are on one set of instructions to keep this pattern short and clear.
The instructions are all the same but, of course, we will work more rows and have more stitches for the larger sizes.
The row/stitch/height measurements will all be listed in order of size from smallest to biggest. Instructions for sizes bigger than Toddler size are shown in parenthesis (…) and in order of size like so:
Toddler (Child, Teen/Adult S, Adult M, Adult L).
For example, with the brim:
“Ch 7 (9, 11, 11, 11)”
You will chain: 7 for Toddler (9 for Child, 11 for Teen/Adult S, 11 for Adult M, 11 for Adult L).
“Row 1 (RS) – 1 hdc in 2nd ch from hook and each across. (6 (8, 10, 10, 10))”
You will have (6 sts for Toddler (8 sts for Child, 10 sts for Teen/Adult S, 10 sts for Adult M, 10 sts for Adult L)).
Size Shown: Toddler
Crochet Winter Hat Free Pattern
BRIM
Toddler (Child, Teen/Adult S, Adult M, Adult L)
Ch 7 (9, 11, 11, 11)
Row 1 (RS) – Place 1 hdc in 2nd ch from hook and each ch across. (6 (8, 10, 10, 10))
Row 2 (WS) – Ch 1 (does not count as a stitch here or throughout), turn. 1 sc first st, 1 yoslst in 3LO of each of the remaining sts across. (6 (8, 10, 10, 10)
Row 3 (RS) – Ch 1, turn. 1 hdc in 3LO of each st across until 1 st remains. 1 hdc last st. (6 (8, 10, 10, 10))
Row 4 through 54 (60, 66, 72, 78) – Repeat Rows 2 and 3 in sequence. You will end on a repeat of Row 2.
Brim will measure approximately 16 (17, 19, 20, 21) inches in length, though may need to be stretched slightly to achieve length. As long as the brim stretches slightly, that’s okay. If the brim needs to be stretched a lot to achieve the listed length, the gauge is off and will need to be reworked with a larger hook.
For example, if it needs to stretch .25 or .5 inches to reach length, that means it’s stretching “slightly”. If it needs to stretch 1 inch or more, that means it is stretching “a lot”.
SEAM THE BRIM
Ch 1, turn. The right side of the brim will be facing.
*You will know the right side is facing if the “normal” single crochets and half double crochets are on your left. If you’re left handed, they’ll be on the right.
Bring Row 1 up behind your last row worked – Row 54 (60, 66, 72, 78) – and align the top of the stitches from your final row to the bottom of the chains from the first row.
Sl st the first 2 stitches together by inserting hook into 3LO of yoslst from Row 54 (60, 66, 72, 78) and into bottom of chain in first row.
Continue seaming the brim by placing a sl st through the 3LO of yoslst from final row and bottom of chain from Row 1 until 1 st remains on each short edge of the brim.
Sl st these 2 sts together normally (there are no 3rd loops on these stitches).
Once seamed, turn the brim inside out to hide the seam. This will now be your right side (or outside of the beanie).
Prepare to work along the long edge that has “normal” single crochets and half double crochets.
BODY OF BEANIE
Round 1 (RS)- Ch 1, [1 sc in side of next 8 (9, 10, 11, 12) sts, 2 sc in side of next st]. Repeat inside brackets 6 times total. Sl st to first sc to close. (60 (66, 72, 78, 84))
Round 2 (WS) – Ch 1, turn. Sl st first st, hdc next st. [Sl st next st, hdc next st]. Repeat inside brackets around to the end. Your last st should be a hdc. Sl st to first sl st of the round to close. (60 (66, 72, 78, 84))
TIP: Place a stitch marker in the first sl st of Round 2. Because we work a sl st into a sl st to close, the first one can be easy to skip. Marking the first sl st of the round helps keep your stitch count correct.
Leave the stitch marker in through the next round (Round 3). This helps to identify where to place the last stitch of this next round. You can do this for each round that begins with a sl st. See pictures for visual reference in the picture tutorials after the pattern.
Round 3 (RS) – Ch 1, turn. Place 1 sc in each st around. Sl st to first sc of the round to close (60 (66, 72, 78, 84))
Rounds 4 through 18 (18, 18, 20, 24) OR until beanie measures approximately 5 (5.5, 6, 6.5, 7) inches tall including brim – Repeat Rounds 2 and 3 in sequence. Last round worked will be a repeat of Round 2.
Now we will work decrease rounds. If needed, mark your 18th (18th, 18th, 20th, 24th) round to keep track of your rounds.
DECREASE ROUNDS (to shape beanie)
Decrease Round 1 – Ch 1, turn. [1 sc each of the next 8 (9, 10, 11, 12) sts, sc2tog]. Repeat inside brackets 6 times total. Sl st to first sc to close. (54 (60, 66, 72, 78))
Decrease Round 2 – Ch 1, turn. Hdc first st, sl st next st. [Hdc next st, sl st next st]. Repeat inside brackets around to the end. Your last st should be a sl st. Sl st to first hdc of the round to close. (54 (60, 66, 72, 78))
*How we alternate sl st and hdc now switches on every wrong side row to keep the texture of the pattern the same. The same “rules” apply. The last sl st placed at the end of the round is the final stitch. The sl st to close does not count as a stitch. When we chain 1 and turn, we skip the sl st to close and place our first stitch in the last sl st of the previous round.
Decrease Round 3 – Ch 1, turn. [1 sc each of the next 7 (8, 9, 10, 11) sts, sc2tog]. Repeat inside brackets 6 times total. Sl st to first sc to close. (48 (54, 60, 66, 72))
Decrease Round 4 (WS) – Ch 1, turn. Sl st first st, hdc next st. [Sl st next st, hdc next st]. Repeat inside brackets around to the end. Your last st should be a hdc. Sl st to first sl st of the round to close. (48 (54, 60, 66, 72))
Decrease Round 5 – Ch 1, turn. [1 sc each of the next 6 (7, 8, 9, 10) sts, sc2tog]. Repeat inside brackets 6 times total. Sl st to first sc to close. (42 (48, 54, 60, 66))
Decrease Round 6 – Repeat Decrease Round 2. (42 (48, 54, 60, 66))
Decrease Round 7 – Ch 1, turn. [1 sc each of the next 5 (6, 7, 8, 9) sts, sc2tog]. Repeat inside brackets 6 times total. Sl st to first sc to close. (36, (42, 48, 54, 60))
Decrease Round 8 – Repeat Decrease Round 4. (36, (42, 48, 54, 60))
Decrease Round 9 – Ch 1, turn. [1 sc each of the next 4 (5, 6, 7, 8) sts, sc2tog]. Repeat inside brackets 6 times total. Sl st to first sc to close. (30 (36, 42, 48, 54))
Decrease Round 10 – Repeat Decrease Round 2. (30 (36, 42, 48, 54))
Decrease Round 11 – Ch 1, turn. [1 sc each of the next 3 (4, 5, 6, 7) sts, sc2tog]. Repeat inside brackets 6 times total. Sl st to first sc to close. (24 (30, 36, 42, 48))
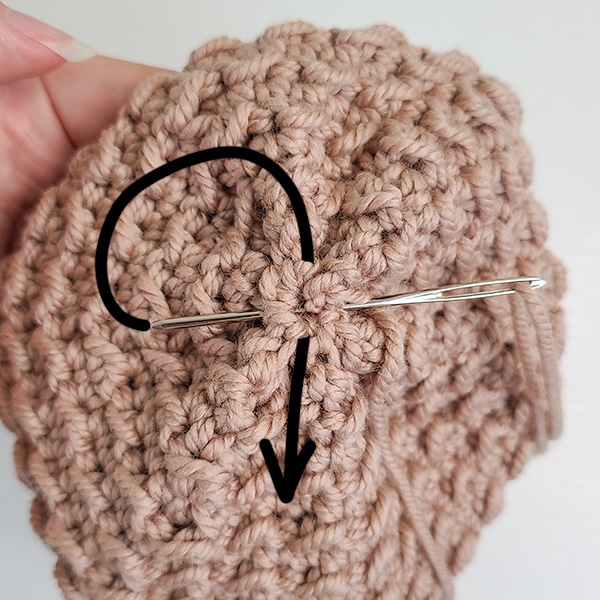
Cut yarn but leave a long tail approximately 8-10 inches in length. Tie off and prepare to cinch the top of the crochet winter hat pattern closed.
This tail end will be used to cinch the top of the beanie closed and weave in any ends. This is more than enough of a tail and you will have some extra tail after following the instructions and weaving ends.
CINCHING AND FINISHING – ALL SIZES
To close this crochet winter hat, we now need to cinch the top closed. The instructions are the same regardless of the size you’re creating.
The 11 Rounds of decreasing we worked at the end of this beanie help to shape the beanie into a classic fit and will help the beanie cinch closed properly without a huge amount of folds. It will still have some folds, but won’t feel bulky.
Thread your tapestry needle with the long tail end of yarn that we left on the work after working Decrease Round 11. We will use the “running stitch” to cinch the top closed.
To do this, insert your tapestry needle into the first stitch of Decrease Round 11 from front of work to back of work.
Then, skip the next stitch and insert your tapestry needle into the next stitch of the round from back of work to front of work.
Continue weaving the needle in and out of every other stitch all the way around.
When you’ve reached the end of the round, pull the tail tight. This will cinch the top closed. You might have to push the stitches back toward the beginning of the round to get it all tight, but it will all cinch closed.
Now that the top is cinched, secure it by sewing in one side of the cinch and out the other. You can do this as many times as preferred to ensure it is properly secured. Tie off.

If you’d like to add a pom to the top, don’t trim your yarn. Sew the pom on where the beanie cinches closed.
Alternatively, you could also sew a button onto the inside of the beanie so that the elastic loop can be threaded through the beanie and attached, so that it is removable.
If you do not want a pom, you can skip the above paragraph.
Once complete, weave your needle to the inside of the beanie, tie off, trim yarn and weave ends. You’re all done! Enjoy!
Want to get the PDF version of this crochet winter hat pattern? Get your copy on Etsy or Ravelry by clicking the buttons below!
Did you love this free crochet beanie pattern? Make sure to share the love and Pin it to Pinterest!
That’s it for this free crochet winter hat pattern! Isn’t it fantastic? I hope you love crocheting the Arctic Beanie and I hope it keeps you warm and cozy this winter!
One of my greatest joys is seeing your finished crochet projects from my patterns or tutorials, so when you post to Instagram, don’t forget to tag me so I can show you some love! I’m @theloopholefoxcrochet. You can also share pictures on my recent posts on Facebook or within my Facebook group!
And don’t forget to pin this to your Pinterest boards, so you can remember it for later!
Don’t forget to join my Facebook Group so we can chat all about your creations! We are a group for crocheters of all experiences, all interests and love to hang out together. Come join the fun!

Shannon | Designer & Editor
Shannon helps crocheters find their next project and build their skills with in depth tutorials and crochet patterns on her blog, theloopholefox.com.
With more than a decade of crochet experience, Shannon knows that understanding why we do something matters just as much as how we do it. She teaches new techniques and crochet stitches in depth so you can crochet with confidence.
Find More Free Crochet Beanie Patterns:
The Hazel Beanie
Tuesday Beanie
Jesse Beanie (and the matching Jesse Scarf!)
Or check out my round up of 20 of the Best Free Crochet Beanie Patterns!
Hi! super excited yo make this har for my son this weekend! I live patterns that have a you tube tutorial, so Thank you!
Question-if I wanted to use 2 colors on this hat, could I? And how would you suggest I do that? I was thinking maybe the band in 1 color and then a 3nd color for the rest. Any tips are appreciated! Thanks!
Tammy
Hi Tammy! Yay, I’m so excited for you and I hope you love it! 🙂
You can definitely use two colors on this hat. If you were to make the band in one color and use a second color for the rest, I would suggest working your first color through round 9. For round 10 and on, use your second color. This will create a nice change of color from band to bulk of the beanie.
I’m excited about a two toned beanie! If you post it to IG, tag me so I can see and show you some love.