Fun and Easy Crochet Beanie – Easy to Customize!
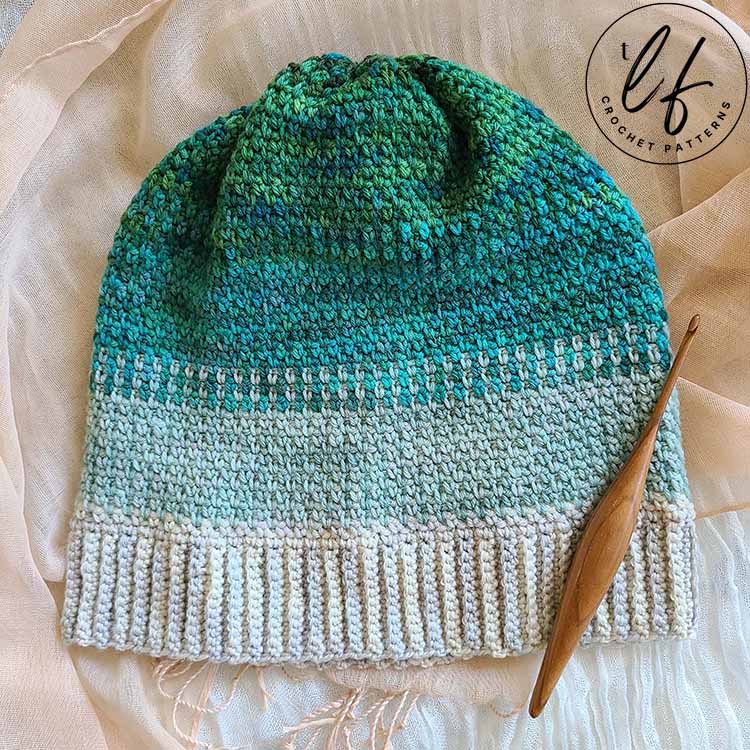
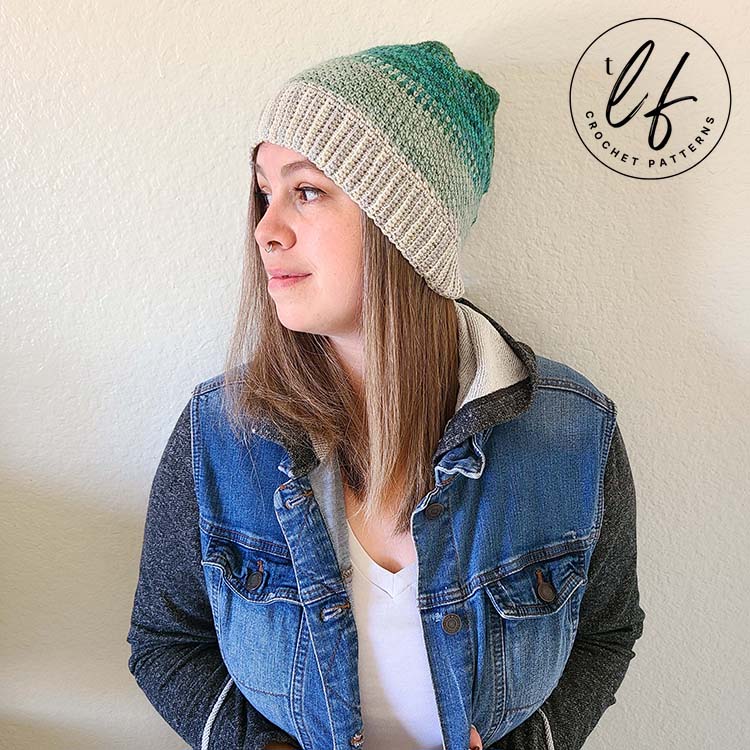
The Tuesday Beanie is a fun and easy crochet beanie pattern that is relatively fast and easy to crochet. Using a beginner-friendly construction and stitch pattern, this crochet beanie is a fantastic starting point for anyone looking to dive into using a thinner weight of yarn for accessories.
And the best part? It’s totally and completely customizable in size and what yarn weight you want to use! Yep, you heard right! If you don’t want to use Fingering (Super Fine – 1) weight yarn as instructed in the pattern, that’s totally okay!
Love this easy crochet beanie pattern? Click the blue text to Pin it to Pinterest so you always have it!
DISCLAIMER: This post includes affiliate links. This means, should you decide to purchase a product via one of these links, I will receive a small commission at no extra cost to you. I only recommend products I use and love (Or products I know others love, have heavily researched, know have good ratings and plan to purchase myself). These small commissions help to support this blog and continue keeping most of my patterns free. You can read more on my Privacy Policy, if you prefer.
Crochet Beanie Inspiration
One thing I love to make, wear and gift is crochet beanies. Who doesn’t love being warm and cozy, or helping someone else be warm and cozy?
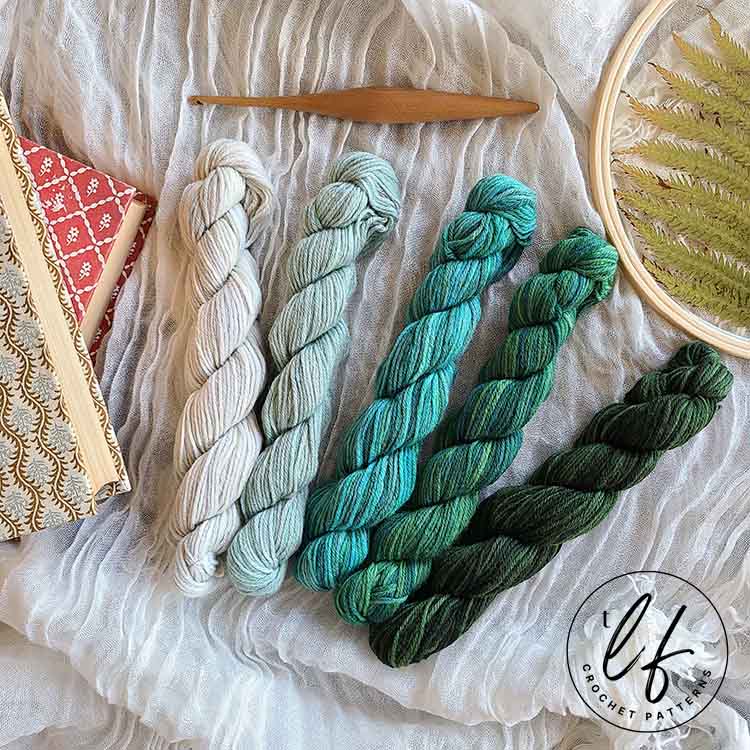
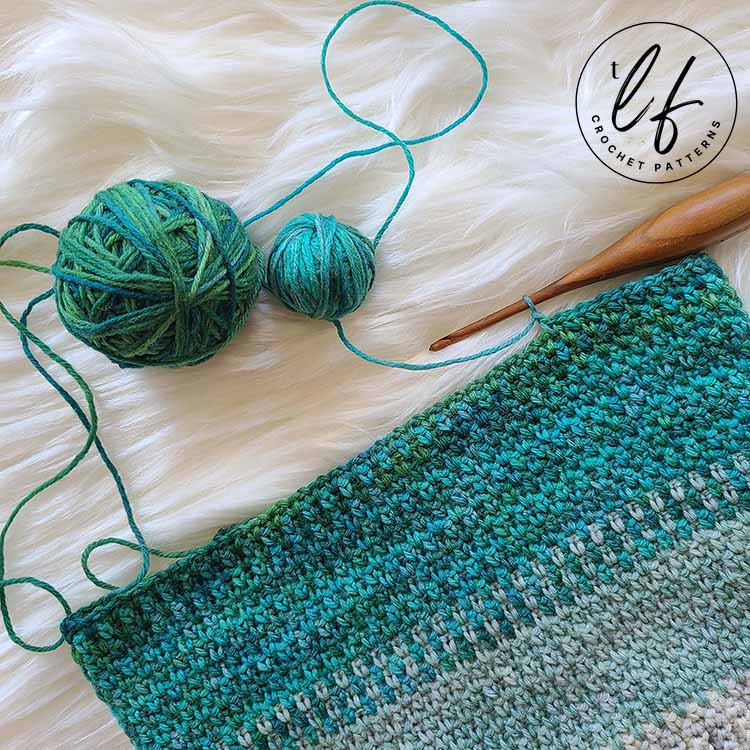
A lot of the inspiration for this beanie came from the yarn I purchased. Normally I prefer to have a plan for all yarn I purchase, but when I saw the Stroll Tonal Spring Fields Mini Pack on We Crochet… I HAD to have it even though I had zero plans for it.
This pack of yarn comes with 5 mini hanks of the Stroll Tonal yarn. They’re 20 grams each, which means the entire pack is only 100 grams of yarn. While this is a fantastic way to test out new yarn and see the colors in person without purchasing the larger, more expensive hanks individually, it’s clearly not a huge amount of yarn.
Fingering (Super Fine – 1) weight yarn is also one of those yarns that crocheters either LOVE or are a little intimidated by. It makes sense because the yarn is so thin that it can be a little intimidating to work on larger projects with more intricate stitch patterns using it.
So, what doesn’t require a ton of yarn, can be friendly to those who are new to Super Fine weight and is still fun an accessible? An easy crochet beanie pattern, of course!
I did make the original sample using 4 of the 5 colors (left out the darkest color, which is the most right in the picture above) from the Stroll Tonal Mini Pack and then decided to make one in a solid color, too. They’re both equally gorgeous!
It’s customizable? Yep!
I specifically designed the construction of this beanie to be easy to customize to any size or yarn weight you’d prefer to use. No extreme math, gauge swatching or rocket science required.
Personally, I’m a big fan of Fingering weight yarn. I love how lightweight it is and how intricate even simple stitch patterns can look with it. However, I know that’s not always the case. Sometimes we’d like to make something a little faster, use up some of our stash, have the item be a little warmer… Or just don’t like using Fingering weight yarn.
That’s okay!
One of the questions I receive the most about patterns I’ve designed using such a thin yarn weight is “Can I use a heavier weight?” With this easy crochet beanie pattern, you absolutely can!
The construction of this beanie is set up to be as customizable as possible. All you need to do before you start is know what size you’re looking to crochet. Each section of the beanie is worked to a certain length in inches and, as long as the band you create in the first section of the pattern is the length required, you’re off to the crochet races!
There’s a ton of information below in the pattern on how to customize the size and how to use a different yarn weight. “Even if I want to keep the color pattern of your multi-colored beanie?” Yep!
All about the yarn
We Crochet’s Stroll Tonal is a Fingering (Super Fine – 1) weight yarn. The actual hank is 100 grams or 462 yards (where as the pack of mini-hanks were 20 grams each). It’s 75% Fine Superwash Merino Wool and 25% Nylon. The Superwash Merino Wool is a fantastic choice for “easy care” garments and it’s super soft against the skin, too!
You could easily make a single color beanie using one of the full sized hanks, as the entire beanie requires about 75 grams or 345 yards of Fingering weight yarn. Or, of course, you could check out all the gorgeous mini packs of the Stroll Tonal colors. Be careful, though! They’re super pretty.
I have also made an adult medium sized crochet beanie from this pattern using a Medium (4) acrylic yarn in a single color. I ended up using approximately 3.5 ounces/ 100 grams/ 177 yards. You could easily use yarn you already have on hand to create these easy crochet beanies as gifts or to donate to your local charities or shelters.
Want this pattern in a printable format with photos to help you through all the steps?
You can purchase on in my Etsy shop by clicking the button below!
Easy Crochet Beanie Construction and Details
This beanie pattern begins with working the brim. The brim is worked in rows until it reaches a certain length. Once the length is achieved, the short ends are seamed together.
We then work one round along the long edge of the brim to create a clean base to work the rest of the hat on. This base round is all single crochet.
Then, we move on to working the main portion of the beanie which is a one row repeat. This is fairly quick. You can follow the color change chart, if you prefer a multi-colored beanie or continue crocheting the repeat round with a single color.
Once we have reached the appropriate height, we close the top of the beanie in a series of folds.
SKILL LEVEL
Advanced Beginner
This easy crochet beanie uses the Moss Stitch (single crochets and chains) to create a beautiful woven look. These are typically the first stitches crocheters learn, so this crochet pattern is accessible.
The more advanced techniques crocheters will have to understand before attempting this pattern are: single crochet in the back loop only, working in closed rounds, placing single crochets in the side of stitches (as you would work a border), working a stitch into a chain space, creating chain spaces and skipping stitches, seaming two ends together and measuring your work.
An adventurous beginner could absolutely follow this pattern, but it may push their skills a little bit. Which is a good thing!
MATERIALS
Fingering (Super Fine – 1) weight yarn. Approximately 2.5 ounces/75 grams/345 yards TOTAL for a one color beanie.
If you prefer a multi-colored beanie, you will need:
Color A – 0.5 ounces/17 grams/79 yards
Color B – 0.5 ounces/17 grams/79 yards
Color C – 0.5 ounces/17 grams/79 yards
Color D – 0.6 ounces/19 grams/88 yards.
YARN USED
We Crochet Stroll Mini Pack
This pack included 5 mini hanks of different colors, each 20g or 92 yards. I used 4 of the colors.
This Mini Pack’s colorway is “Spring Fields”.
The specific colorways used:
Color A: Pearlescent Tonal
Color B: Eucalyptus Tonal
Color C: Cold Stream Tonal
Color D: Mountain Pass Tonal
TOOLS
3.5 mm (E-4) hook. If you change yarn weight, make sure to use a hook size that correlates to your yarn weight. (Example: Medium (4) weight yarn – 5 mm (H-8) hook)
Tapestry needle
Scissors
Cloth Measuring Tape
Stitch Markers, if preferred.
GAUGE
26 sc x 25 rows = Approx 4 inches x 4 inches.
Special note: If your gauge is off, don’t worry. This beanie can be worked using your gauge.
Your brim rows should measure approximately 1.75 to 2 inches across the row for a brim that isn’t too short or too wide. As long as you are comfortable with the row width in the BAND section of the pattern, you can continue as this beanie pattern works off of your gauge. If your band is too thin or too wide for your liking, add or remove any amount from your starting chains.
FINISHED SIZE
This easy crochet beanie pattern worked exactly as written fits the average head circumference of 22 inches.
This is the “Adult Medium” size. Please see “How to Change Size and/or Yarn Weight” below the written pattern for instructions on how to change size, if preferred.
Laid flat:10 inches wide, 9.5 inches tall.
ABBREVIATIONS (US TERMS)
- Ch – Chain
- Sl st – Slip stitch
- Sc- Single crochet
- Scblo – Single crochet back loop only
- Sk – Skip
- Spc – Space
- St(s) – Stitch(es)
- […] – Repeats are listed inside brackets
- (…) – Stitch counts are listed at the end of the row in parentheses and italics.
NOTES
- Please review all notes, including special notes, before starting this pattern.
- This beanie is worked from the bottom up.
- When working on the main portion of the beanie, we will work in closed rounds. Always slip stitch to the first single crochet of the round to close.
- You will turn your work to begin each new round.
- This beanie requires a multiple of 2 stitches in both the band and the main portion.
- Chain 1 at the beginning of each round does not count as a stitch.
- This crochet pattern is easy to customize to a desired size or yarn weight.
- The pattern is written to use Fingering (1 – Super Fine) weight yarn and the approximate yarn usage reflects this weight.
- Should you decide to use a different yarn weight, your yarn usage will differ.
- Information and instructions on how to change the size or yarn weight are listed under the “How to Change Size and/or Yarn Weight” header below the pattern.
The Moss Stitch
This crochet beanie pattern uses the Moss Stitch, which is a fun and easy stitch pattern that uses only single crochets and chains. It’s rhythmic and interesting while staying simple and fast to crochet.
If you haven’t used the Moss Stitch (also known as the Linen stitch) before, you can check out my tutorial! This photo and video tutorial will show you how to work this stitch in rows. In this pattern, we work this stitch in rounds but the photo and video tutorial should help you out, if you need it!
Easy Crochet Beanie Pattern
BAND (for Brim)
With Color A, Ch 13
Row 1 – Place 1 sc 2nd ch from hook and each across. (12)
Row 2 – Ch 1, turn. 1 sc first st, 1 sc blo 10 sts, 1 sc last st. (12)
For Rows 3 through 132 OR until the band measures approximately 21.5 inches, Repeat Row 2. Make sure to end on an even amount of Rows.
Place the two short ends of your rectangle together, making sure not to twist the band. Seam the ends together by placing 1 sl st in the stitches of each side across to the end. Do not cut your yarn.
Turn the band “inside out” to hide the seam. With your band turned inside out, the side facing you will now be your “right side”. We will now work along the long edge of the band to begin working on the main portion of the beanie.
MAIN PORTION OF BEANIE
Round 1 – Ch 1, turn to work along length of band. Place 1 sc in side of each sc across. Sl st to first sc to close. (132)
Round 2 – Ch 1, turn. Place 1 sc first st. Ch 1, sk 1, [1 sc next st, ch 1, sk 1]. Repeat around to end. Sl st to first sc to close. (66 sc, 66 ch 1 spcs)
Round 3 – Ch 1, turn. Place 1 sc in first ch 1 spc. Ch 1, sk sc [1 sc in ch 1 spc, ch 1, sk sc]. Repeat around to end. Sl st to first sc to close. (66 sc, 66 ch 1 spcs)
For a single color beanie:
Rounds 4 through 54 OR until beanie measures approximately 8.5-9 inches for fitted or 9.5-10 inches for a slightly slouchy beanie, Repeat Round 3.
For a multi-colored beanie, follow the color chart:
| Color | If following written pattern exactly |
| Color A | All rows of band |
| Color A | Complete Rounds 1, 2 & 3 |
| Color B | Rounds 4 through 16 |
| Color C | Round 17 |
| Color B | Round 18 |
| Color C | Round 19 |
| Color B | Round 20 |
| Color C | Rounds 21 through 33 |
| Color D | Round 34 |
| Color C | Round 35 |
| Color D | Round 36 |
| Color C | Round 37 |
| Color D | Rounds 38 through 54 (or until 9.5-10 inches in height) |
If you are changing the yarn weight and or the size and would still like to follow the color pattern, please see the color pattern chart under the “How to Change Size and/or Yarn Weight” header!
FINISHING INSTRUCTIONS
This beanie is closed in a series of secured “folds” that come together to close the top. To close the top of this beanie, tie off your yarn and leave a long tail of about 10-12 inches. This length will end up being too long, but it’s better to have more length than necessary. Turn your beanie inside out.
At this point, you should have a long tube-like project. Lay the project flat so that the work is completely flat like a rectangle and the last row worked is at the top. Make sure your seam (and your tail of yarn) is in one corner of the “rectangle”.
With your tapestry needle and tail yarn, weave into the opposite corner of the rectangle and pull tight. This will pull the two corners together. Sew these two corners together a few times to make sure it’s tight.

Your work might seem a bit wonky, that’s okay! When we sewed the two corners together we created two “folds”. One pointing toward us and one pointing away from us. Gently pull these folds in the direction they’re facing so that you identify two corners once more (see picture on the right above).
Then, sew your tapestry needle down through the bottom fold and pull tight. When pulling tight, guide the work so that the two new folds stay on top of the work.

Then, sew your tapestry needle through the top flap and pull tight, guiding the fold.
You will now have 4 folds (or 4 corners). Working the same method as written above, secure each of these folds down to the center by sewing with your tapestry needle. Guide each fold as you do. Once all 4 folds are secured down, you will now have 8 folds (or 8 corners).
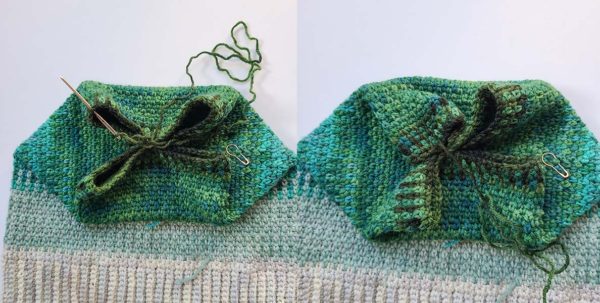
The pictures above show the process of securing the 4 folds down. You can see in the image on the right how the fold makes 2 more.
Secure all 8 folds using the same method. It can be a little fiddly finding all of the 8 folds. Work from one fold to the next, making sure to grab all of them.
Once all 8 are secured, sew around the center a couple of times to make sure everything is secure. Then, weave in your ends and trim the extra yarn.
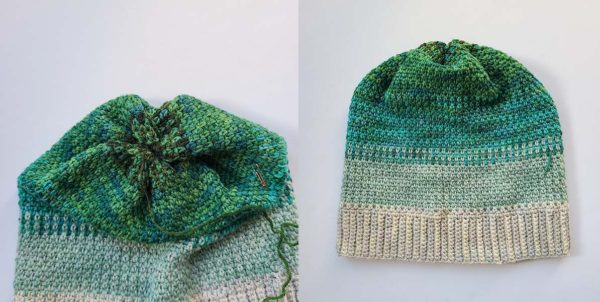
Turn your beanie right side out. You’re done!
How to Change Size and/or Yarn Weight for this Easy Crochet Beanie
This beanie pattern is easy to customize to the size you prefer and/or to the yarn weight you prefer.
Fingering (Super Fine – 1) weight is a fantastic weight to use for lightweight items and this easy crochet beanie pattern can be a fun introduction to this weight, however, changing the size and/or yarn weight used to create this beanie is fairly straightforward. All of the different parts of this beanie are basically a repeat of a single row or round until a specific length is reached.
The sizing chart below gives approximate dimensions for different sizes. The sizes listed are taken from industry standards. These sizes are meant to be a guidance or approximation. No two head sizes are the same. Whenever possible, use a cloth measuring tape to measure the head circumference of who you intend the Tuesday Beanie for. This will help make sure the beanie fits properly.
Sizing Chart (All sizes are approximate)
| SIZE | HEAD CIRCUMFERENCE | BAND LENGTH (for Brim) | HEIGHT (More Fitted) | HEIGHT (Slightly Slouchy) |
| Toddler (1-3) | 18-19 Inches | 18.5 Inches | 7.25 Inches | 7.75-8 Inches |
| Child (3-10) | 19-20 Inches | 19.5 Inches | 7.5 Inches | 8-8.25 Inches |
| Adult Small/Teen | 20-21 Inches | 20.5 Inches | 8-8.5 Inches | 8.75-9.25 Inches |
| Adult Medium | 22 Inches | 21.5 Inches | 8.5-9 Inches | 9.5-10 Inches |
| Adult Large | 23 Inches | 22.5 Inches | 9-9.5 Inches | 10-10.25 Inches |
Chart Notes: The beanie’s band (or brim) will stretch by about a half inch. If you measure the head circumference for who you intend the beanie for, remove a half inch from the measured length to accommodate stretch. For example, if you have measured a head circumference of 21 inches, work your band length to 20.5 inches.
There are two columns for height with one being “more fitted” and the other being “slightly slouchy”. You will want to repeat Round 3 until your work reaches the height listed in the column you prefer for the size you’ve chosen.
CHANGING BAND LENGTH: Regardless of if you change just the size or decide to also use a different yarn weight, you will follow the written instructions for the band in the main pattern. However, instead of completing 132 rows, you will work Row 2 until your band length measures either the length listed in the chart above OR 0.5-0.75 inches shorter than your measured head circumference. Make sure you have an EVEN amount of rows.
THE STITCH COUNT OF ROUNDS CHANGES: Once you’ve completed your band, you will notice that you likely have less than 132 rows (you might even have more!). This means that when you transition to working rounds, your stitch count will change from what is listed in the written pattern.
For example, if you created 100 rows to reach your band length, you should have 100 single crochet at the end of Round 1.
ROUND 1 NOTE: Make sure you have the same number of stitches as you did rows in the band before continuing. This may not end up “perfect” and sometimes working into the side of stitches can be a bit fiddly. You should have an EVEN amount of stitches when you complete Round 1.
ROUND 2 NOTE: Round 2 is worked exactly as written in the pattern. The only difference is that you will have a different stitch count. Your stitch count will be one half single crochet and one half chain 1 spaces based on your Round 1 stitch count. To figure out how many single crochets and how many chain 1 spaces you should have at the end of your round, simply divide your total number of stitches by 2. Because you have an even number of stitches, your result should be a whole number.
Using the same 100 stitch count example: You would have 50 single crochet and 50 chain 1 spaces.
ROUNDS 4 THROUGH 54 NOTE: You may end up having to work more or less of the round repeat to reach the height necessary for your beanie. Make sure to identify what size of beanie you are making and what the recommended height in inches is for that size. You will want to repeat Round 3 until your beanie reaches that size in height (including the brim!)
If you’d like to follow the color pattern while changing size and/or yarn weight, follow the chart below.
| Color | If changing yarn weight and/or size | If following written pattern exactly |
| Color A | All rows of band | All rows of band |
| Color A | Complete Rounds 1, 2 & 3 | Complete Rounds 1, 2 & 3 |
| Color B | Repeat Round 3 until work is approximately 4 inches high, from bottom of band to last row row worked. | Rounds 4 through 16 |
| Color C | 1 round | Round 17 |
| Color B | 1 round | Round 18 |
| Color C | 1 Round | Round 19 |
| Color B | 1 Round | Round 20 |
| Color C | Repeat Round 2 until work is approximately 6 inches high, from bottom of band to last row worked. | Rounds 21 through 33 |
| Color D | 1 Round | Round 34 |
| Color C | 1 Round | Round 35 |
| Color D | 1 Round | Round 36 |
| Color C | 1 Round | Round 37 |
| Color D | Continue Repeating Round 2 until work reaches 9.5-10 inches in height from bottom of band, or until desired height. | Rounds 38 through 54 (or until 9.5-10 inches in height) |
Want all of this information PLUS photo tutorials for each step of this process in an easy to print format?
You can purchase the PDF of this easy crochet beanie pattern in my Etsy shop! The PDF pattern is 10 pages long with photo tutorials, information and charts, like above. You’ll also get a “printer friendly” version without all the photos, to help you save ink. Win/Win!

I hope you love your easy crochet beanie as much as I love mine. I’ve made a bunch for friends and family over the last few months and I plan to make quite a few more to donate to shelters (and use up my stash!).
One of my greatest joys is seeing your finished crochet projects from my patterns or tutorials, so when you post to Instagram, don’t forget to tag me so I can show you some love! I’m @theloopholefoxcrochet. You can also share pictures on my recent posts on Facebook or within my Facebook group!
And don’t forget to pin this to your Pinterest boards, so you can remember it for later!
Don’t forget to join my Facebook Group so we can chat all about your creations! We are a group for crocheters of all experiences, all interests and love to hang out together. Come join the fun!

Shannon | Designer & Editor
Shannon helps crocheters find their next project and build their skills with in depth tutorials and crochet patterns on her blog, theloopholefox.com.
With more than a decade of crochet experience, Shannon knows that understanding why we do something matters just as much as how we do it. She teaches new techniques and crochet stitches in depth so you can crochet with confidence.
Looking for more fun crochet beanie patterns? Check these out!
The Arctic Beanie – Textured and tightly woven, this beanie is perfect for winter!
The Jesse Beanie – This beanie is also easy to change the yarn weight and size. The best part is, this beanie is great for men and women!