
Melody Square – Crochet Mitered Granny Square for Blankets
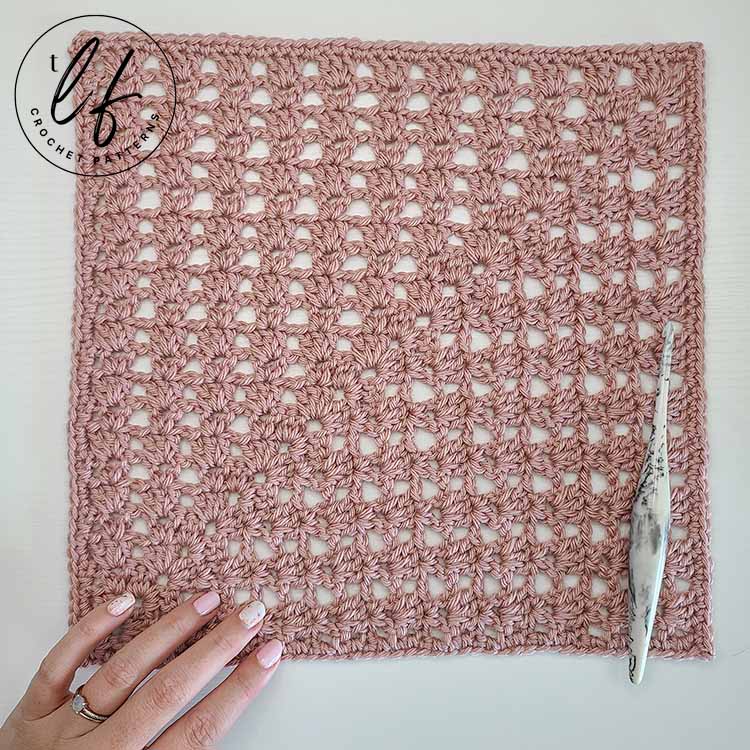
There’s something about crochet granny squares, isn’t there? They’re so much fun to crochet and come in a variety of styles, so there are always new and interesting squares to make. This mitered granny square for blankets fits right in with it’s unique construction, pretty lace structure and, of course, the granny stitch!
Love this mitered granny square? Share the love and Pin it to Pinterest!
DISCLAIMER: This post includes affiliate links. This means, should you decide to purchase a product via one of these links, I will receive a small commission at no extra cost to you. I only recommend products I use and love (Or products I know others love, have heavily researched, know have good ratings and plan to purchase myself). These small commissions help to support this blog and continue keeping most of my patterns free. You can read more on my Privacy Policy, if you prefer.
When Debbie of Madame Stitch asked me to join her Granny Stitch Sampler Blanket Crochet-A-Long (CAL), I couldn’t deny her. I love designing squares and I instantly knew exactly what I wanted to make.
The rule we were given when designing squares for Debbie’s CAL was this: It must include the granny stitch somewhere in the pattern. Challenge accepted!
Previously, I designed the Melody Triangle Shawl and Melody Rectangle Shawl, both of which are fan favorites. The Melody designs couple the V stitch and the granny stitch together to create a melody of beloved stitches (see what I did there? 😉 ).
I knew immediately that I would tweak the Melody designs to fit into a square but I wanted it to have something a little different and unique compared to the two previous designs. So, I designed it to be a mitered granny square and I have to tell you, the result is phenomenal!
Isn’t the finished blanket for the Granny Stitch Sampler Blanket CAL absolutely gorgeous? You can see my Melody Square on the center right in the corner of the blanket.
All of the squares are so beautiful and I love how unique they are, despite all using the granny stitch somewhere in the pattern.
You can join the free CAL by heading over to the main CAL post for the Granny Stitch Sampler Blanket.
If you want all the square patterns, the seaming instructions and the border pattern all together in one place, you can grab the Granny Stitch Sampler Blanket eBook! Purchasing the eBook will save you a ton of time and money as opposed to buying each PDF for the pattern separately.
What is a mitered square?
This crochet square pattern uses the Mitered Square technique, which means there are no long starting chains and that the squares are easy to alter the size if you need to, by crocheting more or less rows than stated in the pattern.
The Mitered Square technique begins the square in one corner and continually grows in size and stitch count as you work the rows. Rows are worked on two sides of the square with a corner created by a chain 2 space in the center.
If you’ve never worked a mitered square before, don’t worry! It’s a lot easier than it sounds and I have included a ton of photos in the PDF pattern.
You can also check out some of my smaller mitered square patterns to get an idea of the method prior to making this mitered granny square.
You can try out my Crochet Kitchen Towel, the Juni Dishcloth or my Crochet Bonding Squares patterns for small, quick projects that will help get you in the groove of what a mitered square is.
What yarn should I use for my mitered granny square?
This pattern is written to use Medium (4) worsted weight yarn that has a blend of acrylic and wool. As this square was designed originally for use in a crochet blanket CAL, this yarn weight and fiber is typically best for this type of project.
However…
If you’re using this square for something else, want to make it by itself for a project, or for any reason you desire, you can make this mitered granny square using any yarn.
Yep! You read that right. Any yarn of any weight and fiber.
From smooth and sleek cotton to fluffy soft hygge, this mitered granny square will look fantastic in any color or fiber.
Keep in mind that the yarn usage listed does reflect medium (4) worsted weight acrylic/wool blend yarn, so if you change weight or fiber, your yarn usage will be different.
Where to get this Crochet Mitered Granny Square Pattern
The Melody Square is a free crochet pattern in this blog post. Scroll down and log into Grow to view the free version.
However, if you’d like a more robust pattern with photo tutorials, the steps for the photo tutorial written out in full sentences and a printer friendly version of the PDF, I recommend you purchase the PDF pattern.
With the PDF pattern, you will receive photo tutorials for the special stitches, as well as a detailed photo tutorial for each row which will set you up to work this crochet mitered granny square pattern with confidence. The photos include details with arrows and dots to help identify all the stitches and their placement.
Additionally, you can get the PDF version of this pattern in the Granny Stitch Sampler eBook which includes 11 other square patterns all designed using the Granny Stitch.
SKILL LEVEL
Confident Advanced Beginner. Crocheters looking to follow this pattern should know how to:
- Read a crochet pattern – There is NOT a video tutorial for this mitered granny square pattern.
- Work the basic stitches – Chain, slip stitch, single crochet and double crochet.
- Understand how to make chain spaces, skip chain spaces and/or work into them.
- Understand and be willing to block a project. You will need to block this square.
- Know how to keep track of a corner chain 2 space or be willing to use stitch markers to keep track.
This is NOT an absolute beginner pattern. Absolute beginners will find this pattern outside of their skill level but adventurous beginners could be able to work through it, especially with the PDF pattern that includes a ton of photos to help you through.
If you are unfamiliar with any of these techniques or aren’t familiar with reading patterns, I highly recommend the PDF as it will walk you through everything step by step.
MATERIALS
Medium (4) worsted weight yarn of your choice.
You will need approximately: 60 grams / 2.11 ounces / 131 yards
Yarn Used
Sirdar Country Classic in colorway Oyster. This yarn is 50% Merino Wool and 50% Acrylic.
TOOLS & NOTIONS
5 mm (H-8) Hook – Check out my favorite crochet hooks!
Tapestry needle
Scissors
Stitch markers, if you prefer them
Blocking Boards and Pins
GAUGE
Check gauge after completing 7 rows. Your square should measure approximately 4 inches along the raw side. Gauge is listed unblocked.
Gauge will not make or break this pattern. You can work the row repeat as many times as necessary to achieve 11.5 inches prior to the border and blocking.
Note: I am a tight crocheter, so my tension is usually tighter than others. Learn more about gauge and what this means here.
FINISHED SIZE
12 inches x 12 inches square
Size is listed after blocking.
You can easily customize the size of this square by repeating more or less rows as indicated in the pattern. The project will always be square regardless of how many times you repeat the rows. You will need to block the square to strengthen the square shape.
ABBREVIATIONS (US TERMS)
- Ch – Chain
- Sl St – Slip stitch
- Sc – Single Crochet
- Dc – Double crochet
- V st – V stitch (1 dc, ch 1, 1 dc all in the same stitch or space).
- STsc – Stacked Single Crochet
- St(s) – Stitch(es)
- Spc(s) – Space(s)
- Sk – Skip
- Corner Ch 2 Spc – Refers to the only ch 2 space in the instructions. This ch 2 spc controls the corner of the square.
- […] – Repeats are listed within brackets.
- (…) – Instructions within parenthesis in the row instructions indicate to work all stitches inside ( ) in the same stitch or space.
- (…) – Stitch counts are listed at the end of the row in parenthesis & bold italics.
NOTES
- This pattern uses Stacked Single Crochet (STsc) to begin rows. This is an alternative to turning chains and helps to keep the edges straight. You can change this to your preferred method of starting a new row, if you prefer.
- This pattern uses the Mitered Square technique. This means that it is worked from one corner outward and grows larger with each row.
- Working a mitered square is very similar to working a triangle shawl. The difference is we only increase in the corner chain 2 space. We do NOT increase the start or end of the rows.
- Blocking is required: The square will be more of a diamond shape than a square prior to blocking. This is the nature of using a lacy stitch in a mitered square. Once blocked, it will hold the square shape.
- Measure along the raw edge to get the most accurate length prior to blocking.
- You can work more or less rows as needed to reach 11.5 inches prior to the border round and then block to 12 inches.
- Corner instructions are bolded to help break up the size of the instructions: (2 dc, ch 2, 2 dc) in corner ch 2 spc.
Blocking Note
Because this crochet pattern uses both the mitered square technique and a lacy stitch, you will need to block the finished piece.

Left Square: Unblocked. Right Square: Blocked
Once worked through the pattern and prior to the border, the “square” (or diamond shape) should be approximately 11.5 inches along a raw edge. Place your border of single crochets and then block the square to not only ensure the shape but also the size.
Stitch Count Note
The stitch counts are listed at the end of each row in parenthesis and bold italics. You will notice that the stitch count has more than just a number listed. This is to help with breaking down the stitch count. In later rows, there will be many stitches and it can be tedious to count them. This pattern breaks down the stitch count to help make counting stitches easier.
For example, on Row 8, you will see: “(32 sts, 16 each side – 13 dc, 3 ch 1 spcs)”
This means that for Row 8, you will have 32 stitches total. On each side of the corner chain 2 space, you will have 16 stitches. Making up these 16 stitches are 13 double crochet and 3 chain 1 spaces.
Special Stitch – Stacked Single Crochet
The Stacked SC is an alternative way to start a new row that does not require turning chains. This helps to keep the edges of your work straight and without gaps or bumps.
I have a full photo tutorial with all the steps, tips and information you need to learn this technique. Check out the Stacked Single Crochet tutorial.
You are welcome to use a different method for starting each row if you prefer. You can: Use a chain 2 and not count it as a stitch, which means you will place your first double crochet in the first stitch. Or, you can chain 3, count the chain 3 as a stitch and do not place a stitch in the first stitch of the row.
To create a Stacked Single Crochet, you will: Turn your work. Do not create any turning chains.
Insert hook into first stitch, yarn over and pull up a loop. 2 loops on hook.
Yarn over, pull through both loops. 1 loop on hook. (All we have done so far is make a single crochet in the first stitch without chaining 1).
Now, insert your hook into the left leg (right leg, if you’re left handed) of the single crochet.
Yarn over and pull up a loop. 2 loops on hook. Yarn over and pull through both loops.
This stacks 2 single crochets on top of each other to create the height of a double crochet.
If you’re not familiar with Stacked Single Crochets, I recommend putting a stitch marker in the top of the second single crochet created. This is the top of your stitch and what you will work into when finishing the next row. The top of the first single crochet made in the stack will lean to the side. Don’t work into it or it will unnecessarily increase your work.

Melody Square – Free Pattern
This free crochet pattern is Exclusive Content for Subscribers.
To unlock this free crochet pattern, click the “Sign Up for Free” button in the box below. This will open a new window in which you can sign up for your totally free (and totally useful!) Grow account.
Once you have created an account, you’ll be able to log in and unlock Exclusive Content on this website and any other website that uses Grow.
Additionally, you can bookmark blog posts within your Grow account to keep track of all of your favorite free crochet patterns – all for free!
Thank you for subscribing, supporting and valuing crochet designers like myself. Enjoy!
Please Note: Signing up for Grow on this site will automatically sign you up for The Loophole Fox Newsletter. You will receive an email asking you to confirm your subscription. If you do not wish to subscribe, ignore the email completely. If you do subscribe and at any point no longer wish to receive emails, that’s totally okay. You can unsubscribe at any time.
Want to get the PDF version of this crochet mitered granny square pattern? Get your copy on Etsy by clicking the button below!
That’s all there is to it! I hope you enjoyed this mitered granny square pattern and all of the squares that are a part of the Granny Stitch Sampler Blanket CAL!
Looking for an eBook with all of the patterns in their PDF formats instead of buying each pattern individually? You can do that! Check out the Granny Stitch Sampler Blanket eBook!

Love the Melody Square pattern? Share the love and Pin it to Pinterest!
One of my greatest joys is seeing your finished crochet projects from my patterns or tutorials, so when you post to Instagram, don’t forget to tag me so I can show you some love! I’m @theloopholefoxcrochet. You can also share pictures on my recent posts on Facebook or within my Facebook group!
And don’t forget to pin this to your Pinterest boards, so you can remember it for later!
Don’t forget to join my Facebook Group so we can chat all about your creations! We are a group for crocheters of all experiences, all interests and love to hang out together. Come join the fun!

Shannon | Designer & Editor
Shannon helps crocheters find their next project and build their skills with in depth tutorials and crochet patterns on her blog, theloopholefox.com.
With more than a decade of crochet experience, Shannon knows that understanding why we do something matters just as much as how we do it. She teaches new techniques and crochet stitches in depth so you can crochet with confidence.
