
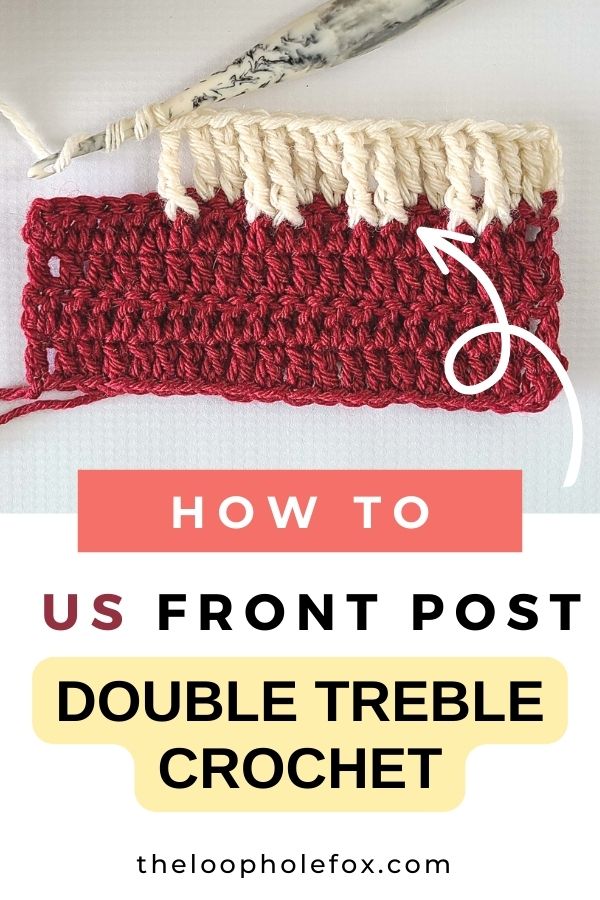
How to Front Post Double Treble Crochet (US)
When it comes to texture in crochet projects, there’s one stitch that can be a hero but isn’t talked about quite as often: The US Front Post Double Treble Crochet. This incredibly tall and long stitch has a variety of different uses when it comes to textured stitch patterns like cables and is a fantastic stitch to add to your stitch knowledge.
Before trying out the more advanced techniques that use this stitch, though, it’s important to know how to work this stitch on it’s own in the standard front post technique. So let’s do it!
What is the Front Post Double Treble Crochet (FPdtr)?
The Front Post Double Treble Crochet (in US terms) is abbreviated to FPdtr and is another way to add raised texture to your crochet projects. It is similar to the Front Post Double Crochet but it uses a Double Treble Crochet instead.
You’ll likely see this stitch far less often than you would the shorter front post stitches, but there’s no denying the uses and gorgeous texture that Front Post Double Treble Crochets can create.
This stitch is typically worked several rows below the current row or as crossed stitches to create cables. The height of the Front Post Double Treble Crochet lends it’s height and length to stitch patterns that need to reach and cross, so you’ll typically see them in projects that are more intermediate in skill level.
While this stitch typically will be used in the techniques I’ve mentioned above, I think it’s important to learn how to work this stitch in it’s most basic form before we start going into the rows below or crossing them.
Once you’ve learned how to work a basic Front Post Double Treble Crochet, you can move on to my tutorials for how to work them in the rows below the current row and how to cross them in the rows below.
What stitches should I know before I try a FPdtr?
Before you try this crochet stitch, you should know the basic crochet stitches. This means you should know and feel at least somewhat confident creating chains and working single crochet, half double crochet, double crochet and treble crochet stitches.
It will be helpful if you also know how to work a US Double Treble Crochet. If you haven’t learned how to work this stitch yet, my dtr stitch tutorial will help!
You will also find it helpful to be familiar with the much more common Front Post Double Crochet before trying this stitch. I will walk step by step through how to work this stitch around the post, but if you haven’t ever worked a Front Post stitch before, I would recommend that you start with the FPdc tutorial. It will walk you through the stitch anatomy so that you can identify the post of the stitch easier.
This tutorial assumes that you have some basic understanding of what the post of the stitch is and/or that you are familiar with Front Post Double Crochet, as this is a slightly more advanced technique.
How to Front Post Double Treble Crochet (US Terms)
This Front Post Double Treble Crochet stitch tutorial will show you step-by-step how to work this stitch with photos along the way. There will be highlights and arrows to help identify the steps as clearly as possible.
Ready to get started? Let’s go over the technical stuff first.
DISCLAIMER: This post includes affiliate links. This means, should you decide to purchase a product via one of these links, I will receive a small commission at no extra cost to you. I only recommend products I use and love (Or products I know others love, have heavily researched, know have good ratings and plan to purchase myself). These small commissions help to support this blog and continue keeping most of my patterns free. You can read more on my Privacy Policy, if you prefer.
YARN AND HOOK USED IN THIS TUTORIAL
To practice the Front Post Double Crochet, you can use any yarn you like! Choose a hook size that corresponds with the yarn weight you’re using and you’re good to go.
In my tutorial photos, I’m using Bernat Maker Home Dec in colorway Aqua and my Furls Ebony Streamline Wood 8mm (M).
WRITTEN FRONT POST DOUBLE TREBLE CROCHET INSTRUCTIONS
To work a Front Post Double Treble Crochet (FPdtr), you will:
Yarn over 3 times and insert your hook from front of work to back of work between the posts of the previous stitch and current stitch and maneuver the hook back to the front of the work on the other side of the post. Your hook should now sit horizontal with the post of the stitch on the front of hook. Yarn over, pull a loop through. You will have 5 loops on hook. Yarn over, pull through 2 loops a total of 4 times.
Step by Step Instructions
Now that we have the technical stuff out of the way, let’s walk step by step through how to work the Front Post Double Treble Crochet.
For this tutorial, I am using a swatch of 4 rows of 12 double crochet. You will most typically see this stitch worked around double crochets or a similar stitch taller than a single crochet, so the double crochet is a good stitch to learn on.
First thing’s first, we need to talk about the height of the double treble crochet and how it interacts with the other stitches. Because this stitch is so tall, working this stitch in the post of the stitch below next to a single crochet or double crochet would make it stick out a bit wonky.
You will notice that most patterns have this stitch worked several rows below or with skipped stitches. This stitch is generally used that way because of it’s height or length. It doesn’t necessarily make sense to use it in the “standard” front post technique because of this.
For the sake of this tutorial, we are working this stitch in the way we would a standard Front Post stitch because it is easiest to learn it this way. Because of this, we lead up to it with treble (or triple) crochets so that the height of this stitch is used to it’s full potential.
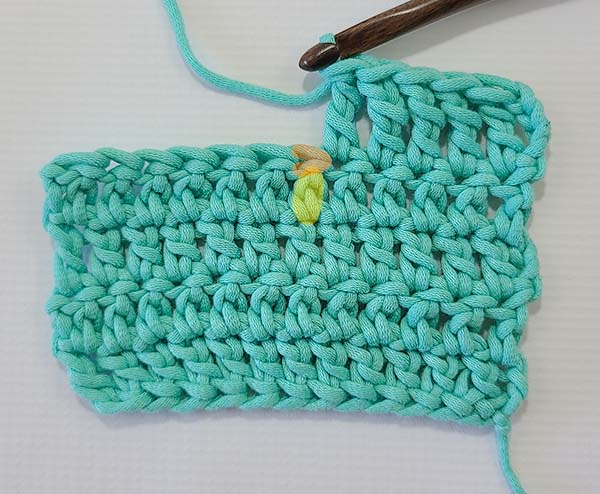
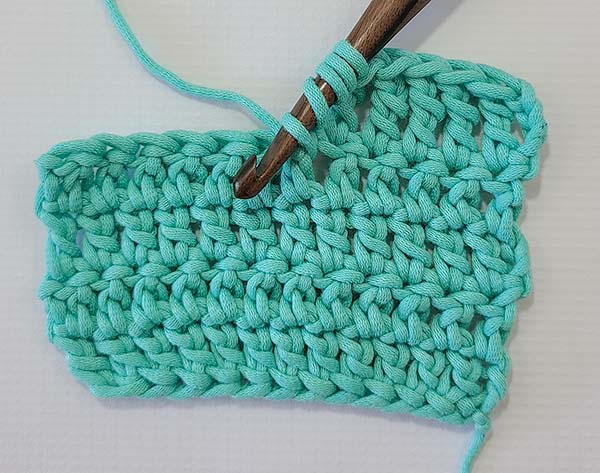
So, to begin this tutorial, I have crocheted 5 treble crochet. We will place a Front Post Double Treble Crochet in the next stitch.
So, let’s identify the post of the next stitch.
This image shows the next stitch highlighted in orange and yellow. The orange highlight represents the top of the stitch and the yellow highlight represents the post.
(If you need a refresher on this, please see the stitch anatomy lesson in my Front Post Double Crochet tutorial).
To properly place a front post double treble crochet, we will insert the hook around the post of the highlighted stitch from front of work to back of work between the post of the previous stitch and the current stitch. Then, we bring the hook back to the front of the work on the other side of the post.
Let’s go through this step by step.
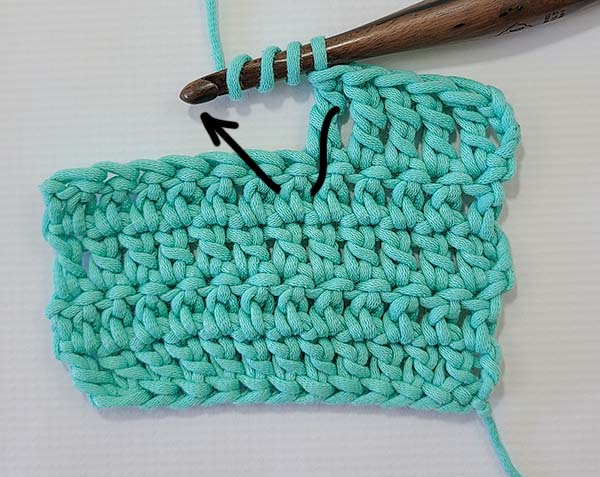
We will yarn over 3 times. It will appear that we have 4 loops on our hook. Then, we will maneuver our hook in the same direction of the arrow in this image. To do this, we will swing our hook down and in front of the work.
Insert the hook from front of work to back of work between the posts of the previous stitch and the current stitch.
Then, once your hook is inserted between the posts, bring the hook back to the front of the work on the other side of the current stitch’s post. A black arrow shows where your hook will come through.

Your hook should sit horizontal with the post of the stitch on the front of the hook.
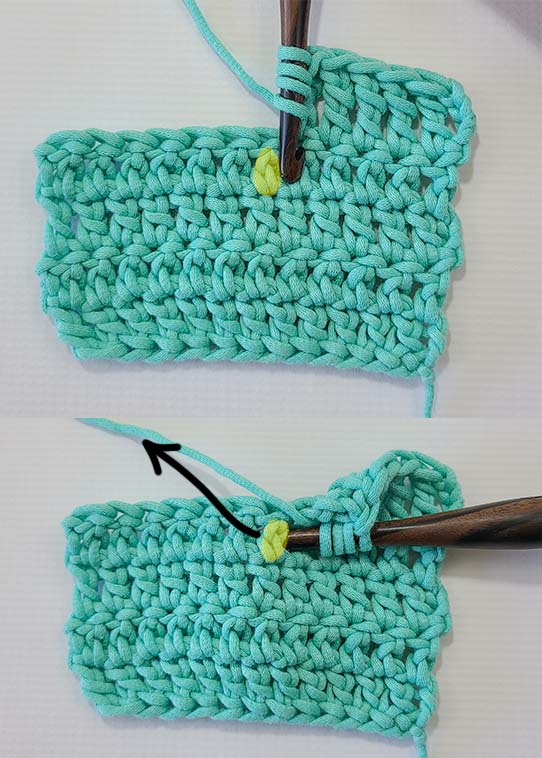
This is why this stitch is called a “Front Post Double Treble Crochet”. It is worked on the front of the work and the post of the stitch is on the “front” of the hook!
Now, we yarn over and pull a loop through.
We have 5 loops on our hook. From here, we will finish this Front Post Double Treble Crochet as we would a normal double treble crochet.
We will yarn over and pull through 2 loops a total of 4 times.
(If you’re unfamiliar with this or struggling with these loops getting too loose, please review the stitch tutorial for the standard double treble crochet.)
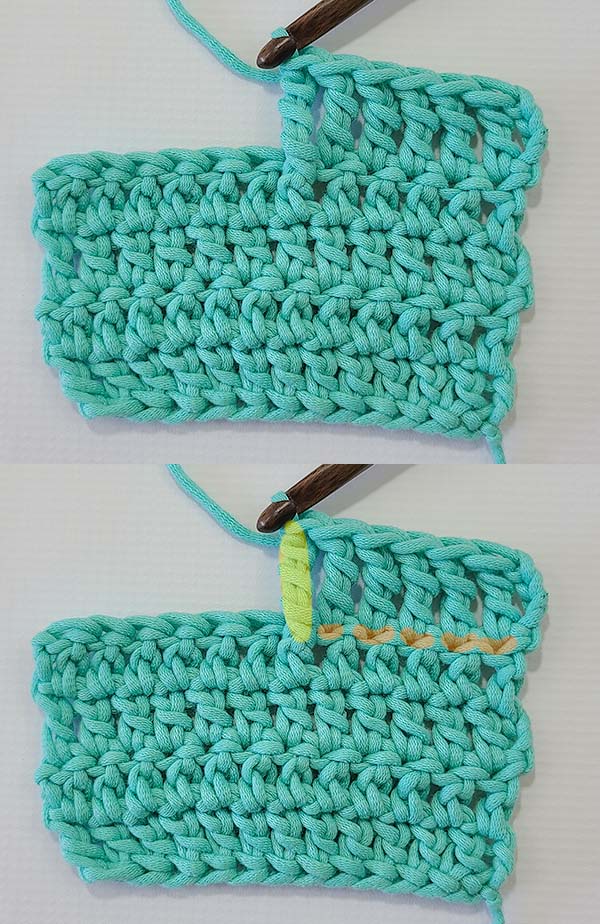
We now have 1 completed Front Post Double Treble Crochet. These images are the same however I have highlighted the bottom picture for clarity.
The Front Post Double Treble Crochet is highlighted yellow. You can see how this stitch wraps around the post of the double crochet below instead of being worked into the top of the stitch.
The previous four treble crochet worked are highlighted at the bottom with orange. You can see how these stitches are clearly worked into the top of the stitch.
Also notice how the Front Post Double Treble Crochet pulls the post of the previous stitch forward, so it now sits higher than the previous double crochets of that row.

Just like any other front post stitch, we can place another Front Post Double Treble Crochet around the post of the next stitch, if we wanted to or were instructed to in the pattern we are following.

Here we have two completed Front Post Double Treble Crochets next to each other.
Notice that the height of the Front Post Double Treble Crochets are the same as the treble crochets that were originally worked in this row.
The extra height of the FPdtr went to working around the post of the stitch below, so it sits slightly lower and matches the height of the trebles.
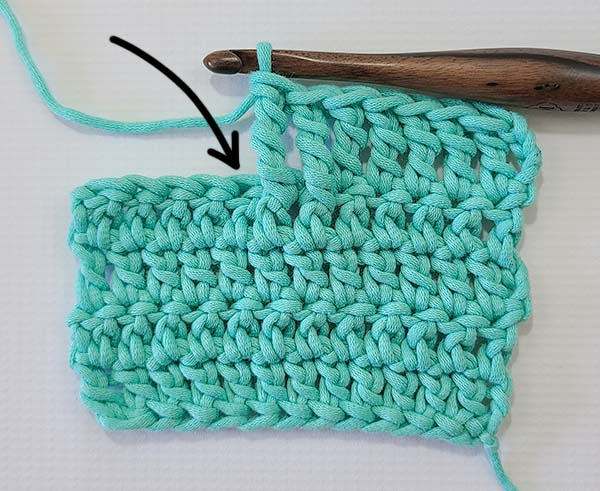
Just like the other front post stitches, we want to make sure that we skip the top of the stitches that belong to the posts we worked around.
If we worked into these stitches, it would unnecessarily increase the amount of stitches.
When you plan to place (or are instructed to place) a standard stitch into the next stitch, make sure it’s in the top of the next stitch.
An arrow points to the top of the next stitch in this image.

Here we have the row finished with 5 more treble crochet.
In this row we have 5 treble crochet, 2 Front Post Double Treble Crochet and 5 more treble crochet for a total of 12 stitches.
So, what do I do now?
To continue practicing the Front Post Double Treble Crochet, you can simply continue creating swatches of double crochets so that you can continue to practice placing FPdtr’s around the posts.
Once confident with Front Post Double Treble Crochets in this “standard” front post technique way, you can move on to learning how to use them as you’d see them in crochet patterns. You’ll find them worked in 2 or more rows below or as crossed front post stitches.
The combination of those two techniques will make you nearly unstoppable when it comes to raised crochet texture!
That’s all there is to the Front Post Double Treble Crochet!
I hope you’ve enjoyed this tutorial and that you can move forward crocheting all your favorite patterns that use Front Post Stitches with confidence. Thanks so much for hanging out with me today!
Don’t forget to join my Facebook Group so we can chat all about your creations! We are a group for crocheters of all experiences, all interests and love to hang out together. Come join the fun!

Shannon | Designer & Editor
Shannon helps crocheters find their next project and build their skills with in depth tutorials and crochet patterns on her blog, theloopholefox.com.
With more than a decade of crochet experience, Shannon knows that understanding why we do something matters just as much as how we do it. She teaches new techniques and crochet stitches in depth so you can crochet with confidence.
Looking for more Crochet Stitch Tutorials? Try these!
How to Crochet the Suzette Stitch
How to Crochet the Even Moss Stitch
How to Crochet the Arcade Stitch
How to Crochet the Linked Double Crochet
The Magic Circle: How and Why it Works
Foundation Single Crochet and Why It’s Awesome
Foundation Half Double Crochet and Double Crochet and Why They’re Also Awesome
