
Blooming Square – In Bloom Ruana CAL
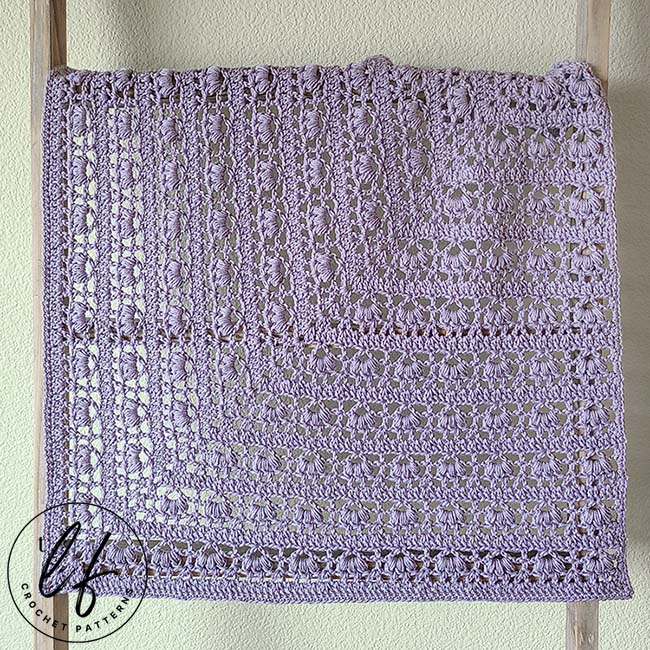
If you love blooming flowers, you will love this crochet flower square pattern. Designed as a part of the In Bloom Ruana CAL co-hosted by myself and my lovely friend Agat of Made by Gootie, this mitered square celebrates flowers in full bloom.
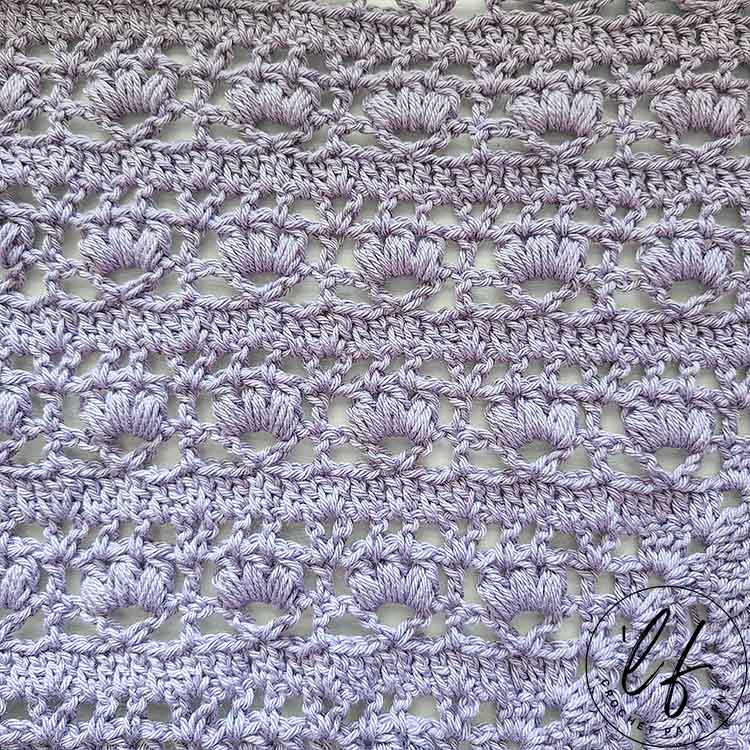
Inspired by flowers blooming in spring, the Blooming Square creates flowers using Puff Stitches and wide V stitches.
Using the mitered square technique, this pattern features gorgeous lines of lacey stitchwork that perfectly line up with additional squares made from this pattern or with the Flower Buds Square as a part of this CAL.
With a lacy construction and a four row repeat, this crochet flower square is not only a lovely part of the In Bloom Ruana CAL but could also be used for other projects that are made from squares.
For my ruana, I used two of my crochet flower squares and one of Agat’s. My two Blooming Squares are at the front of my crochet shawl to drape over the shoulders and the Flower Bud’s square designed by Agat is proudly displayed at the back.

What is a mitered square?
This flower square crochet pattern uses the Mitered Square technique, which means there are no long starting chains and that the squares are easy to alter the size if you need to, by crocheting more or less rows than stated in the pattern.
The Mitered Square technique begins the square in one corner and continually grows in size and stitch count as you work the rows. Rows are worked on two sides of the square with a corner created by a chain 2 space in the center.
If you’ve never worked a mitered square before, don’t worry! It’s a lot easier than it sounds and we have included a ton of photos in the PDF pattern.
You can also check out some of my smaller mitered square patterns to get an idea of the method prior to making this crochet lace shawl.
You can try out my Crochet Kitchen Towel, the Juni Dishcloth or my Crochet Bonding Squares patterns for small, quick projects that will help get you in the groove of what a mitered square is.
DISCLAIMER: This post includes affiliate links. This means, should you decide to purchase a product via one of these links, I will receive a small commission at no extra cost to you. I only recommend products I use and love (Or products I know others love, have heavily researched, know have good ratings and plan to purchase myself). These small commissions help to support this blog and continue keeping most of my patterns free. You can read more on my Privacy Policy, if you prefer.
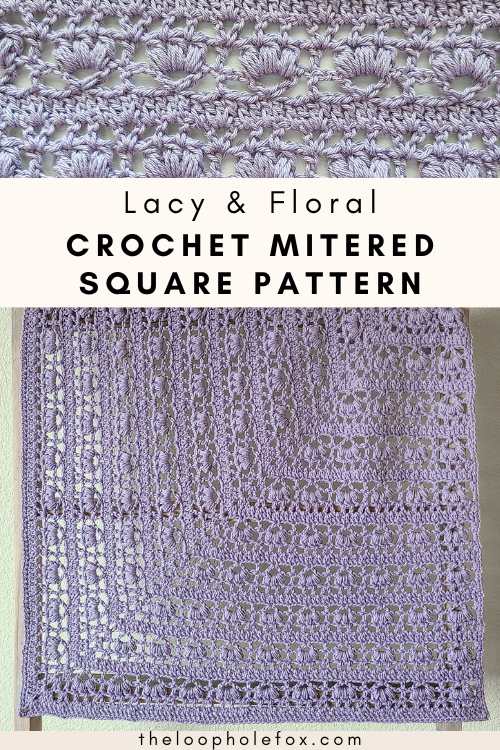
Love this pattern and the In Bloom Ruana CAL? Save it for later and Pin it to Pinterest!
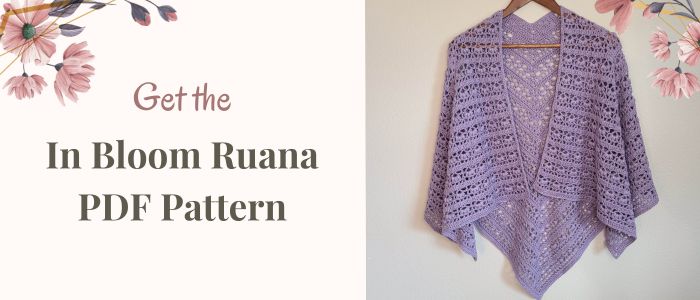
The In Bloom Ruana PDF Pattern
If you prefer to have everything in one place, don’t like the idea of jumping from one website to the other for each pattern or prefer to have the pattern without ads, the premium In Bloom Ruana PDF pattern is a fantastic option for you.
The purchase of the In Bloom Ruana PDF pattern will give you access not only to this crochet square pattern but to all the technical information, the entire pattern (including both squares), two options for seaming and photo tutorials for both squares as well as both seaming options all on one document.
We also have put together a “Printer Friendly” version of the PDF pattern for those who like to print patterns but may want to save ink. This included secondary PDF removes all of the photo tutorial pictures but leaves important graphics (that are mostly black and white) and the main design photo.
During the event, from June 27, 2023 through July 23, 2023, the PDF will be available for a discounted price of $5.60 (USD) for CAL participants. After the event, the price will be increased to $8.
Where to Get this Crochet Flower Square Pattern
The Blooming Square is a free crochet flower square pattern in this blog post and is a part of the In Bloom Ruana CAL. Scroll down to view the free version.
However, if you’d like a more robust pattern with more in depth photo tutorials and a printer friendly version, I recommend you purchase the PDF pattern. The photo tutorial included in this free version of the square pattern is a paired down photo tutorial. In the PDF pattern, the photo tutorial is more step-by-step.
The PDF pattern comes with both squares for the In Bloom Ruana CAL, all the technical information, border instructions and seaming instructions.
Even if you prefer not to seam the crochet flower square patterns into a ruana, you’ll get two square patterns that you can use for almost anything you like.
The Blooming Square pattern PDF is only available in the In Bloom Ruana Pattern.
SKILL LEVEL
The skill level for this crochet ruana pattern is Intermediate. Crocheters looking to purchase and follow this pattern should know how to:
- Read a crochet pattern – There is NOT a video tutorial for this crochet flower square pattern.
- Work the basic stitches – Chain, single crochet and double crochet
- Be familiar with creating chain spaces
- Be familiar with working several stitches into one stitch or chain space
- Be familiar with or become familiar with the following special stitches: “Closed” Puff Stitch and Stacked Single Crochet (Optional but recommended)
- Be prepared to learn or already be familiar with the mitered square technique.
While I believe an advanced beginner absolutely could follow this pattern, you will need to be familiar with these techniques and understand how to work them to feel confident doing so. You can purchase the PDF which comes with photo tutorials for the special stitches as well as step by step or you can check out my stitch tutorials which are linked in the abbreviations.
MATERIALS
DK (3) Weight cotton or cotton blend yarn of your choice. You will need approximately:
Per Square Made:
160 g/400 m / 437 yards
Yarn Used
Stylecraft Naturals Bamboo & Cotton DK in colorway Lavender. This yarn is 60% Bamboo and 40% Cotton.
NOTE: Because this is a cotton and bamboo blend, this DK yarn is on the thinner side and may have a significant gauge difference to an acrylic or wool DK. If you wish to use acrylic or wool yarn, you may want to look into a Sport (2) weight instead.
TOOLS
3.5 mm (E) crochet hook
Tapestry needle
Scissors
Stitch Markers (if preferred)
Blocking Boards & Pins
FINISHED SIZE
19.5 x19.5 inch (49.5×49.5 cm) square. Size is listed after blocking.
This is the size only for this flower square crochet pattern. It is not the finished size of the Ruana from the In Bloom Ruana CAL.
GAUGE
Check gauge after completing 10 rows. Your square should measure approximately 4 inches (10 cm) along the side.
Note: I am a tight crocheter, so my tension is usually tighter than others. Learn more about gauge and what this means here.
ABBREVIATIONS (US TERMS)
- Ch – Chain
- Dc – Double crochet
- Puff-4 – 4 YO Puff St : [yo, insert hook into indicated st or spc, yo and pull up a loop] x 4 times working into same st/sp. 9 loops on hook. Yo and pull through 8 loops, yo again and pull through 2 remaining loops.
- RS – Right Side
- Sk – Skip
- Spc(s) – Space(s)
- St(s) – Stitch(s)
- STsc – Stacked Single Crochet
- V-dc – Dc V stitch: (1 dc, ch 1, 1 dc) in the same st/sp
- Wide-V – (1 dc, ch 3, 1 dc) in the same st/spc
- WS – Wrong side
- Flower – Used only in stitch count. References (Puff-4, ch 1, Puff 4, ch 1, Puff-4) worked in same ch space
- * – Repeats are shown via asterisks. Repeat begins at * and ends at ;
- […] – Instructions within brackets indicate a stitch repeat within a repeat. Repeat these instructions as instructed within the main row repeat.
- (…) – Instructions within parenthesis indicate to work all stitches in the same stitch or space.
NOTES
- An alternative to the Magic Circle: Ch 3, skip the ch 2 at row 1 and work the pattern into the 3rd ch from the hook.
- There is a stitch count table after the written instructions, which will help you follow the row repetitions.
- To help with stitch count: every row adds 4 stitches (2 on each side).
- STsc is an alternative to the 1st double crochet, its intention in this pattern is to get a straighter edge. If you prefer, you can replace it with ch 3, or ch 2 + dc at the beginning of each row.
- You can place a stitch marker in the corner ch-2 space to keep track of the corner ch-2 space.
- Corner instructions are bolded to help break up the size of the instructions: (2 dc, ch 2, 2 dc) in corner ch-2 spc.
- All chain spaces are referenced by their number. Ch-1 = chain 1 space. Ch-2 = chain 2 space. Ch-3 = chain 3 space.
- Some repeats both start and end with skipping a stitch. This is intentional. Make sure to pay attention to these so that your stitches are worked properly.
- At the beginning of a row with these repeats, you will only need to skip 1 stitch to begin the repeat.
- In the middle of the row, you’ll need to end the previous repeat with a skipped stitch and start the new repeat with a skipped stitch.
- At the end of the row (or just prior to the corner ch-2 space), you will end with the skipped stitch at the end of the repeat.
- Because this square has lacy stitches, the square will need to be blocked to reach size and to strengthen the square shape.
Special Stitch – Puff-4: 4 YO Puff Stitch
“Puff-4” in this pattern references a 4 yarn over puff stitch. Check out my Puff Stitch photo tutorial for step by step photo instructions.
To work this stitch you will: * yarn over, insert hook into indicated stitch or space, yarn over and pull up a loop; Repeat from * 3 more times. You will have 9 loops on hook. Yarn over and pull through 8 of the 9 loops. Then, yarn over and pull through the 2 remaining loops.
Special Stitch – Stacked Single Crochet (STsc)
The Stacked SC is an alternative way to start a new row that does not require turning chains. This helps to keep the edges of your work straight and without gaps or bumps. Check out my Stacked Single Crochet photo tutorial for step by step photo instructions.
To work a Stacked SC, you will: Turn your work. Do not create any turning chains.
Insert hook into first stitch, yarn over and pull up a loop. 2 loops on hook. Yarn over, pull through both loops. 1 loop on hook. (All we have done so far is make a single crochet in the first stitch without chaining 1).
Now, insert your hook into the left leg (right leg, if you’re left handed) of the single crochet. Yarn over and pull up a loop. 2 loops on hook. Yarn over and pull through both loops.
This stacks 2 single crochets on top of each other to create the height of a double crochet.
Blocking Note
Because this crochet flower square pattern uses both the mitered square technique and a lacy stitch, it is recommended that you block the square.
Mitered squares can have a tendency to be slightly diamond shaped especially when they use lacy stitches. Don’t be surprised if your square isn’t perfectly square when you finish it. You will need to block it.
As noted in the In Bloom Ruana CAL main post, you can block your finished squares or your finished ruana. You don’t have to do both.
I blocked each square separately, including this crochet flower square, and my finished ruana did not need any additional blocking.
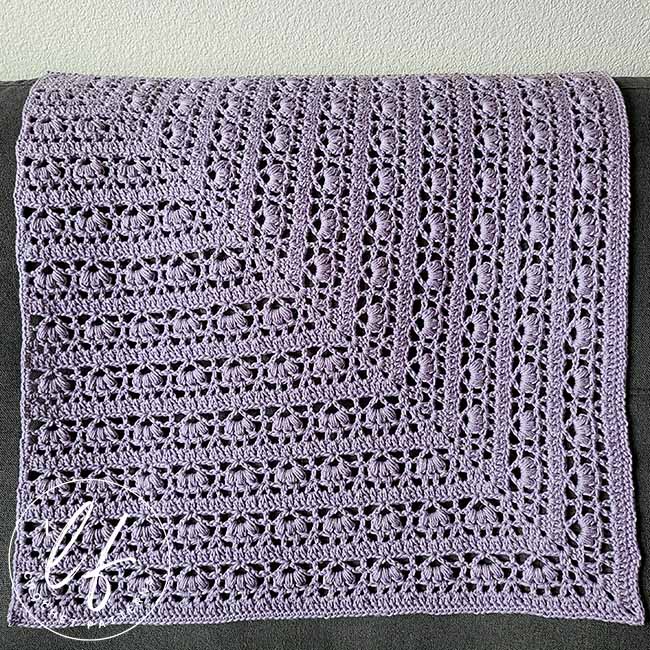
Blooming Mitered Square – Free Crochet Flower Square Pattern
Make a Magic Circle (Click for tutorial, if needed)
Row 1 (WS) – In Magic Circle, ch 2 (doesn’t count as a st). Place 2 dc, ch 2, 2 dc. Pull tail tight. Do not join. (4 dc, 1 Corner Ch-2 Spc)
Row 2 (RS) – Turn. STsc (Counts as 1 dc here and throughout) first st, 1 dc next st. (2 dc, ch 2, 2 dc) in corner ch-2 spc. 1 dc each of the next 2 sts. (8 dc, 1 Corner Ch-2 Spc)
Row 3 (WS) – Turn. STsc first st, 1 dc each of the next 3 sts. (2 dc, ch 2, 2 dc) in corner ch-2 spc. 1 dc each of the next 4 sts. (12 dc, 1 Corner Ch-2 Spc)
Row 4 (RS) – Turn. STsc first st, 1 dc each of the next 5 sts. (2 dc, ch 2, 2 dc) in corner ch-2 spc. 1 dc each of the next 6 sts. (16 dc, 1 Corner Ch-2 Spc)
Row 5 (WS) – Turn. STsc first st. Ch 1, sk 3 sts (Pic 1), Wide-V in next st (Pic 2). Ch 1, sk 3 sts. (2 dc, ch 2, 2 dc) in corner ch-2 spc. Ch 1, sk 3 sts, Wide-V in next st (Pic 3). Ch 1, sk 3 sts, 1 dc last st. (20 Sts Total – 6 dc, 2 Wide-V, 4 Ch 1 spcs, 1 Corner Ch-2 Spc)

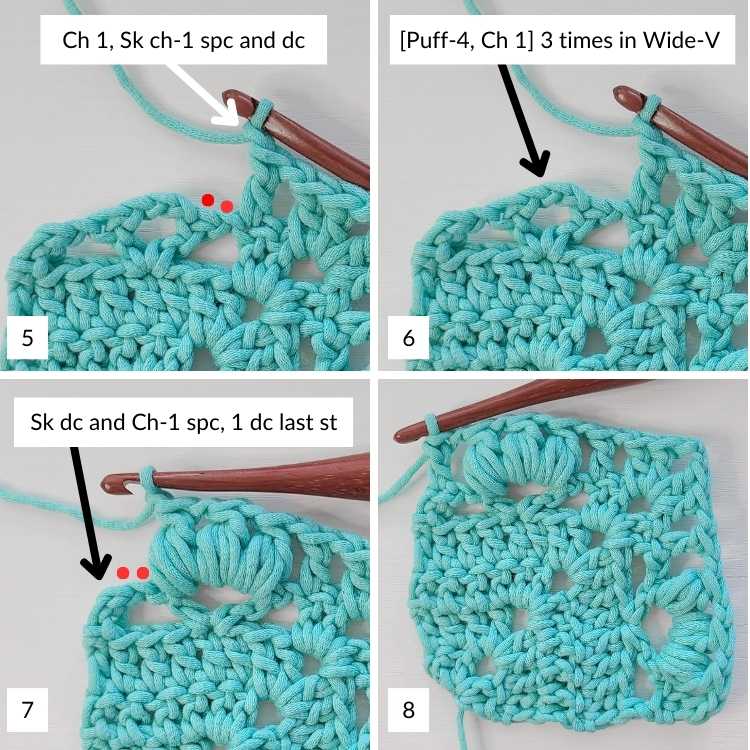
Row 6 (RS) – Turn. STsc first st, ch 1, sk ch-1 spc and dc (Pic 1). ( [Puff-4, Ch 1] 3 times) in ch-3 spc of Wide-V (Pics 2 & 3). Sk dc and ch-1 spc, 1 dc next st (Pic 4). Ch 1, sk 1, (2 dc, ch 2, 2 dc) in corner ch-2 spc.
Ch 1, sk 1, 1 dc next st. Ch 1, sk ch-1 spc and dc (Pic 5), ( [Puff-4, Ch 1] 3 times) in ch-3 spc of Wide-V (Pic 6). Sk dc and ch-1 spc, 1 dc last st (Pic 7). (24 Sts Total – 8 dc, 2 Flowers, 6 Ch 1 spcs, 1 Corner Ch-2 Spc)

Row 7 (WS) – Turn. STsc first st, 1 dc in ch-1 spc (Pic 1).
* Ch 1, Sk Puff-4, 1 dc in ch-1 spc ; Repeat from * 1 more time (Pic 2). Ch 1, Sk Puff-4 and ch-1 spc, V-dc in next st (Pic 3). Ch 1, Sk ch-1 spc and dc, 1 dc next st (Pic 4). (2 dc, ch 2, 2 dc) in corner ch-2 spc. 1 dc next st. Ch 1, sk dc and ch-1 spc, V-dc in next st (Pic 5). Ch 1, sk ch-1 spc and Puff-4, 1 dc next ch-1 spc (Pic 6).
* Ch 1, Sk Puff-4, 1 dc in ch-1 spc; Repeat from * 1 more time (Pic 7). 1 dc last st. (28 Sts Total – 14 dc, 2 V-dc, 8 Ch 1 spcs, 1 Corner Ch-2 Spc)


Row 8 (RS) – Turn. STsc first st. 1 dc in each of the next 6 sts and ch-1 spcs (Pic 1).
Sk 1 st, 3 dc in V-dc ch-1 spc (Pic 2). Sk 1 st, 1 dc in ch-1 spc. 1 dc in each of the next 3 sts (Pic 3). (2 dc, ch 2, 2 dc) in corner ch-2 spc.
1 dc each of the next 3 sts, 1 dc in ch-1 spc. Sk 1 st, 3 dc in V-dc ch-1 spc. Sk 1 st, 1 dc in each of the next 7 ch-1 spcs and sts. (32 dc, 1 Corner Ch-2 Spc)

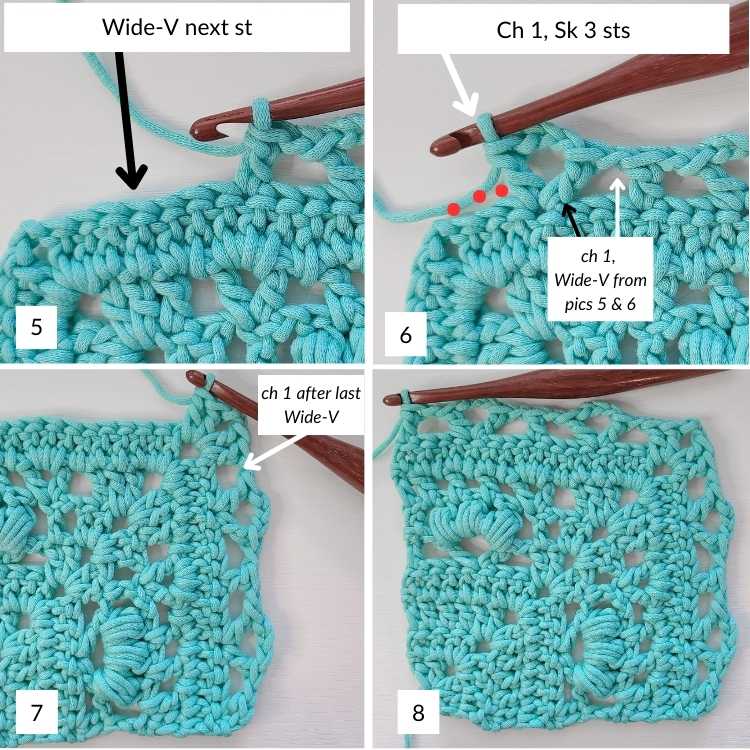
Row 9 (WS) – Turn. STsc first st. Ch 1, sk 3 sts (Pic 1), Wide-V next st (Pic 2).
Ch 1, sk 3 sts, 1 dc next st (Pic 3).
Ch 1, sk 3 sts, Wide-V next st (Pics 4 & 5). Ch 1, sk 3 sts (Pic 6). (2 dc, ch 2, 2 dc) in corner ch-2 spc.
Ch 1, sk 3 sts, Wide-V next st. Ch 1, sk 3 sts, 1 dc next st. Ch 1, sk 3 sts, Wide-V next st. Ch 1, sk 3 sts, 1 dc last st. (36 Sts Total – 8 dc, 4 Wide-V, 8 Ch 1 spcs, 1 Corner Ch-2 Spc)

Row 10 (RS) – Turn. STsc first st.
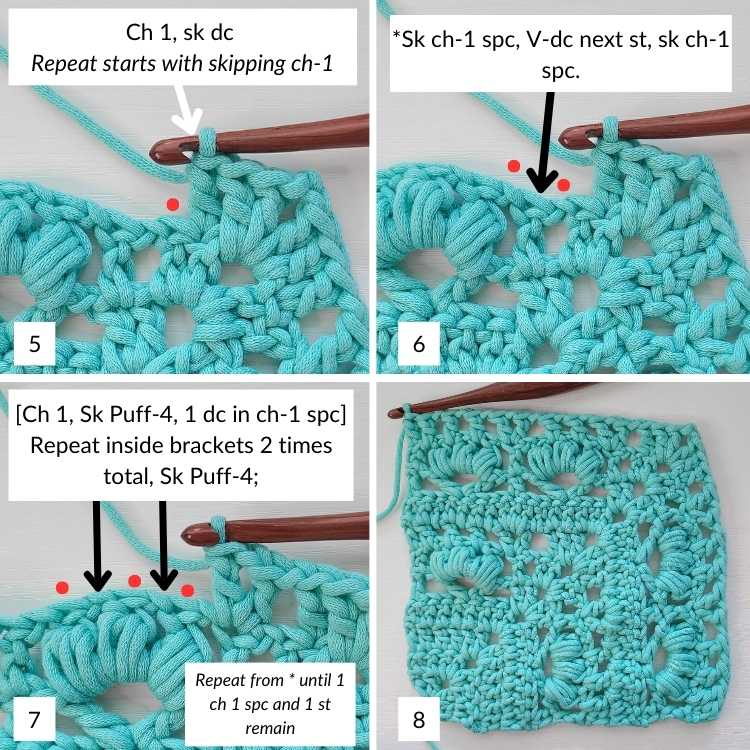
* Ch 1, sk ch-1 spc and dc (Pic 1), ( [Puff-4, Ch 1] 3 times) in ch-3 spc of Wide-V (Pic 2). Sk dc and ch-1 spc, 1 dc next st (Pic 3) ; Repeat from * until 1 st remains prior to corner ch-2 spc. Ch 1, sk 1 st (Pic 5). (2 dc, ch 2, 2 dc) in corner ch-2 spc. Ch 1, sk 1 st, 1 dc next st (Pic 6).
* Ch 1, sk ch-1 spc and dc, ( [Puff-4, Ch 1] 3 times) in ch-3 spc of Wide-V. Sk dc and ch-1 spc, 1 dc next st ; Repeat from * to end of row. (40 Sts Total – 10 dc, 4 Flowers, 10 Ch 1 spcs, 1 Corner Ch-2 Spc)

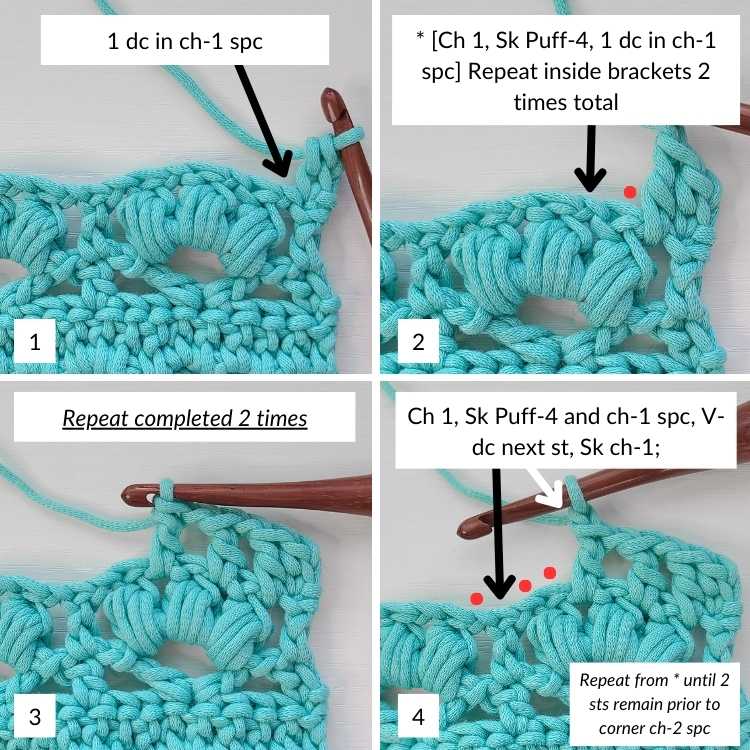
Row 11 (WS) – Turn. STsc first st. 1 dc in ch-1 spc (Pic 1).
* [Ch 1, sk Puff-4, 1 dc in ch-1 spc] Repeat inside brackets 2 times total (Pics 2 & 3). Ch 1, sk Puff-4 and ch-1, V-dc in next st, sk ch-1 (Pic 4) ; Repeat from * until 2 sts remain prior to corner ch-2 spc. Ch 1, sk dc, 1 dc next st (Pic 7). (2 dc, ch 2, 2 dc) in corner ch-2 spc. 1 dc next st. Ch 1, sk dc (Pic 5).
* Sk ch-1, V-dc in next st, sk ch-1 (Pic 6). [Ch 1, sk Puff-4, 1 dc in ch-1 spc]. Repeat inside brackets 2 times total. Ch 1, Sk Puff-4 (Pic 7); Repeat from * until 1 ch-1 spc and 1 st remain. 1 dc in ch 1 spc, 1 dc in last st. (44 Sts Total – 18 dc, 4 V-dc, 14 Ch 1 spcs, 1 Corner Ch-2 Spc)
Row 12 (RS) – Turn. STsc first st, 1 dc next st (Pic 1).
* 1 dc in each of the next 5 ch-1 spcs and sts (Pic 2). Sk dc, 3 dc in V-dc ch-1 spc. Sk dc (Pic 3) ; Repeat from * until 1 ch-1 spc and 3 sts remain prior to corner ch-2 spc. 1 dc in ch-1 spc and 1 dc in each of the next 3 sts. (2 dc, ch 2, 2 dc) in corner ch 2 spc. 1 dc in each of the next 3 sts, 1 dc in ch 1 spc.
* Sk dc, 3 dc in V-dc ch-1 spc. Sk dc, 1 dc in each of the next 5 ch-1 spcs and sts; Repeat from * until 2 sts remain. 1 dc in each of the last 2 sts. (48 dc, 1 Corner Ch-2 Spc)

Row 13 (WS) – Turn. STsc first st.
* Ch 1, sk 3 sts, Wide-V next st (Pic 1). Ch 1, sk 3 sts, 1 dc next st (Pic 2) ; Repeat from * until 7 sts remain prior to corner ch-2 spc. Ch 1, sk 3 sts, Wide-V next st. Ch 1, sk 3 sts. (2 dc, ch 2, 2 dc) in corner ch-2 spc.
* Ch 1, sk 3 sts, Wide-V next st. Ch 1, sk 3 sts, 1 dc next st; Repeat from * to end of row. (52 Sts Total – 10 dc, 6 Wide-V, 12 Ch 1 spcs, 1 Corner Ch-2 Spc)

Rows 14 through 48 – Repeat Rows 10 through 13 in sequence.
For example, Row 14 will be a repeat of Row 10 and Row 15 will be a repeat of Row 11. Row 48 will be a repeat of Row 12. Use the stitch count table below to keep track of stitch counts and row repeats. Don’t fasten off, continue working the border.

Border
This graphic helps to visualize the steps of the border instructions. The instructions start where the text points to the top left corner and we will follow the green arrows to the end.

Border Round 1 – Ch 1. Do not turn but rotate to work along the side of the rows. In the side of each dc, place 2 sc. (96)
Do not turn. Instead, rotate to work along the side of rows. The right side of the work will be facing you.
At the end of this side, you will be at the starting Magic Circle. In this circle, place (1 sc, ch 2, 1 sc) (2). If necessary, pull tail of Magic Circle tight once more.
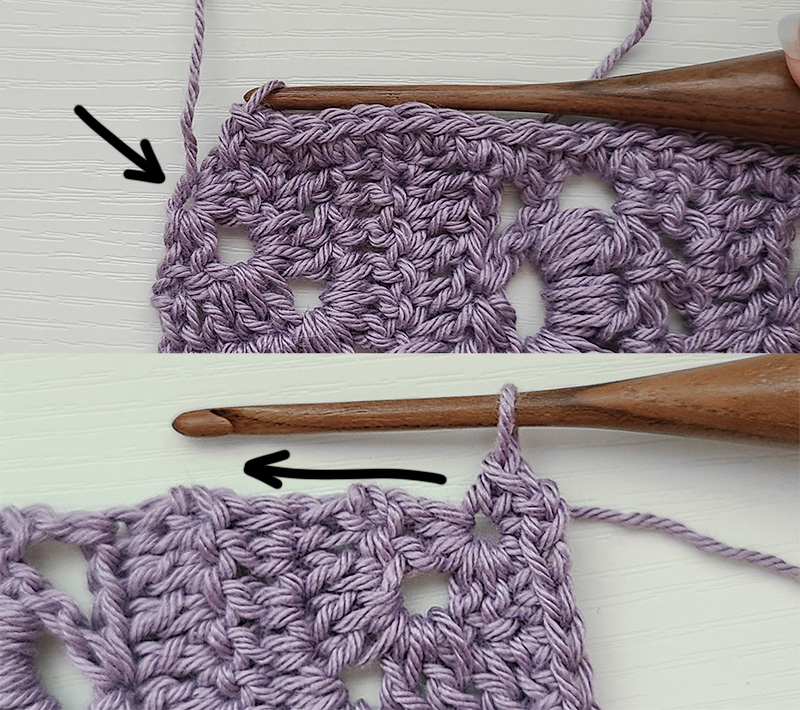
Rotate to work along the next side of the rows. In the side of each dc, place 2 sc. (96) At the end, ch 2 and rotate to work along Row 48.
Place 1 sc in each st across to corner ch 2 spc (96). In the chain 2 space, place (1 sc, ch 2, 1 sc) (2).
Continue placing 1 sc in each st across to end (96). Ch 2, sl st to first sc to close. (388 sts, 97 on each side, 4 ch 2 spcs)
Now you can finish off the flower square. Cut yarn and weave in your ends. Return back to the In Bloom Ruana CAL main post for next steps in the CAL event.
Want to get the PDF version of this square and the full In Bloom Ruana pattern?
Get your copy by clicking the button below!

Now that you’re all done with this flower square crochet pattern, you can head back to the main CAL page to see the next steps in the CAL!
Enjoy!
Don’t forget to join my Facebook Group so we can chat all about your creations! We are a group for crocheters of all experiences, all interests and love to hang out together. Come join the fun!

Shannon | Designer & Editor
Shannon helps crocheters find their next project and build their skills with in depth tutorials and crochet patterns on her blog, theloopholefox.com.
With more than a decade of crochet experience, Shannon knows that understanding why we do something matters just as much as how we do it. She teaches new techniques and crochet stitches in depth so you can crochet with confidence.
