
Crossed Stitches Help for Part 3 – Harmony Blanket CAL
This post is simply to provide help with Rows 5 and 7 of Part 3 of the Harmony Blanket CAL. Part 3 was designed by Hannah of HanJan Crochet. I do not take any credit for this pattern whatsoever. I have done my best to make a tutorial that accurately and clearly represents the pattern that Hannah has included for the Harmony Throw Blanket CAL. I have made this tutorial with permission from Hannah.
The hardest part of this pattern is the crossed treble stitches worked 2 rows below. I have an entire tutorial on how to figure out where the post of the stitch is 2 rows below, how to skip stitches and then work into stitches 2 rows below and how to work into the skipped stitches 2 rows below. You can find it here: Tutorial
However, you may find it helpful for the photo tutorial to specifically follow the pattern Hannah designed.
This tutorial will not show you how to work front post stitches, including the front post treble crochet. This assumes you know how to work front post stitches. This tutorial ONLY walks you through the pattern step by step as written by Hannah.
For transparency, I am working with 16 stitches which is 2x the stitch multiple for Hannah’s part. If you’re struggling with this pattern and would like to practice, I recommend a swatch of 16 stitches.
I also will not be showing how to work Rows 1 through 4 as they should be fairly straight forward.
Let’s get started with Row 5:
The instructions for Row 5 state specifically:
“ch1, *hdc in next 2 sts, skip next 2 sts, FPtr in next 2 sts two rows below, working in front of the last 2 sts, FPtr in 2 skipped sts 2 rows below, hdc in next 2 sts; rep from * across.”
This is a lot to digest. Let’s write it out in full sentences:
“We will chain 1 and turn. Then we go directly into the row’s repeat. We will [place 1 half double crochet in each of next 2 stitches. Then, we will skip 2 stitches. Working in the posts of the stitches 2 rows below, we will place 1 front post treble crochet in each of the next 2 stitches. Then, working in front of the last 2 stitches, we will place 1 front post treble crochet in each of the 2 posts of the stitches 2 rows below the stitches we skipped. Then we will place 1 half double crochet in each of the next 2 stitches]. We will repeat the instructions inside the brackets across the row.”
Now, let’s go through this step by step:
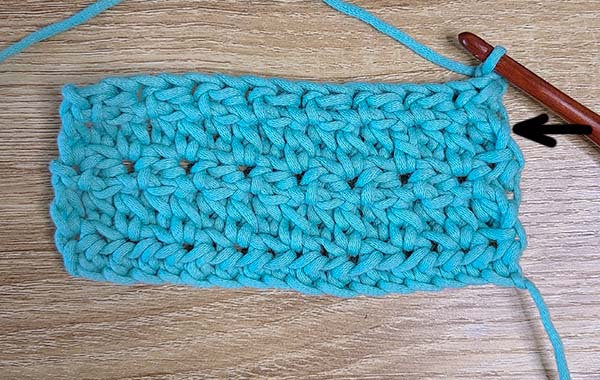
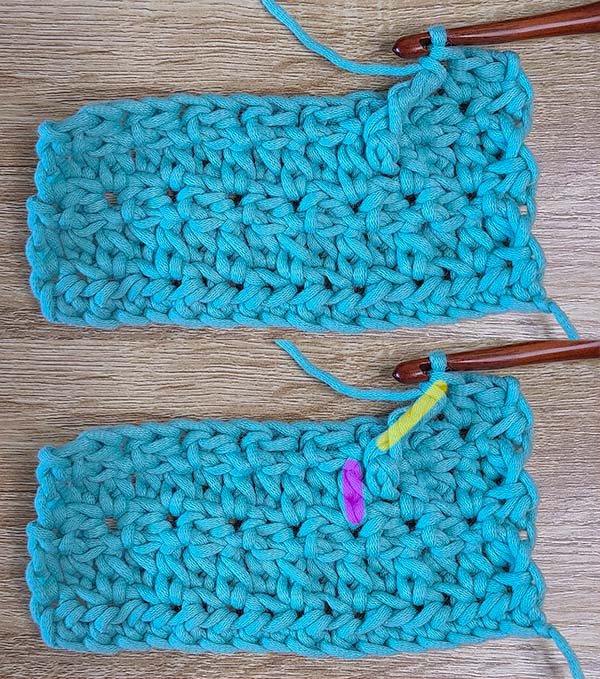
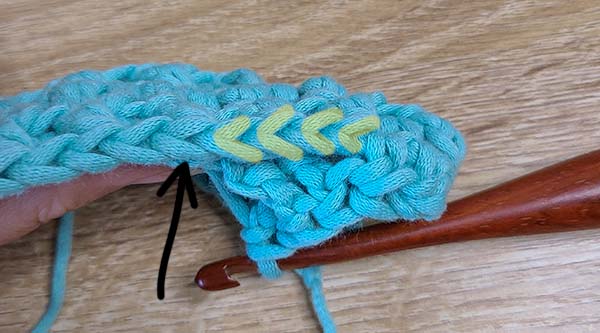
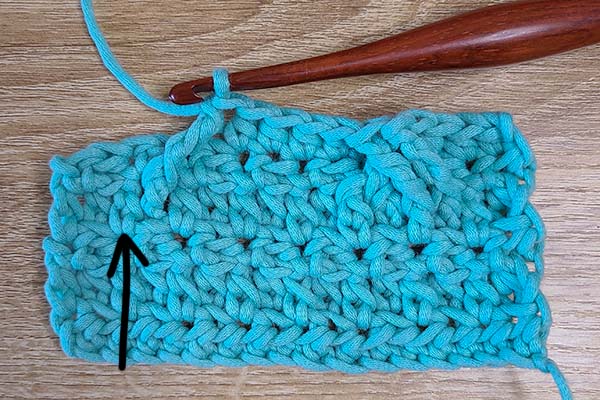
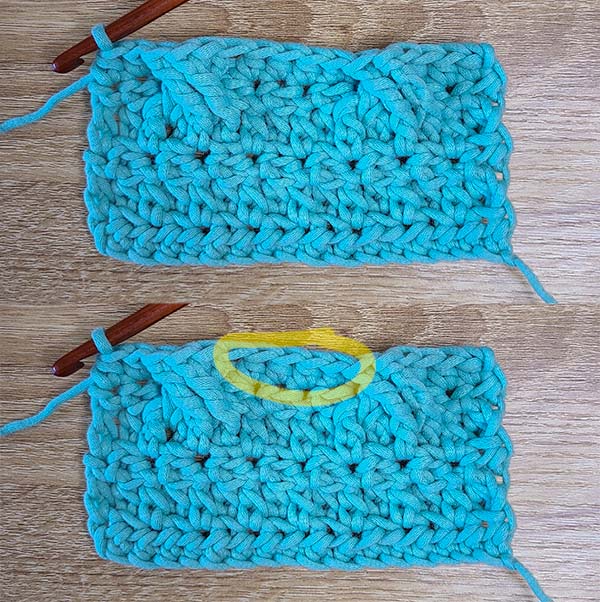
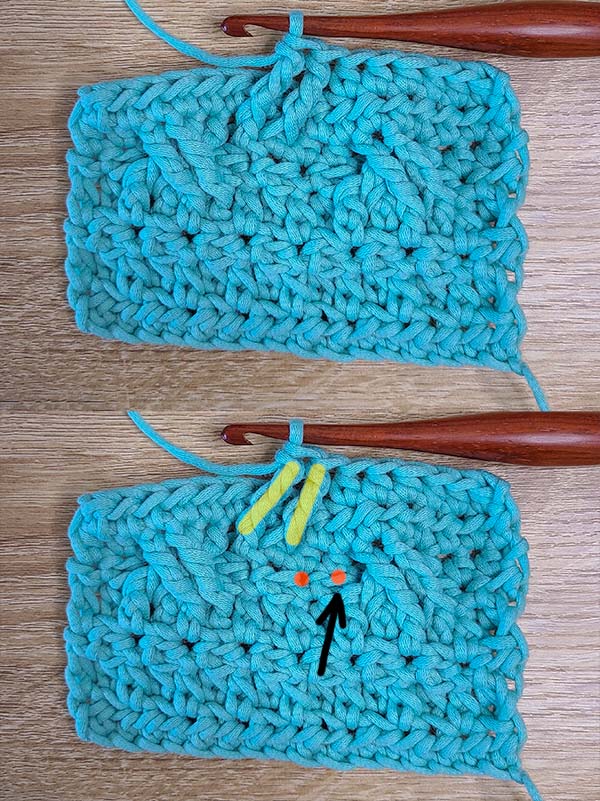
Here is my swatch of 16 stitches with the 4 rows worked. A black arrow is pointing to Row 3. Row 3 is the row that is “2 rows below”. This becomes important when we drop down and place front post stitches.
We immediately begin the repeat for this row. So, we place 1 half double crochet in each of the first 2 stitches.
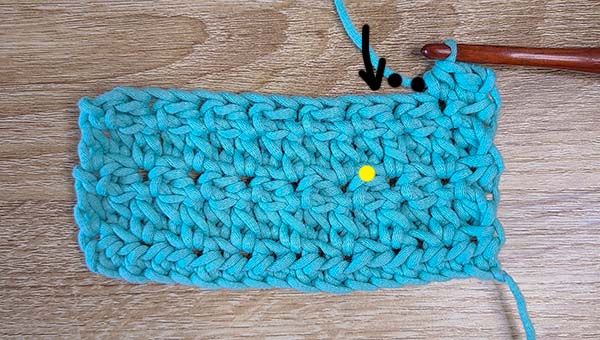
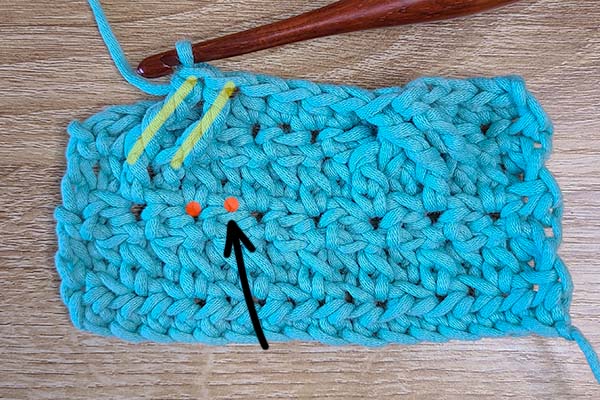
Then, the instructions tell us to: “Then, we will skip 2 stitches. Working in the posts of the stitches 2 rows below, we will place 1 front post treble crochet in each of the next 2 stitches.“
The 2 stitches we skip are marked with black dots in the image above. An arrow points downward at the 3rd stitch, which is the next stitch. We want to place our front post treble crochet “2 rows below”. So we follow the post of the stitch downward and work around the post of the stitch in Row 3. In the image above, a yellow dot is just below the post of this stitch. It is an extended half double crochet worked in the back loop only.
If you want specific help with how to identify the post of the stitch in the row BELOW, please view this tutorial.
Here’s another way to find the correct post:
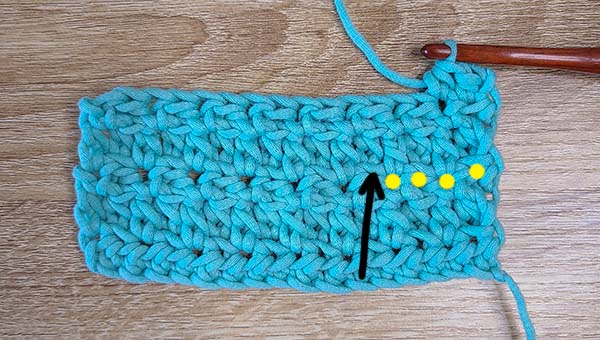
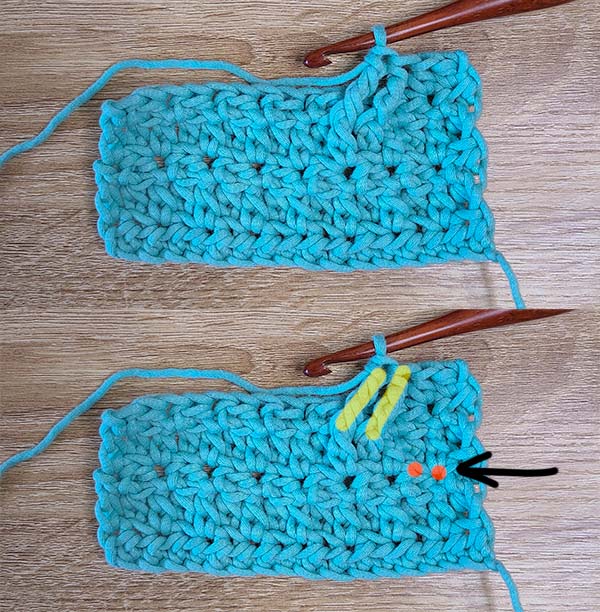
You can simply count the stitch posts along Row 3 until you find the correct stitch. In this case, it will be the 5th stitch from the end. The yellow dots indicate the posts below the first two half double crochets of Row 5 AND the posts below the 2 stitches we are skipping.
A black arrow points to the 5th post, which is the one we will work into.
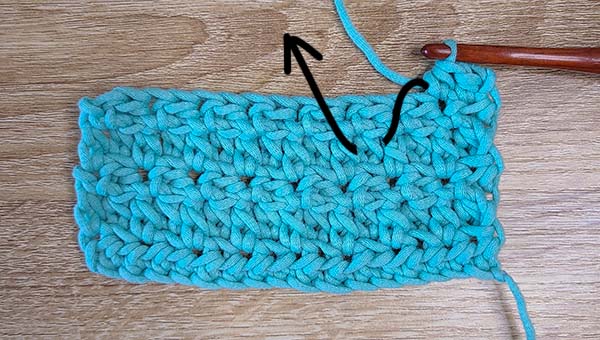
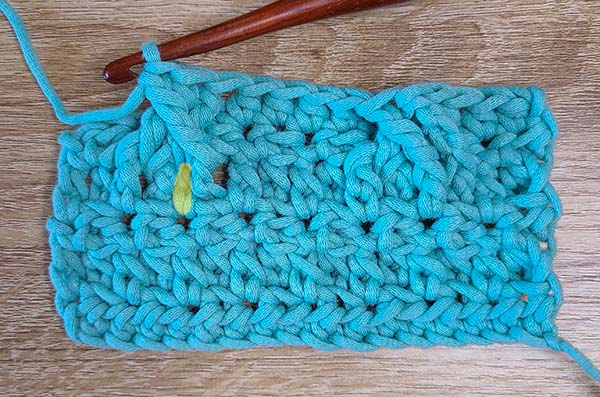
Now that we have identified the correct post, we can place our first front post treble crochet. A black arrow indicates that we will be placing a front post treble crochet around the 5th post in Row 3.
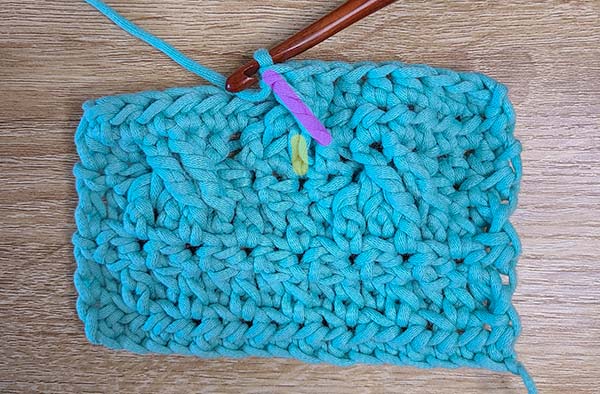
With our first front post treble crochet placed, your work should look like the top picture in the image above. In the bottom image, I’ve highlighted the first front post treble crochet in yellow so that it can be seen a little better.
I’ve also highlighted the post of the stitch directly after the post we just worked into in a bright pink. This is the NEXT stitch we will place a front post treble crochet into.
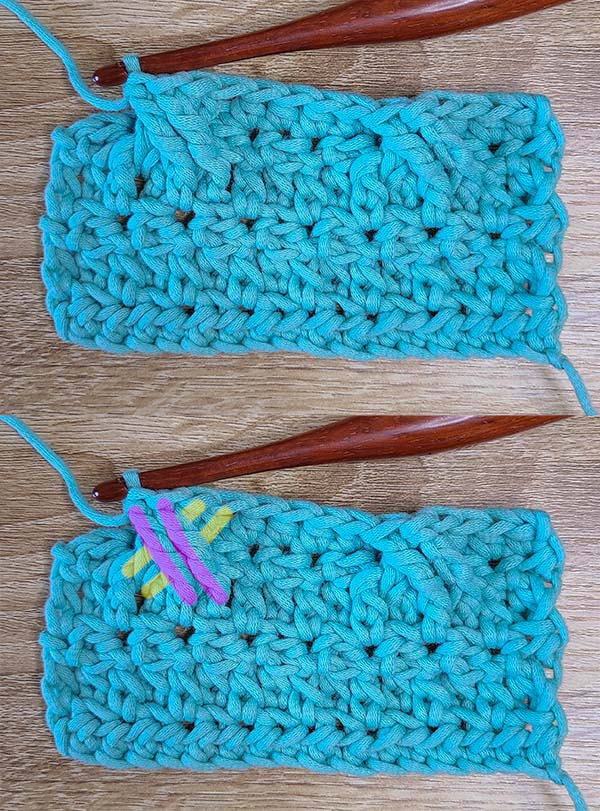
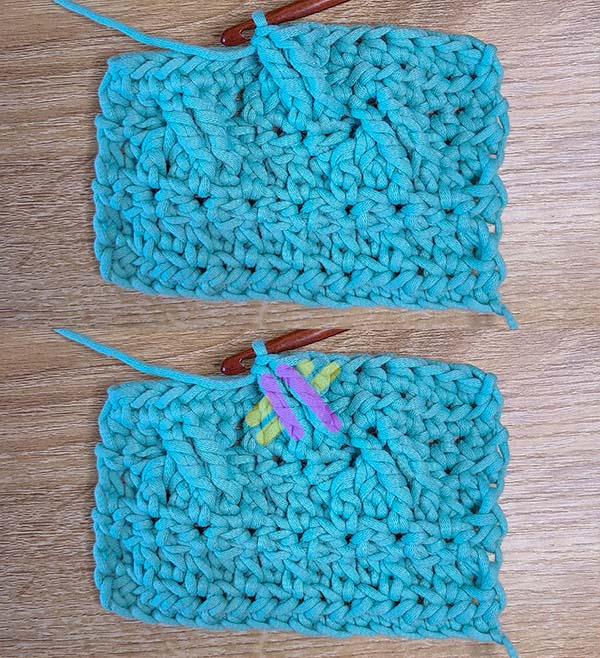
With the second front post treble crochet placed, your work should look like the top picture in the image above. You will now have 2 front post treble crochets side by side that look like they’re leaning (like two slashes //).
In the bottom image, I’ve highlighted the first two front post treble crochets in a bright yellow. We can now move on to the next part of the repeat.
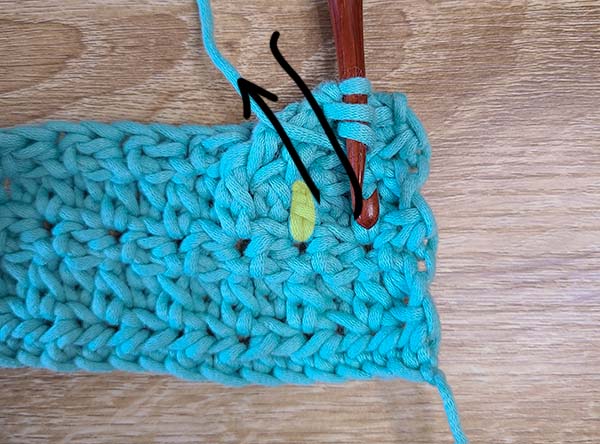
Now we: “work in front of the last 2 stitches, we will place 1 front post treble crochet in each of the 2 posts of the stitches 2 rows below the stitches we skipped.”
Notice that I’ve placed orange dots just below the two posts of the stitches below the stitches we skipped in the image above. A black arrow points to the right most orange dot. These are the stitches we will now be working into. We work into the first skipped stitch first and then we work into the second. The right most orange dot with the black arrow pointing to it is the first skipped stitch and the first stitch we will work into for these instructions.
“Working in front” means to make sure that everything BUT the post of the stitch is behind your hook when working these stitches. Your yarn should not wrap around anything but this one post.
So, we place 1 front post treble crochet in the first of the skipped posts. You will have to bring your hook all the way back to this post and it’s going to feel weird. Almost like you’re warping your work. Don’t worry, you can’t hurt anything bringing your hook this far back! 🙂

Here is the front post treble crochet worked in the first skipped stitch. I’ve highlighted the first two front post treble crochet’s we worked in yellow so you can see how this new front post treble crochet crosses over the top of them.
You will also notice that I’ve highlighted a stitch post in pink. This is the second post of the skipped stitches. Place the next front post treble crochet around this stitch.
Once again, you can’t hurt anything. Don’t be afraid to move the other front post treble crochets out of the way to get around that post, if you have to.
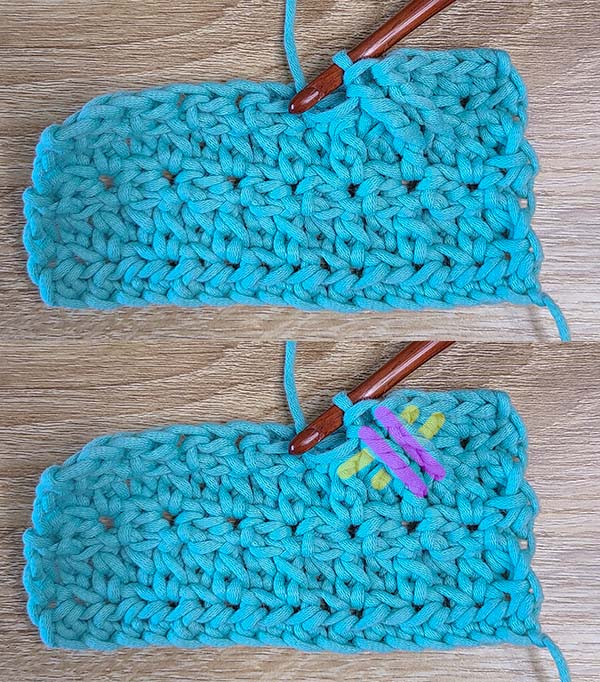
This image shows the same picture twice. I’ve highlighted the bottom image so that you can clearly see the anatomy of these front post treble crochet stitches that we have worked.
The first two front post treble crochets are highlighted in yellow. The second two front post treble crochets are highlighted in pink. You can see how the last two front post treble crochets cross over the first two.
Now we need to finish the repeat. Don’t forget that there are MORE instructions after these front post treble crochets!
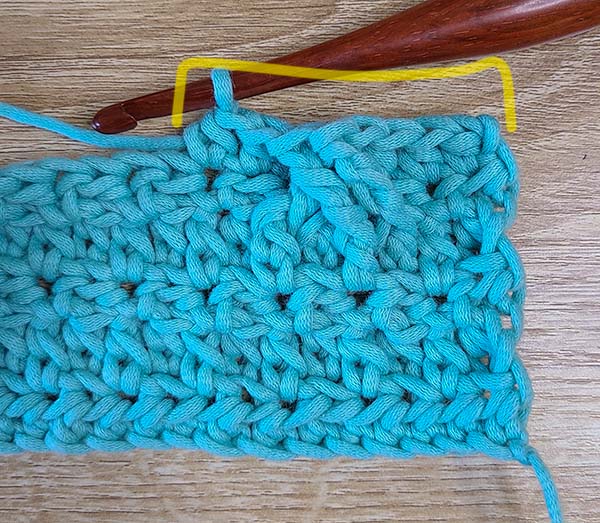
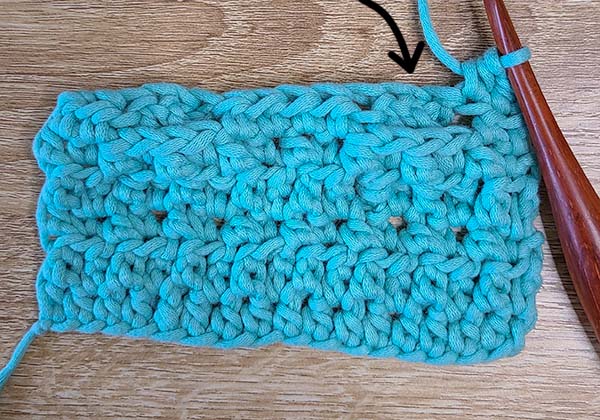
To finish the repeat, we will place 1 half double crochet in each of the next 2 stitches.
To make sure that your placement of these half double crochets is correct, you can look at the back of your work.
I’ve highlighted the tops of 4 stitches from Row 4. Because we have worked front post stitches, the tops of these stitches will not be worked into and should be ignored. Ignore these 4 stitches and place 1 half double crochet in the 5th, which a black arrow points to in the image above.
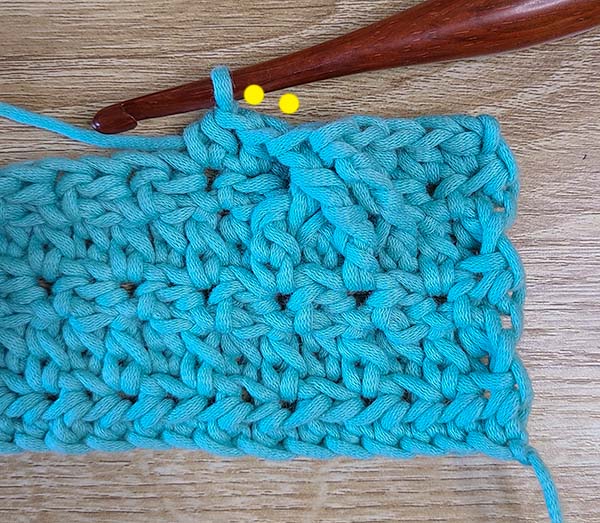
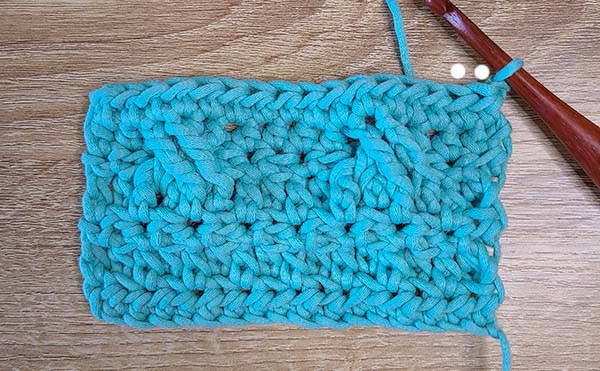
In this image, you can see I have placed my last 2 half double crochets.
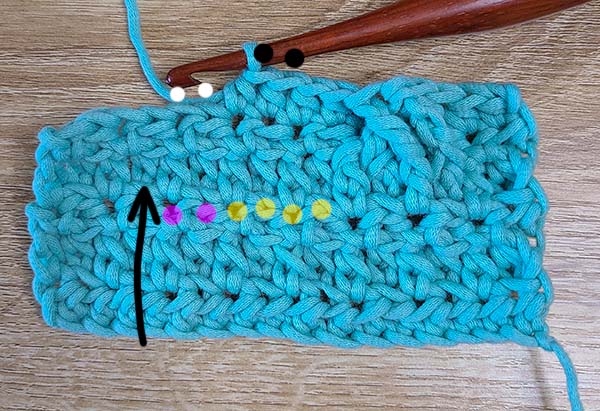
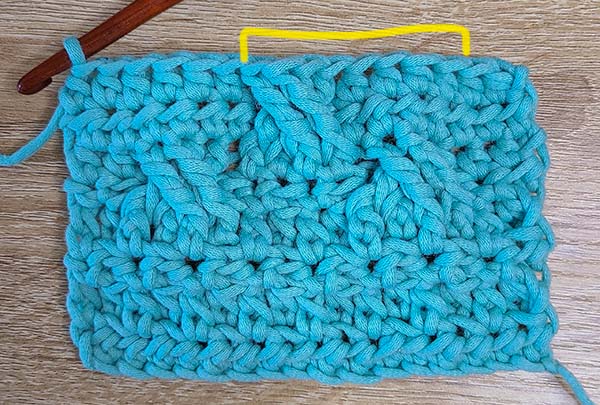
In this image, I’ve drawn a yellow bracket around the 8 stitches we have worked so far. By working these 8 stitches, we have completed the repeat as Hannah instructed a total of 1 time.
We need to work the repeat again (and again, and again).
So, let’s begin the repeat again. We will: [place 1 half double crochet in each of next 2 stitches. Then, we will skip 2 stitches. Working in the posts of the stitches 2 rows below, we will place 1 front post treble crochet in each of the next 2 stitches. Then, working in front of the last 2 stitches, we will place 1 front post treble crochet in each of the 2 posts of the stitches 2 rows below the stitches we skipped. Then we will place 1 half double crochet in each of the next 2 stitches]
Begin the repeat by placing 1 half double crochet in the next 2 stitches.
2 MORE half double crochet, yep! You will have a total of 4 half double crochet in a row when worked properly.
Here I have placed my 2 half double crochet that begin the repeat. You can see that I have 4 total half double crochet side by side.
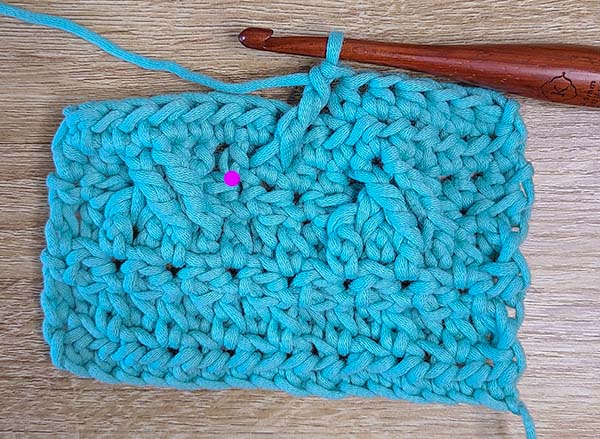
Then, we skip 2 stitches (white dots in the image above) and work a front post treble crochet around the post of the stitch 2 rows below the next stitch (a black arrow points to it).
I’ve highlighted the stitch posts of Row 3 with yellow and pink dots to help show how you can easily count your stitches.
The 4 yellow dots indicate the posts of the stitches below the 4 double crochets. We will not work into these.
The 2 pink dots are the posts of the 2 skipped stitches. We will work into these AFTER we place our first 2 front post treble crochets.
So, essentially, you can count the posts from Row 3 across to know which post the next front post treble crochet goes into. Starting with the first unworked post after the crossed front post trebles, count 7 posts over. You will place the first front post treble crochet of this repeat into the 7th post.
Here I have placed my first front post treble crochet of this repeat. Now I need to place 1 front post treble crochet in the post of the next stitch 2 rows below. An arrow points to this stitch post in the image above.
Here are the two front post treble crochets completed and highlighted yellow so you can see them. With these two front post treble crochets completed, now we: “work in front of the last 2 stitches, we will place 1 front post treble crochet in each of the 2 posts of the stitches 2 rows below the stitches we skipped.”
Just like in the previous repeat, I’ve placed orange dots at the bottom of the two skipped posts. A black arrow points to the first one.
We will place 1 front post treble crochet in the first of the skipped stitches. Bring your hook all the way back to this stitch. Remember – This can feel weird but you’re not going to hurt anything doing this!
Here is the first of the front post treble crochets placed in a skipped stitch. Now we place 1 front post treble crochet in the second of the skipped stitches. I’ve highlighted this stitch post yellow in the image above. Don’t forget, you can move the other front post trebles out of the way to get your hook around this post easier. You won’t hurt anything.
This image shows the same picture twice. I’ve highlighted the bottom image so that you can clearly see the anatomy of these front post treble crochet stitches that we have worked.
The first two front post treble crochets are highlighted in yellow. The second two front post treble crochets are highlighted in pink. You can see how the last two front post treble crochets cross over the first two.
Now we finish the repeat with 1 half double crochet in each of the next 2 stitches. For me, this finishes the row because it’s a swatch. You will begin the repeat again.
Notice these 4 half double crochets in between the crossed front post trebles? These 4 half double crochets are the end and start of 2 repeats next to each other. You should have 4 total half double crochet here. If you do not, something has gone wrong.
These 4 half double crochets are what the next row of crossed front post trebles will be worked into. You may wish to mark them with stitch markers, if you are new to working 2 rows below.
Let’s move on to Row 6:
The instructions for Row 6 state specifically:
“ch1, hdc in each st across.”
This is fairly straight forward. We chain 1, turn and place 1 half double crochet in each stitch across.
When you’re working these half double crochets across the row, make sure you place them in the tops of the stitches of Row 5. Do not drop down and pick up the tops of the stitches we ignored from Row 4.
Let’s move on to Row 7:
The instructions for Row 7 state specifically:
“ch1, hdc in next 2 sts, * hdc in next 4 sts, skip next 2 sts, FPtr in next 2 sts two rows below, working in front of the last 2 sts, FPtr in 2 skipped sts 2 rows below; rep from * to last 6 sts, hdc in last 6 sts.”
Row 7 is very similar to Row 5. The difference is that the repeat starts later and the half double crochets of this repeat have moved. This allows the crossed front post treble cables to be offset from each other.
Either way, it’s a lot to digest. Let’s write it out in full sentences:
“We will chain 1 and turn. We will place 1 half double crochet in each of the first 2 stitches. Then we will begin the row’s repeat. We will [place 1 half double crochet in each of next 4 stitches. Then, we will skip 2 stitches. Working in the posts of the stitches 2 rows below, we will place 1 front post treble crochet in each of the next 2 stitches. Then, working in front of the last 2 stitches, we will place 1 front post treble crochet in each of the 2 posts of the stitches 2 rows below the stitches we skipped.] We will repeat the instructions inside the brackets across the row.”
To begin Row 7, we chain 2, turn and place 1 half double crochet in each of the first two stitches. White dots indicate these first two stitches.
Then, we begin the repeat.

We will place 1 half double crochet in each of the next 4 stitches. These stitches are marked with white dots over the top of them.
Then we work the next part of the repeat: “Then, we will skip 2 stitches. Working in the posts of the stitches 2 rows below, we will place 1 front post treble crochet in each of the next 2 stitches.“
The stitches 2 Rows below will now be the half double crochets in between the crossed front post treble stitches in Row 5.

Then, we begin the crossed front post treble stitches. Remember how I circled the 4 half double crochet at the end of Row 5? These are the 4 stitches we will work into for the front post trebles.
In the image above, there are two pictures. The top picture has the 4 half double crochets circled with yellow, just like at the end of Row 5.
The bottom picture has 2 yellow dots, 2 pink dots and a black arrow. The yellow dots are just below the posts of the half double crochets we will skip. The pink dots are just below the posts of the next 2 half double crochets we will place the front post stitches around.
A black arrow points to the rightmost pink dot. This is the post we will work the first front post treble crochet around.
Here is my first front post treble crochet placed. Now I need to place 1 front post treble crochet in the post of the next stitch 2 rows below. I’ve placed a pink dot just below the post of the stitch we will work around.
The top picture in this image shows my second front post treble crochet worked. Now we move on to the next part of the repeat. We will: “work in front of the last 2 stitches, we will place 1 front post treble crochet in each of the 2 posts of the stitches 2 rows below the stitches we skipped.”
In the bottom picture in this image has the first two front post treble crochets worked highlighted like slashes ( // ). Orange dots are placed just below the posts of the stitches that we skipped. These are the stitches we will now work around. A black arrow points to the right most orange dot. This is the stitch we will place our next front post treble crochet into.
I’ve highlighted this front post treble crochet in pink. The last remaining post of the skipped stitches is highlighted yellow. Place 1 front post treble crochet around this stitch. Remember – you can push the other front post trebles out of the way, if you need to.
With all of the front post treble crochets placed, I’ve completed 1 repeat. This image shows the same picture twice. I’ve highlighted the bottom image so that you can clearly see the anatomy of these front post treble crochet stitches that we have worked.
Now you would begin the repeat again, starting with placing 1 half double crochet in each of the next 4 stitches.
Because I am at the end of the row with my swatch and I have 6 stitches left, I will place 1 half double crochet in each of the 6 stitches as instructed in Hannah’s pattern.
This image shows my row “finished”. I’ve drawn a yellow bracket around the 8 stitches that create the first repeat of Row 7. You can see how this repeat is offset from the previous one.

Here is an image with all of the crossed front post treble cables highlighted as they have been throughout this tutorial so that you can see them a little more clearly. You can clearly see how the cable created in Row 7 sits in between the cables created in Row 5.
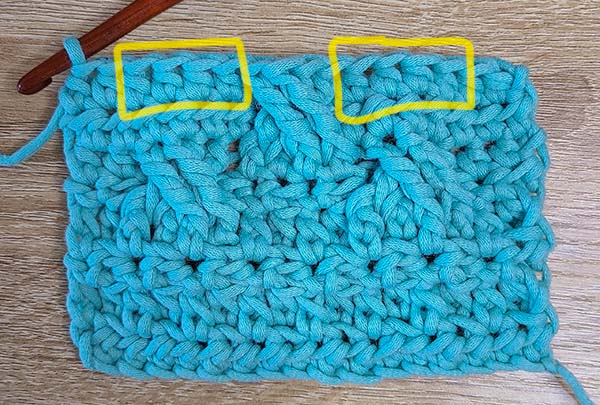
Finally, in this image I have drawn bright yellow boxes around the sets of 4 half double crochets on either side of the cable. The box of 4 half double crochets on the right started the repeat. If I had a longer swatch, the 4 half double crochets on the left would be the beginning of the next repeat.
You should always have 4 half double crochets between the crossed front post treble cables so that you can work the next set of crossed front post treble crochets into them.
I have done my best to make a tutorial that accurately and clearly represents the pattern that Hannah has included for the Harmony Throw Blanket CAL. Please remember, this is not my pattern. I have made this tutorial with permission from Hannah. I take no credit for the creation of this pattern.
If you still need help after reviewing this tutorial, I suggest you reach out to Hannah of HanJan Crochet. She will know best how to help you with the pattern she has written.
Thanks!
Thank You! You say you have done your best.. it is perfect❣
🧶✂️ crocheting Giants hugs for your helping me …d’Marie
Oh gosh, thank you for such a kind comment! I’m so glad you found it helpful. Sending big hugs your way! 🙂