Aestas Crochet Ruana Pattern
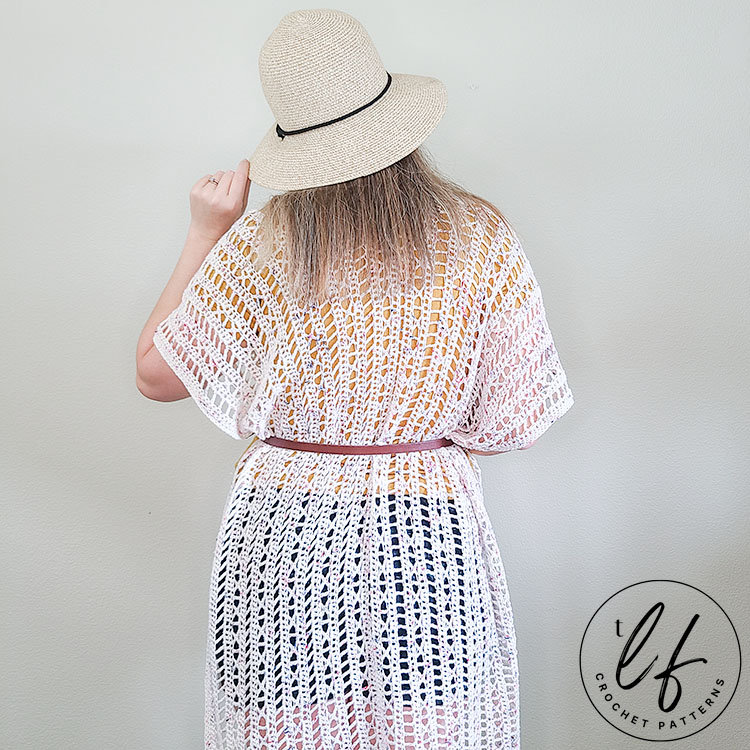
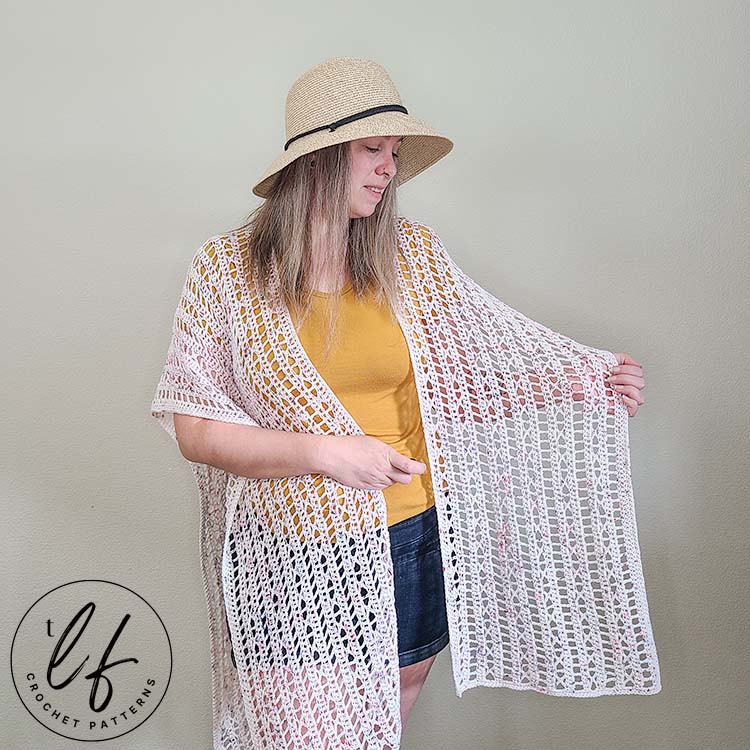
For when you want to add a bit of layering but no extra warmth to your outfits in the summer, a lacy crochet ruana is a fantastic choice. The Aestas Crochet Ruana pattern features lacy, open stitches, beautiful drape and open sides to keep the air flowing and your outfit on point.
Named after the Roman goddess of summer, the Aestas Ruana was designed to be a part of your summer wardrobe.
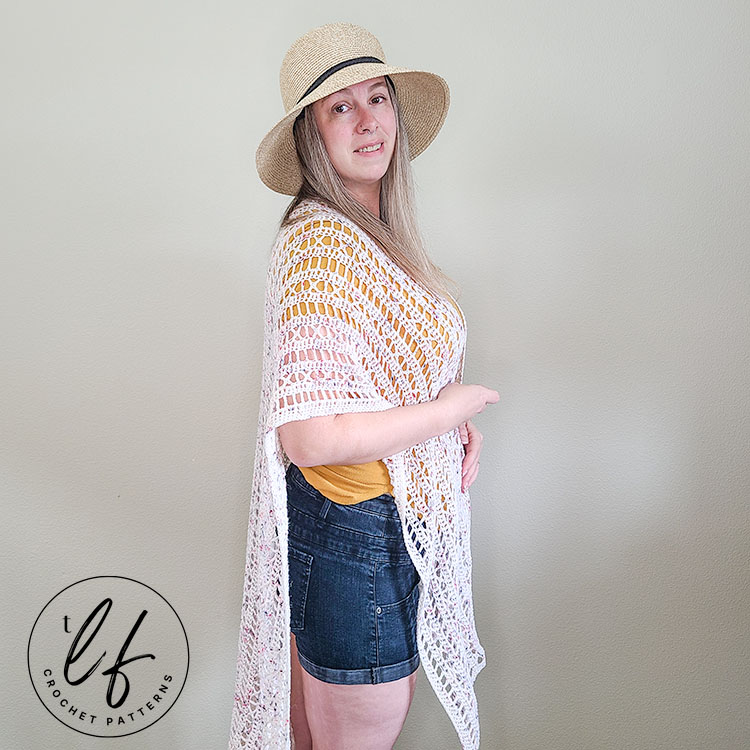
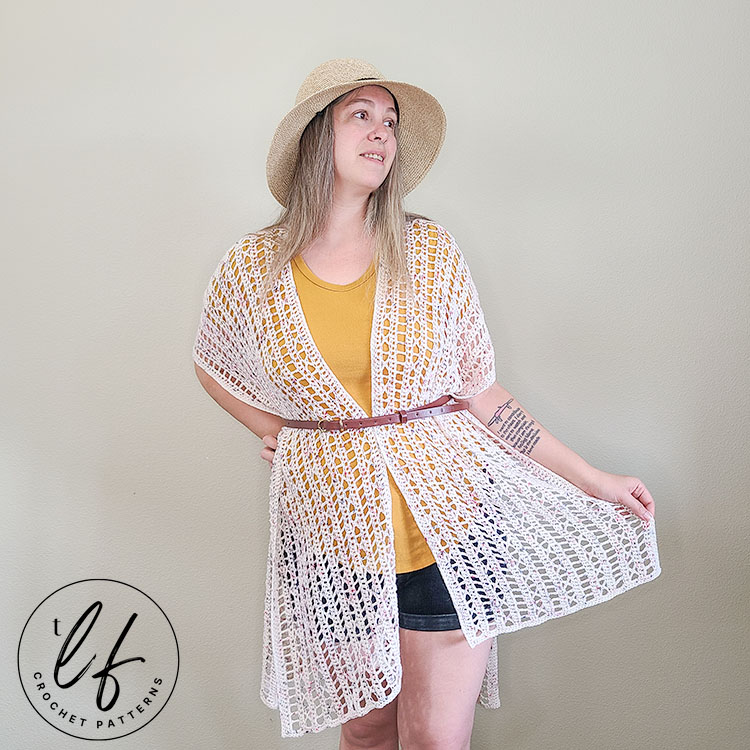
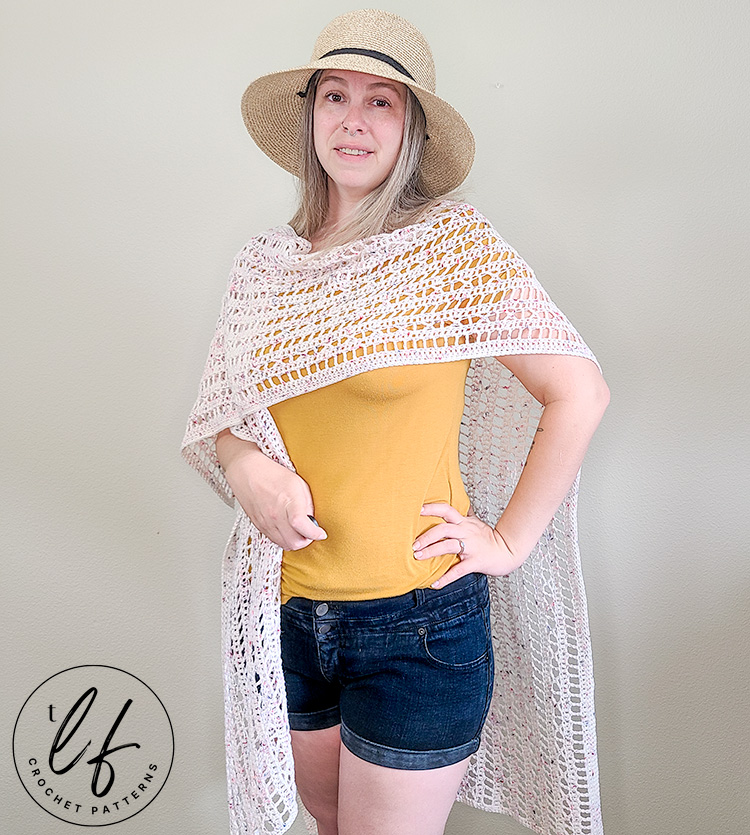
This crochet ruana pattern will help you be your own goddess of summer. Meant to be a lightweight layering piece, you can wear this crochet ruana open and flowy like a duster, with a thin belt to accent your waist, as a swim suit cover up, or wrapped up around the shoulders as a wrap.
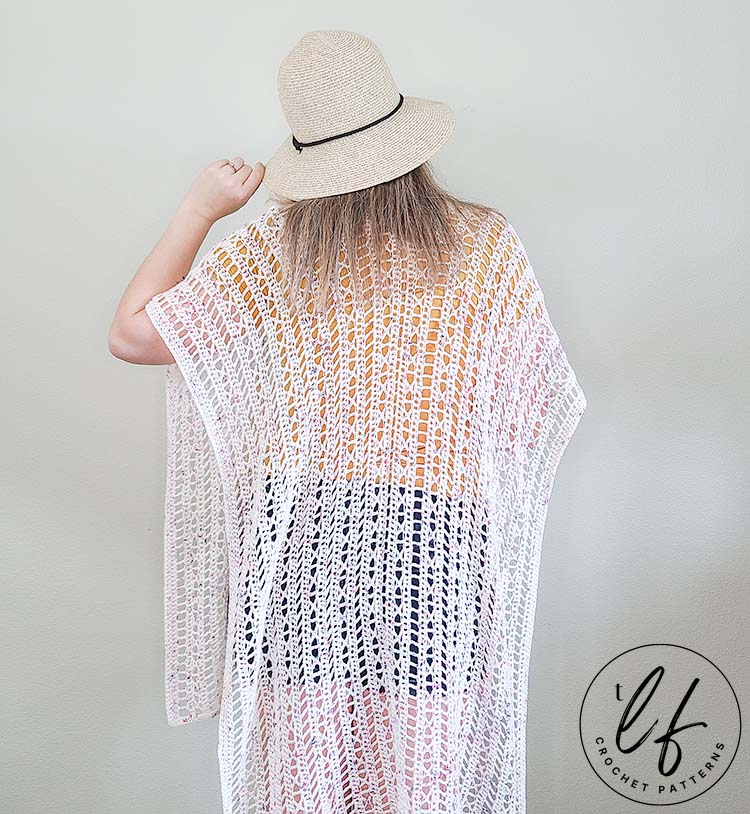
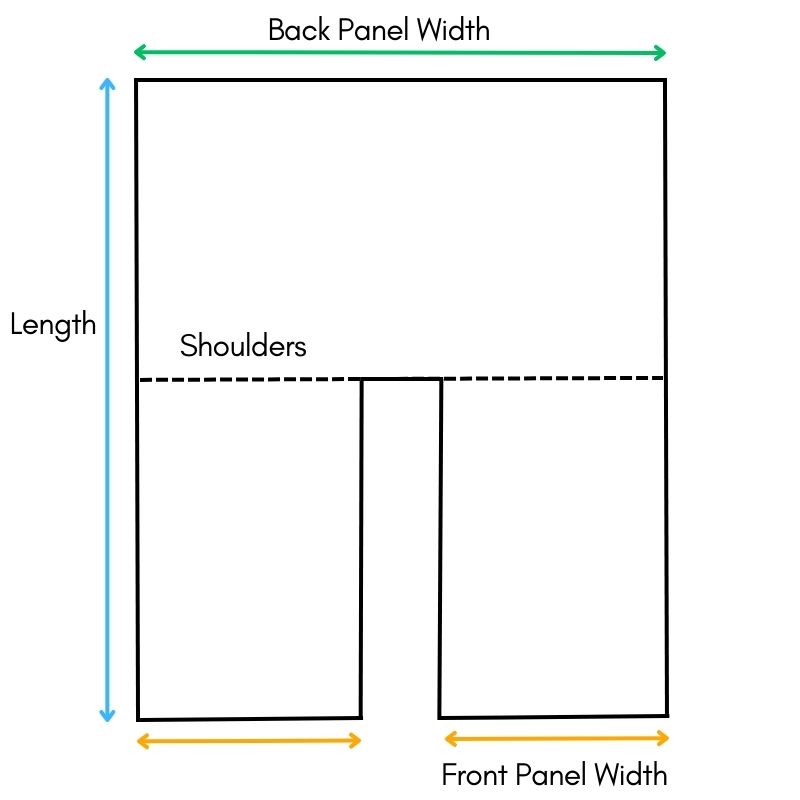
Worked in one piece, this crochet ruana pattern will guide you through creating a long rectangle with a slit halfway through the width. This opening is seamless and allows the ruana to be worn vertically with panels over the shoulder instead of horizontally like a rectangle shawl.
Ruana’s are typically left open at the sides and this design is as well. You can seam up the sides, if you prefer, but this is not intended or included in the pattern.
The Aestas crochet ruana pattern features open, lacy stitch work so that you and your outfit stay cool this summer.
The Inspiration for the Aestas Ruana
I love designing crocheted shawls that have interesting stitch work but are easy in the long run with short sections of rows to repeat. Two of my more intricate looking but easy to crochet shawls are my rectangle shawls: The Heather Shawl and the Melody Rectangle Shawl.
It wasn’t long before a lovely crocheter asked if I ever considered turning one into a ruana. While I could have turned either one of those into a crochet ruana pattern, I knew I wanted to design something new and have the ruana be even more open and lacy than other shawls.
One of my least favorite things about crochet garment patterns is seaming and I knew I didn’t want any seaming in this crochet ruana pattern. It is designed to be worked entirely as one piece so that you don’t have to seam two rectangles together.
I named this crochet ruana pattern Aestas because I could not stop thinking “roman” while designing it. The white yarn with speckles of color reminded me of marble and the stitch design reminded me of Roman numerals.
Aestas is the Roman goddess of summer so I felt there was no better name for this ruana.
Be your own goddess of summer with this crochet ruana pattern.
If you prefer a premium, ad-free PDF version of this pattern, you can grab one on in my Etsy shop by clicking the button below!
DISCLAIMER: This post includes affiliate links. This means, should you decide to purchase a product via one of these links, I will receive a small commission at no extra cost to you. I only recommend products I use and love (Or products I know others love, have heavily researched, know have good ratings and plan to purchase myself). These small commissions help to support this blog and continue keeping most of my patterns free. You can read more on my Privacy Policy, if you prefer.
How do I choose the best yarn for this Crochet Ruana Pattern?
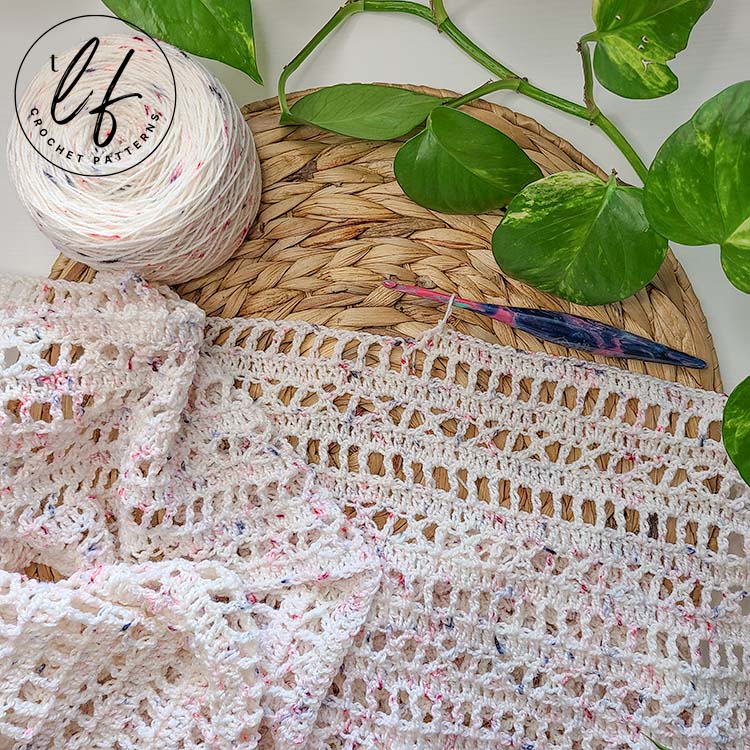
For this crochet ruana pattern, I used We Crochet’s Hawthorne Fingering in colorway Cobbler Speckle. I was fortunate to receive yarn support from We Crochet for this design (thank you!). This yarn is 80% Fine Superwash Highland Wool and 20% Polyamide (Nylon).
While wool yarn isn’t always the first choice for summer, I decided on wool for this crochet ruana pattern for a few reasons.
The biggest reason is that I wanted the ruana to have fantastic drape and to block well. Wool yarn is a fantastic choice for garments that you want to have gorgeous drape. Considering that this is a Fingering (1) weight wool and it has a lacey stitch pattern, it doesn’t hold in warmth as it would if it were a more dense stitch.
Wool yarn blocks very well and has more stretch than other yarns, especially cotton. When it comes to lacy stitches and a flowy feeling like what I wanted for this crochet ruana, wool was the best choice.
It doesn’t hurt that the yarn is absolutely gorgeous, either!
While you can use a different fiber of yarn, I would recommend wool as it worked exactly as I wanted and expected it to.
Keep in mind if you decide to change the fiber of yarn, there may be differences in the weight. Cotton yarn is notorious for being thinner than other fibers. If you change the yarn fiber or yarn weight, the amount of yarn you use will not match the requirements in this pattern.
Where to Get this Crochet Ruana Pattern
The Aestas Ruana is a free crochet ruana pattern in this blog post. Scroll down to view the free version.
However, if you’d like a more robust pattern with photo tutorials, the steps for the photo tutorial written out in full sentences and a printer friendly version of the PDF, I recommend you purchase the PDF pattern.
The PDF pattern also comes with instructions on how to customize the size of the crochet ruana, if desired, which is not included in the free crochet ruana pattern.
With the PDF pattern, you will receive photo tutorials for the special stitches as well as a detailed photo tutorial for each row, including the transition rows, which will set you up to work this crochet ruana pattern with confidence. The photos include details with arrows and dots to help identify all the stitches and their placement.
SKILL LEVEL
Intermediate – Crocheters looking to purchase and follow this pattern should know how to:
- Read a crochet pattern – There is NOT a video tutorial for this pattern
- Work the standard stitches (chain, single crochet, double crochet, treble crochet)
- Create chain spaces and work into them
- Skip stitches
- Place several stitches in the same stitch or space indicated
- Be prepared to learn a new stitch. It is very likely you haven’t used the special stitch before.
- The pattern is written to use Fingering weight (1) yarn. This can require some stamina for finishing the project. The lacy stitches create a lot of height so it’s not a significant amount of rows, but Fingering weight is not often used by beginners and may require some practice.
While I believe an advanced beginner absolutely could follow this pattern, you will need to be familiar with these techniques and understand how to work them to feel confident doing so. You can purchase the PDF which comes with photo tutorials for the special stitches as well as step by step or you can check out my stitch tutorials which are linked in the abbreviations.
MATERIALS
Fingering (1) weight wool blend yarn. You will need approximately: 13 ounces/ 375 grams/ 1,400 yards.
Note: If you customize the size of this pattern, change the yarn weight or fiber, your yarn usage will not match these requirements.
Yarn Used
We Crochet’s Hawthorne Fingering in colorway Cobbler Speckle. I used just shy of 4 hanks. This yarn is 80% Fine Superwash Highland Wool and 20% Polyamide (Nylon).
Note: You can use a different fiber for this crochet ruana pattern if you prefer. Keep in mind that different fibers will block (or stretch) in different ways. Cotton or Acrylic won’t stretch as much as wool does when blocked, so your size may turn out slightly different than listed. Wool is one of the fibers that stretches the most. Keep this in mind if you choose a different fiber.
TOOLS
4.5 mm (G+) crochet hook
Tapestry needle
Scissors
Stitch Markers (At least 1 stitch marker)
Blocking Boards & Pins
FINISHED SIZE
One size fits most. I am modeling the crochet ruana in these pictures. I am 5’8″ and typically wear a size L or XL in US women’s sizes.
The ruana is designed to be over sized and flowy.
Unblocked –
Back panel width: 28 inches.
Front Panel width: 14 inches each.
Length: 58 inches.
Blocked –
Back panel width: 33 inches.
Front Panel width: 16 inches each.
Length: 70 inches.
*See blocking note for information about size difference between blocked and unblocked.
GAUGE
21 sts by 8 rows = Approximately 4.5 inches x 4.5 inches. Gauge is listed unblocked.
To test gauge, chain 22 and follow the written pattern through Row 8. This is also a great way to practice Trx, the special stitch, if you haven’t used it before!
Note: I am a tight crocheter, so my tension is usually tighter than others. Learn more about gauge and what this means here.
ABBREVIATIONS (US TERMS)
- Ch – Chain
- Sl St – Slip Stitch
- Sc – Single Crochet
- Dc – Double Crochet
- Tr – Treble Crochet
- Trx – Treble Cross
*See Special Stitches or click for tutorial - STsc (dc) – Stacked SC to dc height
*See Special Stitches or click for tutorial - STsc (tr) – Stacked SC to tr height
*See Special Stitches or click for tutorial - Sk – Skip
- St(s) – Stitch(es)
- Spc(s) – Space(s)
- […] – Repeats are listed within brackets.
- (…) – Stitch counts are listed at the end of the row in parenthesis & bold italics.
Special Abbreviations Note: You will see “Trx across next 4 stitches” in this crochet ruana pattern in rows that use the Treble Cross. The Trx is worked over 4 stitches and this is what it is referring to.
NOTES
- This pattern uses Stacked Single Crochet (STsc) to begin rows. This is an alternative to turning chains and helps to keep the edges straight. You can change this to your preferred method of starting a new row, if you prefer.
- The Stacked SC is used for both double crochet and treble crochet heights. You will see the height required in parenthesis. For a STsc (dc), you will crochet a Stacked Single Crochet to the height of a double crochet. For STsc (tr), you will crochet a Stacked Single Crochet to the height of a treble crochet.*See Special Stitches
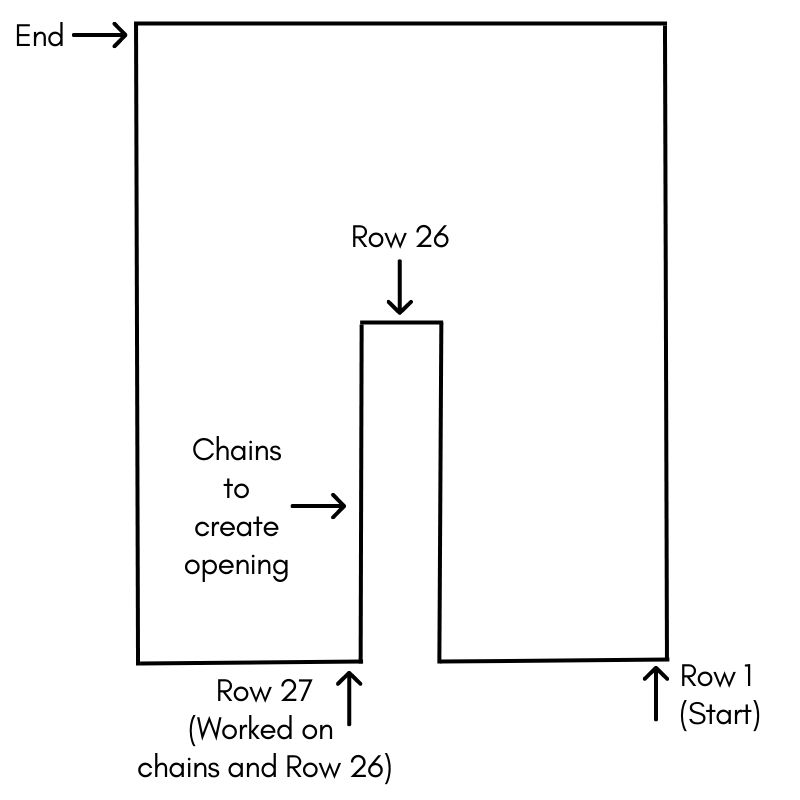
- This ruana is crocheted in one piece, so there is no seaming required. There is a “transition row” (Row 26) which will create the opening of the ruana.
- You will very likely learn a new stitch with this pattern. Please review the special stitch written instructions or click the hyper links to review the photo tutorials.
- Please be sure to read over all descriptions for special techniques and special stitches BEFORE starting this pattern.
- Blocking the finished product is highly recommended. *See Blocking Note
- This crochet ruana pattern is designed as “one size fits most” and how you block will help determine the size. *See Blocking Note
Special Stitch – Stacked Single Crochet (STsc)
The Stacked SC is an alternative way to start a new row that does not require turning chains. This helps to keep the edges of your work straight and without gaps or bumps. Check out my Stacked Single Crochet photo tutorial for step by step photo instructions.
To work a Stacked SC, you will: Turn your work. Do not create any turning chains.
Insert hook into first stitch, yarn over and pull up a loop. 2 loops on hook. Yarn over, pull through both loops. 1 loop on hook. (All we have done so far is make a single crochet in the first stitch without chaining 1).
Now, insert your hook into the left leg (right leg, if you’re left handed) of the single crochet. Yarn over and pull up a loop. 2 loops on hook. Yarn over and pull through both loops.
This stacks 2 single crochets on top of each other to create the height of a double crochet.
To create the height of a treble crochet, you would stack an additional single crochet for a total of 3. Insert your hook into the left leg (right leg, if you’re left handed) of the second single crochet. Yarn over and pull up a loop. 2 loops on hook. Yarn over and pull through both loops.
This stacks 3 single crochets on top of each other to create the height of a treble crochet.
Special Stitch – Treble Cross Stitch (Trx)
The Treble Cross (Trx) is a gorgeous tall X shaped stitch that is worked over 4 stitches. It sounds more difficult than it is! Check out my Treble Cross Stitch photo tutorial for step by step photo instructions.
To work a Trx, you will: Yarn over 2 times and insert your hook into the next stitch. Yarn over and pull up a loop. You will have 4 loops on hook. Yarn over and pull through 2 loops. You will have 3 loops on hook and 1 “leg” made (this looks like a half finished double crochet).
Now, skip 2 chains. Yarn over and insert your hook into the next chain. Yarn over and pull up a loop. You will have 5 loops on hook. Yarn over and pull through 2 loops. You will have 4 loops on hook and a second “leg” made.
Yarn over and pull through 2 loops. This crochets the 2 legs together (2tog). Pay attention to where these two legs join and the two diagonal loops that show at this join as we will use this area later.
Yarn over, pull through 2. 2 loops on hook. Yarn over, pull through 2. 1 loop on hook.
Now, chain 2. Yarn over and insert your hook into the 2 diagonal loops where the two legs were crocheted together. Yarn over and pull a loop through. 3 loops on hook. Yarn over, pull through 2. 2 loops on hook. Yarn over, pull through 2. Treble Cross Stitch complete!
Construction of the Crochet Ruana Pattern
This crochet ruana is worked in rows and the stitch count stays the same throughout. It is worked entirely as one piece and the only shaping, the opening for the neck and shoulders, is worked into the rows. There is no seaming.
The ruana is worked length wise. We begin by working rows to achieve the width of the first panel. Next, we work a transition row (Row 26) that centers the piece and creates the opening. In this part, we work half of a row and then, without cutting yarn, create a long chain that brings the stitch count back up. Then, in the next row (Row 27), we work into the chains and into the stitches from Row 26. This is the start of the second panel.
Finally, we finish the ruana by crocheting through Row 51, place a border and block it.
Blocking Note
Because this crochet ruana pattern uses a lacy stitch, it is recommended that you block the finished piece. There are a few things to note:
Different Fibers React Differently to Blocking
Wool will stretch much more than cotton or acrylic during blocking. Keep this in mind if you change the fiber as it can change the size of your finished ruana. I chose wool because of its ability to stretch and its drape.
If You Prefer the Size before Blocking
Prior to blocking the project, try it on and see how you feel about the size. If you are happy with the size it is currently, pin it down first and then wet it to ensure the shape but do not stretch the size more than finalizing the shape. It may become a little wider or longer when pinning it down dry but not significantly.
For example, this means that you will want to block the piece dry, spray it with water and allow to dry. This will keep the ruana approximately the same size but will ensure the shape is nice and defined.
Wool yarn is typically best blocked when completely submerged in water for 15-20 minutes and then pinned down. This, however, allows the yarn to stretch fairly significantly, as you can see in the size difference listed. This is why I listed both the unblocked and blocked sizes. Keep this in mind prior to wet blocking your ruana, if you use wool.
The Aestas Ruana – Free Crochet Ruana Pattern
Ch 242
Row 1 – STsc (dc) 2nd ch from hook and place 1 dc in each ch from hook. (241 sts)
Row 2 – Turn. STsc (tr) first st. [Ch 1, sk 1 st, 1 tr next st]. Repeat inside brackets across the row to end. Repeat will end in last st of row. (241 sts – 121 tr, 120 ch 1 spcs)
Row 3 – Turn. STsc (dc) first st. [1 dc in ch 1 spc, 1 dc next st]. Repeat inside brackets across the row to end. Repeat will end in last st of row. (241)
Row 4 – Turn. STsc (tr) first st. [Trx across next 4 sts, 1 tr next st]. Repeat inside brackets across the row to end. Repeat will end in last st of row. (241 sts (including chs as sts) – 48 Trx, 49 tr)
Row 5 – Turn. STsc (dc) first st. [1 dc next st, 2 dc in ch 2 spc of Trx, 1 dc each of the next 2 sts]. Repeat inside brackets across row to end. Repeat will end in last st of row. (241)
Rows 6 through 25 – Repeat Rows 2 through 5 in sequence. Row 25 will be a repeat of Row 5.
After completing Row 25, count 121 stitches across the row starting from the first stitch that will be worked in Row 26. Mark the 121st stitch with a stitch marker.
Row 26 (Transition Row) – Turn. STsc (dc) first st. [Ch 1, sk 1 st, 1 dc next st]. Repeat inside brackets to marked stitch. Then, ch 121. (60 ch 1 spcs, 61 dc, 120 chs + 1 turning ch)
Row 27 – Turn. STsc (dc) 2nd ch from hook. 1 dc each of the next 119 chs. 1 dc next st (from Row 26). [1 dc in ch 1 spc, 1 dc next st]. Repeat inside brackets to end of row. (241)
Row 28 – Turn. STsc (tr) first st. [Trx across next 4 sts, 1 tr next st]. Repeat inside brackets across the row to end. Repeat will end in last st of row. (241 sts (including chs as sts) – 48 Trx, 49 tr)
Row 29 – Turn. STsc (dc) first st. [1 dc next st, 2 dc in ch 2 spc of Trx, 1 dc each of the next 2 sts]. Repeat inside brackets across row to end. Repeat will end in last st of row. (241)
Row 30 – Turn. STsc (tr) first st. [Ch 1, sk 1 st, 1 tr next st]. Repeat inside brackets across the row to end. Repeat will end in last st of row. (241 sts – 121 tr, 120 ch 1 spcs)
Row 31 – Turn. STsc (dc) first st. [1 dc in ch 1 spc, 1 dc next st]. Repeat inside brackets across the row to end. Repeat will end in last st of row. (241)
Rows 32 through 51 – Repeat Rows 28 through 31 in sequence. For example, Row 32 will be a repeat of Row 28 and Row 33 will be a repeat of Row 29. Row 51 will be a repeat of Row 31.
Do not cut yarn. Continue to crocheting the border.
Border
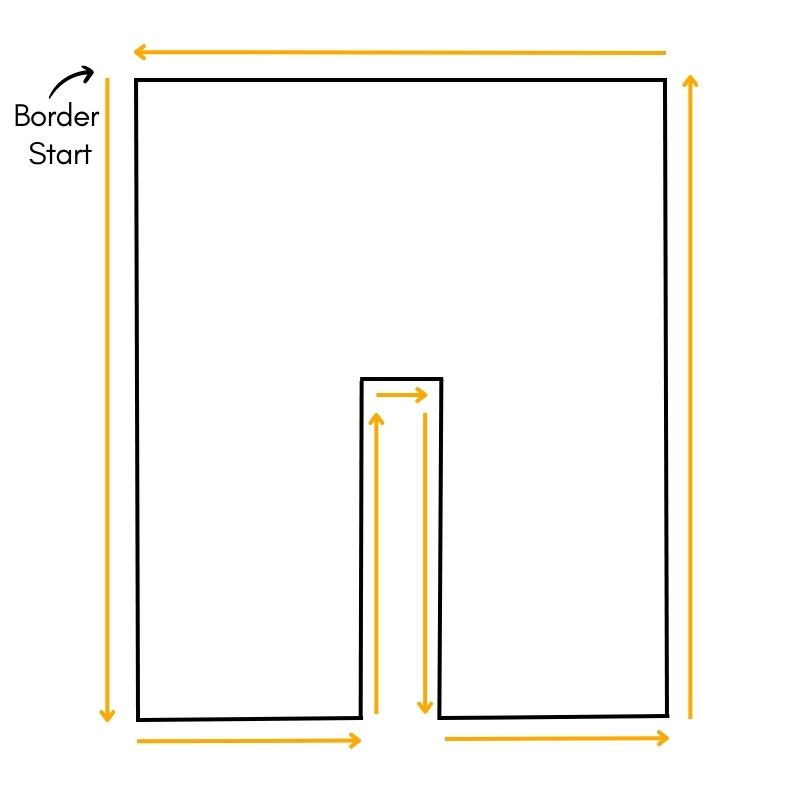
This graphic helps to visualize the steps of the border instructions. The instructions start where the text points to the top left corner and we will follow the yellow arrows to the end.
Round 1 – Turn. Sc 1st st and each st across to end of row (241). At end of row, ch 2 and rotate to work along the short edge of front panel.
Place 2 sc in side of each dc and 3 sc in side of each tr. (62) At the end of the short edge, ch 2 and rotate to work along the inside long edge of front panel.
Place 1 sc in bottom of each of the 120 chains. (120) At the end, do not chain. Rotate to work into the side of the dc from Row 26 (transition row).
Place 2 sc in side of dc. (2) Then, rotate to work along the inside long edge of the next front panel.
Place 1 sc in each st across to end (120). At the end, ch 2 and rotate to work along the short edge of front panel.
Place 2 sc in side of each dc and 3 sc in side of each tr. (62) At the end of the short edge, ch 2 and rotate to work along the long side of panel.
Place 1 sc in bottom of each ch across. (241) At the end, ch 2 and rotate to work along the long back edge.
Place 2 sc in side of each dc and 3 sc in side of each tr. (126) At the end, ch 2 and sl st to first sc made to close. (974 sts, 6 ch 2 corners)
Round 2 – Do not turn. Place 1 single crochet in each stitch around. In each chain 2 corner space, place (1 sc, ch 2, 1 sc). At the end of the round, slip stitch to the first sc to close. (986)
Finish off, weave ends. Block the Project.
If you…
Used Wool & Want the Blocked Size: Submerge in water for 15-20 minutes, gently squeeze (don’t wring) the excess water out and press water out with a towel. Arrange and pin on blocking boards to size. Allow to dry.
Used Wool & Want the Unblocked Size:
Arrange and pin the project onto blocking boards. Spray with water until the project is damp. Allow to dry. This should help keep the project from stretching significantly.
Want to get the PDF version of this crochet ruana pattern? Get your copy on Etsy by clicking the button below!
Did you love this free crochet ruana pattern? Make sure to share the love and Pin it to Pinterest!
I hope you love the Aestas crochet ruana as much as I do! Enjoy!
Don’t forget to join my Facebook Group so we can chat all about your creations! We are a group for crocheters of all experiences, all interests and love to hang out together. Come join the fun!

Shannon | Designer & Editor
Shannon helps crocheters find their next project and build their skills with in depth tutorials and crochet patterns on her blog, theloopholefox.com.
With more than a decade of crochet experience, Shannon knows that understanding why we do something matters just as much as how we do it. She teaches new techniques and crochet stitches in depth so you can crochet with confidence.