Treble Cross Crochet (AKA K Stitch) Stitch Tutorial
If you’re looking for a tall, lacy stitch that holds form without a ton of blocking, you’ll love the Treble Cross Stitch (also known as the K Stitch).
Perfect for light weight summer garments like my Aestas Crochet Ruana Pattern or pretty lace home decor and surprisingly fun to crochet once you know the steps, this tall X-shaped stitch has definitely become one of my favorites.
What is the Crochet Treble Cross Stitch?
The crochet Treble Cross Stitch is a lacy stitch that creates an X shape. Worked over 4 stitches, the Treble Cross Stitch or K Stitch is created by first crocheting 2 stitches together, creating space at the top and then adding the last arm of the X.
Not to be confused with the Crossed Double Crochet, which is created by literally crossing a second double crochet over the first, the Treble Cross crochet stitch is worked over several steps and is all worked together.
This means that each part of the stitch has it’s own place to be in and the stitches will clearly have an X shape with space where there needs to be.
While you absolutely can just cross one treble crochet over another, which is common in cable stitches like in my Piper Baby Blanket, simply crossing two stitches one over another looks very different to actually creating an X shape. Both methods have their own merits and time to be used.
With the crochet Treble Cross Stitch worked as a stitch pattern instead of as just crossing stitches, what you’ll end up with is what looks like 2 double crochets creating an upside down V on the bottom and 2 double crochets creating a V on the top to create an X.
We’ll go over all of this visually in the tutorial, so don’t worry!
What stitches should I know before I try the Treble Cross Stitch?
Before you try this crochet stitch, you should know the basic crochet stitches. This means you should know and feel confident creating chains and working single crochet, half double crochet, double crochet and treble crochet stitches.
It will be helpful to also know what it means to crochet 2 stitches together (abbreviated to “2tog”) but we will go over crocheting 2 stitches together as it pertains to this specific stitch – not in general.
This tutorial assumes that you have basic understanding of double and treble crochets, what it means to yarn over, etc., as the crochet Treble Cross stitch is more advanced.
How is this stitch abbreviated?
This stitch has a couple different abbreviations. Most commonly seen are K or K Stitch and Trx (for Treble Cross). Some might also call it a Crossed Treble Crochet, but this can mean two different things as we talked about above.
This is why it’s important to always read the abbreviations list and special stitches section of a pattern that you’re working so that you know exactly the stitch the designer used. It can be easy to think “Crossed Treble Crochet, got it!” but not realize that the designer used a totally different crossed treble.
In my research around this older crochet stitch, I found it was most often called K or Trx.
Just as a side note, I find it interesting that it was abbreviated to “K”! This stitch looks much more like an X than a K, but I digress. 🙂
How to crochet the Treble Cross Stitch (US Terms)
This crochet Treble Cross stitch tutorial will show you step-by-step how to work this stitch with photos along the way. There will be highlights and arrows to help identify the steps as clearly as possible.
Ready to get started? Let’s go over the technical stuff first.
DISCLAIMER: This post includes affiliate links. This means, should you decide to purchase a product via one of these links, I will receive a small commission at no extra cost to you. I only recommend products I use and love (Or products I know others love, have heavily researched, know have good ratings and plan to purchase myself). These small commissions help to support this blog and continue keeping most of my patterns free. You can read more on my Privacy Policy, if you prefer.
YARN AND HOOK USED IN THIS TUTORIAL
To practice the crochet Treble Cross stitch, you can use any yarn you like! Choose a hook size that corresponds with the yarn weight you’re using and you’re good to go.
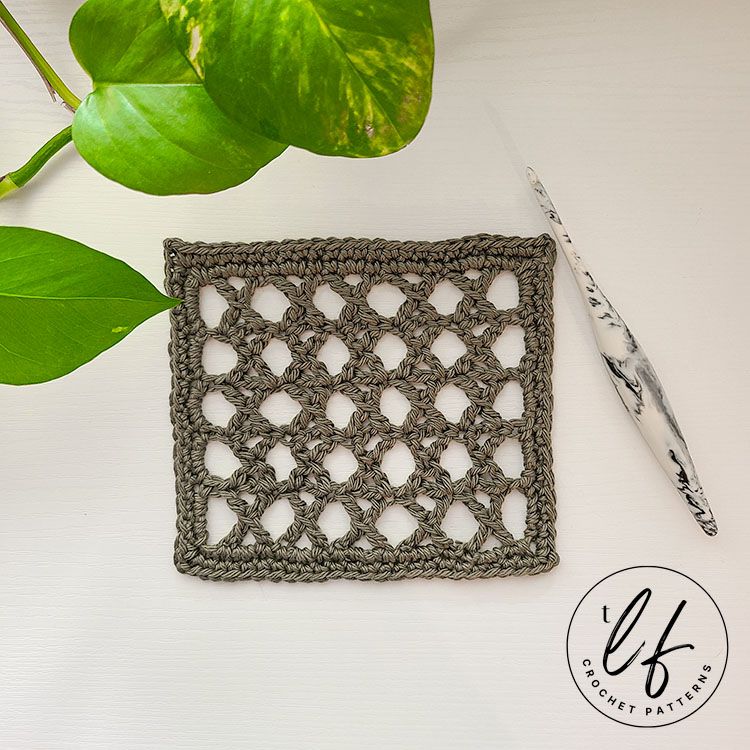
In my tutorial photos, I’m using Bernat Maker Home Dec in colorway Aqua and my Furls Ebony Streamline Wood 6.5mm (M).
WRITTEN TREBLE CROSS STITCH INSTRUCTIONS
To work a Treble Cross Stitch, you will:
Yarn over 2 times and insert your hook into the next stitch. Yarn over and pull up a loop. You will have 4 loops on hook. Yarn over and pull through 2 loops. You will have 3 loops on hook and 1 “leg” made.
Now, skip 2 chains. Yarn over and insert your hook into the next chain. Yarn over and pull up a loop. You will have 5 loops on hook. Yarn over and pull through 2 loops. You will have 4 loops on hook and a second “leg” made.
Yarn over and pull through 2 loops. This crochets the 2 legs together (2tog). Pay attention to where these two legs join and the two diagonal loops that show at this join as we will use this area later.
Yarn over, pull through 2. 2 loops on hook. Yarn over, pull through 2.
Now, chain 2. Yarn over and insert your hook into the 2 diagonal loops where the two legs were crocheted together. Yarn over and pull a loop through. 3 loops on hook. Yarn over, pull through 2. 2 loops on hook. Yarn over, pull through 2.
Treble Cross Stitch complete!
The hardest part about the crochet Treble Cross Stitch is identifying where the two legs come together to place the finishing double crochet. Don’t worry, the photo tutorial is going to go over this in detail with highlights!
STITCH MULTIPLE (& WHAT THIS MEANS IN PRACTICE)
The Treble Cross stitch requires a stitch multiple of 4+1. This does include the turning chain counting as a stitch as the turning chain typically counts with this stitch pattern.
What this means is that you will need a multiple of 4 chains + 1 chain for the stitch pattern to work properly. When we work a row of just Treble Cross stitches, we will begin the row with a treble crochet (typically a chain 4 counting as the stitch) and end the row with a treble crochet in the last stitch.
If you wanted to crochet a row of just single crochets as a solid base or if you want to start later rows with a Stacked Single Crochet to the height of a treble, you would need to chain a stitch multiple of 4 + 3. The multiple of 4 is for your Treble Cross stitches. The + 3 is for the 2 stitches you need on either side for the sides to be straight and for 1 turning chain.
This tutorial will mostly show you the method of counting the turning chain as a stitch but I’ll go over what it looks like to use a different method to start as well.
For example – When counting turning chains as a stitch: This crochet stitch tutorial will begin with 25 chains and will count the turning chains as a stitch. Let’s break this down.
First, I need a multiple of 4 stitches. For this multiple, I chained 24. (4 times 6 = 24)
Then, I need to add an extra chain for the plus 1. So I now have 25 chains.
For example – When the turning chains DO NOT count as a stitch or when worked on a “solid” row: At the end of the tutorial, I’ll show what it looks like to work the Treble Cross stitch on a row of single crochets both counting turning chains and using a Stacked Single Crochet. For this, I chained 18. Let’s break this down.
First, I need a multiple of 4 stitches. For this multiple, I chained 16. (4 times 4 = 16)
Then, I need to add 3 chains for extra chain for the plus 3. So I now have 19 chains.
I would place 1 single crochet in the second chain from the hook and each chain across. This will give me 18 stitches and allow me to work 4 crochet Treble Cross stitches across the row, with 1 treble crochet at the start and 1 treble crochet at the end.
You can use this basic math to create a crochet project of any size using the crochet Treble Cross stitch.
Step by Step Instructions
Now that we have the technical stuff out of the way, let’s walk step by step through how to work the crochet Treble Cross stitch.
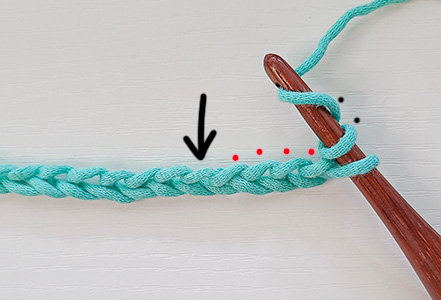
To begin working a Treble Cross stitch, we chain a multiple of 4 + 1. Here I have 25 chains.
We will yarn over 2 times (black dots indicate 2 yarn overs) and insert our hook into the 5th chain from the hook.
The 4 skipped chains are marked with red dots. These 4 chains will count as the first treble crochet of the row.
With the hook inserted into the 5th chain, yarn over and pull a loop through.
You will have 4 loops on your hook.
Yarn over and pull through 2 loops as the black arrow in the image indicates.
You will now have 3 loops on hook and one “leg” made.
Notice that this looks like a partially finished double crochet (if we were to only have 2 loops on hook and not 3).
Now, skip 2 chains (marked with 2 red dots in the image).
Yarn over and insert your hook into the next chain. Then, yarn over and pull a loop through.
You will now have 5 loops on hook.
Yarn over and pull through 2 loops as the black arrow indicates.
We now have 4 loops on hook and 2 “legs” made.
Notice that these two “legs” look like we are crocheting 2 double crochets together. This is important to note as it is a part of the stitch anatomy and helps us to identify the area we will need to work into later.
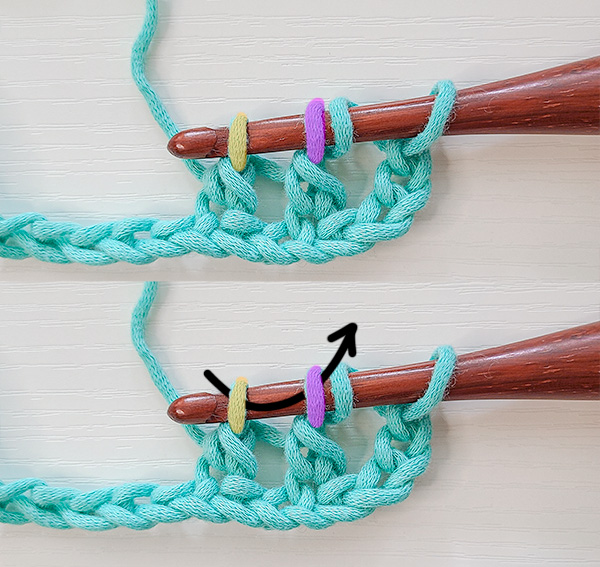
In both of these images, I’ve highlighted the loop nearest to the tip of the hook in yellow and the next loop in pink. The yellow loop is the loop that belongs to the 2nd leg. The pink loop is the loop that belongs to the first leg.
These are the 2 loops we will work into later.
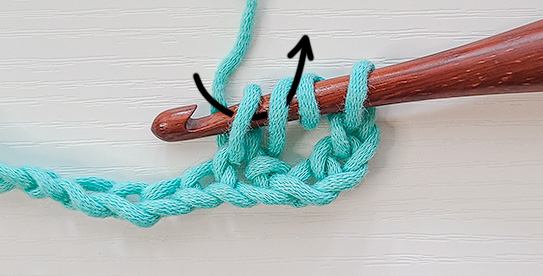
For now, yarn over and pull through 2 loops as the black arrow indicates.
You will now have 3 loops on hook.
If we were to ignore the 2 loops on hook to the right, we would have a double crochet 2 together (dc2tog).
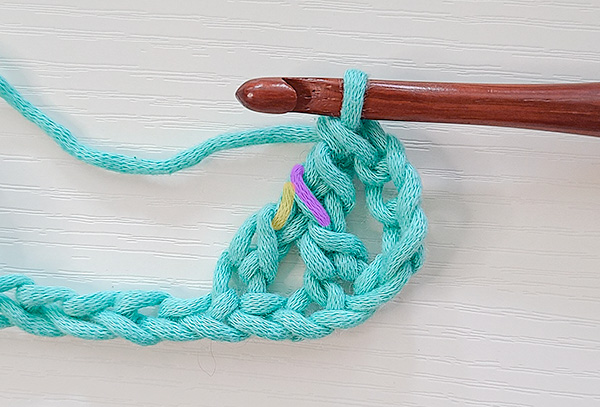
See how the yellow and pink loop have gathered together and sit diagonally in the top image. These are what we will look for later.
In the bottom image, I’ve placed black arrows over the two legs. This is to help identify that these are the “legs” that create the upside down V on the bottom of the X.
Yarn over and pull through 2 loops as the black arrow indicates.
You will have 2 loops on hook.
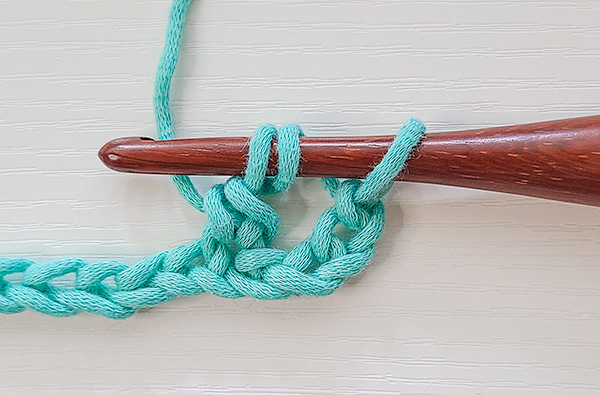
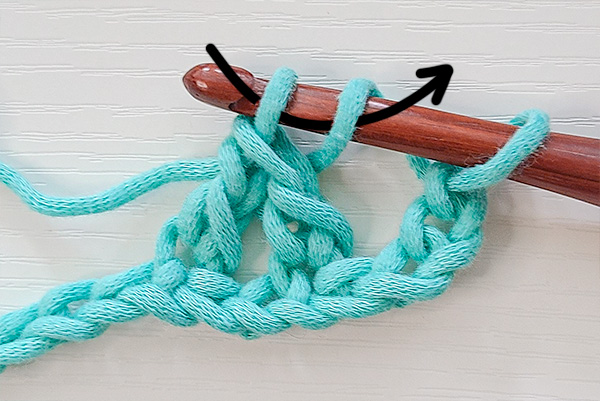
Yarn over and pull through the remaining 2 loops as the black arrow indicates.
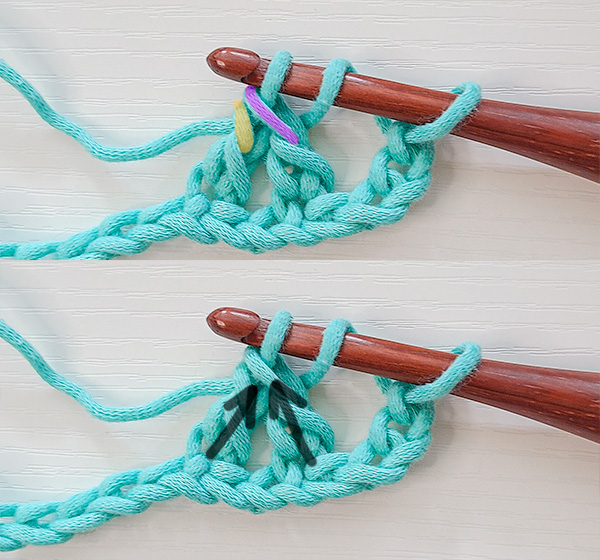
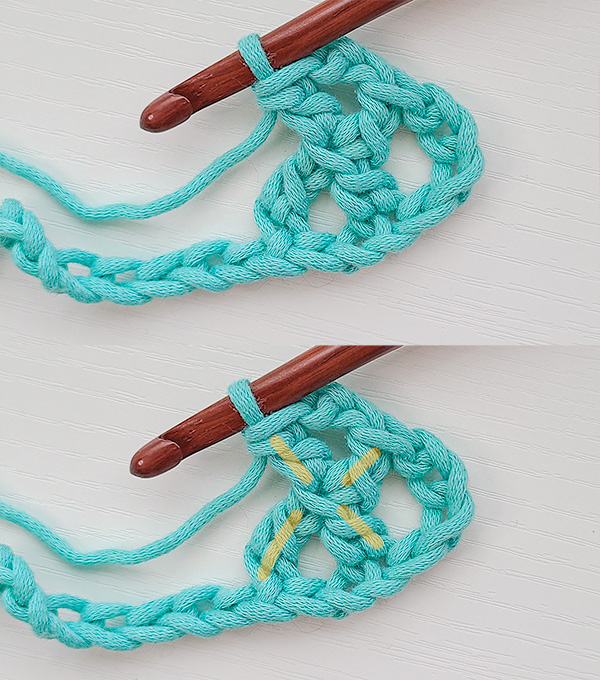
This is what the stitch looks like so far. I’ve highlighted the two loops we will need later in yellow and pink again.
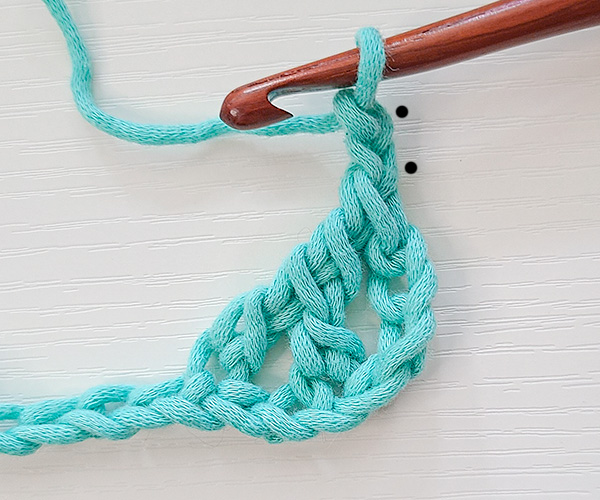
Now chain 2. This chain 2 creates the same amount of space between the top part of the stitch as we have in the bottom of the stitch from skipping 2 chains.

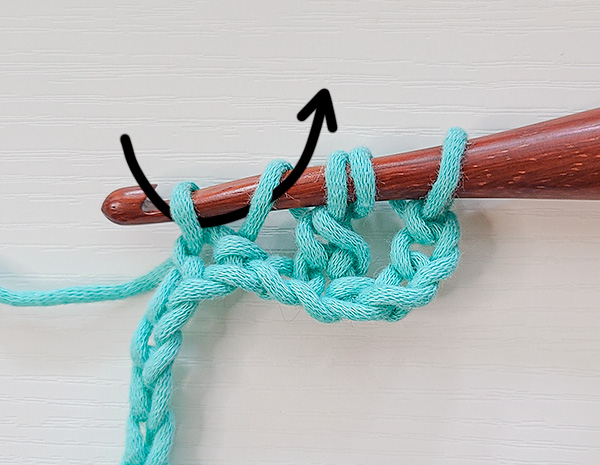
Now yarn over once (as indicated by a black dot).
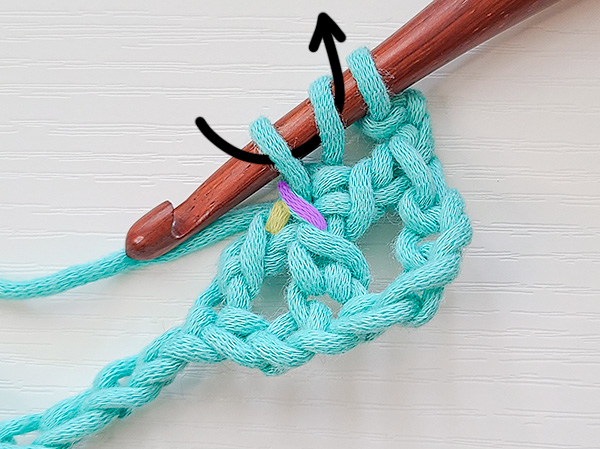
Identify the 2 loops where the two legs were crocheted together. I’ve highlighted them yellow and pink in this image.
Insert your hook under these two diagonal loops from right to left (or left to right, if you’re left handed) as the black arrow in the image indicates.
Then, yarn over and pull a loop through.
You will have 3 loops on your hook.
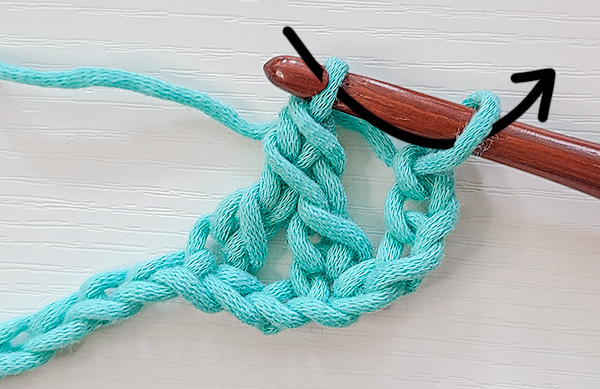
Yarn over and pull through 2 loops as the black arrow indicates.
I’ve kept the 2 loops we have pulled this loop through highlighted yellow and pink so we can be aware of the stitch anatomy.
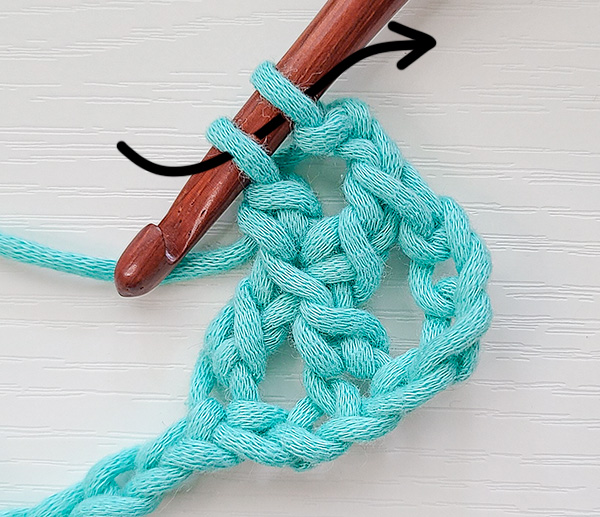
You will have 2 loops on your hook.
Yarn over and pull through 2 loops as the black arrow indicates.
This completes the crochet Treble Cross Stitch!
The two pictures in this image are the same. I’ve highlighted the bottom image for clarity.
You can see in both images how this stitch looks like an X.
In the bottom image, I’ve highlighted the 2 posts or legs of the bottom of the X and the 2 arms of the top of the X.
This helps to show how all of this work came together and to understand the stitch anatomy.
Look at your own Treble Cross Stitch you’ve created and study where the diagonal loops of the yarn overs are. Notice that each leg, post or arm has 1 diagonal loop that is unworked and, in the center of the X, there is one diagonal loop. When the Treble Cross Stitch is worked properly, all of these loops will be balanced like this.
To begin your next crochet Treble Cross stitch, you would yarn over twice and insert your hook into the next chain.
Then, follow the steps listed out above to finish the stitch.
When you reach the end of the row, you will have 1 stitch remaining. In this stitch, you’ll place a normal treble crochet.
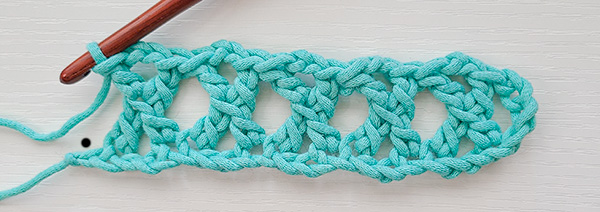
With the treble crochet placed, this is what a row working the Treble Cross stitch all the way across will look like.
Starting a New Row with the Treble Cross Stitch
To begin a new row with the Treble Cross Stitch, you’ll chain 4 and turn. Typically, the chain 4 counts as a treble crochet, so we won’t put a treble crochet into the first stitch.
If you prefer, you can not count the chain 4 and put a treble crochet in that first stitch or used Stacked Single Crochet to get to a treble crochet height. The choice is yours. In this tutorial, I’m counting it as a stitch.
Once you’ve decided on your first stitch technique (chains count or Stacked SC), you can begin working your first crochet Treble Cross stitch of the row.
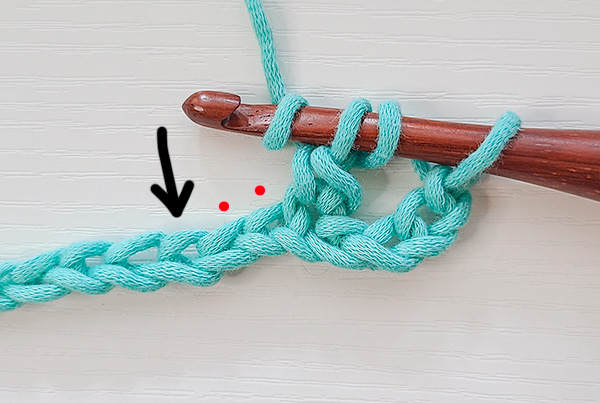
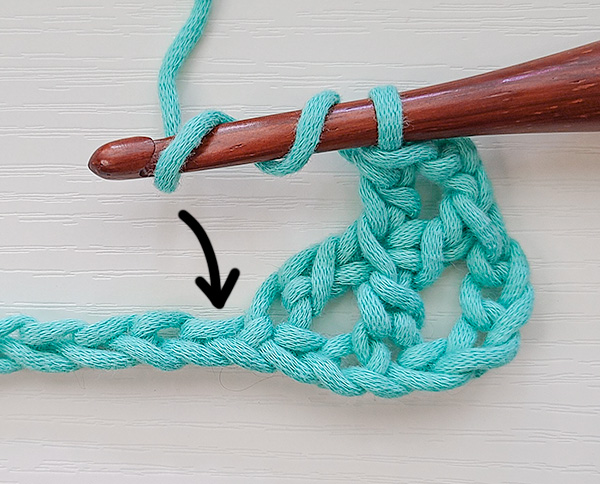
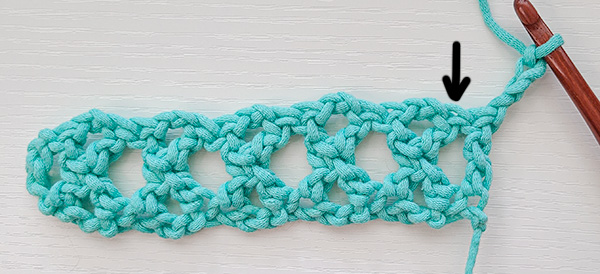
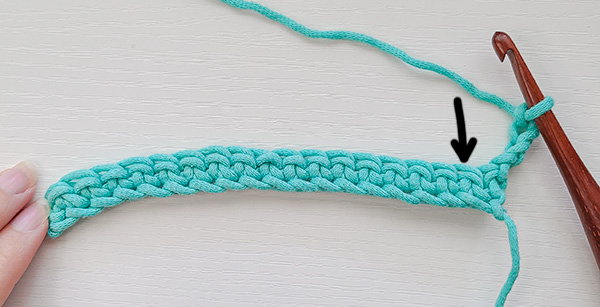
You will begin the Treble Cross stitch in the next stitch, which an arrow points down to in this image.
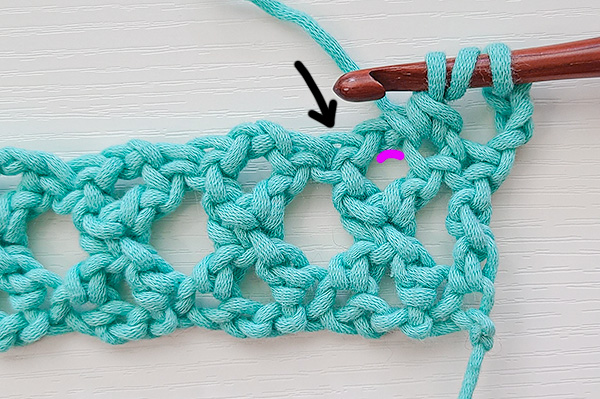
Once you have the first leg of the stitch made, you’ll now skip the 2 chains and work into the next stitch.
In this image, an arrow points down to the stitch you will work the second leg into and a pink line indicates the chains that you will skip.
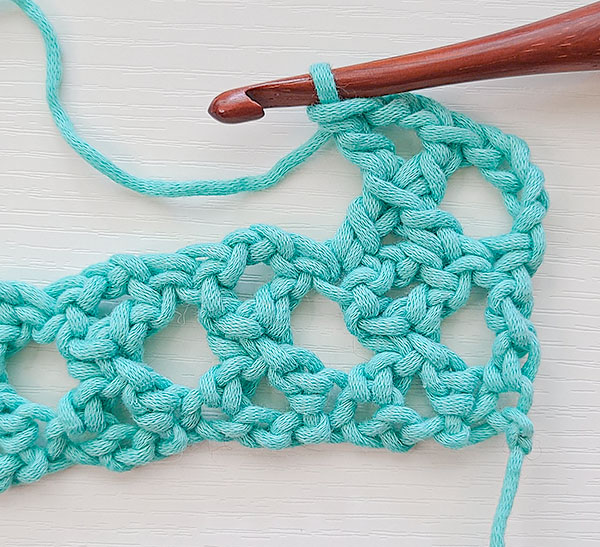
Here’s what the first crochet Treble Cross stitch will look like on the new row.
You can continue placing Treble Cross stitches across the row, working into the stitches and skipping the chains.

At the end of the row, you’ll place a treble crochet into the 4th chain of the chain 4 that counted as a treble crochet in Row 1.
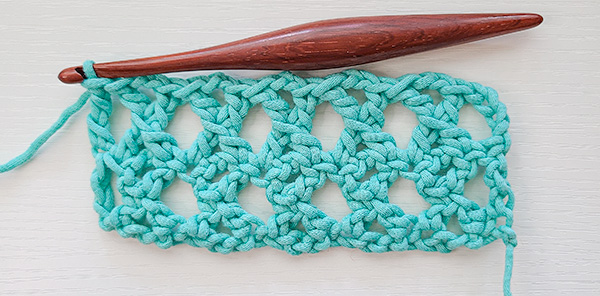
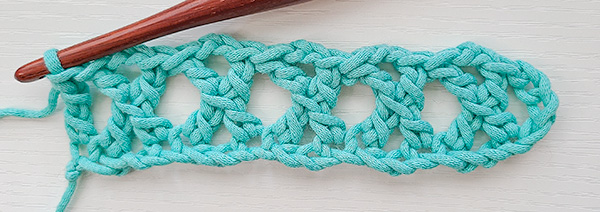
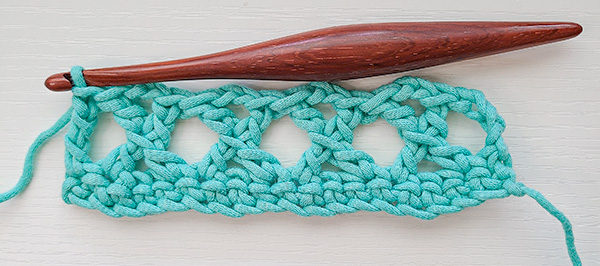
And here’s how a second row worked looks! You can continue working rows using the Treble Cross stitch for as long as you like.
Working the Treble Cross Stitch on a row of Single Crochet
In this image, you can see I have 18 single crochets in a row. I have chained 4 and turned. For this row, I’ll be counting the chain 4 as a stitch so you can see what it looks like.
I can now start a Treble Cross stitch in the top of the next single crochet.
In this image, I’ve worked the crochet Treble Cross stitch all the way across the row until 1 stitch remains and I’ve put 1 treble crochet in the last stitch.
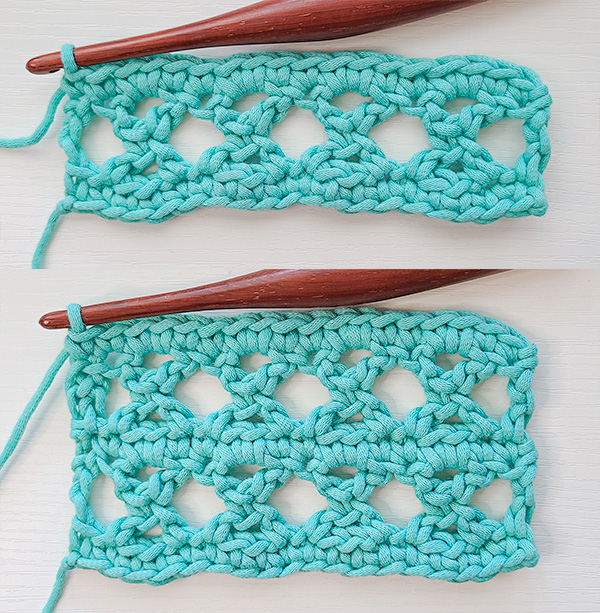
In this image, there are two pictures.
In the top picture, I’ve worked a row of single crochets. I have placed 1 single crochet in each stitch and 2 single crochet in each chain 2 space across. I have 18 stitches.
In the bottom picture, I’ve worked another row of crochet Treble Cross stitches and I started that row with Stacked SC. You can see it on the left. It’s a bit thicker than the treble crochet or chains but it is easier to work into the top of! 🙂 Additionally, I worked another row of single crochets on top.
This is so you can see how the crochet Treble Cross stitch looks both worked on top of itself and on solid rows of single crochets. You can certainly use any stitch you like in between!
So, what do I do now?
To continue practicing the crochet Treble Cross Stitch (otherwise known as K stitch, Trx or Crossed Treble Crochet), you can simply continue creating swatches of the stitch until you get comfortable with all of the steps.
You may find that once you’ve practiced it a few times, it’s actually quite a fun stitch to work!
That’s all there is to the crochet Treble Cross Stitch!
I hope you’ve enjoyed this tutorial. Thanks so much for hanging out with me today!
Don’t forget to join my Facebook Group so we can chat all about your creations! We are a group for crocheters of all experiences, all interests and love to hang out together. Come join the fun!

Shannon | Designer & Editor
Shannon helps crocheters find their next project and build their skills with in depth tutorials and crochet patterns on her blog, theloopholefox.com.
With more than a decade of crochet experience, Shannon knows that understanding why we do something matters just as much as how we do it. She teaches new techniques and crochet stitches in depth so you can crochet with confidence.
Looking for more Crochet Stitch Tutorials? Try these!
How to replace turning chains with Stacked Single Crochet
How to Crochet the Suzette Stitch
How to Crochet the Even Moss Stitch
How to Crochet the Arcade Stitch
How to Crochet the Linked Double Crochet
The Magic Circle: How and Why it Works
Foundation Single Crochet and Why It’s Awesome
Foundation Half Double Crochet and Double Crochet and Why They’re Also Awesome