The Simplicity Scarf
It’s November! Can you believe it? I can and I am excited it is because that means I can finally post the Simplicity Scarf, a crochet hooded scarf pattern that is both easy for beginners and fun for experienced crocheters. This crochet scarf with a hood is gorgeous in it’s simplicity (get it?) but easy to jazz up with fun colors, if you prefer.
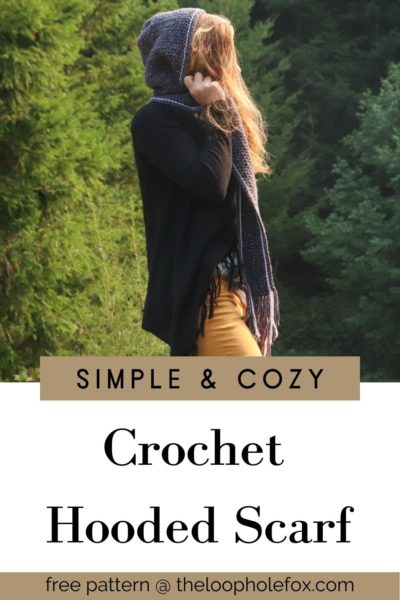
Crochet Hooded Scarf
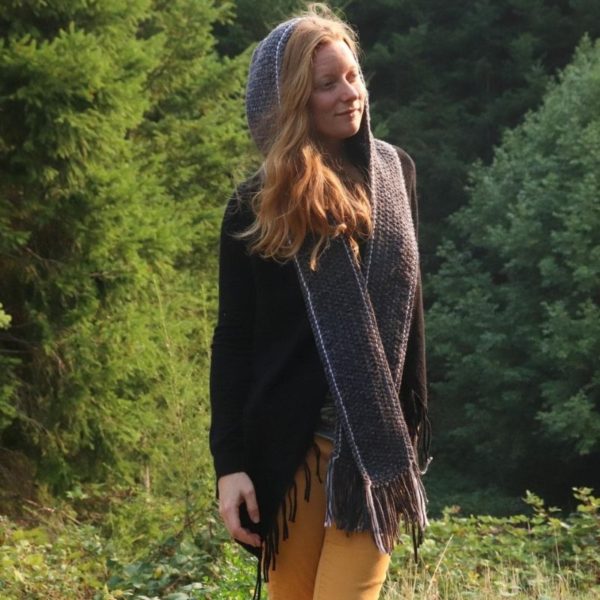
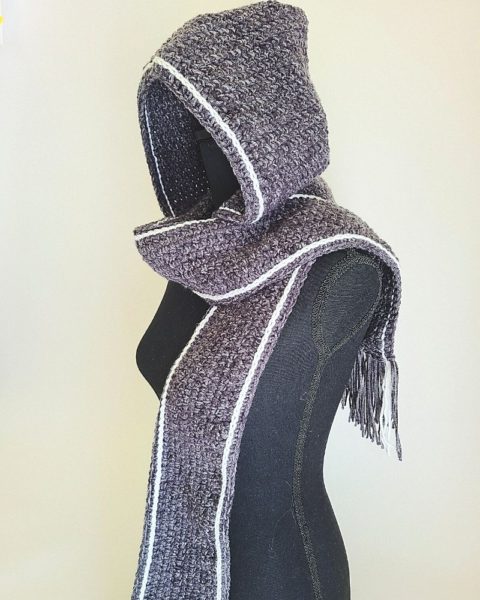
Where I’m from, it gets super cold in the winter and I always find myself struggling with a sweater hood, a jacket, a scarf and on and on. Enter the crochet hooded scarf to fix the problem! I love the Simplicity Scarf because it’s just that: Simple. It looks great in any color and matches any style. Even my husband is eyeballing mine to wear now.
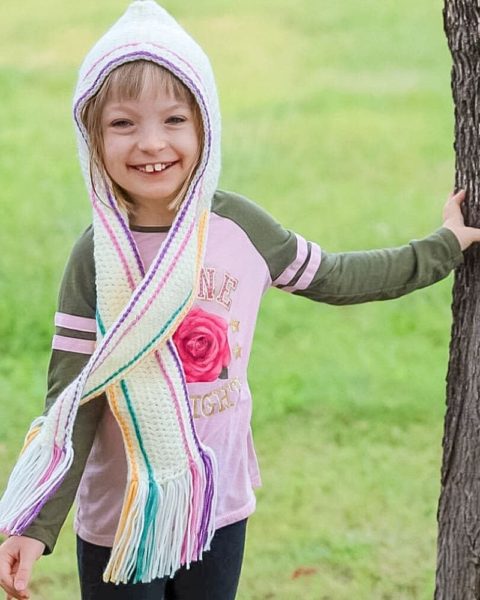
And the best thing? There’s both an adult and a child size, too!
DISCLAIMER: This post includes affiliate links. This means, should you decide to purchase a product via one of these links, I will receive a small commission at no extra cost to you. I only recommend products I use and love (Or products I know others love, have heavily researched, know have good ratings and plan to purchase myself). These small commissions help to support this blog and continue keeping most of my patterns free. You can read more on my Privacy Policy, if you prefer.
If you prefer a premium, ad-free PDF version of this pattern, you can grab one on either my Ravelry or my Etsy shop by clicking the buttons below.
And when I mean it looks great in any color… I mean it. I posted a picture to my personal Facebook page in a “look what I made!” post and received many, many orders that I did not expect. I typically do not do commissions for finished items, but I did this time for my friends and wow! I thought my hands were going to fall off, I made so many crochet hooded scarves in the span of a week. I made them in green, grey, black, white, blue… you name it, I made it.
The crochet hooded scarf pattern written here for free is for two “one size fits most” sizes: Adult and child. In the PDF pattern, you can find instructions on how to create your “perfect size”. A big, cozy scarf with a big hood is great, so you should find that the sizes here are comfortable and big enough for most.
SKILL LEVEL
Easy/ Advanced Beginner – This crochet hooded scarf pattern uses simple stitches such as chains and half double crochet. The majority of crocheting this pattern should be easy. The hood is worked directly onto the scarf, so some counting will be necessary but it’s nothing too difficult. Using surface slip stitch to create the stripes on the scarf is the most advanced technique used in this pattern however, they are fairly straight forward as they’re creating long lines and will work quickly once you get used to them. How to surface slip stitch is explained within the pattern. The stripes are completely optional, of course, so you can omit them if you prefer.
Look What I Made has a fantastic photo tutorial of how to surface slip stitch.
MATERIALS & TOOLS
For this crochet hooded scarf pattern, you will need a Medium (4) weight yarn of your choice.
You will need approximately:
Adult: 10 ounces/ 284 grams/500 yards
Child: 6 ounces/ 171 grams/ 300 yards.
I used:
I Love This Yarn in Dark Grey Stone Wash (adult) Approximately 9-10 oz, or 453 to 500 yards.
I Love This Yarn in White (child) Approximately 5-6 oz or 255 to 300 yards.
Scraps of other colors for stripes, up to 1 oz.
Some acceptable yarn substitutions could be: Caron Simply Soft, Bernat Premium, Lion Brand Basic Stitch, Big Twist, Paintbox Simply Aran.
You aren’t limited to these substitutions, of course. Just some ideas for you!
TOOLS
5 mm (H-8) hook
Tapestry Needle
Scissors
Stitch Markers
GAUGE
11 hdc stitches x 13 rows = Approximately 4 inches x 4 inches
FINISHED SIZE
Child Size: Approximately 39 inches long (scarf) and 9 inches high (hood).
Adult Size: Approximately 70 inches long (scarf) and 11 inches high (hood).
ABBREVIATIONS
This pattern is written in standard US terms.
- Ch – Chain
- Sl st – Slip stitch
- Hdc – Half double crochet
- St(s) – Stitch(es)
- (…) – Stitch counts are listed at the end of the row in parentheses and italics.
NOTES
- The chain 1 or chain 2 at the beginning of the row never counts as a stitch and will not be referenced throughout the pattern.
- This means you should always place your first stitch of the row in the same stitch you chained out of.
- This hooded scarf is worked length wise, so you will make a long chain and work 12 rows for the length of the scarf, instead of working to build length with shorter rows.
- The hood of this scarf is worked directly onto the length by joining in an indicated stitch. We will work several rows (depending on size) and then seam as directed via pictures.
- The stripes of this scarf along the length and opening of the hood are created by using surface slip stitch. These are fun details to add at the end of your scarf, if you’d like to but they are completely optional! 🙂
- Hood sizes are written to adult and child averages and should fit correctly, if not a little large.
HOW TO READ THIS PATTERN
Both the adult and the child size are written in one set of instructions, but have different stitch counts. Each time a set of instructions includes a stitch count, you can find what you need in parentheses. Example: “Make starting chain (Child -110 chains; Adult – 194 chains)”.
SPECIAL STITCH – Surface Slip Stitch
To surface slip stitch, you will also work between the posts.
To begin, tie a slip knot onto your hook and start at the beginning of your row. Hold your working yarn behind your work, insert your hook between the posts of the stitches, yarn over and pull through the loop on your hook to complete your slip stitch.
Next, insert your hook between the posts of the next two stitches. Your working yarn should still be behind your work. Yarn over, pull up a loop and pull through the loop on your hook to complete your slip stitch.
SPECIAL NOTE
The surface slip stitching at the end is completely optional! You can add as many or as few rows of surface slip stitches in as many or as few colors as you prefer. If you’d prefer a simple hooded scarf with no stripe detail, that’s completely okay!
Surface slip stitches can seem daunting at first, but I’d suggest giving them a try and seeing how you like them if you’ve never tried it before.

How to Make this Crochet Hooded Scarf
SCARF
Make starting chain: Child – 110 chains; Adult – 194 chains
Row 1 – Place 1 hdc in 3rd ch from hook and each ch across to end of row. (Child – 108 stitches, Adult – 192 stitches)
Row 2 – Ch 2, turn. Place 1 hdc in each stitch across the row. (Child – 108 stitches, Adult – 192 stitches)
(Child) Rows 3 through 10 – Repeat Row 2. Finish off yarn, weave ends.
(Adult) Rows 3 through 12 – Repeat Row 2. Finish off yarn, weave ends.
HOOD
We will now plan out our hood and join the yarn in indicated stitches.
For the child size hood we need 50 stitches and for the adult size hood we need 60 stitches.
Lay your scarf flat (there is no right or wrong side) with your final row at the top.
Starting in the left corner of your final row and moving right, count (Child – 29 stitches; Adult – 66 stitches) and place a stitch marker.
Now, starting in the right corner of your final row and moving left, count (Child – 29 stitches; Adult – 66 stitches) and place your stitch marker. This outlines the start of our hood.
Join your yarn in the stitch your first stitch marker is in with a chain 2.
*If you’re right handed, this stitch maker is on the right side. If you’re left handed, it’s on the left side.
Row 1 – Place 1 hdc in the same stitch as your chain 2 join and in each stitch across the row to your ending stitch marker. (Child – 50 stitches; Adult – 60 stitches)
Row 2 – Ch 2, turn. Place 1 hdc in each stitch across the row.
(Child) Rows 3 through 30 – Repeat Row 2.
(Adult) Rows 3 through 34 – Repeat Row 2.
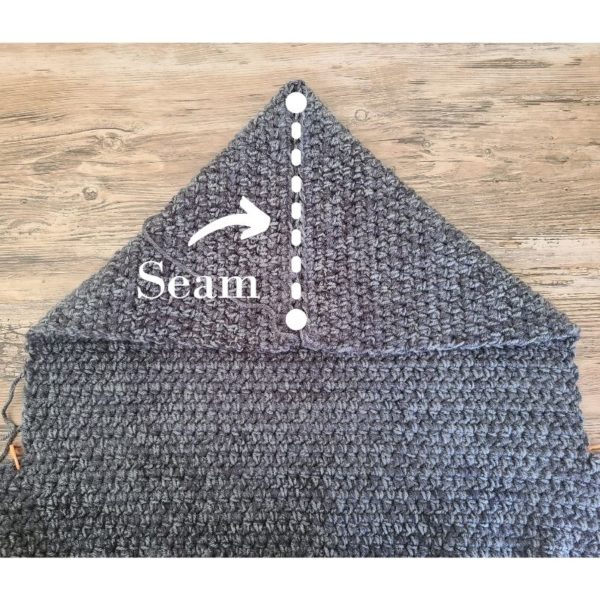
Trim yarn, leaving a long tail for seaming the hood.
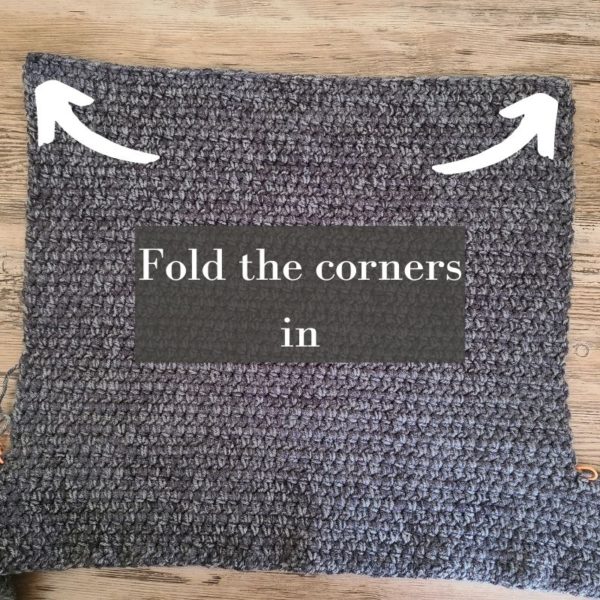
To seam the hood, we will fold the two top corners of the square we have created down toward the center to form a triangle.
With your long tail and a tapestry needle, seam the stitches together to complete the hood. Once complete, turn the hood right side out.
BORDER
To clean up our edges and make this scarf seem even more seamless, we want to add a border. With your hood now right side out, choose a stitch to start in for the border. This can be any stitch you like, but I would recommend starting at one of the short ends of the scarf. This way, when you tie off your yarn, we can hide the close of this round easier with fringe.
Join your yarn with a chain 2 and place 1 hdc in the same stitch. Place 1 hdc in each stitch around the entire project, or in the side of each half double crochet when working along the short sides.When you reach the hood section, you will continue placing 1 hdc in each row by working along the raw edge. When you’ve reached the end of this “round”, slip stitch to your first hdc to close. Trim your yarn and weave in your ends.
If you would like to skip adding stripes, head straight to the “FRINGE” section.
If you’d like to skip stripes and fringe, you’re all done!
STRIPES
You will use surface slip stitch to create these stripes by working along the border in either one or two stripes (your choice!) with a contrasting color of your choice.
These stripes will be worked with your accent color (or colors, if you prefer two different stripes).
For the “first” stripe, you will work along the straight, long edge of the scarf. Because we have placed a border on the hooded scarf, we can now place the surface slip stitches much easier.
To make the surface slip stitch easier, work along the row as you normally would starting a new row (if you’re right handed, start from the right hand side. If you’re left handed, start from the left hand side).
You will want to place these stripes on the scarf with the right side facing up.
Tie a slip knot onto your hook and, while holding your working yarn behind your work, insert your hook in between the post of the first two stitches. Yarn over, pull a loop through and pull it through the loop on your hook as you normally would work a slip stitch.
Now, insert your hook in between the posts of the next two stitches, yarn over, pull up a loop and finish your slip stitch as normal. Continue working in this method across the row.
When you reach the other end, trim your yarn and tie it off securely. You can use this tail end as a part of the fringe later, so you don’t have to worry about weaving in the ends.
Complete the same steps on the other side of the scarf (along the long edge and the hood). You will need to turn to work up along the opening of the hood, and the border around the edge makes working the surface slip stitch along this opening much easier.
If you want to add a second stripe on either side of the scarf, you can do this using the same method we previously used. Count two rows down from the previous stripe and surface slip stitch throughout that row. This can get a bit trickier when you do the hood, as you’ll be working into the rows but just try to keep it as straight as you can.
FRINGE
For my fringe, I placed two strands of yarn per stitch. You can add as many strands as you like. If you prefer a fuller fringe, add more.
I placed fringe in each stitch of the short ends but if you prefer not to, that’s fine, too!
To add fringe exactly as I have, cut two strands of yarn twice as long as your desired fringe length per stitch with your main color. You will also need two strands of yarn of your accent color (or colors) per stitch that corresponds with your stripes (if you’ve made them).
Attach your yarn strands to your stitches. Fold the strands in half and pull the loop through the stitches with your hook. Then, pull the tails through the loop you’ve created and pull tight. You can tie them off, if you prefer.
You’re done!
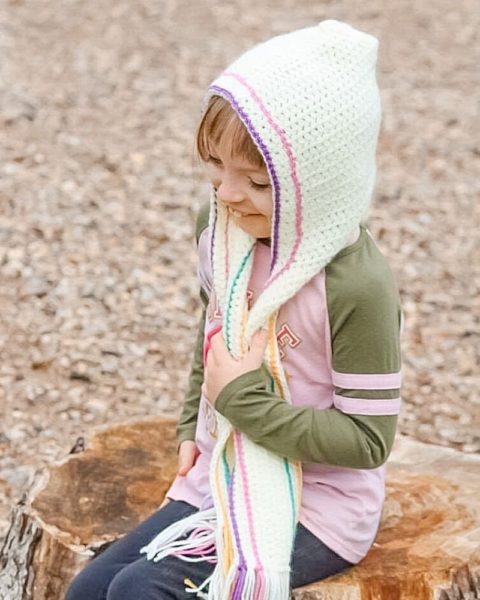

And there you have it! Your very own Simplicity Scarf. Seriously though, how cute is the child version? This little lady is my best friends daughter and she has such a bright personality, we couldn’t not make her crochet hooded scarf as bright as she is.
My sibling is wearing the adult version, and you can see how classic and lovely the hooded scarf looks on them.
Once the weather cools down a bit, I’m basically going to live in mine! What colors will you make yours? I’m so excited to see the color combinations you come up with.
One of my greatest joys is seeing your finished crochet projects from my patterns or tutorials, so when you post to Instagram, don’t forget to tag me so I can show you some love! I’m @theloopholefoxcrochet. You can also share pictures on my recent posts on Facebook or within my Facebook group!
And don’t forget to pin this to your Pinterest boards, so you can remember it for later!
Don’t forget to join my Facebook Group so we can chat all about your creations! We are a group for crocheters of all experiences, all interests and love to hang out together. Come join the fun!

Shannon | Designer & Editor
Shannon helps crocheters find their next project and build their skills with in depth tutorials and crochet patterns on her blog, theloopholefox.com.
With more than a decade of crochet experience, Shannon knows that understanding why we do something matters just as much as how we do it. She teaches new techniques and crochet stitches in depth so you can crochet with confidence.
Find More Free Crochet Scarf Patterns:
Crochet Scarf with Pockets
Nebula Infinity Scarf
Crochet for a Cause – Scarf and Hat Roundup