
Aspen Pocket Scarf
If you’re in the Northern Hemisphere, it’s time to start thinking about cozy wearables like crochet pocket scarfs. With a crisp feeling to the air and leaves starting to fall, it’s finally autumn and it’s time to start bringing out our fall and winter patterns for gifting and loving. I am so excited to present to you this crochet pocket scarf pattern. I hope you love it!
Crochet Pocket Scarf – Easy & Free Pattern
I have to admit, I am not a mitten person. I’ve never liked wearing them but I, like so many people, don’t like my hands to be cold. The only obvious option is to slap some pockets on a scarf and call it a day.
DISCLAIMER: This post includes affiliate links. This means, should you decide to purchase a product via one of these links, I will receive a small commission at no extra cost to you. I only recommend products I use and love (Or products I know others love, have heavily researched, know have good ratings and plan to purchase myself). These small commissions help to support this blog and continue keeping most of my patterns free. You can read more on my Privacy Policy, if you prefer.
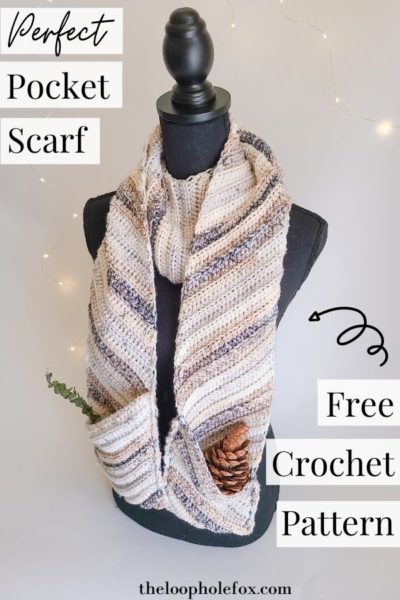
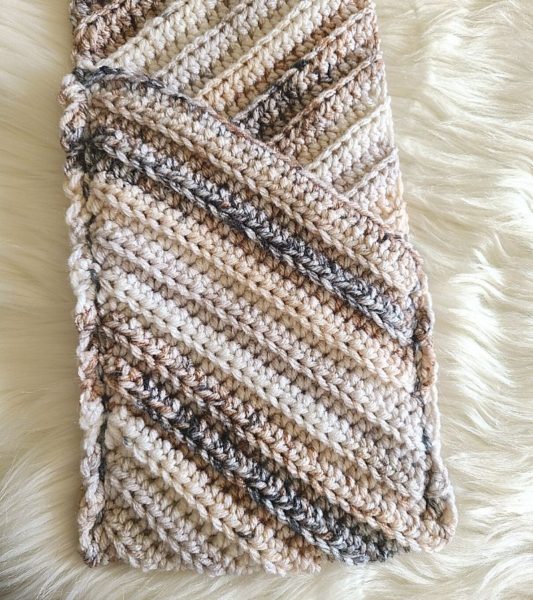
If you’ve been here for a while, you might remember my Nebula Infinity Scarf. The Nebula Infinity Scarf was such a fan favorite that I thought altering the pattern to be used for a crochet pocket scarf pattern would be perfect. The diagonal ribbing on both this crochet pocket scarf and on the Nebula Infinity Scarf is created by always increasing on the same side, and always decreasing on the other. Fun!
That scarf was certainly easy and this crochet pocket scarf pattern is, too. There is a bit more to the pattern, though, so you can’t just crochet the Nebula scarf and throw the pockets on.
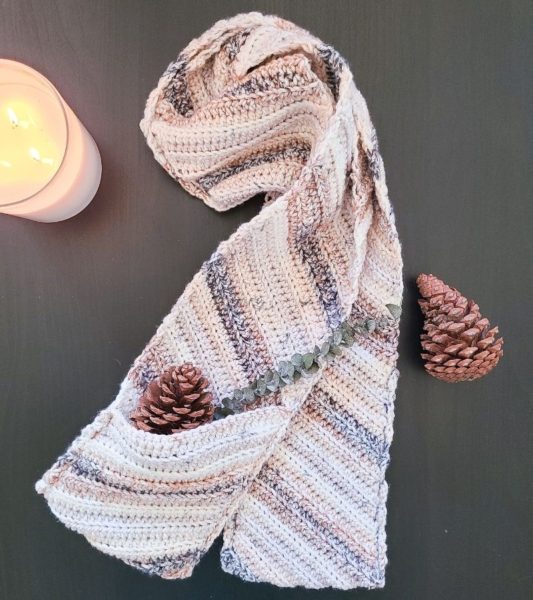
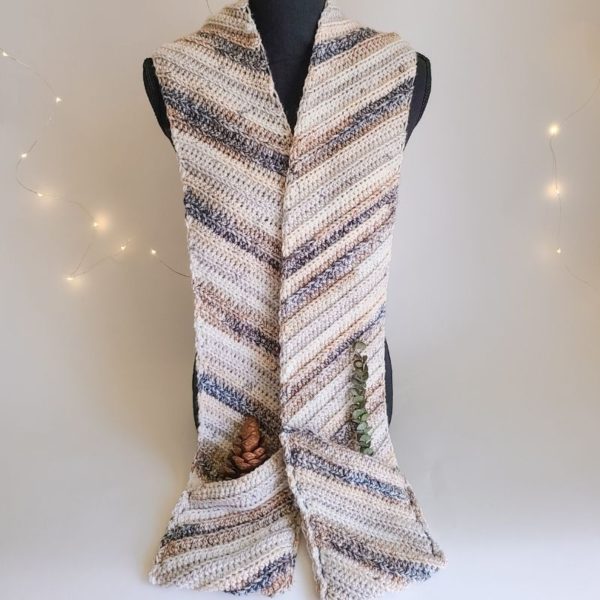
What I love the most about this crochet pocket scarf is, of course, the pockets. While the pockets are wonderful regardless, I absolutely love how the diagonal ribbing creates a diagonal edge to the scarf and therefore gives these pockets a diagonal slope. I think this adds so much personality to the pockets on the scarf that they are absolutely to die for.
If you prefer a premium, ad-free PDF version of this pattern, you can grab one on either my Ravelry or my Etsy shop by clicking the buttons below.
You have two options for the pockets, too. I’m all about giving you as many options as possible on as easy of a free crochet pattern as I can. Because the first and last row of the crochet scarf are diagonal, you can decide which way you want your pockets to slope. You can have them slope in so that height of your crochet scarf pockets are both on the inner seam like hoodie pockets, or so that they are outside. It’s up to you!
Reasons to love this scarf:
It’s beginner friendly while still being elegant and cozy, it has a two row repeat that is easy to remember, can be made to basically any size easily and is nice and light while providing a ton of warmth.
SKILL LEVEL
Easy (Beginner’s should know how to half double crochet – You will also need to know how to decrease, but this will be explained in the abbreviations).
MATERIALS
This pattern is written to a medium (4) Aran weight yarn.
I used: I Love This Yarn in Sand Dunes – Approx 8 oz or 410 yards (1 and ½ skeins)
Some acceptable yarn substitutions could be: Caron Simply Soft, Bernat Premium, Lion Brand Basic Stitch, Big Twist, Paintbox Simply Aran.
You aren’t limited to these substitutions, of course. Just some ideas for you!
You will also need:
5 mm hook, scissors, tapestry needle and stitch markers, if you prefer them.
GAUGE
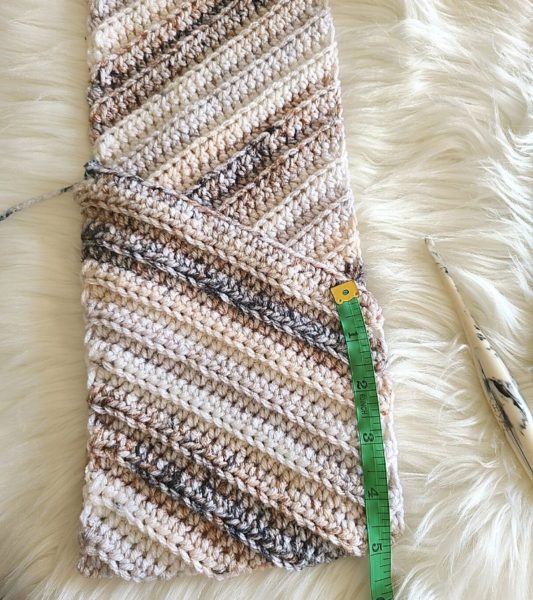
17 hdc stitches x 9 rows = Approximately 4 inches x 4 inches
FINISHED SIZE
6 inches wide by 74 inches long
Scarf pocket depth: Approximately 6.5 inches at center.
HOW TO CHANGE SIZE
I am 5’8” and I prefer a nice long scarf that is capable of both laying flat and wrapping around my neck, if necessary. Keep how you prefer to wear your scarves in mind if you decide to change size. If you like to wrap yours, make sure to keep it longer than you think necessary.
If you would like a scarf that is shorter (or longer) in length, you can decrease (or increase) the amount of rows worked.
This pattern has 84 rows on one side of the scarf, a transition set of rows and then 84 rows down the other side. When you decrease (or increase) the amount of rows worked to achieve a different length, make sure you decrease (or increase) the amount of rows on BOTH sides.
You will also want to keep the pockets in mind, as well, so ensure your scarf is approximately 5 inches longer on either side than your desired length.
ABBREVIATIONS
In US terms;
- ch – chain
- Sc – single crochet
- hdc – half double crochet
- hdc blo – half double crochet in back loop only
- blo – back loop only
- hdc2tog – half double crochet two together (decrease)
To hdc2tog, you will: yarn over, insert your hook into the stitch, yarn over and pull up a loop. Yarn over again, insert hook into the next stitch, yarn over, pull up a loop. Yarn over and pull through all loops on hook.
NOTES
- Chain 2 at the beginning of the row never counts as a stitch. Always start your row in the first stitch.
- The pockets of this crochet pocket scarf are created by simply folding the ends up and seaming. You can use whichever seaming method you prefer to secure your pockets (I sewed mine).
- Every row except the first and last row are worked entirely in the back loop only. With half double crochet, this can get confusing if you’re new to it because half double crochet have 3 loops. The back loop is always the furthest loop from you.
- This scarf has diagonal ribbing and because of this, the pockets have a diagonal edge. To ensure that your pockets slope either to each other or opposite of each other, the transition rows are very important. If you do not do the transition row, your diagonal ends of the scarf will slope the same way and can be a bit odd when wearing.
- Because this pattern is mostly a simple two row repeat, this pattern will be explained for the first few rows and then explain an “A” and “B” row that you will repeat in sequence to refer to.
How to Make This Crochet Pocket Scarf
Chain 30 (for 28 stitches throughout)
R1 – Place 2 hdc in 3rd chain from hook, 1 hdc next 25 stitches. You should have two stitches remaining. Hdc2tog the last two.
R2 – Ch 2, turn. In blo, hdc2tog first 2 stitches. Place 1 hdcblo next 25 stitches and 2 hdcblo in the last stitch.
Now, we will start our 2 row repeat. Before we get into the additional rows, I will explain Row A and Row B.
Row A: Ch 2, turn. Place 2 hdcblo in first stitch and 1 hdcblo in each of the next 25 stitches. You should have 2 stitches remaining, hdc2tog in blo.
Row B: Ch 2, turn. In blo, hdc2tog first 2 stitches. Place 1 hdcblo next 25 stitches and 2 hdcblo in the last stitch.
For Rows 3 through 84, you will crochet rows “A” and “B” in sequence. Row 3 starts with an “A” row.
Make sure your 2hdc in the same stitch are on the same side as your previous 2 hdc in the same stitch, and your hdc2tog is on the same side as your previous hdc2tog.
Your 84th row should be a “B” row.
From here, we need to work two transition rows so that our diagonal ribbing will begin to face the other way.
For Rows 85 and 86 – ch 2, turn. Place 1 hdcblo in each stitch across.
For Rows 87 through 170, you will crochet rows “A” and “B” in sequence. Row 87 starts with a “B” row.
Your 170th row should be a “A” row.
R171 – Place 1 sc in each stitch across.
SPECIAL NOTE: I prefer the raw edge of this crochet pocket scarf so I did NOT put a border around it. If you prefer a more finished edge, you will want to work 1 single crochet into each stitch and row around the length of the scarf.
If you prefer the raw edge as I have created mine: finish off and leave a long tail for seam.
Before you start forming the pockets, you’ll want to place a single crochet border along the short side of the other end of the scarf (along the chains) if you haven’t already. So, join your yarn in the first stitch of the chains and place 1 sc in each across. Finish off and leave a long tail for seam.
It’s time to put some pockets on this scarf!
From here, you’re going to want to decide how you want your scarf pockets to look. Remember when I said these pockets have a diagonal edge? Now is the time to decide if you want those edges to slope to each other or away from each other.
There is no right or wrong side of this scarf, it is completely up to you how you want your pocket slope to be.
With one side of the scarf up, the pockets will face in with the long edge to the inner side of the scarf (like the pockets on a hoodie) and, if you flip it to the other side, they’ll face outward.
Once you’ve decided which way you want the pockets to face (I wanted my long sides facing in like a hoodie), it’s time to form pockets and seam!
With your scarf flat, fold the ends of the scarf up to the body (so it is stacked on top of each other). When folding the pockets over, make sure the short side is approximately 5 inches long to leave a nice big and comfy pocket.
You might consider pinning the pockets in place so you don’t lose your size.
You can seam these pockets whichever way you prefer. If you need some ideas on seaming methods, you can check out this great article by E’Claire Makery that will show you a few different seaming methods.
I decided to actually hand sew my seams (I know!). I used what is called a Back Stitch and sewed my seams together. I used this back stitch hand sewing tutorial to make sure my sewing was done well. I will tell you: I am NOT a good sewer, so if I can sew the pockets on this crochet pocket scarf pattern, so can you!
Of course, you can use any standard crochet seaming method instead.
Once both of your crochet scarf pockets are seamed, you’re all done!
I hope you love this crochet pocket scarf pattern as much as I do. If it would stop being 100 Fahrenheit outside, I’d wear it every day.
One of my greatest joys is seeing your finished crochet projects from my patterns or tutorials, so when you post to Instagram, don’t forget to tag me so I can show you some love! I’m @theloopholefoxcrochet. You can also share pictures on my recent posts on Facebook or within my Facebook group!
And don’t forget to pin this to your Pinterest boards, so you can remember it for later!
Don’t forget to join my Facebook Group so we can chat all about your creations! We are a group for crocheters of all experiences, all interests and love to hang out together. Come join the fun!

Shannon | Designer & Editor
Shannon helps crocheters find their next project and build their skills with in depth tutorials and crochet patterns on her blog, theloopholefox.com.
With more than a decade of crochet experience, Shannon knows that understanding why we do something matters just as much as how we do it. She teaches new techniques and crochet stitches in depth so you can crochet with confidence.
Find More Free Crochet Patterns:
Nebula Infinity Scarf
Moss Stitch Triangle Shawl

Thank you for everything you do, I just love your patterns 🙂
Oh, you’re so welcome. Thank you for your kind comment, I am so pleased and humbled. 🙂
How about getting your lovely pooch to model scarves? Much more interesting than the mannequin although I don’t think the pattern would be quite as clear.
Now that is an idea! I might have to get her a few more treats, though. 😉
I love this scarf! Love the colors as well as the style. Thank you so much! I’m looking forward to more great patterns from you.
Thank you, Linda! I’m so glad you love the style and colors. I love, love, loved this colorway and how soft the yarn is.