
How to Make a Yarn Tassel for Any Project
If you’ve finished a crochet, knitting, sewing or any kind of DIY project, sometimes it needs a little something extra. This is where a tassel comes in. If you’ve never made a yarn tassel before, don’t worry! I’m going to walk you through how to make one step by step.
Yarn tassels are fun little projects that take only a few minutes but can be made into some really cool things. Not only are yarn tassels great embellishments on finished crochet or knitting projects, but they’re also fun keychains, garlands, decor… you name it, a yarn tassel is good for it.
A few of my free crochet patterns include these little bundles of fun as finishing touches, so I wanted to create this post to help you create one if you haven’t previously.
Fair warning, though. You’re going to want to make a ton of them.
Ready to make some cuties? Let’s get to it!
How to Make a Tassel from Yarn – Step by Step
Step 1: Gather your materials. You’ll need yarn (scrap yarn is fine, you need enough to wrap around something long-ish about 20 or more times), scissors and a tapestry needle.
You can use any yarn you prefer for this. Really, you can use anything you like. You could use macramé cord, hemp cord, strips of plastic from shopping bags, t-shirts. Whatever you want to use is totally fine.
Step 2: Find something in your home that is sturdy and about as wide as you’d like your tassels to be long. For me, this was a random little box. You can use any thing you want here. If you want BIG tassels you can use a book, you can use a random piece of cardboard, a spatula, a fork for mini tassels, you name it. Anything that is approximately as wide as you’d like your tassels to be long.

Step 3: Cut 2 lengths of yarn a few inches long (mine were about 3 inches). Set aside. We will use these later to secure our bits of yarn, so we want to have these already cut and handy.

Step 4: Wrap your yarn around the sturdy item you’ve decided on until you’ve reached about the thickness you’d like for the tassel. For a not too big, not too small tassel, I wrap mine between 20-25 times. The size is up to you!

Remember, though: The more times you wrap, the thicker the yarn tassel will be. This means when you secure it, it can fluff up a bit. Just a tip!
Step 5: Pick up one of the lengths of yarn you set aside and thread it under the strands and up to the top of your sturdy item. You should be on the side without the tail that started the wrap. Tie the yarn off. This gathers all of your strands into one place.

Step 6: Remove the wrapped yarn from your sturdy item. Pick up the other previously cut strand of yarn, and wrap it a few times tightly (but not too tight!) around all the strands of yarn a little below the first strand that gathered all of the pieces together. You can decide on the location of this wrapping. A quarter of an inch or so is probably enough. Once happy with the wrapping, tie your yarn off and weave the tail in under the wrapped portion so that it hangs out in the tassel.

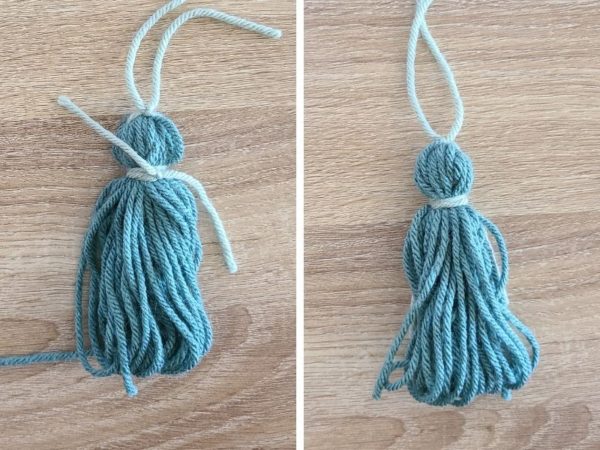
Step 7: Cut through all the loops at the bottom of the tassel. I do this by putting my scissors into the loops, pulling straight down and then cutting. This helps to make sure that all the strands of yarn are approximately the same length.

Step 8: Trim as necessary so all the little strands are even. You’re done!
From here, you can work through steps 3 through 8 to create as many tassels as you like. If you’re making my Fledgling Baby Afghan, you’ll need four. If you’re making a yarn tassel garland, you’ll need many!
What will you make out of yarn tassels? I’d love to know!
Don’t forget to join my Facebook Group so we can chat all about your creations! We are a group for crocheters of all experiences, all interests and love to hang out together. Come join the fun!

Shannon | Designer & Editor
Shannon helps crocheters find their next project and build their skills with in depth tutorials and crochet patterns on her blog, theloopholefox.com.
With more than a decade of crochet experience, Shannon knows that understanding why we do something matters just as much as how we do it. She teaches new techniques and crochet stitches in depth so you can crochet with confidence.