
How to Crochet a Non-Stretchy Crochet Strap
Love your crochet bag but hate how much the handle stretches? Me, too! I spent some time figuring out what my perfect non-stretchy crochet strap technique is and I’m excited to share it with you today. In this blog post, we’ll not only be talking about how to crochet a strap that doesn’t stretch but we’ll also be going over the results of my “crochet science experiment” and why it works. Let’s dive in!
Don’t want to forget how to make a crochet handle that doesn’t stretch? Pin this tutorial to Pinterest!
I’ve sunk some serious hours into figuring out the best way to make a crochet bag handle that doesn’t stretch. I’ve designed quite a few crochet bags in my time as a designer and have played with different ways to help strengthen the straps so they don’t stretch out. Despite all of this, most of them still have at least some stretch. Ugh.
With a new crochet bag pattern coming out on the blog shortly, I decided to really dive in and test what works best for me and what might work best for you, too. I armed myself with a little too many crafting supplies and got to work.
I began this little crochet science experiment knowing I wanted the resulting technique to be simple. I didn’t want to purchase anything too expensive (I didn’t want you to have to, either!) and I didn’t want to do too much fiddling about when it comes to something as simple as a strap for a crochet bag.
After a few attempts at finding my “perfect” technique for me, I finally found it shoved in the bottom of my massive wood crafting trunk next to paint brushes and ribbon.
DISCLAIMER: This post includes affiliate links. This means, should you decide to purchase a product via one of these links, I will receive a small commission at no extra cost to you. I only recommend products I use and love (Or products I know others love, have heavily researched, know have good ratings and plan to purchase myself). These small commissions help to support this blog and continue keeping most of my patterns free. You can read more on my Privacy Policy, if you prefer.
Fishing line. The Danielson Co. 15 Pound Test Super Clear fishing line to be exact.
I’ve had this spool of fishing line for years. I honestly don’t even know if it’s sold in this specific line anymore. The label on the spool has “copyright 1998” on it. I mean, it’s old.
I’ve always had fishing line in my stash of goods for DIY projects or for random repairs and have gone through a few spools in my lifetime. Having grown up in rural Northern California, I spent a lot of time learning my way around fishing line. It’s a great little item to have for all sorts of reasons but now I’m going to give you another:
It helps create a non-stretchy crochet bag strap!
The great thing about fishing line is it is designed specifically to withstand pounds of pressure (which is what “15 Pound Test” means on the label). You don’t want your hooked fish snapping the line, after all. So logically it makes sense that if you add fishing line to your crochet strap, it will help keep the handle from stretching out.
Fishing line is perfect for this usage for a few reasons:
- It’s designed specifically to be light weight and withstand pressure.
- It’s a thin strand, so crocheting over it won’t cause issues with your tension or bulge your rows out.
- Possibly best of all, it’s clear! Unless someone really gets in there and starts looking for it, they will be none-the-wiser.
How Does Fishing Line Help to Make a Crochet Handle that Doesn’t Stretch?
Before we get to the technique of how to do it, I want to show you how (and a little bit of why) it works. I worked a long strap for my new bag pattern with fishing line included, handed one end to my husband and held the other end myself. We each pulled as hard as we could to see if there was any stretch or movement. The only real movement was my bicep shaking under the pressure of his much stronger one. A successful non-stretchy crochet handle, in my book!
Testing it by playing tug-of-war with my husband wasn’t enough, though. I wanted to actually see the difference side by side and I wanted to show you the difference.
So, I’ve created test swatches in two different methods for crochet science purposes and I’ve tested them against each other using glass prisms as weights. The prisms weigh about 3 ounces each which I felt was a good amount of weight for a small swatch and I had two identical ones, so it worked as a control weight group.
Test 1: Crochet Strap Worked with Long Rows Lengthwise – How Non-Stretchy is the Strap?
For the first test, I crocheted a sample swatch strap “lengthwise”. By this, I mean I worked a longer starting base (foundation stitches or chains) and worked only a few rows. I started with a row of 20 foundation single crochet and then crocheted over 15 pound test clear fishing line for four additional rows. I created a second mini crochet strap with the same number of stitches and rows, but this time with no fishing line. The mini straps both ended up being approximately 4 inches long before any testing with weights began.
Once finished, I placed the crochet straps on my wall at the same starting height, secured them with push pins and hung a prism on the bottom of each.
After about twenty minutes, I checked back on the swatches. The strap that used the fishing line maintained the 4 inch length. The strap that didn’t use the fishing line became two inches longer and ended up being 6 inches!
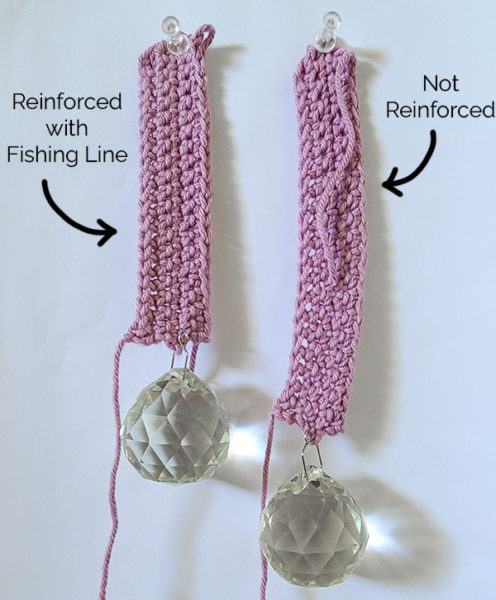
So, why did this work? The crochet handle that was reinforced with fishing line didn’t stretch because it was worked length wise (a long starting base with less rows worked). This kept the fishing line “vertical” to the bag. By working lengthwise, all the pressure of the weight is resting on the long vertical lines and the weight is pulling down vertically with the fishing line. The fishing line stops the stitches from stretching out any further than the fishing line is long.
A little more simply put – the strap maintained its length simply because the fishing line did not allow the stitches to become stretched out. Think of this if you were to hang those glass prisms on just the fishing line. That fishing line isn’t going anywhere and neither is the prism.
Test 2 – Crochet Strap Worked Row by Row – How Non-Stretchy is the Strap?
For the second test, I worked two swatches of 5 stitches wide by 9 rows tall to mimic a strap in which you would work rows and rows and rows of a small amount of stitches to achieve your strap length. For the swatch with reinforcement, I started with a row of foundation single crochet and then crocheted over the same fishing line for 8 additional rows. The swatches both ended up being approximately 2 inches long.
Using the same method as before, I hung the straps on the wall and checked back after twenty minutes. The strap that used the fishing line became about a quarter of an inch longer, so it ended up 2.25 inches. The strap that didn’t use the fishing line became an inch longer, so it stretched to 3 inches!
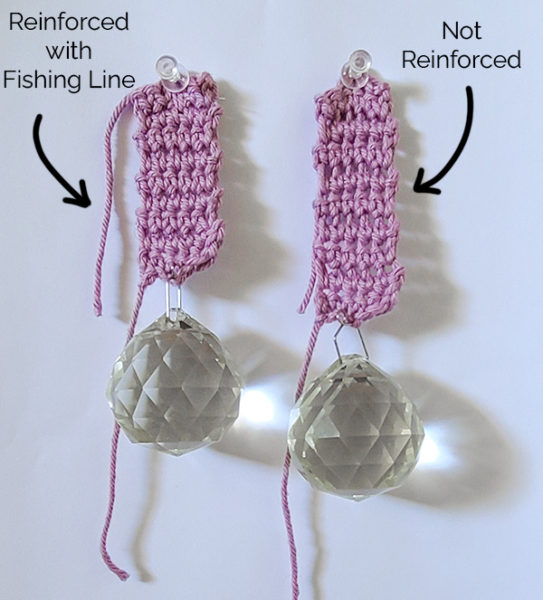
So, this kind of worked. A crochet strap stretching by a quarter of an inch isn’t too bad but it did still stretch. What was the difference?
In the results of this test, we did see the strap with the fishing line get a little longer. While it didn’t stretch by too much, it is important to look at why it stretched when the first test didn’t.
In this case, the crochet strap was still reinforced by the fishing line but instead of the fishing line being vertical, it was horizontal. This means that instead of weighing on long strands that won’t stretch, the weight was pulling down on horizontal lines which will have some give. Considering that the fishing line was worked in a zig-zag pattern up the rows, it makes sense that this zig-zag would open up and yield to the weight put on it.
A more simple description – Think of these horizontal lines like a Slinky. If you set a Slinky on a table and pull at the top ring, you’ll see the coil yield to your hand pulling and it would start to open up. That’s basically what happened here.
Conclusion to our mini crochet science experiment: The fishing line helped in both tests, however, the fishing line helped the most to create a non-stretchy crochet strap when worked lengthwise with long rows of stitches versus worked rows and rows of less stitches.
In fact, the fishing line kept the crochet strap approximately the same length as it was at the start of the test. This is because the weight is essentially hanging on a long line and that long line isn’t budging. Will it budge eventually? Maybe, but considering it seems I’ve had the fishing line I used in this test since 1998 and it’s still going strong, I’m more likely to believe the yarn would go before the fishing line would.
I generally prefer to work straps lengthwise anyway, so I am pleased with the results of the test. Would I still use fishing line to help short row straps stay non-stretchy? You bet.
I will likely in the future go back through all of my crochet bag patterns and update them to include this information.
So, how do you make a non-stretchy crochet strap using fishing line?
While the process of crocheting over fishing line is fairly straight forward, I wanted to include a lot of pictures and information in case you haven’t carried yarn while crocheting before. I’ll also be showing you how to secure both ends of the fishing line within your work, so you don’t have to worry about tying knots or doing anything too fancy.
If you’re familiar with carrying yarn (like when working tapestry crochet, for example), you’ll glide right through this tutorial.
Before we start, an important note: Fishing line is a totally different feel than yarn and is a very strong material. The material can cut you if you try to be super forceful with it. Do not wrap it around your fingers and pull hard to get it tight. You should not have to pull very hard at all. You shouldn’t have any issues gently pulling the fishing line when pinched between fingers, especially because we don’t need it to be extremely tight anyway. However, if you have any doubt, I would recommend a little pair of jewelry pliers to help pinch and pull the fishing line around easily.
Make sure to cut the fishing line with scissors that you don’t use specifically for yarn so that you don’t dull the blades. Nail clippers work well for clipping fishing line, too.
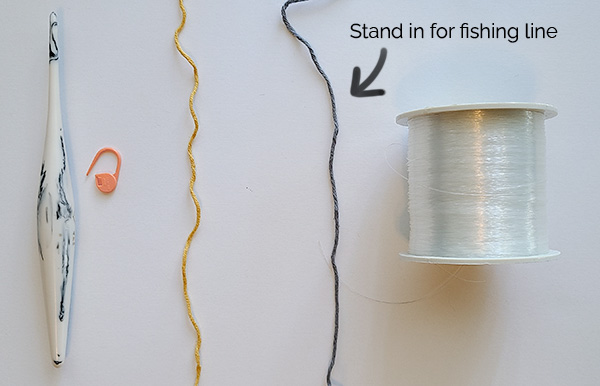
To follow along, you’ll need yarn, a corresponding hook, at least one stitch marker and some fishing line. I would recommend at least 15 Pound Test Clear fishing line, if not heavier (higher pound number = heavier weight, just like with yarn). Stren 15 Pound Test fishing line is one I’ve used before for actual fishing and would recommend.
Because we are using clear fishing line, I’m going to be using a strand of grey yarn to “stand in” for the fishing line so that what I’m doing is actually apparent. Please keep in mind throughout this that you’ll want to use fishing line in place of the grey strand.
Let’s get started!
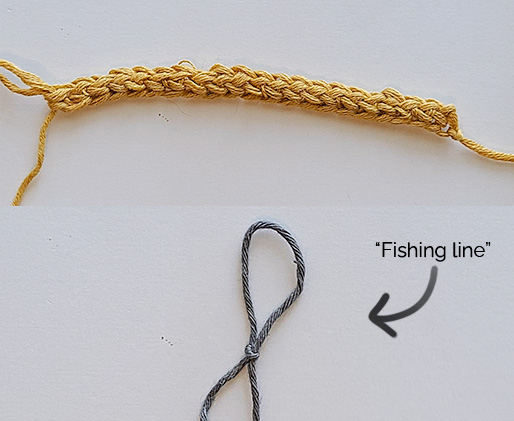
To get started, you’ll want to either chain the amount you need and put a single crochet in each chain across (like you would normally) or foundation single crochet the amount of stitches you prefer. For the purposes of this tutorial, I’ve worked 20 foundation single crochet. Set your row of single crochets aside and create a slip knot with your fishing line.

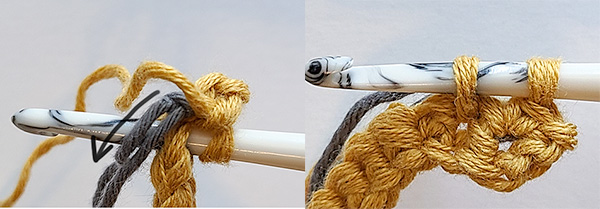
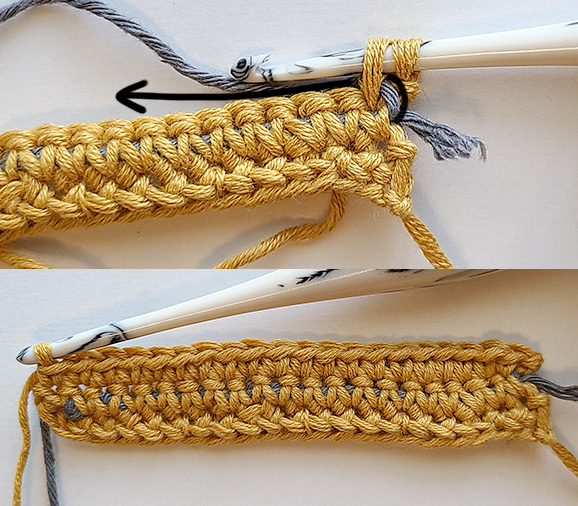
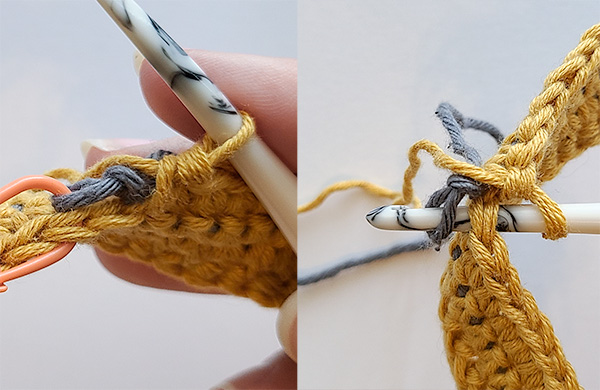
Now, pick up your row of single crochets, chain 1 and turn your work to begin your next row. Insert your hook into the first single crochet as you normally would to start your next stitch. Before you yarn over to finish your stitch, put the fishing line’s slip knot on your hook and tighten as needed. You’ll see two arrows in the picture above to the right. These are pointing at the “fishing line” slip knot and the top of the first single crochet.
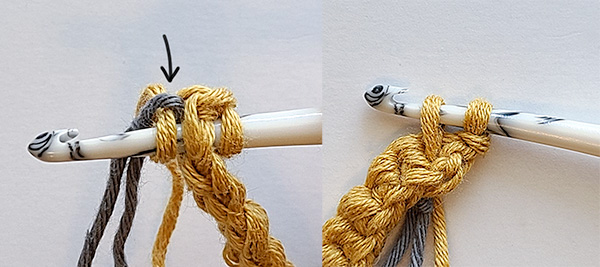
Yarn over and pull a loop through the slip knot and then through the stitch. Do not pull the slip knot with your yarn over. If worked correctly, you should see the slip knot hanging on the yarn you pulled through. The slip knot should not be on your hook or pulled through the stitch.
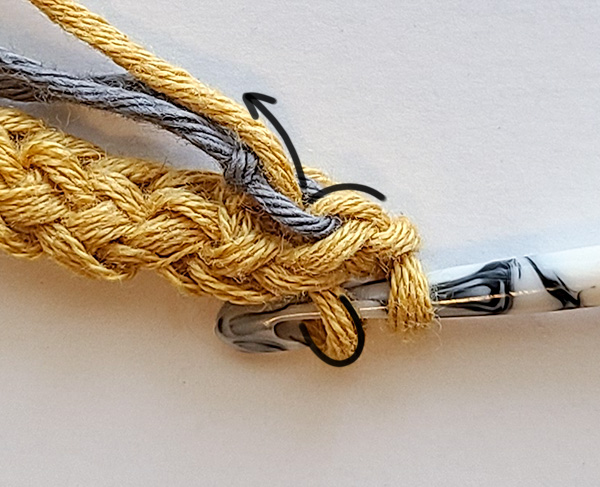
In this image, I’ve drawn an arrow so you can see how your yarn should go through the slip knot of the fishing line to secure it onto your work.
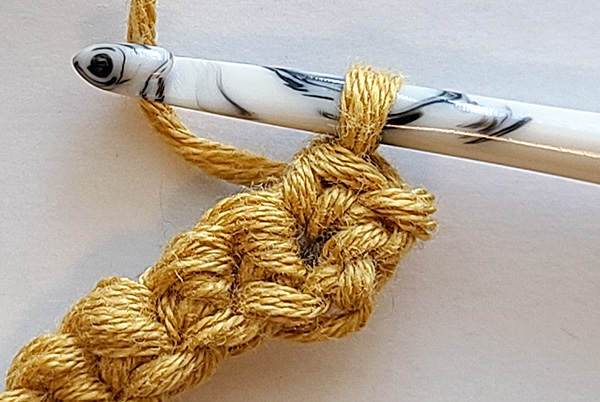
Finish your single crochet as normal. You can see in the image above that the grey yarn “fishing line” doesn’t show whatsoever. It won’t show with clear fishing line, either.
Continue working across the row placing a single crochet in each stitch across. When working your stitches, make sure the fishing line goes over your hook and lays along the top of the stitches. The line should not be pulled up with your yarn over, pull through. It should simply lay flat along the top of your stitches. You can crochet over both ends of the fishing line until your short tail is weaved in.
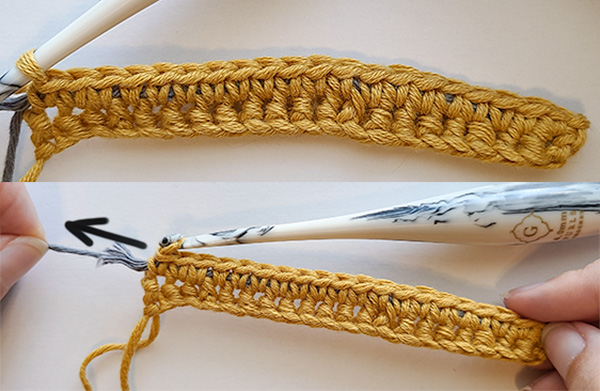
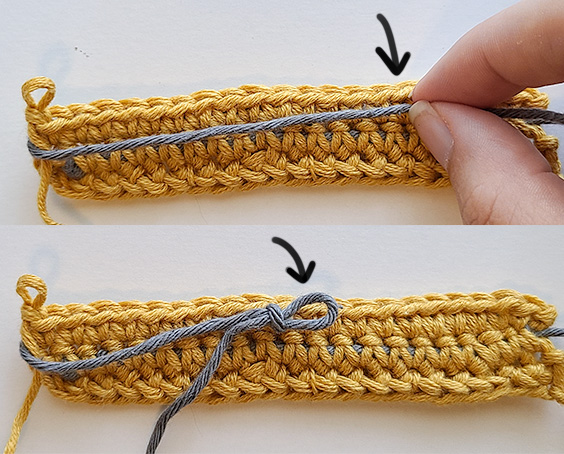
Once you’ve worked your way across the row, you will want to gently pull on the fishing line to make sure that it is laying flat. This is what makes our crochet strap non-stretchy, so we don’t want any of the line sticking out wonky.
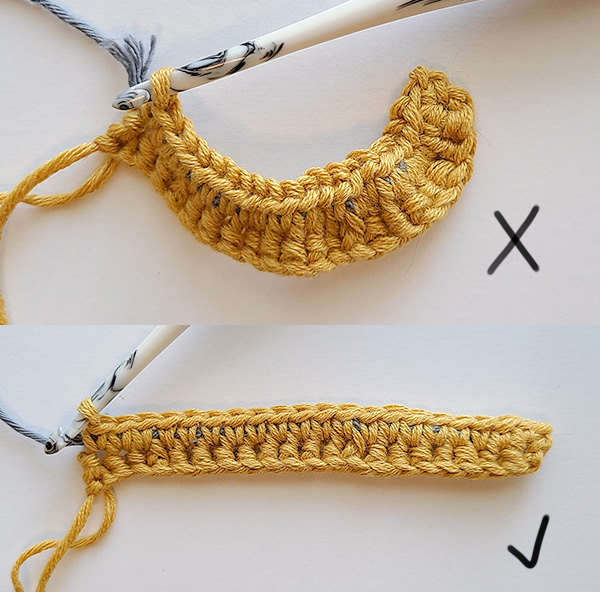
Be sure not to pull on the fishing line so much that it warps your work. We want non-stretchy crochet straps, not wonky ones. If your work looks like the top image, take a second to smooth the stitches back out and give the fishing line some slack. When your work looks like the bottom image, you’re set to move on to the next row.
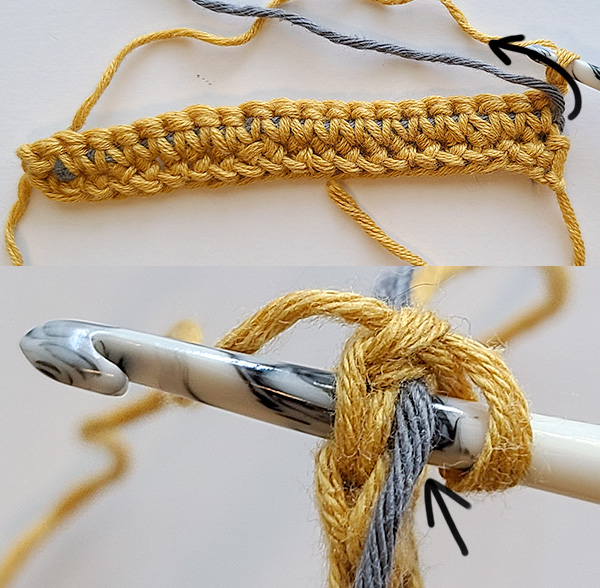
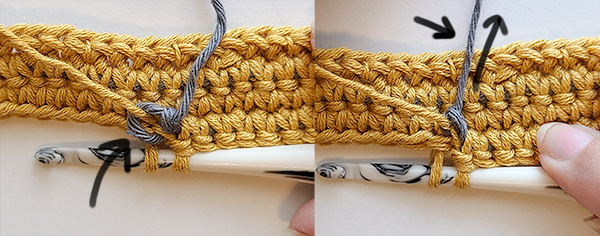
To begin the next row and all further rows you’d like to work, simply fold the fishing line up and over the last stitch in preparation to carry it once more like in the top image above. When you insert your hook into the first stitch, make sure that your fishing line is over your hook as well, like my grey “stand in” yarn is in the second picture.
Continue working across the row just as we did before, making sure to carry the fishing line through all of the stitches. Work as many rows as preferred for your non-stretchy crochet strap. Make sure to pull the fishing line tight like we did in the first row so you don’t have anything sticking out.
Now, to securely finish off the fishing line! Let’s assume that the next row we work will be our final row.
To finish off the non-stretchy crochet strap and secure the fishing line, we are going to make another slip knot. This one might take a tiny bit of fiddling to get right because it needs to be at a specific length.
We want our finishing slip knot to be just about 3/4ths of the way across the row. This length is give or take, it doesn’t need to be perfect. We want it to be about 3/4ths of the way across because we want to secure the slip knot to the work as we did in the first row and we need to crochet over the tail a bit to make sure it is secure, too.
So, lay your fishing line over your work as in the top picture above. Try to keep this fairly tight so that you don’t end up with too much length after working across a bit. When in doubt, it’s better to go shorter than longer. Once you’ve discovered the required length, create a slip knot like in the second picture.
Keep in mind: The slip knot size can effect how far down your row the secure placement will be. A larger slip knot will be further away, a smaller slip knot will be closer. In general, I try to work with a tighter slip knot so I don’t end up with a line longer than the row of stitches. That would make our crochet strap not as non-stretchy, after all.
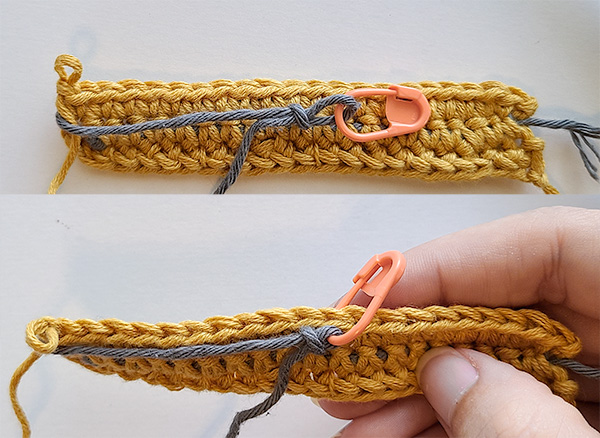
Once you have your slip knot created, use a stitch marker to secure it to the stitch that holds it fairly tight but not so tight that it makes your work curl. This will both make sure the slip knot does not come undone while working this last row and keep it nice and small so you don’t have extra slack.
Work across the row as we have before, making sure to enclose the fishing line within the stitches. When you’re right up against your slip knot, make sure to pull the fishing line tight as we did previously (not so tight it warps the work). In the picture above, you can see a loop of grey yarn sticking out just a little bit on the right. When pulled tight, that grey yarn (and your fishing line) will not show.
When you’ve reached the fishing line slip knot, it’s time to secure it as we did the first one. Insert your hook into the stitch and then into the slip knot.
Your slip knot may be closer or further away than where you secured it with a stitch marker. It doesn’t matter if this changes, it was an approximate guess and really only held the fishing line in place.

Yarn over and pull through both the slip knot and the stitch. The slip knot should not be pulled up with the stitch but instead should be securely captured by your yarn over pull through.
Before finishing your single crochet, make sure the fishing line slip knot isn’t huge. If it has a lot of room to it, it can make it so your crochet strap stretches a little more than desired as the line settles and allows the stitches to stretch. To do this, grab the tail that is still hanging out and gently pull until the slip knot is tight. Then, finish your single crochet as normal.

Continue working your single crochets across the row to the end. Continue crocheting over the end of the fishing line to secure what will be the “tail” down.
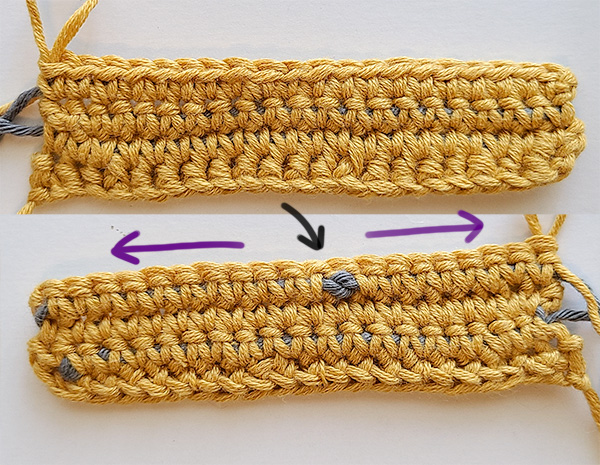
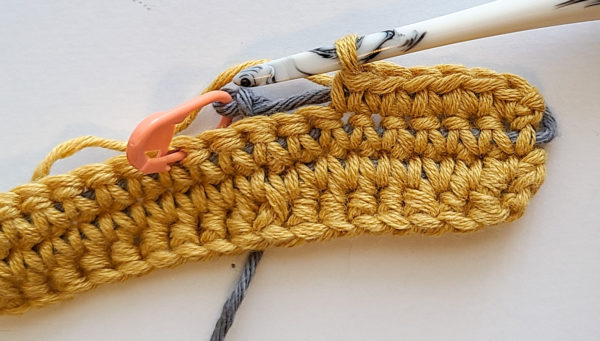
Now with your final row finished, you have a non-stretchy crochet strap! In the image above, you can see where I’ve pointed out the final, securing slip knot. When using fishing line, that slip knot is much smaller and clear, so it is not noticeable whatsoever. The purple arrows show how the fishing line is pulled in both directions, keeping the slip knot tight and secure. I like to weave the tail end of the fishing line in through a few stitches just as you would an end on any crochet project to make sure it’s extra secure.
You could even tie the fishing line to the body of the bag, if you really wanted to secure it.
You Now Have a Non-Stretchy Crochet Strap!
Pat yourself on the back! You’ve learned a new skill that will help your crochet bags last even longer. How exciting! This technique shouldn’t add too much work to your project and will help keep your crochet handles for anything nice and strong.
Personally, I think the best thing about using fishing line to make sure your crochet strap is non-stretchy is that it doesn’t add a whole lot of fiddling about with your project. You won’t have to make extra pieces or do anything fancy. Just make sure the fishing line follows along with each stitch and you’re all set to go.
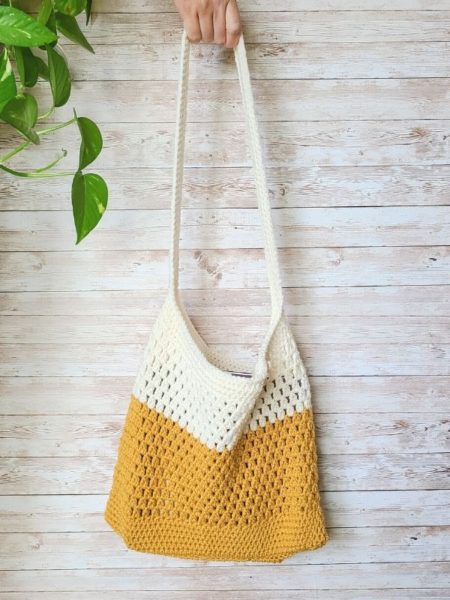
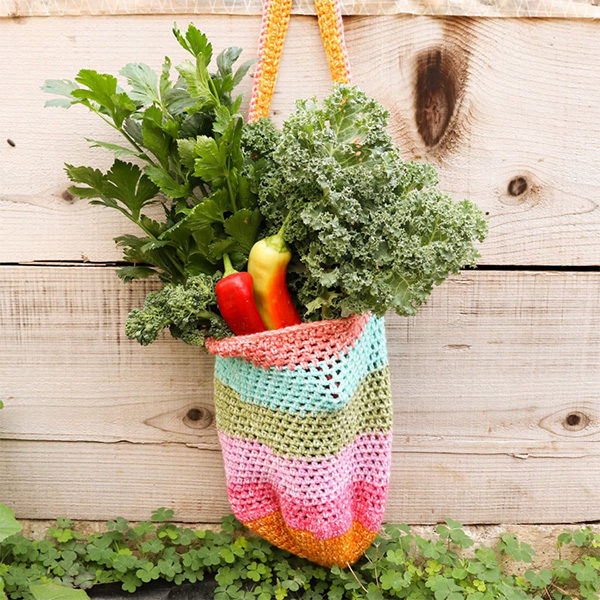
Looking for some bags to try your new skill on? You could use this technique to help the crochet handles stay sturdy on either of these bags. Click the image to head to the free pattern!
Don’t forget to join my Facebook Group so we can chat all about your creations! We are a group for crocheters of all experiences, all interests and love to hang out together. Come join the fun!
Thanks so much for hanging out with me today. Enjoy!

Shannon | Designer & Editor
Shannon helps crocheters find their next project and build their skills with in depth tutorials and crochet patterns on her blog, theloopholefox.com.
With more than a decade of crochet experience, Shannon knows that understanding why we do something matters just as much as how we do it. She teaches new techniques and crochet stitches in depth so you can crochet with confidence.
If you loved this tutorial, why not check out my other Tips and Techniques?
Used nylon guitar strings ought to work too, with the added benefit of already having been stretched to the limit.
I never would have thought of that! I’ve never really had much to do with guitar strings so I don’t think I ever would have. What a clever idea!
Awesome! Love this and all the photos make it so clear on how to do this right!
I’m so glad you liked it and found all the pictures helpful! 🙂
That is awesome! Stretchy straps are why I don’t do bags. Well, I USED to not due bags. Thanks yet again form your ingenious ideas and understandable explanations!
Thank you! I’m so glad you enjoyed this post and that you’ve found it helpful! 🙂
This is what I read crochet blogs for: down-to-earth, practical tips from one crocheter to another, backed by experience — and experiments! Thanks you for your time and for your enquiring mind.
Oh my gosh, thank you so much for your kind comment! I’m so glad you found the information useful and the experiment interesting! 🙂
This is a great idea! I’ll definitely try it on the next bag I make.
Thank you! Let me know how it goes! 🙂