Free Crochet Bobble Sheep Pattern
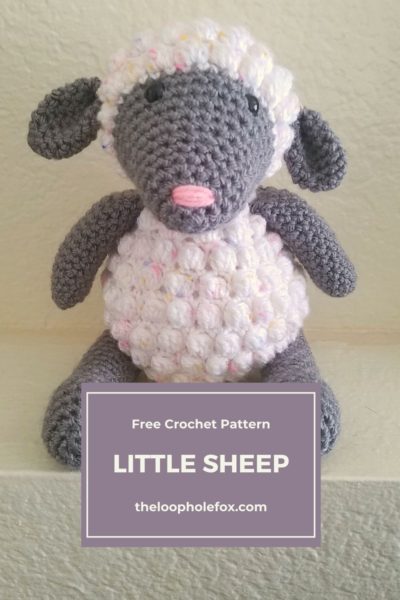
This adorable textured sheep is so fun and cozy to create. This free crochet bobble sheep pattern will walk you through how to make a little sheep friend of your own. I love the use of the bobble stitch to create a texture for his fur and, if you’ve followed me at all anywhere, you know I love my amigurumi toy patterns to be fat and happy. This guy sure is both of them.
Free Crochet Bobble Sheep Pattern
Some of my favorite amigurumi toy patterns are of animals we see every day and I needed a sheep of my own. My sister has been hounding me to crochet a sheep for her for what seems like forever, so I felt there was no better time to create this free crochet bobble sheep pattern than now.
DISCLAIMER: This post includes affiliate links. This means, should you decide to purchase a product via one of these links, I will receive a small commission at no extra cost to you. I only recommend products I use and love (Or products I know others love, have heavily researched, know have good ratings and plan to purchase myself). These small commissions help to support this blog and continue keeping most of my patterns free. You can read more on my Privacy Policy, if you prefer.
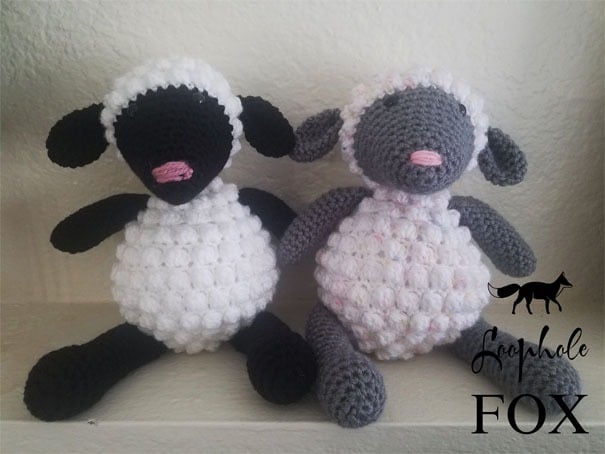
This free crochet bobble sheep pattern is so fun because of it’s ability to, of course, be any color! I’ll be working up a purple and yellow sheep for said sister and have been eyeballing my yarn stash for all the groovy sheep I can make in the future. Why did I say groovy? I never say that word.
Let’s get to this amigurumi toy pattern.
How Do You Crochet a Sheep?
There are many different ways to crochet a sheep, so you have to ask yourself what your end goal is. If you’re looking for an amigurumi sheep, look no further – this free crochet bobble sheep pattern has you covered. If you’re interested in other types of sheep patterns, such as blankets or appliques, you can find any free crochet sheep pattern your heart desires on allfreecrochet.com.
SKILL LEVEL
Intermediate – You will need to know how to work in rounds.
MATERIALS & TOOLS
Yarn
I Love This Yarn Pastels Tweed
This is the white on the white and grey sheep, it has flecks of pink, blue and yellow and I absolutely love it.
~Less than one skein.
Medium (4) Weight
Paintbox
Slate Grey
~Less than one skein.
Medium (4) weight
Safety Eyes
I used 10mm all black eyes
For the nose, I used small amounts of pink left over from my Rose Blanket.
Red Heart With Love Super Saver
Cameo
Standard stuffing.
However, whatever colors you decide is what’s important! As long as your yarn is a medium (4) weight, you’ll be fine.
Tools
5.5 MM Hook
Scissors
Stitch Markers (if you find them necessary – I used them for parts of this pattern)
Tapestry Needle
Sewing pins (for pinning before sewing)
GAUGE
Gauge is not incredibly important for this pattern, however, you will want to use a hook small enough that your stitches stay tight and solid. Otherwise, the stuffing of your pattern will show through your stitches.
FINISHED SIZE
The sheep is approximately 8.5 inches tall sitting and 11 inches tall standing.
ABBREVIATIONS
This pattern is worked in US terms.
- ch – chain
- sc – single crochet
- mr – magic ring
- inc – increase (2 sc in one st)
- dec – decrease (insert hook, yarn over, pull through. 2 loops on hook. Insert hook into next st, yarn over, pull through. Yarn over, pull through all three loops.
- bobble – bobble stitch. The full stitch is explained below under “Special Stitch”
- st – stitch
- sl st – slip st
- * * – repeat instructions inside
- R# – round and round number
- FO – fasten off
NOTES
- Rounds are worked continuously unless otherwise noted.
- If you’re unfamiliar with the magic circle (magic ring) and would like to learn, you can check out my tutorial here. Otherwise, you can certainly start in chains.
SPECIAL STITCHES – The Bobble Stitch
To crochet a bobble stitch, you will be crocheting 4 double crochet together. You will: *Yarn over, insert hook into stitch and pull up loop. Yarn over, pull through two. You will have two loops on hook* Repeat inside three more times in the SAME stitch. You will have a total of five loops on hook. Yarn over, pull through all five.
How to Make this Bobble Stitch Crochet Sheep
FACE AND HEAD
With Grey:
R1 – In MR, place 6 sc (6)
R2 – *Inc first st, 1 sc next* Rpt 3x (9)
R3 – *Inc first st, 1 sc next 2 sts* Rpt 3x (12)
R4 – *Inc first st, 1 sc next 3 sts* Rpt 3x (15)
R5 – *Inc first st, 1 sc next 4 sts* Rpt 3x (18)
R6 – 1 sc each st (18)
R7 – 1 sc each st (18)
R8 – *Inc first st, 1 sc next 5 sts* Rpt 3x (21)
R9 – *Inc first st, 1 sc next 6 sts* Rpt 3x (24)
R10 – *Inc first st, 1 sc next 7 sts* Rpt 3x (27)
Fasten safety eyes between R10 and 11.
R11 – * Inc first st, 1 sc next 8 sts * Rpt 3x (30)
R12 – 1 sc each st (30)
R13 – *Inc first st, 1 sc next 9 sts * Rpt 3x (33). Sl st to close, FO. Join white in any st.
R14 – *Inc first st, 1 sc next 10 sts * Rpt 3x (36). Sl st to close.
R15 – Ch 1, *sc first st, bobble next st * Rpt 18x (36) [You will end on a bobble st]. Sl st to first sc to close.
R16 – Ch 1, 1 sc each st around (36). Sl st to close.
R17 – Ch 1, *sc first st, bobble next st * Rpt 18x (36) [You will end on a bobble st]. Sl st to first sc to close.
R18 – Ch 1, *1 sc next 4 sts, dec * Rpt 6x (30) Sl st to close.
R19 – Ch 1, *sc first st, bobble next st * Rpt 15x (30) [You will end on a bobble st]. Sl st to first sc to close.
R20 – Ch 1, *1 sc next 3 sts, dec * Rpt 6x (24) Sl st to close.
R21 – Ch 1, *sc first st, bobble next st * Rpt 12x (24) [You will end on a bobble st]. Sl st to first sc to close.
R22 – Ch 1, *1 sc next 2 st, dec * Rpt 6x (18) Sl st to close.
R23 – Ch 1, *sc first st, bobble next st * Rpt 9x (18) [You will end on a bobble st]. Sl st to first sc to close.
R24 – Ch 1, dec 9x (9) Sl st to close.
R25 – Ch 1, dec, bobble, dec, bobble, dec, sc. sl st to close and FO. Weave in ends.
(R25 can get fiddley because it is so tight BUT, is worth it to keep the bobble st looking organic at the back of the head).
BODY
With white
R1 – In MR, place 6 sc (6) Sl st to close.
R2 – Ch 1, 1 sc and 1 bobble in each st (12) Sl st to close.
R3 – Ch 1, inc each st around (24) Sl st to close.
R4 – Ch 1, *1 sc next st, 1 bobble next st * Rpt 12x (24) [You will end on a bobble st]. Sl st to first sc to close.
R5 – Ch 1, 1 sc each st around (24) Sl st to close.
R6 – Ch 1, *1 sc next st, 1 bobble next st* Rpt 12x (24) [You will end on a bobble st]. Sl st to first sc to close.
R7 – Ch 1, *1 sc first st, inc next * Rpt 12x (36) Sl st to close.
R8 – Ch 1, *1 sc next st, 1 bobble next st* Rpt 18x (36) [You will end on a bobble st]. Sl st to first sc to close.
R9 – Ch 1, *1 sc two st, inc next * Rpt 12x (48) Sl st to close.
R10- Ch 1, *1 sc next st, 1 bobble next st * Rpt 24x (48) [You will end on a bobble st]. Sl st to first sc to close.
R11 – Ch 1, 1 sc each st (48) Sl st to close.
R12 – Ch 1, *1 sc next st, 1 bobble next st * Rpt 24x (48) [You will end on a bobble st]. Sl st to first sc to close.
R13 – Ch 1, 1 sc each st (48) Sl st to close.
R14 – Ch 1, *1 sc next st, 1 bobble next st* Rpt 24x (48) [You will end on a bobble st]. Sl st to first sc to close.
R15 – Ch 1, *1 sc next 2 st, dec * Rpt 12x (36) Sl st to close.
R16 – Ch 1, *1 sc next st, 1 bobble next st * Rpt 18x (36) [You will end on a bobble st]. Sl st to first sc to close.
R17 – Ch 1, 1 sc each st (36) Sl st to close.
R18 – Ch 1, *1 sc next st, 1 bobble next st * Rpt 18x (36) [You will end on a bobble st]. Sl st to first sc to close.
R19 – Ch 1, *1 sc next st, dec * Rpt 12x (24) Sl st to close.
R20 – Ch 1, *1 sc next st, 1 bobble next st * Rpt 12x (24) [You will end on a bobble st]. Sl st to first sc to close.
R21 – Ch 1, 1 sc each st (24) Sl st to close.
R22 – Ch 1, *1 sc next st, 1 bobble next st * Rpt 12x (24) [You will end on a bobble st]. Sl st to first sc to close.
R23 – Ch 1, dec 12x around (12) Sl st to close.
STUFF FIRMLY.
R24 – Ch 1, *1 sc next st, 1 bobble next st * Rpt 6x (12) [You will end on a bobble st]. Sl st to first sc to close.
R25 – Ch 1, dec 6x (6) Sl st to close.
R26 – Ch 1, 1 sc next 3 st, bobble 4th st. 1 sc next 2 st. Sl st to close, FO and leave tail for attaching.
LEGS 2x
With grey
R1 – In MR, place 6 sc (6)
R2 – Inc each st (12)
R3 – *1 sc, inc * Rpt 6x (18)
R4 through 6 – 1 sc each st (18)
R7 – *1 sc, dec* Rpt 6x (12)
R8 through 18 – 1 sc each (12)
STUFF
Row 9 – Ch 1, fold the two edges together to mimic one flat piece. Place 1 sc through both st of either side down to close. You should have 6 scs. FO and leave tail for attaching.
ARMS 2x
With grey
R1 – In MR, place 6 sc (6)
R2 – Inc each st (12)
R3 through 15 – 1 sc each st (12)
STUFF, but not firmly so they are a bit floppy.
Row 16 – Ch 1, fold the two edges together to mimic one flat piece. Place 1 sc through both st of either side down to close. You should have 6 scs. FO and leave tail for attaching.
EARS 2x
With grey
R1 – In MR, place 6 sc (6)
R2 – *Inc, 1 sc next 2 st* Rpt 2x (8)
R3 – *Inc, 1 sc next 3 st* Rpt 2x (10)
R4 – *Inc, 1 sc next 4 st * Rpt 2x (12)
R5 through 8 – 1 sc each st (12)
R9 – Ch 1, fold the two edges together to mimic one flat piece. Place 1 sc through both st of either side down to close. You should have 6 scs. Sl st to first sc of row to pinch. FO and leave tail for attaching. Use tapestry needle to place a few stitches around the pinch to secure.
TAIL
With grey
Ch 6
R1 – sc 2nd ch from hook and place 1 sc in next 3 st. Place 3 sc in last st. Turn so you are working on the opposite side, and place 1 sc in each st down (4 sts). Sl st to very first sc. FO and leave tail for weaving.
ASSEMBLY
To finish off this free crochet bobble sheep pattern, all we have to do is assemble.
Sew head to body securely with tapestry needle. Use small amount of pink yarn to sew nose (I placed the nose slightly above the point of the face and stitched around 4x.
Pin and sew ears to head between rows 15 and 17 (2nd and 3rd row of bobbles after face) (or wherever they look best).
Pin and sew arms to body between rows 21 and 22 (or wherever they look best).
Pin and sew legs equal distances apart on bottom.
Sew tail on backside.

And there ya have it! I hope you enjoy creating this amigurumi sheep from this free crochet bobble sheep pattern as much as I enjoyed designing him.
One of my greatest joys is seeing your finished crochet projects from my patterns or tutorials, so when you post to Instagram, don’t forget to tag me so I can show you some love! I’m @theloopholefoxcrochet. You can also share pictures on my recent posts on Facebook or within my Facebook group!
And don’t forget to pin this to your Pinterest boards, so you can remember it for later!
Don’t forget to join my Facebook Group so we can chat all about your creations! We are a group for crocheters of all experiences, all interests and love to hang out together. Come join the fun!

Shannon | Designer & Editor
Shannon helps crocheters find their next project and build their skills with in depth tutorials and crochet patterns on her blog, theloopholefox.com.
With more than a decade of crochet experience, Shannon knows that understanding why we do something matters just as much as how we do it. She teaches new techniques and crochet stitches in depth so you can crochet with confidence.