
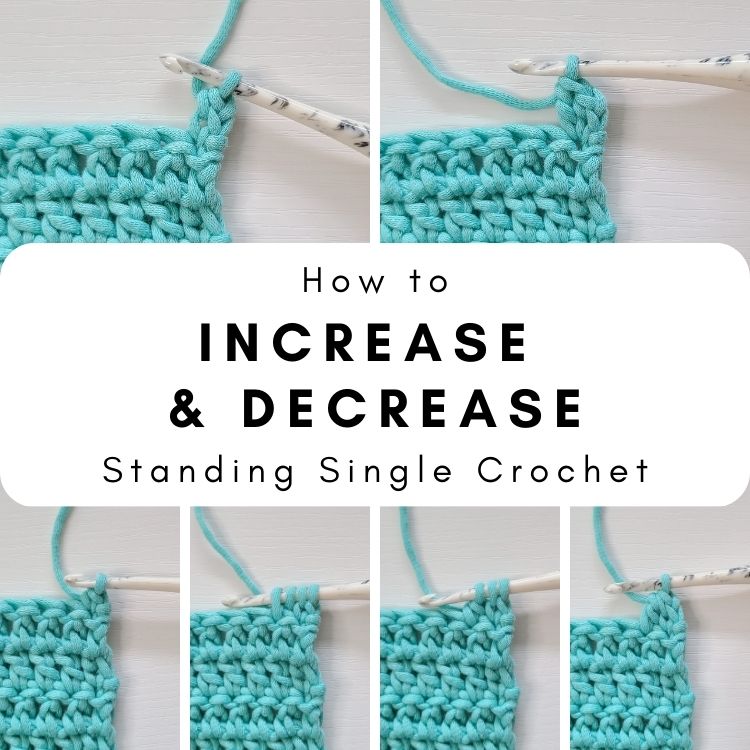
How to Increase or Decrease using Stacked Single Crochet
If you’ve learned how to use the Stacked Single Crochet technique to start your rows without turning chains to help the sides of your work stay straight, you might be wondering if you can Increase or Decrease the start of the row after using this technique. The good news is you totally can! And neither Increasing or Decreasing with the STsc are different from how we would normally increase or decrease.
In this tutorial, we’ll go over how to increase or decrease your work after starting with a Stacked Double Crochet. For decreasing, we’ll go over both dc2tog (double crochet 2 together) and dc3tog (double crochet 3 together). If you haven’t learned the Stacked Single Crochet yet, I recommend checking out my photo tutorial for the technique before following this one.
Since the Stacked Single Crochet helps to keep your edges straight with taller stitches, like the double crochet, it makes sense that we would need ways to either increase or decrease with them. Patterns often use increasing or decreasing to shape the pattern.
So are you supposed to start with chains for those specific instances? You don’t have to! You can both increase and decrease after starting your row with a stacked single crochet and I’ll show you how in this tutorial.
Increasing is straightforward and easy. Decreasing is a little more advanced but really isn’t difficult.
How to Increase and Decrease the Stacked Single Crochet
This tutorial will show you step-by-step how to work these techniques with photos along the way. There will be highlights and arrows to help identify the steps as clearly as possible.
If you don’t already know how to create a Stacked Single Crochet, I highly recommend starting with my photo tutorial for the technique. Starting this tutorial without knowing how to work a Stacked Single Crochet won’t make sense.
DISCLAIMER: This post includes affiliate links. This means, should you decide to purchase a product via one of these links, I will receive a small commission at no extra cost to you. I only recommend products I use and love (Or products I know others love, have heavily researched, know have good ratings and plan to purchase myself). These small commissions help to support this blog and continue keeping most of my patterns free. You can read more on my Privacy Policy, if you prefer.
YARN AND HOOK USED IN THIS TUTORIAL
To practice these techniques, you can use any yarn you like! Choose a hook size that corresponds with the yarn weight you’re using and you’re good to go.
In my tutorial photos, I’m using Bernat Maker Home Dec in colorway Aqua and my Furls Streamline 6.5 mm (K).
How to Increase using Stacked Single Crochet (Double Crochet Height)
Increasing is a very common technique used in crochet. When increasing, we work 2 (or more) stitches into 1 stitch to bring up the stitch count. This shapes the work in a lot of different ways but is most commonly seen when working circles in the round, as the stitch count needs to increase so that the circle shape remains.
Increasing into the same stitch as a Stacked Single Crochet is the same as increasing after using chains to start your row.
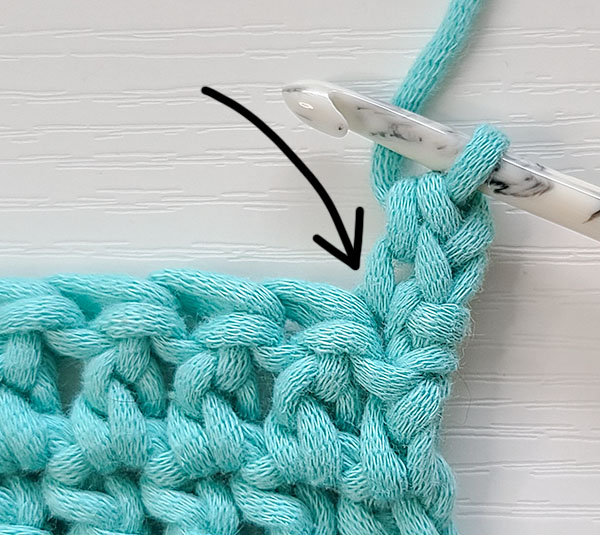
To increase after starting your row with a Stacked Single Crochet, all you have to do is place your next stitch in the same stitch you worked the first Single Crochet of the stack in.
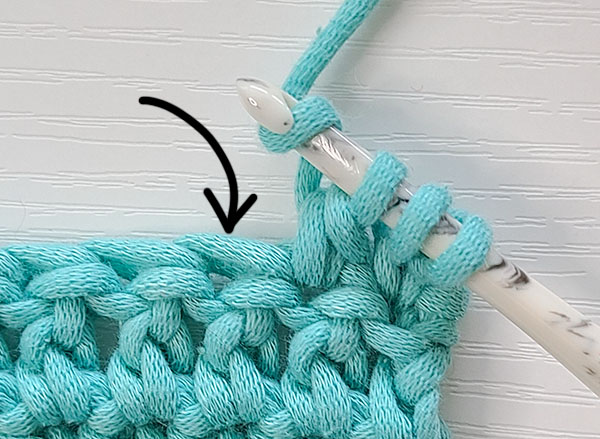
In this image, you can see I have created my Stacked Single Crochet.
An arrow points downward at the stitch it is worked into. This is where we would place a double crochet to increase the work from 1 stitch to 2.
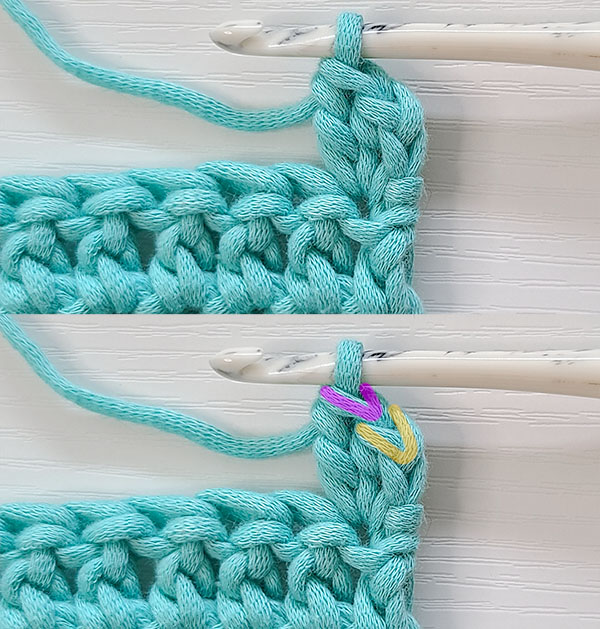
The two pictures in this image are the same, but I’ve used a highlights for clarity.
Now we have 2 stitches in the first stitch, which will have increased the work.
In the bottom image, I’ve highlighted the top of the Stacked Single Crochet in yellow and the top of the double crochet in pink to clearly show the 2 stitches and how they sit.
How to Decrease using Stacked Single Crochet (Double Crochet Height)
“Decreasing” is a very common technique used in crochet. When decreasing, we reduce 2 (or more) stitches into 1 stitch to bring down the stitch count by working the stitch halfway into multiple stitches.
Decreasing across several stitches is very similar to a normal dc2tog (double crochet 2 together) or dc3tog (double crochet 3 together), it’s just the first stitch that is a little different.
Don’t worry! We’re going to go through both the dc2tog and dc3tog using a Stacked Single Crochet with pictures.
DC2TOG using Stacked Single Crochet
Begin by working through the first steps of a Stacked Single Crochet.
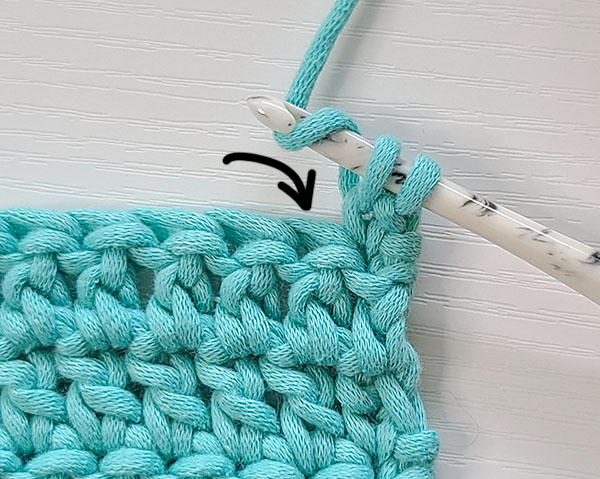
Turn your work but do not chain. Place 1 single crochet into the first stitch.
Now, just like with a STsc, locate the left leg (right leg, if you’re left handed) of the Single Crochet. In this image, the leg is highlighted yellow.
Insert your hook into the leg of the Single Crochet, yarn over and pull up a loop. You will have 2 loops on hook. The bottom picture in this image shows these steps completed.
This is exactly like starting to stack single crochets to reach the double crochet height
Now, instead of yarning over and pulling through the 2 loops on the hook to finish the Stacked Double Crochet, we will instead yarn over and insert our hook into the next stitch.
Then, yarn over and pull up a loop.
This is the same as if we were going to make a dc2tog without the Stacked Single Crochet.
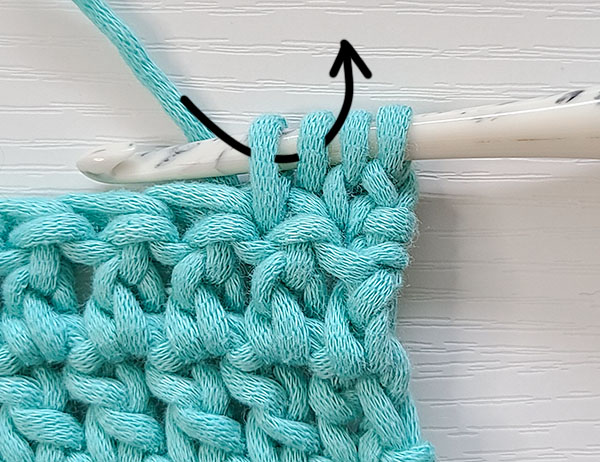
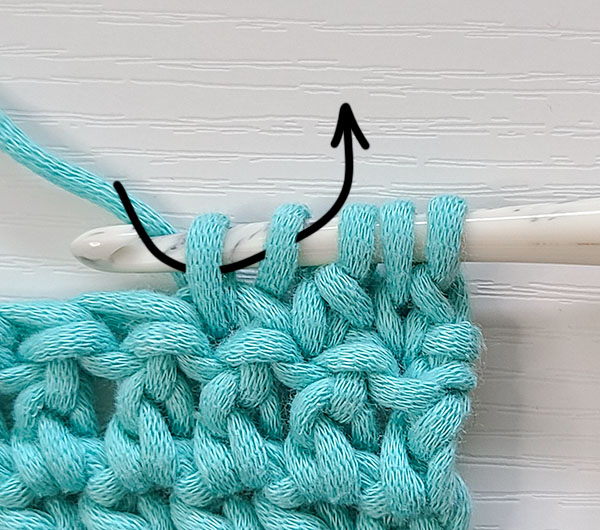
You will now have 4 loops on your hook.
Yarn over and pull through the first 2 loops as the arrow in the image indicates. This completes the second “half” of a double crochet of the dc2tog.
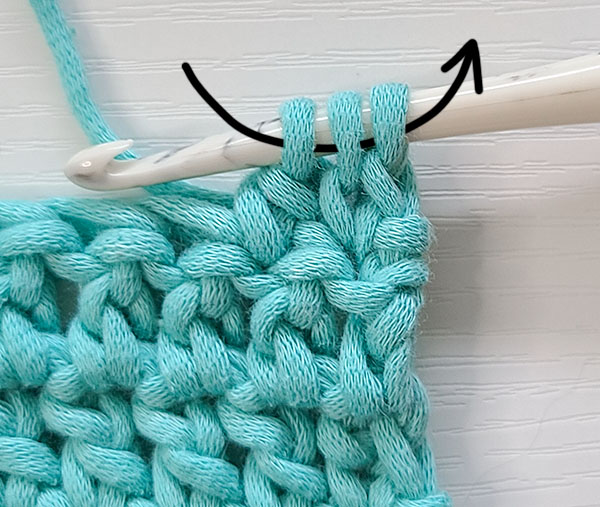
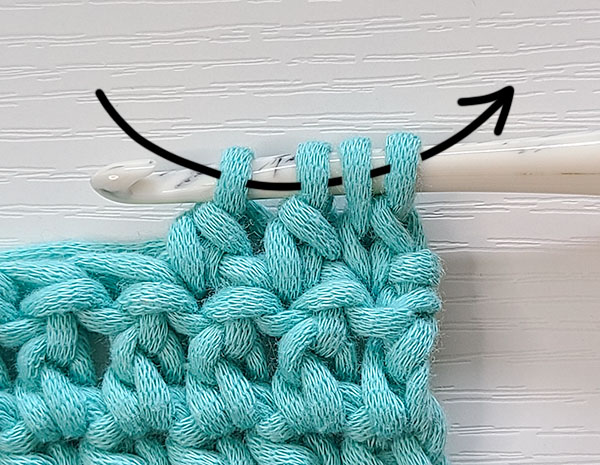
You will now have 3 loops on your hook.
Yarn over and pull through all 3 loops as the arrow in the image indicates.
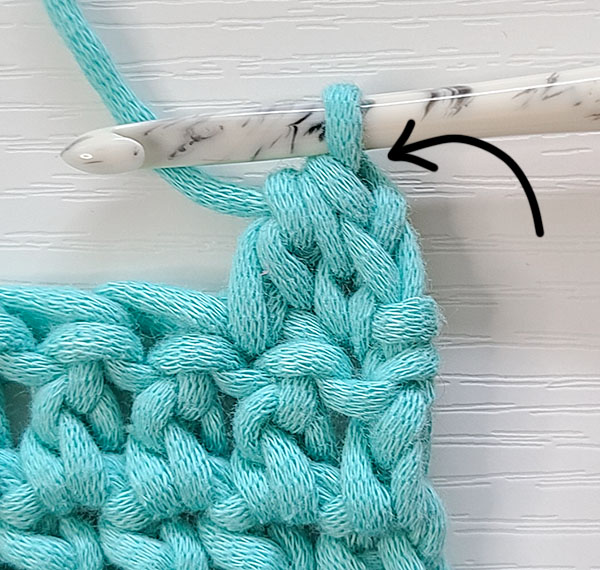
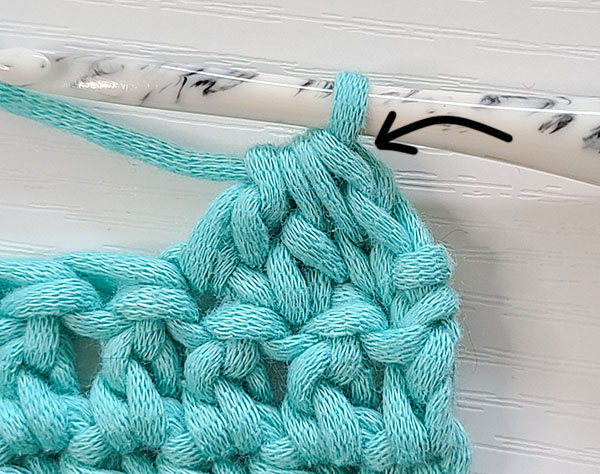
You will now have a completed double crochet 2 together starting with a Stacked Single Crochet.
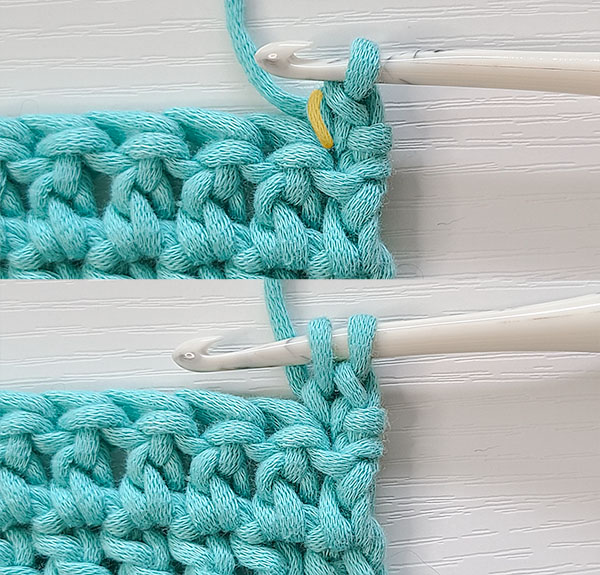
In this image, an arrow points to the top of the dc2tog. On your next row, this will be your last stitch.
Just like with the Stacked Single Crochet, put a stitch marker in this stitch while you get used to where it’s located so you don’t accidentally increase your work.
DC3TOG using Stacked Single Crochet
Double Crochet 3 Together is worked basically the same as the double crochet 2 together, however, we crochet into 3 stitches instead of 2.
Begin by working through the first steps of a Stacked Single Crochet.
Turn your work but do not chain. Place 1 single crochet into the first stitch.
Now, just like with a STsc, locate the left leg (right leg, if you’re left handed) of the Single Crochet. In this image, the leg is highlighted yellow.
Insert your hook into the leg of the Single Crochet, yarn over and pull up a loop. You will have 2 loops on hook. The bottom picture in this image shows these steps completed.
This is exactly like starting to stack single crochets to reach the double crochet height
Now, instead of yarning over and pulling through the 2 loops on the hook to finish the Stacked Double Crochet, we will instead yarn over and insert our hook into the next stitch.
Then, yarn over and pull up a loop.
This is the same as if we were going to make a dc2tog without the Stacked Single Crochet.
You will now have 4 loops on your hook.
Yarn over and pull through the first 2 loops as the arrow in the image indicates. This completes the second “half” of a double crochet of the dc3tog.
You will now have 3 loops on hook.
Yarn over and insert hook into the next stitch as the arrow in this image indicates. Yarn over and pull up a loop.
You will now have 5 loops on hook.
Yarn over and pull through the first 2 loops as the arrow in the image indicates. This completes the third “half” of a double crochet for the dc3tog.
You will now have 4 loops on hook.
Yarn over and pull through all 4 loops as the arrow in the image indicates.
You will now have a completed double crochet 3 together starting with a Stacked Single Crochet.
In this image, an arrow points to the top of the dc3tog. On your next row, this will be your last stitch.
Just like with the Stacked Single Crochet, put a stitch marker in this stitch while you get used to where it’s located so you don’t accidentally increase your work.
So, what do I do now?
Continue practicing increasing and decreasing when starting with the Stacked Single Crochet! Practicing on small swatches is a great idea as you won’t feel pressured for perfection following a pattern or making a project. You’ll have a chance to really look at the stitch anatomy and practice tension. After a few practice swatches, you should feel confident with using these techniques.
You can also read more about my deep dive into How to Keep Edges Straight (coming soon!), what techniques I tried, how they compared to each other and, ultimately, why the Stacked Single Crochet was the best option.
I hope you’ve enjoyed this tutorial. Thanks so much for hanging out with me today!
Don’t forget to join my Facebook Group so we can chat all about your creations! We are a group for crocheters of all experiences, all interests and love to hang out together. Come join the fun!

Shannon | Designer & Editor
Shannon helps crocheters find their next project and build their skills with in depth tutorials and crochet patterns on her blog, theloopholefox.com.
With more than a decade of crochet experience, Shannon knows that understanding why we do something matters just as much as how we do it. She teaches new techniques and crochet stitches in depth so you can crochet with confidence.
Looking for more Crochet Stitch Tutorials? Try these!
How to Crochet the Suzette Stitch
How to Crochet the Even Moss Stitch
How to Crochet the Arcade Stitch
How to Crochet the Linked Double Crochet
The Magic Circle: How and Why it Works
Foundation Single Crochet and Why It’s Awesome
Foundation Half Double Crochet and Double Crochet and Why They’re Also Awesome