Gingham Tote Bag Free Pattern
It’s here!! The Gingham Crochet Tote Bag free pattern is finally live and I could not be more excited! As you’ve learned if you’ve been around here for a while, I love gingham crochet. If you haven’t been around here for a while… Hi! I love gingham.
Hey! Real quick before we get into this pattern… It’s been completely updated and on an entirely new blog post! You can still check out the original, free version below but I would recommend also checking out the updated version!
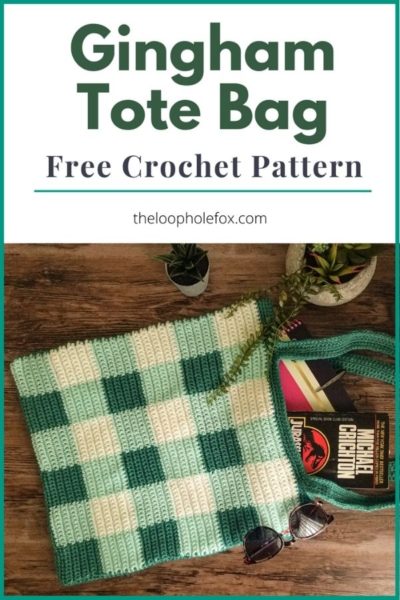
Gingham Crochet Tote Bag – Free Crochet Pattern
So, when I received an email from a follower saying they loved my Gingham Crochet Baby Blanket so much that they’d love a free pattern for a gingham crochet tote bag, I couldn’t not jump on this idea.
I felt a bit overjoyed receiving that email, really. I love to hear from those of you who have used my patterns and I especially loved the thought of someone reaching out to ask for another design because they enjoyed the first one. So this is a big, heartfelt thank you!
My testers had a great time with this pattern, as well. I really enjoyed seeing what colors they chose for their gingham crochet tote bag and watching their pieces come together.
If you’ve never created a gingham crochet project before, it might look a little intimidating. Don’t worry, I’ve created a gingham crochet tutorial specifically in anticipation of this project. Check out the tutorial here before you get started on this free pattern so you’re all up to speed.
SKILL LEVEL
Intermediate. You will only be using single crochet, but you do need to work tapestry crochet, which includes changing color mid row and carrying yarn. I have a tapestry crochet tutorial specific to gingham crochet that I highly recommend you review before you get started.
MATERIALS & TOOLS
Scissors
Stitch Markers
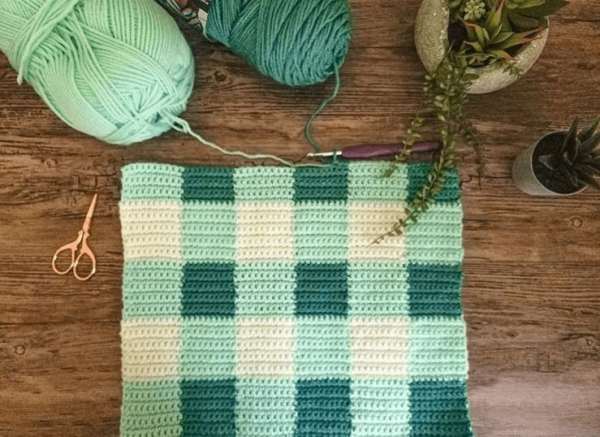
Use any medium (4) weight you prefer. Each skein I purchased was 364 yards or 6 oz. For my gingham crochet tote bag, I used approximately 3/4 skein of each:
Red Heart with Love – Minty (light green)
Red Heart Super Saver – Soft White
Red Heart Super Saver – Jade (dark teal)
GAUGE
My swatch of 10 sc x 10 rows is approximately 2 ¼” by 2 ¼”.
FINISHED SIZE
Height – Approximately 15 inches
Width – Approximately 13 inches
Handle – Approximately 13 inches high from tote to mid point on handle.
ABBREVIATIONS
This pattern is written in US terms.
- Sc – single crochet
- Sl st – slip stitch
- Ch – chain
- R# – Row and row number
- FO – Finish off
NOTES
- This gingham pattern is not your usual gingham pattern where you start and end with the same color on each row.
- I created this specifically to be a continuous pattern around, so your panels will start with one color and end with the other. This means that when you put your two panels together, your squares will continue in the same pattern around the bag. The gingham pattern will be continuous around – it will only be “broken” by the stitching.
- Ch 1 never counts as a stitch. Always place the first sc of the row in the same stitch as your chain.
- You will need to know how to change color mid-row and carry non-working yarn.
- You will need to pull your carried yarn flat between each color change if you find that it’s sticking out of the stitches. Pull it so that it is uniform and mostly hidden, but not so tight that it warps your work.
Tips
Because this pattern starts and ends with different colors, we will want to hide our yarn when we turn as much as possible inside of the tote. To keep your carried yarn hidden when you turn, decide on the “right” and “wrong” of each panel. If you decide the “right” side of your first panel has the first dark green square in the bottom right, you will want your second panel to have the first light green square to the bottom right as the “right” side.
Pay attention to this as you turn your rows to make sure your carried yarn is always hidden to the wrong side (inside the tote). This means that sometimes you’ll push the yarn backward to carry and sometimes you’ll pull your non-working yarn forward.
For example, on your first row, you’ll pull the non-working yarn to the front of the work. On your second row, you’ll put the non-working yarn behind the work. This will hide them on the “wrong” side of the panel.
You can hide it somewhat when we place the borders on, but I’m not a fan of it slightly peaking through. If you don’t mind, don’t bother!
Optional
You can sew a lining in if you prefer – I opted not to on mine for now because I am a terrible sewer (as you might have learned on my Instagram) and I didn’t want to order material without feeling/touching it first.
I prefer the handles of tote bags to be on the longer side. You can shorten your handles if you prefer. When you reach the “handles” section, create less chains for a shorter handle. You can also lengthen them if you prefer, just chain more.
How to Make this Crochet Tote Bag
Panels (Make Two)
With Jade, chain 61.
R1 – Sc 2nd chain from hook and place 1 sc next 9 ch for 10 stitches. On the 10th stitch, finish your sc with Minty. With Minty, place 1 sc in the next 10 chains, finishing your 10th sc with Jade. While working these sc’s, make sure to sc over Jade to carry it. Continue placing 10 sc across the chains, switching color between Minty and Jade every 10 stitches. You should now have your first row that has 6 “blocks”. Starting with a Jade block and ending in a Minty block. Ch 1, turn.
R2 through R10 – With the same color as the last stitch in the previous row, place your first sc in the same stitch as your ch 1 and place 9 more sc. Carry your non-working yarn and sc over it until you need it again. Finish your 10th sc with your second color, and place 10 sc. Continue placing 10 sc across the stitches, switching colors every 10 stitches and making sure your current row of colors matches your previous row. Row 10 should end with Jade. On your last sc of R10, finish your sc with Minty. Trim Jade. Ch 1, turn.
R11 – With Minty, place your first sc in the same stitch as your chain 1 and place 9 more sc. Finish your 10th sc with Soft White and place 10 sc down the row. (Soft White should line up above Minty from the previous row). Carry your non-working yarn until you need it again. Finish your 10th stitch with Minty and place 10 sc. Continue placing 10 sc across the stitches, switching colors every 10 stitches. This row should start with Minty and end with Soft White. Ch 1, turn.
R12 through R20 – With the same color as the last stitch in the previous row, place your first sc in the same stitch as your ch 1 and place 9 more sc. Carry your non-working yarn and sc over it until you need it again. Finish your 10th sc with your second color, and place 10 sc. Continue placing 10 sc across the stitches, switching colors every 10 stitches and making sure your current row of colors matches your previous row. Row 10 should end with Minty. On your last sc of R20, finish your sc with Jade. Trim Soft White. Ch 1, turn, making sure to carry Minty with you.
R21 – With Jade, place your first sc in the same stitch as your chain 1 and place 9 more sc. Finish your 10th sc with Minty and place 10 sc down the row. (Minty should line up above Soft White from the previous row). Carry your non-working yarn until you need it again. Finish your 10th stitch with Minty and place 10 sc. Continue placing 10 sc across the stitches, switching colors every 10 stitches. This row should start with Jade and end with Minty.
R22 through R30 – With the same color as the last stitch in the previous row, place your first sc in the same stitch as your ch 1 and place 9 more sc. Carry your non-working yarn and sc over it until you need it again. Finish your 10th sc with your second color, and place 10 sc. Continue placing 10 sc across the stitches, switching colors every 10 stitches and making sure your current row of colors matches your previous row. Row 30 should end with Jade. On your last sc of R10, finish your sc with Minty. Trim Jade. Ch 1, turn.
R31 – With Minty, place your first sc in the same stitch as your chain 1 and place 9 more sc. Finish your 10th sc with Soft White and place 10 sc down the row. (Soft White should line up above Minty from the previous row). Carry your non-working yarn until you need it again. Finish your 10th stitch with Minty and place 10 sc. Continue placing 10 sc across the stitches, switching colors every 10 stitches. This row should start with Minty and end with Soft White.
R32 through R40 – With the same color as the last stitch in the previous row, place your first sc in the same stitch as your ch 1 and place 9 more sc. Carry your non-working yarn and sc over it until you need it again. Finish your 10th sc with your second color, and place 10 sc. Continue placing 10 sc across the stitches, switching colors every 10 stitches and making sure your current row of colors matches your previous row. Row 40 should end with Minty. On your last sc of R10, finish your sc with Jade. Trim Soft White. Ch 1, turn, making sure to carry Minty with you.
R41 – With Jade, place your first sc in the same stitch as your chain 1 and place 9 more sc. Finish your 10th sc with Minty and place 10 sc down the row. (Minty should line up above Soft White from the previous row). Carry your non-working yarn until you need it again. Finish your 10th stitch with Minty and place 10 sc. Continue placing 10 sc across the stitches, switching colors every 10 stitches. This row should start with Jade and end with Minty
R42 through R50 – With the same color as the last stitch in the previous row, place your first sc in the same stitch as your ch 1 and place 9 more sc. Carry your non-working yarn and sc over it until you need it again. Finish your 10th sc with your second color, and place 10 sc. Continue placing 10 sc across the stitches, switching colors every 10 stitches and making sure your current row of colors matches your previous row. Row 50 should end with Jade. On your last sc of R10, finish your sc with Minty. Trim Jade. Ch 1, turn.
R51 – With Minty, place your first sc in the same stitch as your chain 1 and place 9 more sc. Finish your 10th sc with Soft White and place 10 sc down the row. (Soft White should line up above Minty from the previous row). Carry your non-working yarn until you need it again. Finish your 10th stitch with Minty and place 10 sc. Continue placing 10 sc across the stitches, switching colors every 10 stitches. This row should start with Minty and end with Soft White.
R52 through R60 – With the same color as the last stitch in the previous row, place your first sc in the same stitch as your ch 1 and place 9 more sc. Carry your non-working yarn and sc over it until you need it again. Finish your 10th sc with your second color, and place 10 sc. Continue placing 10 sc across the stitches, switching colors every 10 stitches and making sure your current row of colors matches your previous row. Row 60 should end with Minty. Finish your final stitch with Minty. FO, weave ends.
Panel Border
With your handle color of choice (I chose Jade), we will now place a border of sc around each panel. It’s important to choose the same color as your handles so that your side “stitching” blends in with your handles and finishing. By placing a border on both panels, our stitching to close the tote will look much prettier. Pay attention to the side that shows your turning colors – This will be your “wrong” side, or the inside of the tote.
Join Jade in any corner stitch you prefer and sc in the same stitch. Place additional 59 sc across the row. Ch 1, turn 90 degrees so you’re working down the rows of the panel, and place 60 sc down the side, one sc in each row. Ch 1, turn 90 degrees so you’re now working along the beginning chains and place 60 sc across. Ch 1, turn 90 degrees so you’re now working up the opposite side of the panel and place 60 sc up, one sc in each row. Sl st to close, FO and weave ends. Repeat on the other panel. You should have a total of 60 sc on each side of the panel.
Marking for Handles
On the top of your panels, mark with stitch markers in the 15th stitch inside each corner on both panels. This will mark where to start and end with your handles. This is helpful if your corners on the panels get a little lost after seaming, you can simply count backward. Ignore for now.
Stitching Together
Place your panels together with the wrong sides facing out. Make sure your corner colors DO NOT match (meaning, a white block should be stacked on a Minty Block) so that the gingham crochet pattern colors stay continuous. Using your tapestry needle and a long length of yarn the same color as your border, whip stitch down one side, across the bottom and back up the other side to seam the tote. Do not seam the top.
If you’re unfamiliar with how to whip stitch, check out this awesome tutorial by E’Claire Makery. She shows how to seam crochet projects four different ways!
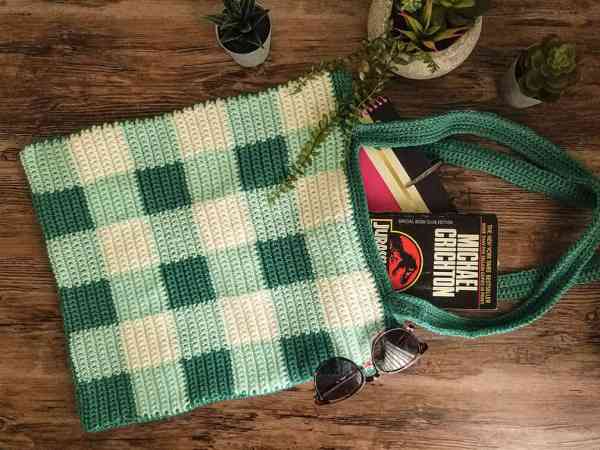
Turn the gingham tote right side out. Your bag is seamed and just needs handles!
HANDLES
Part 1 – Starting Handles
R1 – Join handle color of choice (Jade, for me) in any of the top corner stitches in either panel. Place 1 sc in each stitch for the next 15 stitches. Your last sc should be in the stitch marked by a stitch marker. Ch 120. Being careful not to twist your chain, sc into the next marked stitch. Place 1 sc next 30 stitches. Your last sc should be in the stitch marked by a stitch marker. Ch 120. Being careful not to twist your chain, sc into the next marked stitch. Place 1 sc next 14 stitches. Sl st to close. Chain 1. DO NOT TURN. (300 stitches)
R2 – Place 1 sc in same st and 1 sc next 14 stitches. 1 sc next 120 chains, 1 sc next 30 stitches, 1 sc next 120 chains, 1 sc next 15 stitches. Sl st to close. Chain 1. DO NOT TURN. (300 stitches).
R3 – Place 1 sc in the same stitch and in each of the next 299 stitches around. Sl st to close. Ch 1, DO NOT TURN.
R4 – Place 1 sl st in each stitch around. FO, weave ends.
Part 2 – Finishing Handles
You will need to work part two on each of the handles.
R1 – Find the right corner stitch of the inside of your handle (This is the same stitch that your last sc before starting the first handle chain was in). Join yarn and sc into the same stitch. 1 sc next 30 stitches. 1 sc in the same stitch you placed your first sc after the 120 chains. Working along the other side of the chains, place 1 sc in each chain. Sl st to close. Ch 1, DO NOT TURN (152 stitches).
R2 – Place 1 sc in each stitch around. (152 stitches). Sl st to close. Ch 1, DO NOT TURN. (152 stitches)
R3 – Place 1 sl st in each stitch around. FO, weave ends.
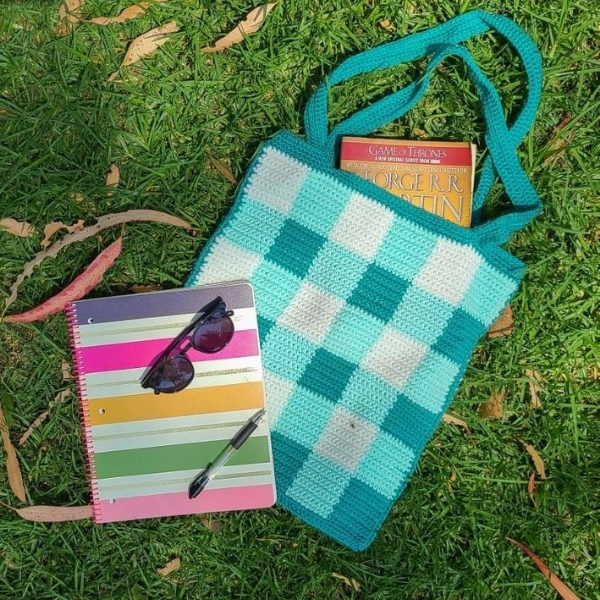
And… You’re done! You’ve now completed a gingham crochet tote bag with this free pattern and you’re all set to conquer the world of shopping or beach going.
One of my greatest joys is seeing your finished crochet projects from my patterns or tutorials, so when you post to Instagram, don’t forget to tag me so I can show you some love! I’m @theloopholefoxcrochet. You can also share pictures on my recent posts on Facebook or within my Facebook group!
And don’t forget to pin this to your Pinterest boards, so you can remember it for later!

Shannon | Designer & Editor
Shannon helps crocheters find their next project and build their skills with in depth tutorials and crochet patterns on her blog, theloopholefox.com.
With more than a decade of crochet experience, Shannon knows that understanding why we do something matters just as much as how we do it. She teaches new techniques and crochet stitches in depth so you can crochet with confidence.
Find More Free Crochet Patterns:
Gender Neutral Gingham Baby Blanket
Crochet Tote Bag for Beginners