
The Afternoon Market Bag
Sometimes, you just need a super simple crochet pattern you can work up in an afternoon. Even better if that crochet pattern is something usable, like a bag! Let me introduce The Afternoon Market Bag – an easy crochet market bag free pattern that you can work up while watching your favorite movies and then take with you when you go shopping for more yarn.

Easy Crochet Market Bag Pattern – Afternoon Market Bag
DISCLAIMER: This post includes affiliate links. This means, should you decide to purchase a product via one of these links, I will receive a small commission at no extra cost to you. I only recommend products I use and love (Or products I know others love, have heavily researched, know have good ratings and plan to purchase myself). These small commissions help to support this blog and continue keeping most of my patterns free. You can read more on my Privacy Policy, if you prefer.
This Afternoon Market Bag is named for how quick and simple it is to work up. Using a very simple pattern repeat, this market bag works up in an afternoon (or two!).
I’ve been designing a few more complicated pattern lately, and I really needed to give my brain a break and just design something super simple but usable. One of my main “pain points” when creating something for myself is: What can I use it for? Will it just sit around my living room catching dust?
This easy crochet market bag will not. I’ve already used it to carry around puppy items to the dog park, for my yarn-a-holic shopping trips, and for quick trips to the market.
If you prefer a PDF of this pattern, which includes photo tutorials for how to work into chain spaces and Rounds 10 and 11, you can grab one on either my Ravelry or my Etsy shop by clicking the buttons below.
I think that the best part of this easy crochet market bag pattern is the mesh body, which creates a slightly stretchy fabric without too many holes. Coupled with the solid bottom, you won’t lose smaller items in the bag AND you’ll have a little bit of extra room to stash boxes of snacks (or other oddly shaped items) inside without losing shape.
The mesh part of this crochet market bag is created with a one round repeat that uses only half double crochet and a chain one. Super fast!
Which yarn is best for a crochet market bag?
For a crochet market bag, I would recommend cotton yarn or a blend of cotton and acrylic yarn. This bag is going to be getting a lot of usage, and there will definitely be times that you’ll want to wash it. I would suggest a yarn that is washable (machine preferred, but hand wash is good, too). You can always hang your bag out to dry and it shouldn’t take too long, but I have always found a cotton or cotton blend works best.
That’s not to say 100% acrylic isn’t in the running! I’ve made many bags with 100% acrylic but I am much more careful of how I wash them.
In the Fox Household, it’s all about how easy something is and if washing this crochet market bag isn’t easy – I will likely use it less.
I plan to make several of these bags to use as reusable grocery crochet bags from this free pattern, because here in California we are all about saving the planet (and they charge you for bags here).
SKILL LEVEL
Easy/Advanced Beginner
This crochet market bag pattern uses basic stitches such as chains, single crochet and half double crochet. Crocheters looking to follow this pattern should know how to increase, work in the round, create chain spaces and work into them. There are two options for the handle – One is “easier” and one is more advanced, but seamless. Your comfort level will determine which handle you prefer to make. There is a link to a video tutorial for another one of my bags that uses the advanced handle option, to help walk you through.
MATERIALS & TOOLS
You will need the following tools:
- 5 mm (H-8) – Check out my favorite hooks!
- Tapestry Needle (to weave ends)
- Scissors
- Stitch Markers (if you prefer them)
You will need the following materials:
- You will need approximately 4-5 oz or 300-400 (depending on your tension) yards of any medium (4) yarn.
- You can use any other yarn weight you prefer, but this will change the size of your bag depending if you go up or down a size.
- Additionally, if you use a lighter weight yarn you may end up using more than what is listed in the pattern.
- This yarn amounts are based on the original design (and the projects by my testers).
If you want your bag to look exactly like mine, I used nearly exactly 5 oz of Caron’s Cotton Cake in Calico Flowers.
- This is a medium (4) weight, 60% cotton 40% acrylic yarn. You may need more or less yarn depending on your gauge and yarn you choose.
GAUGE
Gauge isn’t terribly important, but here is mine for reference: 10 hdc in 4 rows = approximately 2 inches x 2 inches.
If you do not match gauge, you may end up with a smaller (or bigger) bag. The gauge isn’t terribly important as long as you don’t mind your bag being a different (larger or smaller, depending on your tension) size.
Additionally, you can use whatever yarn weight you prefer. This pattern is written to medium (4) Caron Cotton Cake, but my testers also used 100% acrylic medium (4), DK weight, etc. Their bags were different sizes based on these weights. Some of my testers matched gauge and some of them didn’t, so that portion is completely based on your preference. Regardless, you should end up with a bag that is more or less the size indicated.
FINISHED SIZE
The finished bag has the following dimensions, per this pattern and my gauge/tension.
Body Length: Approximately 13 inches
Body Width: Approximately 11 inches
Handle Length (from body of bag to top of shoulder): Approximately 13.5 inches
Handle Length (measuring entire handle as if it were flat): Approximately 32 inches.
You can change the length of the handle if you prefer and this will be explained in the handle portion of this pattern. I prefer longer handles so they can act as both an over the shoulder and cross body.
ABBREVIATIONS
- Ch = chain
- Mc = magic circle
- Sc = single crochet
- Hdc = half double crochet
- Dc = double crochet
- Sl st = slip stitch
- Sk = skip
- […] = pattern repeat
- Rpt = repeat inside brackets
NOTES
- Chains at the beginning of the row do not count unless otherwise noted.
- This means you will always place your first stitch of the round in the same stitch.
- In Round 11 make sure you do NOT count the slip stitch that closed the previous round as a stitch (See Photo Below).
- This pattern is worked completely in closed rounds.
- When slip stitching to close your round, ALWAYS slip stitch to the first stitch of your round, not your chains.
- You can change the length of the handle and this will be explained in the handle portion.
- There are two options to create the handle, please choose the one that works best for you. One is easier and the other is a little more advanced.
“In Round 11, Do Not Count the Slip Stitch”
We always close rounds with a slip stitch into the top of the first stitch of the round. Then, Round 11 begins with slip stitching into the next chain 1 space before we chain 1 to begin the round. This essentially creates two slip stitches. If you’re new to crocheting or unfamiliar with working in closed rounds, these slip stitches can make things confusing.
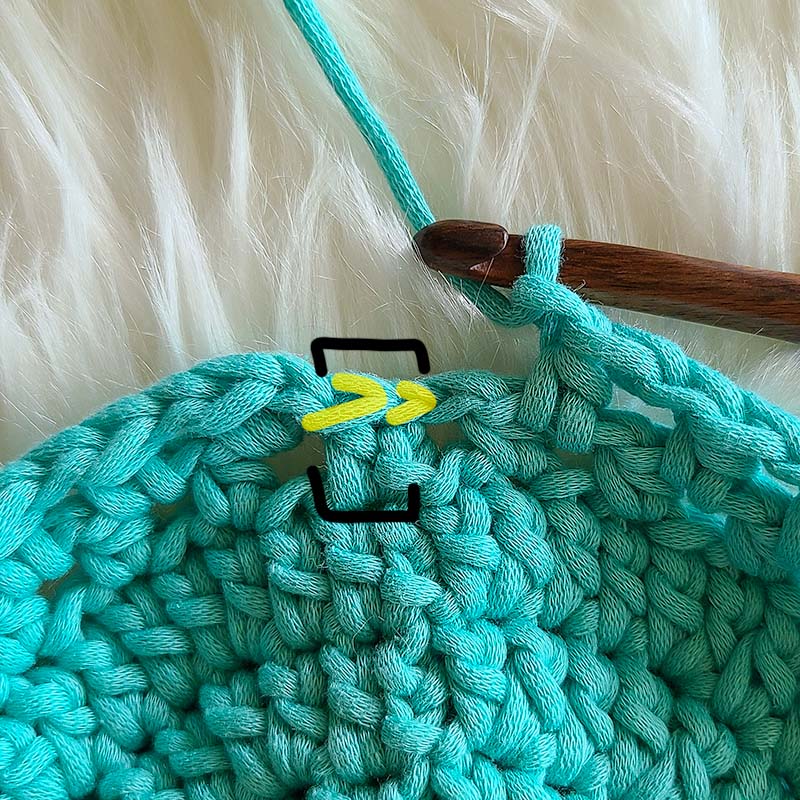
In the image above, horizontal black brackets indicate the last stitch of the previous round (Round 10). The bracket on the top indicates the “top” of the stitch and the bracket on the bottom indicates the post.
You can see that these brackets include the post of the stitch AND the chain 1 that started the round. These brackets also include the slip stitch that closed the previous round and the slip stitch that moved us over 1 stitch to start this round.
In the case of this pattern, you want to pay attention to the POST of the half double crochet, not the two slip stitches. It can seem wonky because of the two slip stitches, especially if you haven’t worked a mesh structure in the round before.
The slip stitch that closed the previous round (rightmost stitch highlighted yellow above) does NOT count and never counts as a stitch in patterns that are worked in the round.
The slip stitch that moved us over 1 stitch to begin Round 11 (leftmost stitch highlighted yellow above) would “count” as the top of our stitch.
For this pattern (and most patterns that use this technique), you won’t be working into this stitch regardless.
This is just an anatomy lesson to help the join make sense so that you don’t end up with too many stitches.
Special Stitch – Magic Circle
This pattern is written to use a magic circle. You can use the magic circle or you can chain 3 and slip stitch to the first chain made to create a circle to work into. Your choice!
If you don’t know how to work a magic circle but would like to learn, I do have a photo and video tutorial!
How to Crochet this Market Bag
Round 1 – In mc, ch 2 and place 12 dc. Sl st to first dc to close. Pull tight. (12)
Round 2 – Ch 2, place 2 dc in each stitch around. Sl st to close (24)
Round 3 – Ch 2, [1 dc first stitch, 2 dc next]. Repeat inside brackets 12 total times. Sl st to first dc to close. (36)
Round 4 – Ch 2, [1 dc next 2 stitches, 2 dc next]. Repeat inside brackets 12 total times. Sl st to first dc to close. (48)
Round 5 – Ch 2, [1 dc next 3 stitches, 2 dc next]. Repeat inside brackets 12 total times. Sl st to first dc to close. (60)
Round 6 – Ch 2, [1 dc next 4 stitches, 2 dc next]. Repeat inside brackets 12 total times. Sl st to first dc to close. (72)
Round 7 – Ch 2, [1 dc next 5 stitches, 2 dc next]. Repeat inside brackets 12 total times. Sl st to first dc to close. (84)
Round 8 – Ch 2, [1 dc next 6 stitches, 2 dc next]. Repeat inside brackets 12 total times. Sl st to first dc to close. (96)
Round 9 – Ch 2, [1 dc next 7 stitches, 2 dc next]. Repeat inside brackets 12 total times. Sl st to first dc to close. (108)
Round 10 – Ch 1, place 1 hdc in first stitch, ch 1, sk 1 st. [1 hdc next st, ch 1, sk 1 st]. Repeat inside brackets a total of 53 times to end of round. Your last hdc will be in the 2nd to last stitch of the round. Making the chain 1 is technically your “last” stitch in this round. Sl st to the first hdc to close. (108 stitches total: 54 hdc and 54 ch 1 spaces)
Round 11 – Sl st into ch 1 spc. Ch 1 and place 1 hdc in the same ch 1 spc. Ch 1, sk 1 st, [1 hdc in next ch 1 spc, ch 1, sk 1 st]. Repeat inside brackets a total of 53 times to end of round. Similar to the last row, making your chain 1 and skipping 1 will be your last “stitch”. Your last hdc of this round will be in the last chain 1 space.Sl st to the first hdc to close. (108 stitches total: 54 hdc and 54 ch 1 spaces)
Round 12 through Round 38 – Repeat Round 11.
Round 39 – Ch 1, place 1 hdc in each stitch and chain 1 space around. Sl st to first hdc to close. (108)
Round 40 – Ch 1, place 1 sc in each stitch around. Sl st to first sc to close close. (108)
Do not finish off.
Handles
To create the handle, there are two options. One is the “easier” option, and one is more advanced. Please choose the one that you feel fits your needs best.
OPTION 1 (EASY): You can easily make a handle for your bag separately from the body, if you prefer. To do this, trim the yarn from the body of the bag and begin working in rows.
Decide how wide you’d like your handle to be (for example, 6 stitches). Create a chain of the same amount plus 1 chain (for turning).
Place 1 hdc in the second chain from hook and each chain across. At the end, chain 1, turn, and place 1 hdc in each stitch across.
Continue working in this method until you have a handle of the appropriate length for you. Once completed, put a border on the handle (if you prefer) and then use a separate length of yarn and your tapestry needle to sew the handle onto the body of the bag.
OPTION 2 (ADVANCED):
To begin forming the handle, we are going to make one long chain and sl st into the 54th stitch of the last row of the body of the bag to form the foundation.
From there, we will work stitches into both sides of the chain to create the width of the handle.
If you want a shorter (or longer) handle, chain more or less to achieve your desired length. For example, I would start by chaining 120 and slip stitching it into the indicated stitch. Carefully hang the bag on your shoulder to check the length. If it is too long (or not long enough), subtract or add chains as you see fit.
Begin Working the Handle:
Chain 120.
Now, refer back to the last round of your bag (Round 40). Starting from the next stitch to the left after your chain, begin counting 54 stitches across the last round of the bag. Sl st into the 54th stitch, being careful not to twist your chain. Do not turn.
R41 – Ch 1 and place 1 sc in the same stitch and the next 53 stitches of the main bag to meet the other side of the chain (which is now where you began chaining after R40).
You will now want to work up along the chain, placing 1 hdc in each of the 120 chains across. Sl st to the first sc to close.
R42 – Ch 1, DO NOT TURN. Place 1 sc in each stitch around both the body of the bag and the handle. Sl st to the first sc to close.
Now we have to work the other side of the handle, otherwise it is going to look a bit wonky!
You will now want to join your yarn on the unworked side of your handle in the same stitch as your chains.
Once joined, repeat R41 and R42. Once completed, finish off by trimming your yarn and weave ends.
And you’re done!
Now you can shop with peace of mind after creating your easy crochet market bag from this free pattern.
One of my greatest joys is seeing your finished crochet projects from my patterns or tutorials, so when you post your easy crochet market bag to Instagram, don’t forget to tag me so I can show you some love! I’m @theloopholefoxcrochet. You can also share pictures on my recent posts on Facebook or within my Facebook group!
And don’t forget to pin this to your Pinterest boards, so you can remember it for later!
Don’t forget to join my Facebook Group so we can chat all about your creations! We are a group for crocheters of all experiences, all interests and love to hang out together. Come join the fun!

Shannon | Designer & Editor
Shannon helps crocheters find their next project and build their skills with in depth tutorials and crochet patterns on her blog, theloopholefox.com.
With more than a decade of crochet experience, Shannon knows that understanding why we do something matters just as much as how we do it. She teaches new techniques and crochet stitches in depth so you can crochet with confidence.
