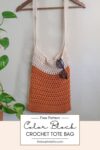
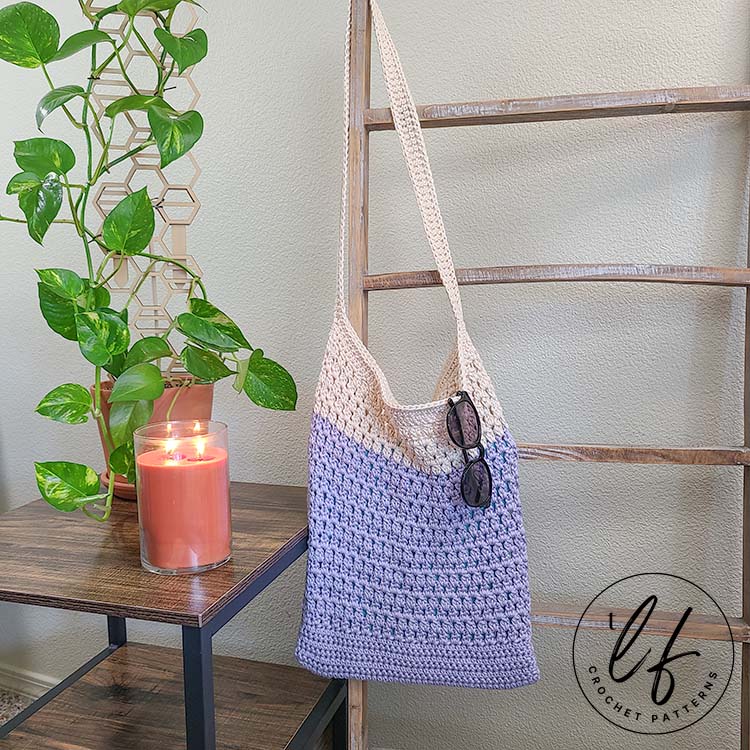
The Summer Tote
No season is the wrong season for an easy crochet bag and I have to say, I have been thinking of and creating crochet tote bag patterns like crazy. I am so excited to share the Summer Tote love with the world. This crochet tote bag pattern has been made by many and I’m always so inspired by all the gorgeous color schemes and pictures I receive. This crochet tote bag pattern may look difficult, but once you get started you’ll find that it is actually pretty easy.
This crochet tote bag pattern was updated on 9/18/2023. The end result is the same but some things have been changed. As we grow in our skills, we learn new and better ways to do things and I have redesigned the Summer Tote because of this. The end result looks the same but is better – I promise!
Old Pinterest Pins (showing a yellow bag) may indicate that this crochet tote bag pattern is “beginner friendly”. This skill level has changed with the update but there is no way for me to remove all pins that have been shared by crocheters on Pinterest. While a beginner absolutely could follow this pattern with the video tutorial and photo tutorials in the PDF, you’ll need to be adventurous and have some patience.
This bag mostly uses beginner friendly stitches (and walks you though learning a cluster stitch!) with a one row repeat for the majority of the bag. These cluster stitch repeat rounds create a gorgeous but sturdy mesh structure, perfect for carrying around anything you might need to.
While there are a couple of advanced techniques, it’s nothing that should be out of your skill level. If you can chain, single crochet, half double crochet and double crochet, then you can work this crochet tote bag pattern. Plus, there’s a video to help you through!
Crochet Tote Bag Pattern – Inspiration and Information
When I created this crochet tote bag pattern, I wanted a gorgeous but functional bag to carry around all sorts of things in. I love the ability to give crochet tote bags a mesh structure so they can stretch with all my books or yarn I’m carrying around, but I also wanted the bag to be quite sturdy as I can be pretty hard on bags.
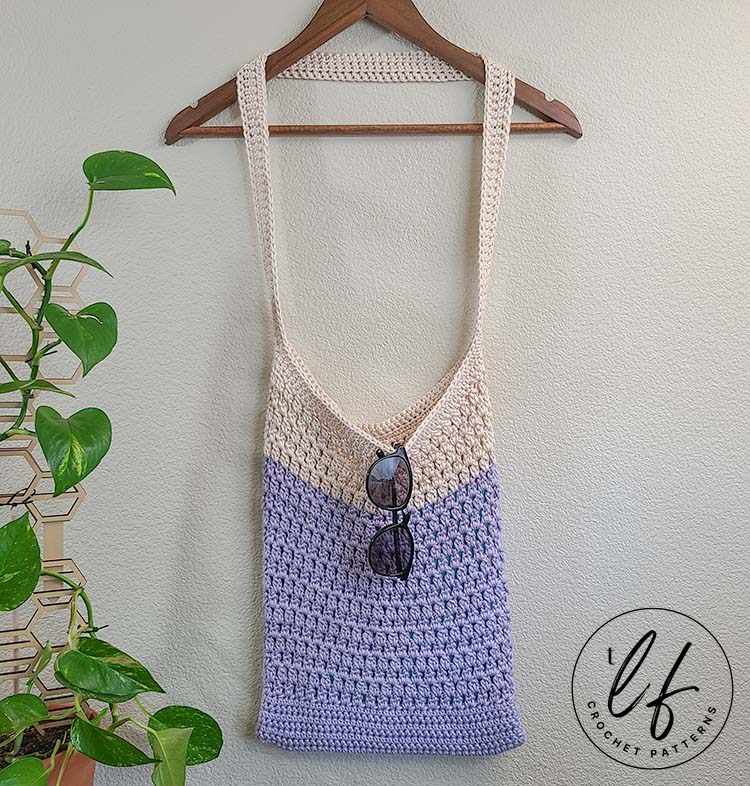
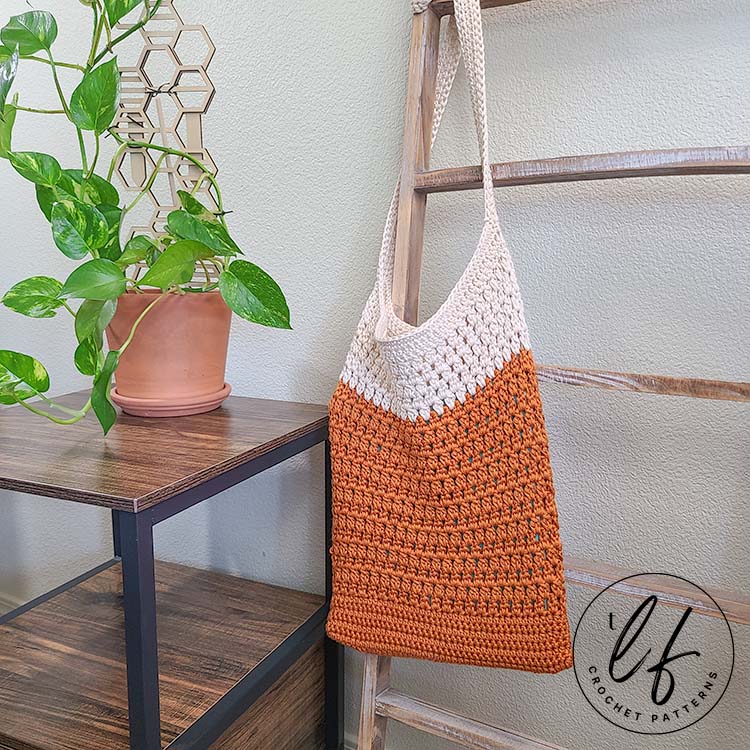
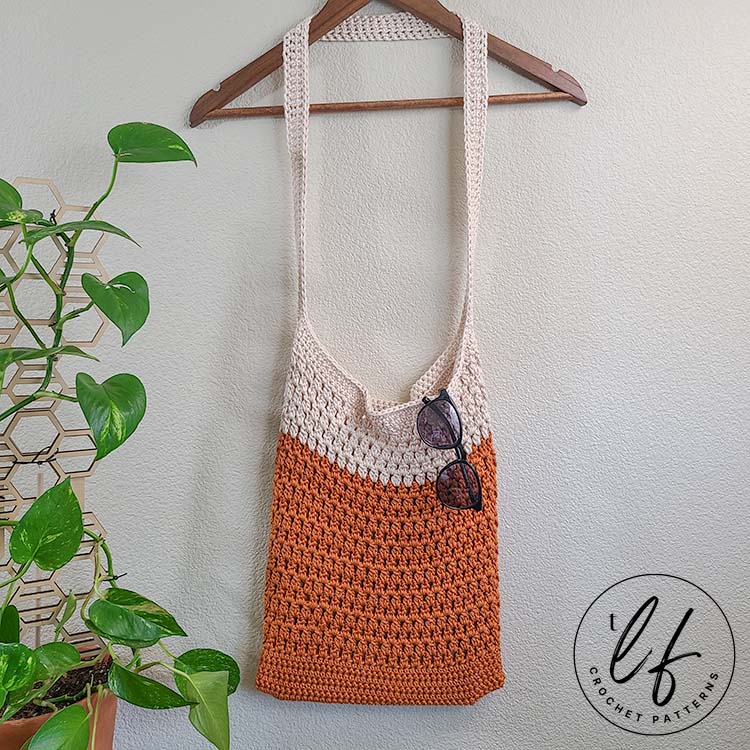
It’s no secret that I love color blocking. I love how striking a color block looks in just about anything you can make. I’ve used color blocking to design this crochet tote bag pattern and my Color Block Super Scarf – which I wear basically the entire winter and with my Thursday Shawl, which uses 3 colors in it’s color blocking.
When I originally designed this tote bag, I ended up using left over yarn from a previous project and ended up completely running out. Feeling a bit too comfy in my pj’s, I decided against going to the craft store and used two colors instead of the planned one. This ended up being a big win as this crochet tote bag pattern now has two options: you can make it in one solid color if you prefer or make it as designed and color block it.
I love being able to offer the ability to make things your own way, so I am quite pleased that this little mistake turned out to be a pretty cool win.
That’s not to say that you can’t make yours in all in as many colors as you choose. This pattern will reference when to switch color for the color blocking, but you can switch whenever you like, use a bunch of different colors or not switch at all.
Okay, enough of me chatting about how much I love this bag (seriously, I love it!), let’s get to the pattern.
If you’d like a PDF version of this pattern which includes a step by step photo tutorial and links to a video tutorial, you can grab one in my Etsy shop by clicking the button below.
DISCLAIMER: This post includes affiliate links. This means, should you decide to purchase a product via one of these links, I will receive a small commission at no extra cost to you. I only recommend products I use and love (Or products I know others love, have heavily researched, know have good ratings and plan to purchase myself). These small commissions help to support this blog and continue keeping most of my patterns free. You can read more on my Privacy Policy, if you prefer.
Crochet Tote Bag Video Tutorial
As this crochet tote bag pattern has some techniques that may not be familiar, I’ve included a video tutorial. The techniques used don’t require anything of you that you don’t already know – You should know how to chain, single crochet, half double crochet, double crochet and work in the round.
The first round of the bag creates a long oval by working on the bottom of the chains and the seamless strap is worked on a long length of chains. Don’t let these intimidate you! If you know how to work into chains, you can do this – I promise!
The video will walk you through the entire bag but pays special attention to Round 1 and to the handle, so make sure to check it out if you need it.
Where to get this Crochet Tote Bag Pattern
The Summer Tote is a free crochet pattern in this blog post. Scroll down to view the free version.
However, if you’d like a more robust pattern with photo tutorials, the steps for the photo tutorial written out in full sentences, links to the video tutorial and a printer friendly version of the PDF, I recommend you purchase the PDF pattern.
With the PDF pattern, you will receive photo tutorials for the special stitches and techniques as well as a detailed photo tutorial for each round which will set you up to work this crochet tote bag pattern with confidence. The photos include details with arrows and dots to help identify all the stitches and their placement.
SKILL LEVEL
Confident Advanced Beginner. Crocheters looking to follow this pattern should know how to:
- Read a crochet pattern – There is a video tutorial for this crochet tote bag pattern and the video has the short hand instructions on the side. It will still be helpful to know how to read a crochet pattern as the video is NOT intended to replace the written pattern.
- Work the basic stitches – Chain, slip stitch, single crochet, half double crochet and double crochet.
- Know how to Double Crochet 2 Together to make a cluster or be willing to learn.
- Understand how to work in the round, how to close rounds and how to turn after closing a round.
- You should have some basic understanding of creating chains without cutting the yarn from your project.
This is NOT an absolute beginner pattern. Absolute beginners will find this pattern outside of their skill level but adventurous beginners could be able to work through it, especially with the PDF pattern that includes a ton of photos to help you through and the video tutorial as well.
MATERIALS (Yarn)
Medium (4) worsted weight COTTON yarn.
COLOR A: 150 g / 225 yds / 5.3 oz
COLOR B: 80 g / 120 yds / 2.9 oz
This yarn is 60% Pima Cotton, 40% Modal (bamboo). There are 50 g per skein in this yarn.
For Color A, I used just shy of 3 skeins.
For Color B, I used just over 1.5 skeins.
Yarn Used
Shine Worsted from We Crochet. The lavender bag used colorways Wisteria (lavender) and Cream (off white). The orange bag used colorways Sweet Potato (orange) and Cream (off white).
TOOLS & NOTIONS
- 5 mm (H-8) hook
- Scissors
- Tapestry needle
- Stitch markers, at least 2 for the handle – two different colors of stitch marker will be helpful.
GAUGE
15 hdc x 11 rows = 4 inches x 4 inches
Gauge isn’t extremely necessary as a bag of any size is just as lovely.
Note: I’m a tight crocheter, so my tension is usually tighter than others. Learn more about gauge and what this means here.
FINISHED SIZE
Height: 13 inches
Width: 11 inches
Handle Height/width: 12 inches long from body of bag / 1 inch wide
ABBREVIATIONS
This pattern is written in US terms.
- Ch – Chain
- Sl st – Slip stitch
- Sc – Single crochet
- Hdc – Half double crochet
- Dc – Double crochet
- St – Stitch
- Dc-cl – 2 double crochet cluster – See Special Stitches
- RS – Right Side
- WS – Wrong Side
- […] – Repeats are listed inside brackets
- (…) – Stitch counts are listed at the end of the row in parentheses and italics.
NOTES
- All rounds are worked in closed rounds. You will slip stitch to close each round before beginning your next.
- Almost all rounds are turned except for when working the handle. Each round will indicate whether or not to turn.
- Always slip stitch to close into the top of the first stitch, not the chains.
- Chain 1 and Chain 2 to begin a new round do not count as stitches. Always place your first stitch of the round in the very first stitch.
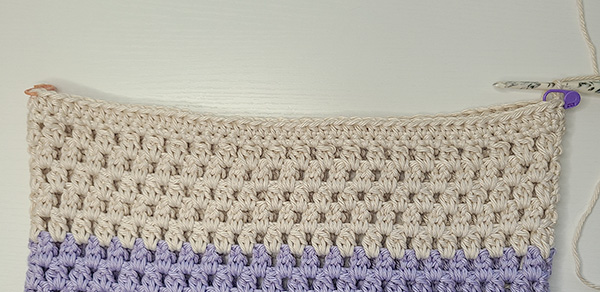
- After Round 9, most of the body of the bag is a repeat of Round 9. Notes will tell you when to change color.
- This bag is designed to be color blocked with two colors, but you can absolutely make this bag in as many or as few colors as you like.
- The handle of the bag is also created to be seamless, and this pattern (and video!) will walk you through. If you’d prefer to instead crochet a long strap separately and sew it on, that is okay!
SPECIAL STITCH – DC-CL (2 Double Crochet Cluster)
In this pattern, we use a “dc-cl” which is a double crochet cluster made with 2 stitches. You might also know this stitch as a dc2tog in one stitch. A dc-cl is similar to a double crochet decrease, but we work all parts of the stitch into the same stitch or space instead of over 2 stitches.
To work a double crochet cluster using 2 double crochets, you will: Yarn over, insert your hook into the indicated stitch, yarn over and pull up a loop. We will have 3 loops on hook.
Yarn over and pull through 2 loops.
We will have 2 loops on hook. Now, instead of finishing this double crochet as normal, we will:
Yarn over and insert the hook into the SAME stitch, yarn over and pull up a loop.
We will have 4 loops on hook. Yarn over and pull through the first 2 loops.
We now have 2 half finished double crochet worked into the same stitch. We have 3 loops on hook. Yarn over and pull through all 3 loops.
We now have a finished dc-cl, a double crochet cluster made of 2 double crochet in the same stitch.
SPECIAL TECHNIQUE – Changing Color After Slip Stitch to Close
Patterns that require ending a round on a chain 1, skip 1 with a slip stitch to close can be a bit messy or difficult when it comes to changing the color for a new round.
Typically, you would change color on the last stitch of the round but, because we end on a chain 1, this could make the color change noticeable. To ensure this doesn’t happen, we change color after slip stitching to close.
To do this, we will go ahead and slip stitch to close the round. Then, with the loop of the slip stitch still on our hook, we will introduce the new color and pull it through the loop on our hook.
Then, we pull the tail of the previous color yarn tight to make sure everything is settled. We have now successfully changed color after the slip stitch.
And, from here, we can chain the required amount of chains for the round to turn and begin following the round instructions.
If you’re worried about these ends coming loose, tie them off and weave them in before continuing with your new color.
You are welcome to change color however you prefer to but this is how I changed color when crocheting my bags.
SPECIAL TECHNIQUE – Crochet in Back Bump of Chains
In this pattern, you will see references to work in the “back bump of the chains”. Working in the back bump of the chains creates a cleaner, more professional finish and a stronger bottom and handle of the bag.
You can review my Crochet in Back Bump of Chains tutorial right here on my blog for visuals.
The linked tutorial will walk you through how it works, why it works and the difference it can make to your projects in detail.
Here’s an overview on how to work in the back bump of the chains:
When we learn to crochet, we learn to go through 1 loop of the chains with the chains facing us (so we can see the sideways “v” shape of the chain).
Because we want a tight bottom to the bag AND Round 1 creates an oval off of the chains, working in the back bump will achieve the tighter finish we are looking for.
To crochet in the back bump of the chains, you will flip your chains over to look at the backside.
There will be one loop or bump directly in the center of the back of the V.
Insert your hook under this bump and finish your stitch as normal. You have now worked into the back bump of the chains.
When you work along the bottom of the chains, they will look like a top of a stitch instead of like a wonky chain. This makes them much easier to find and is what creates that tight, closed bottom and a tighter handle that won’t stretch as far as other handles.
CONSTRUCTION
This crochet tote bag pattern is worked from the bottom up. We begin by creating a long oval. Then, we crochet several rounds for a solid base and transition to the mesh that makes up most of the bag. Once the body of the bag is complete, we create a long chain to support the handle of the bag and work 2 rounds on either side of the chains to create a sturdy handle.
This handle is designed to stretch as little as possible and this is achieved by putting the weight of the bag (and whatever is carried in it) on the chains. You can read more about my technique of creating straps and the tests I did as well as how to reinforce them even more, if you want to.
Crochet Tote Bag Pattern (Free)
With Color A, Ch 45.
Round 1 (RS) – Place 1 hdc in the 2nd ch from hook and in each ch across (44 hdc so far).
TIP: Working into the bottom bump of the chains will help keep the bottom of the bag tighter without any gaps. You can find my tutorial for this technique HERE.
Rotate the row so that it is upside down with the bottom of the chains facing upward and work into the bottom of the chains:
Place 1 hdc in the bottom of each ch. Sl st to first hdc made to close. (88 sts total)
Round 2 (WS) – Ch 1 (doesn’t count as a stitch here or throughout), turn. Place 1 sc in each st around. Sl st to first sc made to close. (88)
Round 3 (RS) – Ch 1, turn. Place 1 hdc in each st around. Sl st to first hdc made to close. (88)
Rounds 4 through 7 – Repeat Rounds 2 and 3 in sequence.
For example, Round 4 will be a repeat of Round 2. Round 5 will be a repeat of Round 3.
Round 8 (WS) – Ch 2 (doesn’t count as a stitch here or throughout), turn. Place 1 dc-cl in first st. Ch 1, sk 1 st, [1 dc-cl next st. Ch 1, sk 1 st]. Repeat inside brackets around to end. You will end with the ch 1, sk 1. Sl st to first dc-cl to close. (88 sts – 44 dc-cl, 44 ch 1 spcs)
Round 9 – Ch 2, turn. Place 1 dc-cl in first ch 1 spc. Ch 1, sk the dc-cl, [1 dc-cl in next ch 1 spc. Ch 1, sk the dc-cl]. Repeat inside brackets around to end. You will end with the ch 1, sk 1. Sl st to first dc-cl made to close. (88 sts – 44 dc-cl, 44 ch 1 spcs)
Rounds 10 through 22 – Repeat Round 9.
At the end of Round 22, change to Color B.
Rounds 23 through 27 – Repeat Round 9 with Color B.
Round 28 (WS) – Ch 1, turn. Place 1 sc in each st and ch 1 spc around. Sl st to first sc to close. (88)
Round 29 (RS) – Ch 1, turn. Place 1 hdc in each st around. Sl st to first hdc to close. (88)
Do not trim yarn. Move on directly to creating the handle.
HANDLE
Before we begin to crochet the strap for this crochet tote bag pattern, we will mark 2 stitches. These 2 stitches help us place the long chain accordingly to make sure the strap is even and correct.
Place 1 stitch marker in the first stitch of the round (this is the stitch we slip stitched into to close Round 29). This is our first stitch marker.
Then, not including the stitch we just marked, count 44 stitches across the row and place another stitch marker. This is our second stitch marker. You will have 43 stitches between each stitch marker.
In the image above, the purple stitch marker to the right is my first stitch marker and the orange stitch marker to the right is my second. Notice they are in the side of the bag and are evenly placed.
Now, chain 100. If you want a longer or shorter strap, chain more or less here. The more you chain, the longer your strap will be. Being careful not to twist your chains, gently rotate the body of the bag until your second stitch marker is facing you, with the right side of the bag facing up.
TIP: You can make sure your chains are all not twisted by lightly pinching your chains between your thumb and pointer finger and running your fingers along the length of chains to make sure they are all facing the same way.
Slip stitch into the stitch with the second stitch marker, inserting your hook into the stitch from the front of work. Ignore the stitch with the first stitch marker for now. Your chains will now resemble a strap (albeit a flimsy one!). We will now work 2 rounds on both sides of the bag and chains to make a sturdy strap.
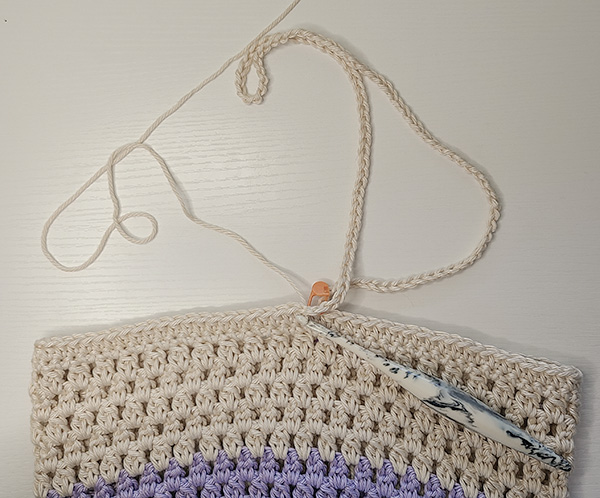
Here you can see I have chained 100 and slip stitched into the stitch that has my second stitch marker.
Round 1 – Ch 1, do not turn. Place 1 sc in the first stitch (the same stitch we slip stitched the ch 100 into) and in each of the next 43 sts along the body of the bag. Then, rotate to work along the 100 chs. Place 1 hdc each ch across. Sl st to the first sc made to close. (144)
TIP: Use the bottom bump of the chains to create a stronger strap with no gaps in the center.
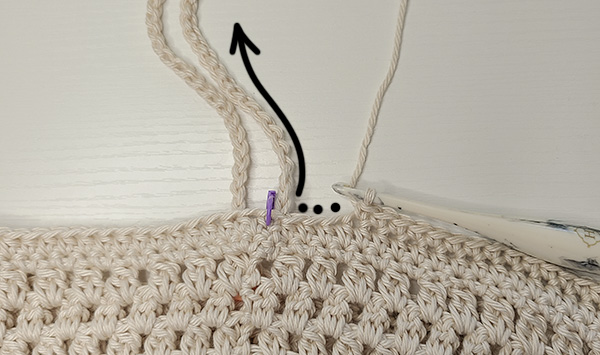
When we have crocheted all of the 44 stitches (“1 sc in first stitch and 1 sc in each of the next 43 sts along the body of the bag”), we will continue up the chains as indicated in the image above.
You will now have 1 “round” created out of 1 half of the body of the bag and the chains.
Round 2 – Ch 1, do not turn. Place 1 sc in the first st and each of the next 143 sts. Sl st to first st to close. (144)
Tie off and cut yarn. Join yarn in the stitch with the first stitch marker that we previously ignored and the right side facing out. This will be the unworked side of the handle. Once your yarn is joined, continue:
Round 1 – Ch 1, do not turn. Place 1 sc in the first stitch (the same stitch we started our chain 100 from) and in each of the next 43 sts along the body of the bag. Then, rotate to work along the bottom of the 100 chs. Place 1 hdc in the bottom of each chain across. Sl st to the first sc made to close. (144)
Round 2 – Ch 1, do not turn. Place 1 sc in the first st and each of the next 143 sts. Sl st to first st to close. (144)
Cut yarn, weave ends. Your Summer Tote is complete!

And you’re done! You now have a crochet tote bag to carry around all of your essentials (for me, that’s yarn!). Be careful though, a ton of people will want one.
One of my greatest joys is seeing your finished crochet projects from my patterns or tutorials, so when you post to Instagram, don’t forget to tag me so I can show you some love! I’m @theloopholefoxcrochet. You can also share pictures on my recent posts on Facebook or within my Facebook group!
And don’t forget to pin this to your Pinterest boards, so you can remember it for later!
Don’t forget to join my Facebook Group so we can chat all about your creations! We are a group for crocheters of all experiences, all interests and love to hang out together. Come join the fun!

Shannon | Designer & Editor
Shannon helps crocheters find their next project and build their skills with in depth tutorials and crochet patterns on her blog, theloopholefox.com.
With more than a decade of crochet experience, Shannon knows that understanding why we do something matters just as much as how we do it. She teaches new techniques and crochet stitches in depth so you can crochet with confidence.
Looking for more Crochet Bag Patterns? Check these out!
The Halcyon Tote – A gorgeous gingham crochet tote bag
The Brivet Bag – For when you need a little crossbody bag to carry around your essentials
The Sunday Clutch Pattern – Fun and funky envelope style crochet bag pattern
The Traveler’s Water Bottle Holder – A fan favorite!
The Afternoon Market Bag – Simple, quick and easy mesh crochet bag