
How to Crochet Straight Edges & Avoid Gaps
Raise your hand if you’re like me when I began crocheting: What should be straight edges are instead warped and full of gaps near those edges. You wondered how to crochet straight edges when you’re following a pattern perfectly. If your hand is raised, this crochet tutorial is for you.
When I was young, I watched my grandmother crochet massive afghans and begged her to teach me. She maintained I was too young for crochet and taught me to knit instead. That doesn’t mean I didn’t still sit near her, enamored that she could wave one hook around a string of yarn and create something great. Magic! Looking at her old afghans now, I notice one thing – The signature gap created by counting your turning chain as a stitch.
This, from what I understand, is the traditional method. However, as we all know, crochet may have rules but that doesn’t mean we can’t improve on those rules. With one or two small changes to your usual crocheting routine, you can achieve straight edges without gaps. This crochet tutorial will walk you through these changes.
And, let’s be honest, save yourself frustration when trying to find the turning chain to crochet into or dropping stitches accidentally.
By small changes, I mean literally the difference between where you place a stitch and, depending on what kind of stitch, how many turning chains you use. It’s that simple! You’ll never have to wonder how to crochet straight edges again after reading this crochet tutorial.
In this tutorial, I’m going to show you how to crochet straight edges in double crochet.
However, this tutorial/tip is SO easy that you can use this tip for any standard crochet stitch. You can keep your edges straight in single crochet, half double crochet, double crochet, treble crochet…. all of them. Super simply.
Just how simple?
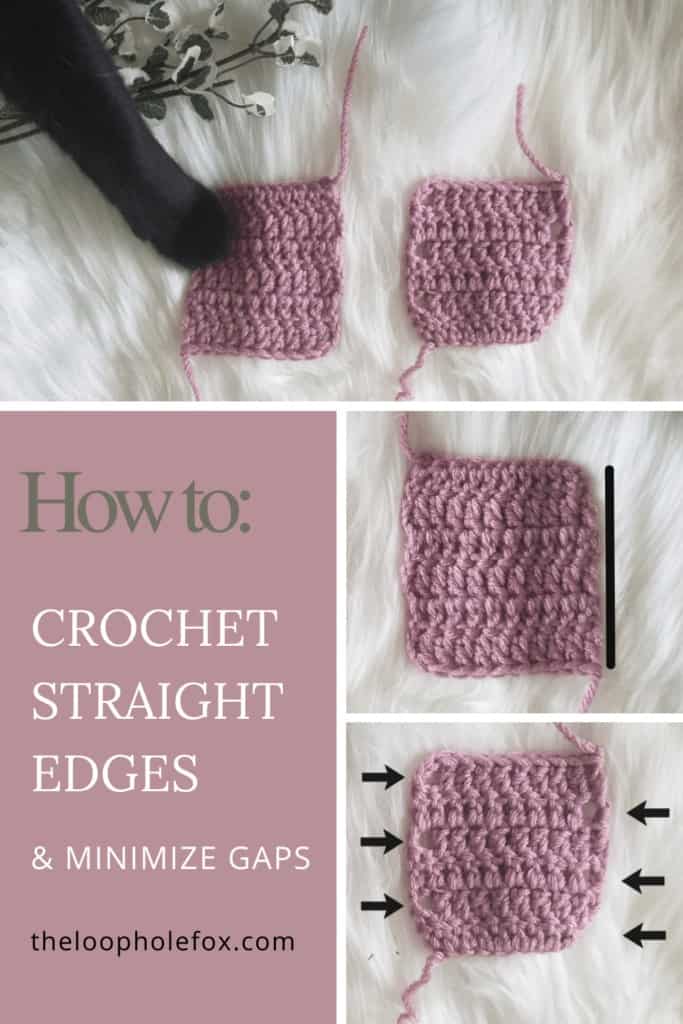
The above picture a perfect example of gaps and wonky edges. To create this swatch, I chained 11, placed a double crochet in the 3rd chain from the hook (counting the chains as a stitch), and placed 8 additional double crochets across the row to equal 10 stitches. I chained 3 to turn (counting the chain 3 as a dc), placed my first double crochet into the next stitch and continued this method for six rows, always putting my last double crochet into into the turning chains.
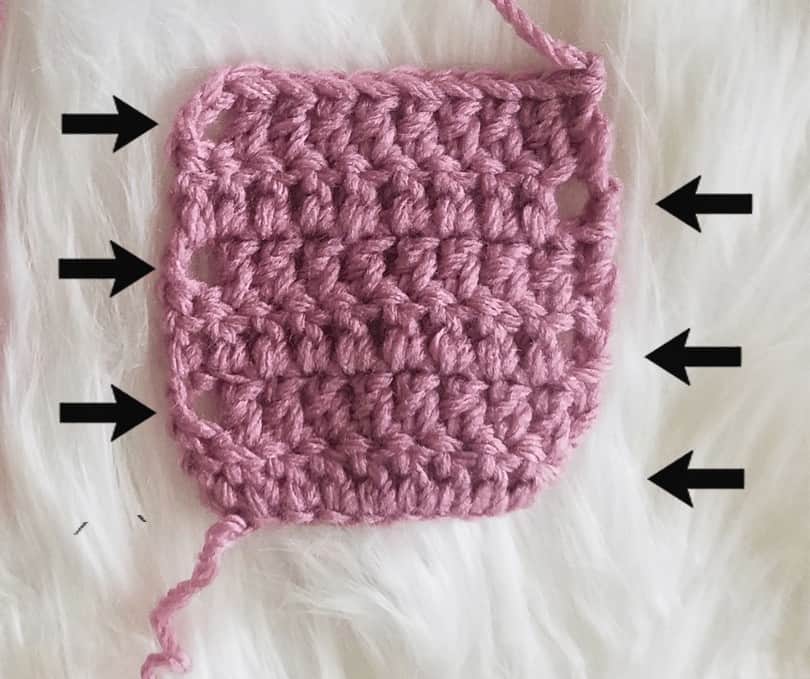
You can see in each row exactly where I chained three to turn and placed my double crochet in the next stitch, which has created these large gaps. These gaps usually even show after a border. You can also see on the bottom right arrow where my foundation is a bit wonky. I, personally, am not a fan of my projects when they have this going on.
How to Crochet Straight Edges and Avoid Gaps

Now, let’s take a look at my second example. There are zero wonky holes and my edges are straight. For this swatch, I chained 12, placed a double crochet in the 3rd chain from hook (not counting the the first chains as a stitch) and placed 9 additional double crochets across the row to equal 10 stitches. I chained 2 to turn (not counting the chain 2 as a stitch), placed my first double crochet into the same stitch my chains came out of and continued across the row, with my last double crochet of the row going into the top of the last double crochet, not a turning chain. This is MUCH easier to find and keeps my stitch counts correct more often.
In this example, there are absolutely no holes and my edges aren’t quite as wonky as the first example. This is a big win as I prefer a fuller, cleaner look such as this as opposed to the first example.
So what was different, exactly?
First, I simply added ONE additional chain to my foundation chain to create a foundation in which all of my stitches are actual stitches, not chains. Do you have to do this? No. You can still create your foundation chain utilizing the original chains and use the following step.
What actually removes gaps and keeps my edges straight is not counting the turning chain as a stitch and chaining 2 to turn instead of 3. By chaining 2 instead of 3 to turn, I left less room for gaps. Not counting the turning chain as a stitch and instead crocheting into the very first stitch removes the possibility of a gap completely.
When a pattern calls for me to work into the next stitch or into the turning chain, I don’t. I go rogue. This is probably a big reason why I create my own patterns. Insert laugh track here.
For single crochets, I still chain 1. When using half double crochet, I chain 2. For double crochets, I chain 2 instead of 3. When using treble crochets, I chain 3 instead of 4.
That’s literally it.
By changing two minor habits, I went from wonky to straight edges like that. With this crochet tutorial, you no longer have to worry about how to crochet straight edges, and can get on with the actual crocheting.
I hope this crochet tutorial helps you on your mission for straight edges like it helped me. What tips or tricks are you interested in? Leave a comment below.
Don’t forget to join my Facebook Group so we can chat all about your creations! We are a group for crocheters of all experiences, all interests and love to hang out together. Come join the fun!

Shannon | Designer & Editor
Shannon helps crocheters find their next project and build their skills with in depth tutorials and crochet patterns on her blog, theloopholefox.com.
With more than a decade of crochet experience, Shannon knows that understanding why we do something matters just as much as how we do it. She teaches new techniques and crochet stitches in depth so you can crochet with confidence.
RELATED POSTS:
How to Gingham Crochet for Absolute Beginners
Crochet Market Bag Pattern
Excellent! Thanks for the great tips and description,. Also, great photos that really illustrate what you’re saying.
I’m glad you found them helpful! Thank you!