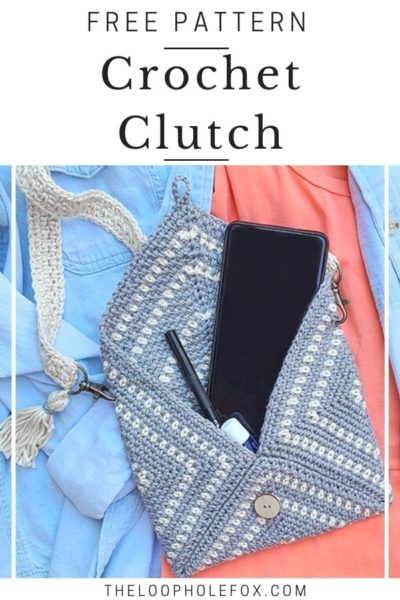
The Sunday Clutch Pattern
Crochet bags are one of my favorite items to have. They’re useful, they’re fun and they’re absolutely gorgeous. The Sunday Clutch, a free crochet clutch pattern, is no exception. This little bag is just big enough to carry your important items and small enough to not be a hassle while you’re out enjoying your summer. Choose your favorite colors and you have a perfect summer accessory!
Love this crochet bag pattern? Pin it to Pinterest!
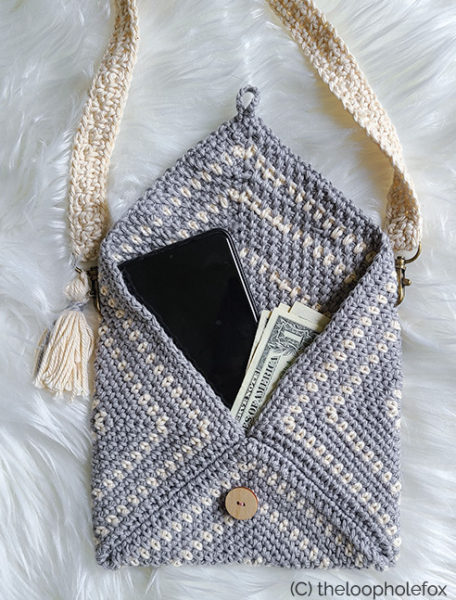
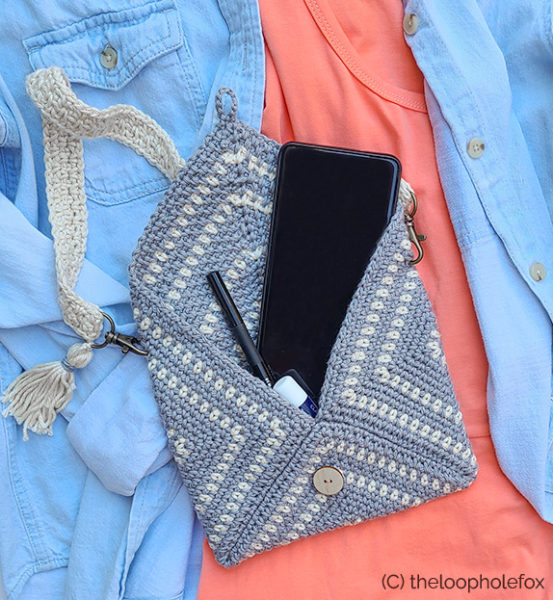
The Sunday crochet clutch pattern is the perfect summer accessory for coffee dates with friends or little outings around town. Small enough to not be a hassle yet big enough to carry important items like your phone, this crochet clutch pattern is perfect for grab-and-go.
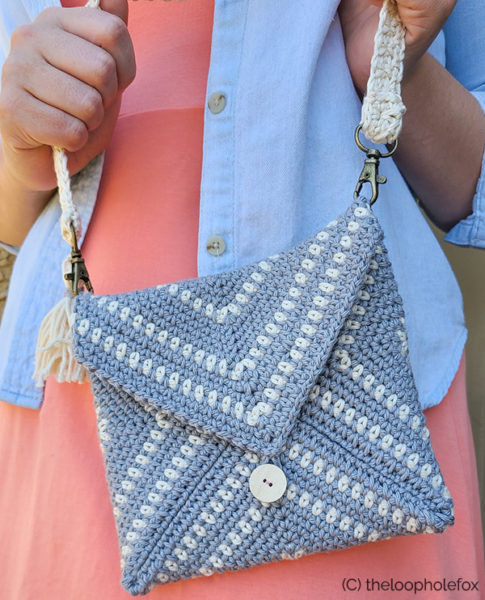
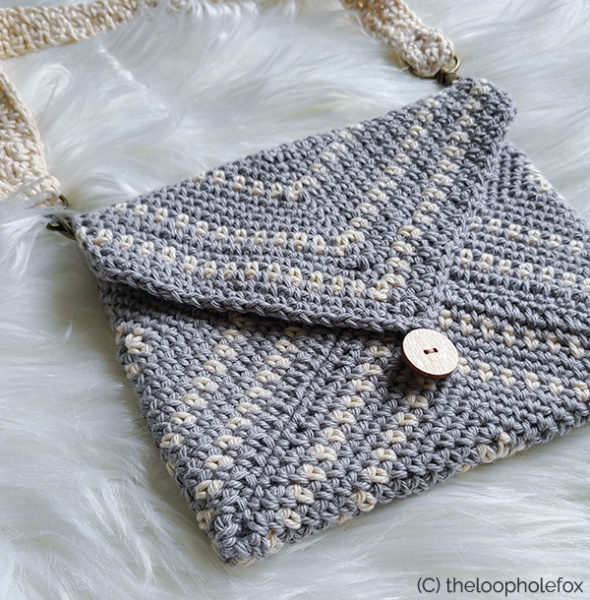
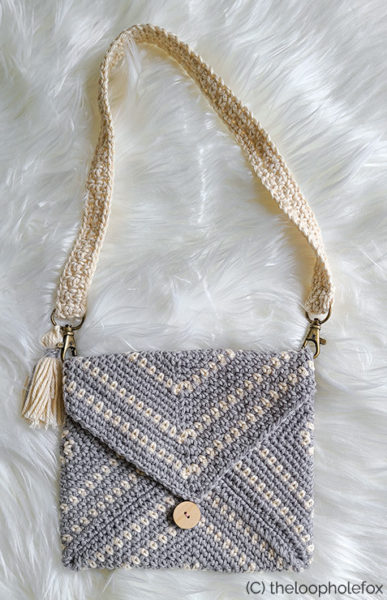
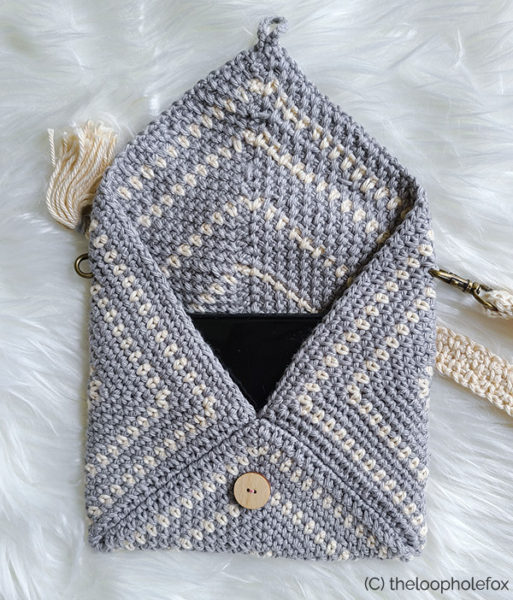
This crochet clutch pattern is worked flat as a square, seamed like an envelope and adorned with an adorable button for a secure close. The envelope seam creates a beautiful diamond shape and diagonal lines for visual interest. You can create a handle for your clutch as shown, purchase a strap for the bag or skip the handle completely, your choice! Finish with a cute tassel or other charm and you’re ready for anything.
DISCLAIMER: This post includes affiliate links. This means, should you decide to purchase a product via one of these links, I will receive a small commission at no extra cost to you. I only recommend products I use and love (Or products I know others love, have heavily researched, know have good ratings and plan to purchase myself). These small commissions help to support this blog and continue keeping most of my patterns free. You can read more on my Privacy Policy, if you prefer.
Inspiration for Crochet Clutch Pattern
I absolutely love crochet bags and knew that a crochet bag would be what I’d pick if I had to make only one project for summer.
I love how versatile crochet bags can be. You could make crochet totes or market bags in all different shapes and styles or you could go as small as a crochet clutch pattern. All crochet bags have a soft spot in my heart and, because I mostly design totes or larger bags, I thought I’d have a little fun and design the Sunday Clutch.
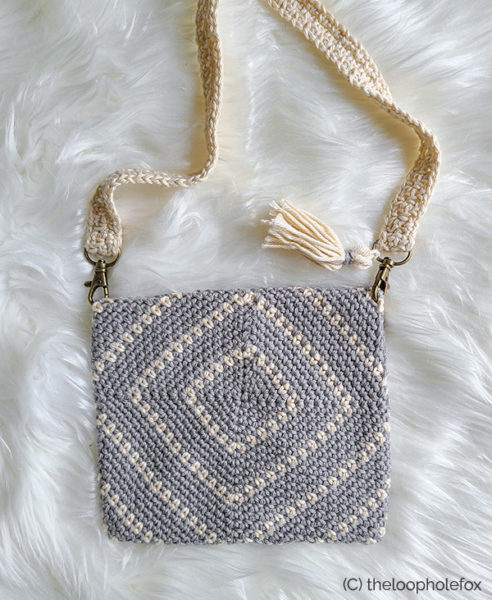
Lately (or, generally, my whole life), I’ve been really drawn to stripes and geometric shapes. Seriously, if I see something striped, I almost have to have it. So, I played with some ideas and finally landed on utilizing the Moss Stitch as the hero of this crochet clutch pattern. Not only was I able to achieve beautiful striping, but the stripes created a beautiful diamond design.
I had some left over yarn from WeCrochet after making the first sample with grey as the main color, so I made a second bag from the crochet clutch pattern with reverse colors and I love both of them! The Sunday Clutch is truly versatile and can be exactly what you’d want it to be. You can make it in as few or as many colors as you like, as big or as little as you like, with a strap or without one. The choice is yours!
Personally, I love crochet patterns that have some availability to be customized, and I think this crochet clutch pattern is no exception.
All About the Yarn
The yarn I used for this crochet clutch pattern is We Crochet’s Comfy Worsted. A big, big thank you to We Crochet for providing yarn support to myself and all of the designers in this crochet blog hop for our designs!
We Crochet’s Comfy Worsted is a blend of 75% prima cotton and 25% acrylic, which makes it a great cotton blend yarn for a multitude of summer crochet projects. I specifically chose this yarn because it was a simple, affordable cotton option that has a strong construction, a ton of color options and a soft feel. Unlike other cotton yarns I’ve used, this yarn was not scratchy or too stiff to work with and didn’t have splitting issues. It ended up being a great option for the crochet clutch bag and I am so glad it’s what I ended up choosing.
This yarn comes in a ton of beautiful colors so there is no shortage of options to choose from. What is really cool about the website is when you click on one of the colors, it will give you a detailed explanation of the yarn’s color. So, instead of just saying “grey”, it will say what kind of grey, if it’s warmer, if it has undertones of a certain color, etc. The site also usually tells you what color that specific color would pair well with, which is a great thing when you’re shopping for yarn online.
The Sunday Crochet Clutch Pattern
Overview and Details
This crochet clutch pattern is worked in the round as a square and then seamed like an envelope. The construction of the square uses the Moss Stitch and, when used in this method, this project works up very similar to a granny square. So, if you’ve ever worked a traditional granny square, you should be ready to go with this crochet clutch.
The project is worked in a flat square and then folded and seamed like one would do to make an envelope out of paper. Whichever seaming method is easiest for you will work fine for this project. Once seamed, we add a button of our preference for a secure closer and create the handle, if we prefer one.
If you do create your own handle (or purchase one), you’ll want to make sure you have D-Ring Lobster Clasps (or purchase a handle with them). The handle is attached via the D-Ring Lobster Clasps, threaded through stitches on the corner of the bag. This design allows the bag to be used as a little handbag or as a clutch. If you prefer to have your project be just a clutch, you can omit the instructions for the handle.
All in all, a pretty easy and fun pattern that is easy to customize.
Speaking of customization, you can easily customize the size of this crochet clutch pattern. If you’d like a smaller crochet bag than listed in the pattern, you can work less rounds. If you’d like a bigger bag, you can work more. Additionally, for the handle, you can make your own as I have or you can purchase one for a strong accent. You could also forgo the handle all together and have this crochet pattern be just a clutch. That’s up to you!
As I said previously in this blog post, you can also customize the colors. While the pattern is written to two colors, you could simply choose one color for a simpler bag, or you could use as many colors as you prefer. Make this crochet clutch pattern yours!
If you prefer a premium, ad-free PDF version of this pattern, you can grab one on either my Ravelry or my Etsy shop by clicking the buttons below. The PDF is 9 pages long and includes pictures to help guide you step by step through the first few as well as how to seam the bag, attach your handle to your lobster clasps, etc. The purchase will also come with a printer friendly version (only 1 picture) to help save on ink!
Skill Level
Easy/Advanced Beginner – This crochet clutch pattern uses the “Moss Stitch” which is made up entirely of single crochets and chains, which does lend some “beginner friendly” availability. Advanced techniques include working in the round, creating corners so the project stays square, seaming and sewing on a button.
If you’re brand new to crochet, I would learn these techniques before attempting this crochet clutch pattern. However, if you have some understanding of these techniques, you should have no issues.
Materials
For this crochet clutch pattern, you will need a Medium (4) weight cotton yarn in two colors of your choice.
Color A: You will need approximately 2.3 oz / 65g / 145 yards. (Just shy of 1.5 skeins of Comfy Worsted)
Color B: You will need approximately 1 oz / 25g / 55 yards. (0.5 skeins of Comfy Worsted)
I used We Crochet Comfy Worsted in colorways Whisker (grey) and Ivory (cream/white).
You could use nearly any medium (4) cotton yarn you prefer. A good substitute would be I Love This Cotton, if you prefer to shop in store. If you do plan on purchasing yarn for this project that isn’t the yarn I chose, I wouldn’t worry so much about the gauge being off (because all bag sizes are good bag sizes!) and decide more on the feel and structure of the yarn.
Tools
4 mm (G-6) hook (I used my favorite Furls Streamline Swirl)
Tapestry needle
Scissors
Stitch Markers
Additional Materials
You will need a button that is approximately 0.75 to 0.78 inches in diameter. I used a button from I set I already had, but these buttons have great reviews and would be a good option, if you don’t want to search around for some.
If you prefer a handle, you will need two 0.75 (3/4th) inch D Ring Lobster Clasps. I purchased these from Amazon and found them to work very well.

Gauge
Gauge isn’t extremely important. Regardless of the size of your square for your bag, the bag will turn out beautifully. However, check your gauge after Round 6. It should measure approximately 2 inches across the square if you used a magic circle to start. Again, if your gauge is slightly off – it’s not to worry. If you find that your project is very loose and needs some tightening up, use a smaller sized hook.
Note: I am generally a “tight” crocheter. This means my gauge is typically tighter than others.
Finished Size
Before seaming: Approximately 12 inches x 12 inches.
After seaming: Approximately 8 inches wide x 7.5 inches tall (without handle).
Handle length: Approximately 18 inches long (without clasps) and 1 inch wide.
Abbreviations
- Sc – Single crochet
- Ch – Chain
- Spc – Space
- Sk – Skip
- Sl st – Slip stitch
- CA – Color A
- CB – Color B
Notes
- This pattern calls for usage of a magic circle. You can use the magic circle or you can chain 3 and slip stitch to the first chain made to create a circle to work into. Your choice! I have a video tutorial linked for the magic circle below.
- This pattern is worked in closed rounds. You will always slip stitch to the first stitch of the round to close.
- Chain 1 at the beginning of the rounds do not count as stitches. Always place your first stitch of the round in the same stitch.
- You might want to mark your chain 2 space corners with stitch markers, at least in the first few rounds.
- You can crochet over your ends as you work to weave them in, but you will want to crochet over the same end on the next round in the chain 1 spaces to make sure it’s fully weaved.
- Make sure to read the section “How to Read this Pattern” before you begin, so you have an understanding of the different types of brackets used and what they mean.
Special Stitches
This crochet clutch pattern begins with a Magic Circle. You can use an alternate method if you prefer. I would recommend at least attempting with a magic circle, though, as it will have a might tighter beginning and closed structure for the bag. I have a photo tutorial and video tutorial for this technique, which you can check out if you haven’t used it before.
This crochet clutch pattern also uses the Moss Stitch, worked in the round as a square. The Moss Stitch uses single crochet and chains to create a mesh, woven structure. If you haven’t worked the Moss Stitch before, I have both a photo and video tutorial for the stitch, too.
How to Read this Crochet Clutch Pattern
This crochet clutch pattern uses different types of brackets for different instructions. The majority of the pattern uses the “Moss” (or “Linen”) stitch which is made of single crochets and chain 1 spaces, similar to a granny square. Because of this, there often need to be repeats within repeats for a simple to read pattern. Please review the different brackets and what they mean before working this pattern. These brackets reference when to repeat, what to repeat, and when to work several stitches in the same space.
- […] – Full repeats are listed in brackets. This means you will repeat everything within the brackets the number of times indicated.
- (…) – Stitch Counts are listed at the end of the row in parentheses and italics.
- [ (….)….] – Parentheses inside of a bracket indicate to work all steps within the parentheses in the same indicated space.
- [..{….}…] – Braces “{ }” inside of a bracket indicate to repeat the instructions within the braces until instructed to start the full repeat over.
Using Round 4, which uses all of the brackets, as an example: “Round 4 – sl st into ch 2 spc, ch 1 [(sc, ch 2, sc) in ch 2 space. Ch 1, sk sc {sc in ch 1 spc, ch 1, sk sc} across side to next ch 2 spc]. Repeat 4x. Sl st to first sc to close. (16 sc, 4 ch 2, 12 ch 1)”
This means you will: Slip stitch into the chain 2 space to begin the round. Then you will chain 1, [(place 1 single crochet, chain 2 and 1 single crochet) all in the chain 2 space. Then you will chain 1, skip the single crochet from the previous row, {place a single crochet in the next chain 1 space, chain 1, skip the single crochet from the previous row} until you reach the next chain 2 space.] Then begin the repeat over again.
You will repeat the bolded section a total of 4 times to complete the round. You will then slip stitch to the first single crochet to close. Once complete, you should have (16 single crochet, 4 chain 2 spaces, 12 chain 1 spaces).
How to Make this Crochet Clutch Pattern
With CA,
Round 1 – In magic circle, ch 1, [sc, ch 2] Repeat 4x. Pull tail tight. Sl st to first sc to close. (4 sc, 4 ch 2)
Round 2 – sl st into ch 2 spc, ch 1 [(sc, ch 2, sc) in ch 2 spc. Ch 1, sk sc] Repeat 4x. Sl st to first sc to close. (8 sc, 4 ch 2, 4 ch 1)
Round 3 – sl st into ch 2 spc, ch 1 [(sc, ch 2, sc) in ch 2 space. Ch 1, sk sc, sc in ch 1 spc, ch 1, sk sc]. Repeat 4x. Sl st to first sc to close. (12 sc, 4 ch 2, 8 ch 1)
Round 4 – sl st into ch 2 spc, ch 1 [(sc, ch 2, sc) in ch 2 space. Ch 1, sk sc {sc in ch 1 spc, ch 1, sk sc} across side to next ch 2 spc]. Repeat 4x. Sl st to first sc to close. (16 sc, 4 ch 2, 12 ch 1)
Round 5 – Repeat Round 4. (20 sc, 4 ch 2, 16 ch 1)
Finish off CA. Join CB in in ch 2 spc with a ch 1.
Round 6 – [(sc, ch 2, sc) in ch 2 space. Ch 1, sk sc {sc in ch 1 spc, ch 1, sk sc} across side to next ch 2 spc]. Repeat 4x. Sl st to first sc to close. (24 sc, 4 ch 2, 20 ch 1)
Finish off CB. Join CA in ch 2 spc with a ch 1.
Round 7 – Repeat Round 6. (28 sc, 4 ch 2, 24 ch 1)
Round 8 through 11 – Repeat Round 4. Round 11 stitch count: (44 sc, 4 ch 2, 40 ch 1)
Finish off CA. Join CB in ch 2 spc with a ch 1.
Round 12 – Repeat Round 6. (48 sc, 4 ch 2, 44 ch 1)
Finish off CB. Join CA in ch 2 space with a ch 1.
Round 13 – Repeat Round 6. (52 sc, 4 ch 2, 48 ch 1)
Round 14 through Round 17– Repeat Round 4. Round 17 stitch count: (68 sc, 4 ch 2, 64 ch 1)
Finish off CA. Join CB in ch 2 space with a ch 1.
Round 18 – Repeat Round 6. (72 sc, 4 ch 2, 68 ch 1)
Finish off CB. Join CA in ch 2 spc with a ch 1.
Round 19 – Repeat Round 6. (76 sc, 4 ch 2, 72 ch 1)
Round 20 through Round 23 – Repeat Round 4. Round 23 stitch count: (92 sc, 4 ch 2, 88 ch 1)
Finish off CA. Join CB in ch 2 space with a ch 1.
Round 24 – Repeat Round 6. (96 sc, 4 ch 2, 92 ch 1)
Finish off CB. Join CA in ch 2 space with a ch 1.
Round 25 – Repeat Round 6. (100 sc, 4 ch 2, 96 ch 1)
Round 26 and 27 – Repeat Round 4. Round 27 stitch count: (108 sc, 4 ch 2, 104 ch 1)
Finish off CA. Join CB in ch 2 space with a ch 1.
Round 28 – Repeat Round 6. (112 sc, 4 ch 2, 108 ch 1)
Finish off CB. Join CA in ch 2 space with a ch 1.
Round 29 – Repeat Round 6. (116 sc, 4 ch 2, 112 ch 1)
Round 30 – Repeat Round 4. (120 sc, 4 ch 2, 116 ch 1)
Round 31 – sl st into ch 2 spc, ch 1 [(sc, ch 2, sc) in ch 2 spc. {Ch 1, sk sc, sc in ch 1 spc} across side to next ch 2 corner, ending on ch 1, sk sc]. Repeat 3x. In last ch 2 spc, work (sc, ch 9, sl st to front loop of of first sc in ch 2 spc to form loop, sc). [Ch 1, sk sc, sc in ch 1 spc] across side to the end of round, ending on ch 1, sk sc. Sl st to first sc to close. (124 sc, 3 ch 2, 120 ch 1, 1 ch 9)
*Special note – Ensure the loop created by the chain 9 of this round fits over your button. This loop should be snug. It should not be so tight you have to fight with it, and not so loose that it will come undone without guidance. If the loop is not big enough or is too big, adjust the chain length as needed to be secure.
Finish off, weave ends.
Handle
The handle of this bag is designed to be removable so that this bag can be a shoulder bag or a clutch. If you prefer to just have a clutch, you can skip the handle section. You can create a handle as long or as short as you prefer. If you’d like a longer (or shorter) handle, you would add or remove chains from your starting chains.
You do need an ODD number of chains if you change the handle length, so make sure you have an odd number to start with.
10 stitches = approximately 2 inches, so if you’d like to add length, you can add 10 extra chains per every 2 inches you’d like to increase. For example, if you wanted a handle that was approximately 22 inches long, you would add 20 chains to the starting chain.
Instructions:
With CB, Ch 101
Row 1 – sc in 3rd ch from hook (2 skipped chs = ch 1 spc), [chain 1, sk 1 ch, sc next]. Repeat inside brackets to end of row. Your last sc should be in the last ch. (50 sc, 50 ch 1)
Row 2 – ch 2, turn. Sk sc, sc in ch 1 space. [ch 1, sk sc, sc ch 1 spc]. Repeat inside brackets to end of row. Your last sc should be in the last ch 1 spc, which was created by skipping 2 ch at the beginning of row one. (50 sc, 50 ch 1)
Row 3 – Repeat Row 2.
Border:
Ch 1, turn. Place 1 sc in each sc and ch 1 spc to end of row. At the end, ch 1, turn 90 degrees to work along the short end. Place 1 sc in the side of each sc and ch 1 spc. Repeat along the other two sides to the end. Ch 1, sl st to first sc to close.
Finish off, weave ends.
Thread one short end through a D ring on a clasp and fold over. You should have just enough space to seam and have some movement, but not a ton of space for the D ring to shuffle around. Using an extra length of yarn and a tapestry needle, sew the short end to the main strap to secure.
Seaming the Bag
Place your square down so the right side is facing up and bring the 3 corners of your square that do NOT have the 9 chain loop together in the center like an envelope.
Seam two of the edges that touch with whichever seaming method you prefer. I used a separate length of yarn, a tapestry needle and the mattress stitch to seam my edges together. The mattress stitch seams the two sides together like you’re tying a shoe. Start at the chain two spaces in the center and work your way to the bottom of the bag. Repeat this seam on the other side. Once both seams are finished, turn your bag right side out.
Button and Finishing
Your bag should now look like an open envelope. You will notice that your top flap does not line up perfectly with the seams – that’s okay! When we fold the flap over, the top most corners of the flap will fold with it.
Sew the button onto the bag approximately 1.5 inches below where the 3 corners of the bag meet after seaming. You can center the button by centering it where your Color B rows have created points.
Fold your flap over and secure the flap closed by pulling the loop of chains over the button. Where the flap folds at the top of the bag is where we will place the clasps. Place one clasp in either corner by threading the clasp through the stitches to secure.
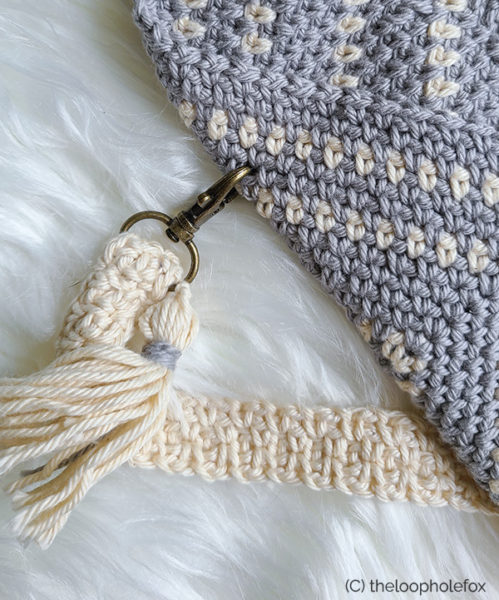
With your bag seamed, button sewed on and handle attached, you’re all set! Now you can add a cute tassel or other charm to the D ring of the clasp, if you like.
You’re done! Enjoy!
That’s it! You now have an adorable crochet clutch pattern to take with you on your fun coffee dates and quick errand running (which we all know means buying more yarn!).
Don’t forget to Pin this pattern to Pinterest so you don’t forget it!
I hope you enjoy The Sunday Clutch pattern and I can’t wait to see all the projects! If you’d like to have your finished Sunday Clutch featured in my newsletter or on my Instagram, you can email me a picture and I’d love to show it off! My email is [email protected]. Please state that you’d like to be featured! 🙂
One of my greatest joys is seeing your finished crochet projects from my patterns or tutorials, so when you post to Instagram, don’t forget to tag me so I can show you some love! I’m @theloopholefoxcrochet. You can also share pictures on my recent posts on Facebook or within my Facebook group!
And don’t forget to pin this to your Pinterest boards, so you can remember it for later!
Don’t forget to join my Facebook Group so we can chat all about your creations! We are a group for crocheters of all experiences, all interests and love to hang out together. Come join the fun!
Thanks so much for hanging out with me today. Enjoy!

Shannon | Designer & Editor
Shannon helps crocheters find their next project and build their skills with in depth tutorials and crochet patterns on her blog, theloopholefox.com.
With more than a decade of crochet experience, Shannon knows that understanding why we do something matters just as much as how we do it. She teaches new techniques and crochet stitches in depth so you can crochet with confidence.
Find More Free Crochet Bag Patterns:
The Summer Tote
The Afternoon Market Bag
The Halcyon Tote