
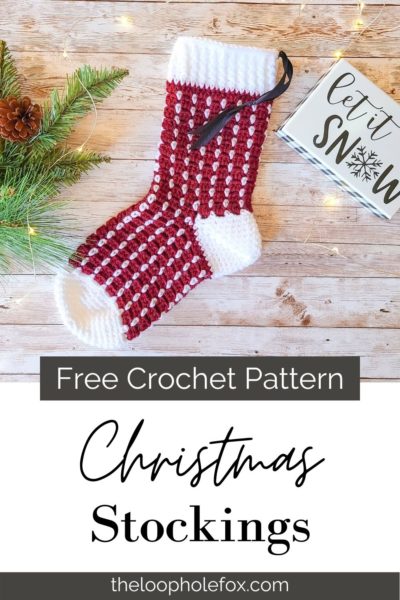
Fireside Christmas Stocking
It’s finally time! The Christmas season is upon us. With Thanksgiving over, it’s finally time to put up our Christmas trees, wrap presents and decorate which, of course, includes stockings! I am so excited to present this crochet Christmas stocking pattern just in time for the season!
Inside this blog post, you’ll find the free crochet Christmas stocking pattern with a few pictures to help walk you through. I have also included the full, step by step video tutorial and links to the PDF patterns with full photo tutorials. You’ll have a bunch of stockings in no time!
Crochet Christmas Stockings with a Ton of Personality
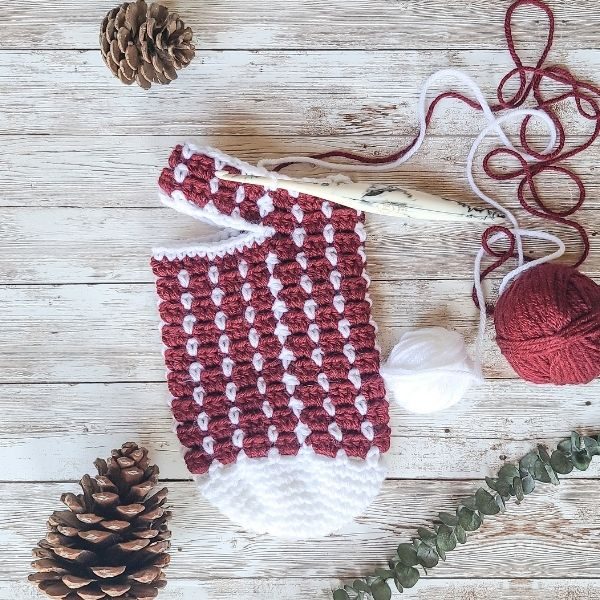
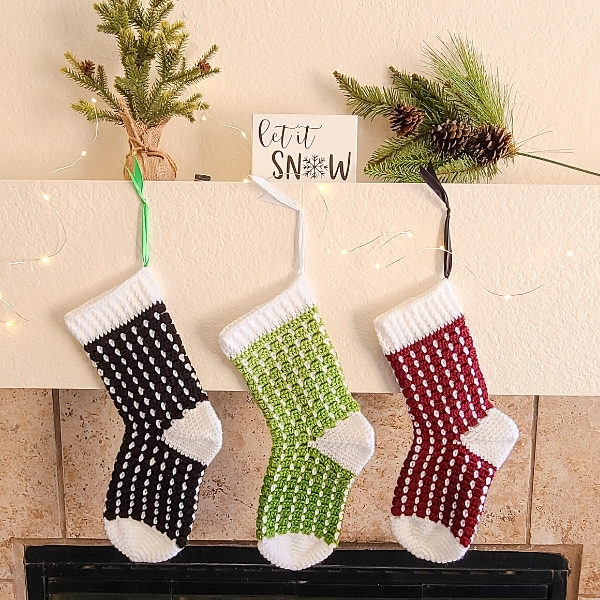
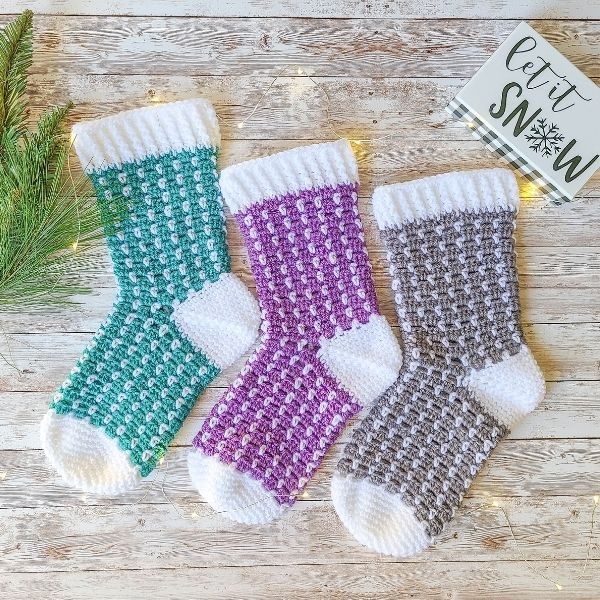
I love this crochet Christmas stocking pattern so much that I’ve created like eight of them! I designed the first one, and then couldn’t stop creating them for my friends and family members. As you can see in the pictures throughout the crochet stocking pattern, I’ve created two different sets. A classic Christmas set and a fun and funky colored set. They’re adorable!
The best thing about this crochet Christmas stocking pattern is that these can be created completely using scrap yarn. You heard that right! These stockings take less than 2 ounces of yarn per color, so you can make lovely Christmas stockings for your family AND bust your stash! Win win.
Merry Christmas to me!
DISCLAIMER: This post includes affiliate links. This means, should you decide to purchase a product via one of these links, I will receive a small commission at no extra cost to you. I only recommend products I use and love (Or products I know others love, have heavily researched, know have good ratings and plan to purchase myself). These small commissions help to support this blog and continue keeping most of my patterns free. You can read more on my Privacy Policy, if you prefer.
If you prefer a PDF version of this pattern, which includes a full photo tutorial, you can grab one on either my Ravelry or my Etsy shop by clicking the buttons below.
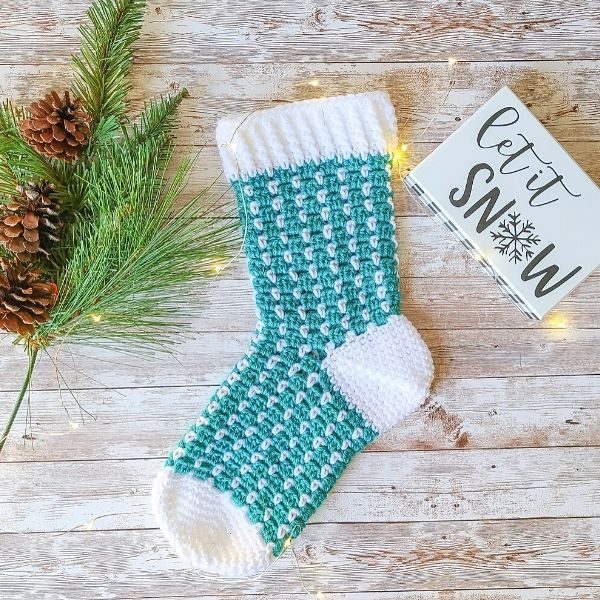
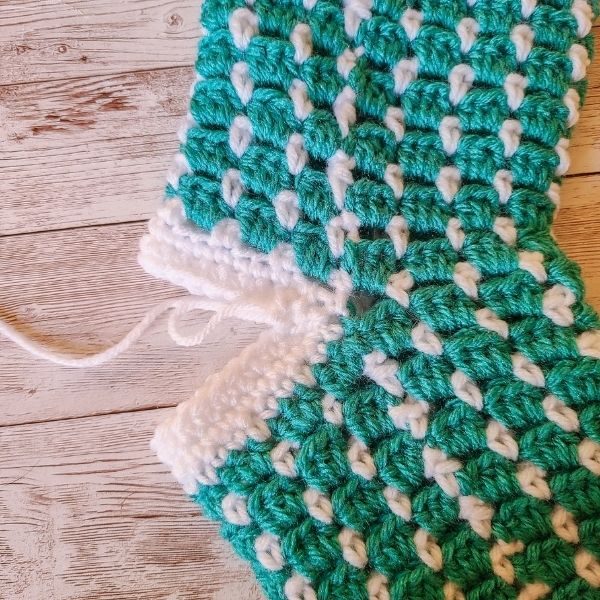
When I decided to design this crochet Christmas stocking pattern, I wanted it to have a ton of personality (of course) and be somewhat simple (of course). I landed on the block stitch and I am SO happy I did. These stockings are easy to create for any gender by changing your main color and you’ll still have the detail of the “pinstripe” running up the side.
Even my Grinch-y husband loved these stockings. So you know they’re a hit. 😉
SKILL LEVEL
Advanced Beginner/Light Intermediate – You should know the basic stitches and how to work in closed rounds. You should be familiar with creating chain spaces and working into them. The heel of this stocking is an afterthought heel which is a slightly more advanced technique. It’s not difficult to create but may be new to you.
MATERIALS
This pattern is written to a medium (4) Aran weight yarn. You will need approximately:
Main Color (MC) – 2.5 ounces / 160 yards
Contract Color (CC) – 1.5 ounces / 80 yards
Contract color is used for the toe, heel and cuff.
If you’d like to have a ribbon loop to hang your stockings from like I did, you will also need ribbon of your choice for the accent on this hat. I purchased these from Amazon.
I used:
All the yarn I used was scrap yarn left over from other projects. If you’re looking specifically for the colors I used, please see below. However, you can use your scrap yarn for this project, provided you have enough.
Big Twist Value in White (used on all stockings in photos), Red Heart Super Saver in Black (black stocking), Red Heart Ombre in Green Apple (green stocking), I Love This Yarn in Aubergine (red stocking), Red Heart Super Saver in Jade (teal stocking), Red Heart Super Saver in Medium Purple (purple stocking) and Big Twist Value in Taupe (grey stocking).
TOOLS
You will also need:
5 mm (H-8) hook
Tapestry needle
Scissors
Stitch Markers, if you prefer them
GAUGE
Gauge isn’t extremely important, but if you’d like your stocking to be approximately the same size as mine:
Check gauge after completing Round 9. Fold your work in half and measure your half circle across the top (widest portion). It should measure 4.5 to 5 inches.
Note: I am a tight crocheter, so my tension is usually tighter than others. Learn more about gauge and what this means here.
FINISHED SIZE
From heel to toe: Approximately 10 inches.
From heel to cuff: Approximately 10 inches.
Width: Approximately 5 inches.
ABBREVIATIONS
This pattern is written in standard US terms.
- MC – Main color
- CC – Contrast Color
- Ch(s) – Chain(s)
- Sl st – Slip stitch
- Sc – Single Crochet
- Sc2tog – Single Crochet 2 Together*
- Hdc – Half double crochet
- FPhdc – Front Post Hdc*
- St – Stitch
- Sk – Skip
- […] – Repeats are listed in brackets [ ].
- (#) – Stitch counts are referenced at the end of each round in parentheses and bold italics (#).
NOTES
- This pattern is worked completely in closed rounds.
- The chain 1 at the beginning of the round never counts as a stitch. Always place your first stitch in the same stitch you chained out of.
- This Christmas stocking is worked from the toe up.
- The heel is an “afterthought” heel, meaning it is the last portion of the stocking that we crochet and is added on separately.
- For most of this pattern, you will not need to trim your yarn (unless you want to). We simply drop the yarn we aren’t using inside of the work, and pick it up later when we need it. This helps alleviate having a ton of ends to weave in.
- When we switch color, we will not finish the last stitch with the new color. Rather, we will change color after the slip stitch. This hides the seam better. (There are pictures below to show you).
- Stitch counts are referenced at the end of each round in parentheses and bold italics (#).
- Repeats are listed in brackets [ ].
SPECIAL STITCHES
SC2TOG
The sc2tog (or single crochet 2 together) is a decrease in which we make 2 stitches into 1 stitch.
To sc2tog, you will: Insert your hook into the first stitch, yarn over and pull through as if you were going to work a single crochet. Now, instead of finishing the single crochet crochet, you will insert your hook into the next stitch, yarn over and pull through. You will now have three loops on your hook. Yarn over and pull through all five. Sc2tog complete!
FPHDC
In this pattern, the ribbing of the cuff is created using Front Post Half Double Crochets.
To work a FPhdc, you will:
Yarn over and insert your hook from front of work to back of work between the posts of the previous stitch and current stitch and maneuver the hook back to the front of the work on the other side of the post.
Your hook should sit horizontal with the post of the stitch on the front of the hook. Yarn over and pull up a loop. Complete the FPhdc the same as you would a normal half double crochet: Yarn over and pull through all 3 loops.
MAGIC CIRCLE
This pattern is written to use a magic circle. You can use the magic circle or you can chain 3 and slip stitch to the first chain made to create a circle to work into. Your choice!
If you’d like to learn how to create a magic circle, you can find my photo and video tutorial here: https://theloopholefox.com/magic-circle-how-to-video-tutorial/
CHANGING COLOR AFTER SLIP STITCH
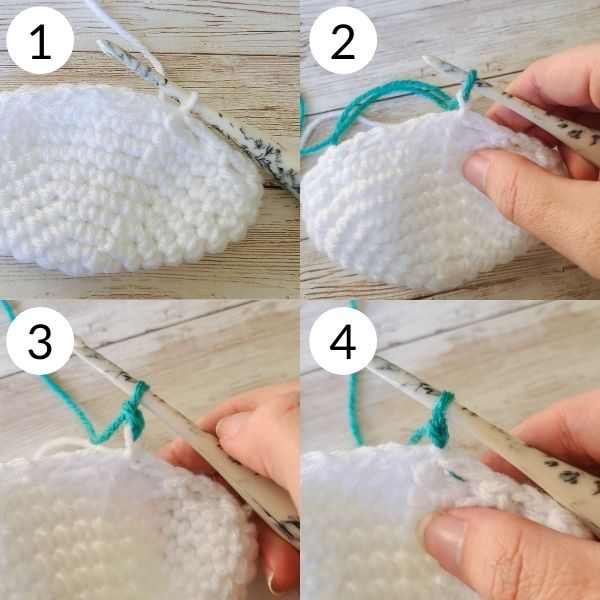
Step 1: Slip stitch to close.
Step 2: Introduce second color by pulling through the slip stitch.
Step 3: Chain 1 (if required for the pattern)
Step 4: Pull the tail end of the first color tight.
In my video tutorial, I show you all of these steps in detail. Don’t forget to check it out if you need to!
How to Make this Crochet Christmas Stocking
Beginning with CC, create a Magic Circle or chain 3, slip stitch to first chain made to form a circle.
Round 1 – In the Magic Circle, place 6 sc. Sl st to first stto close. (6)
Round 2 – Ch 1 (does not count here or throughout), place 2 sc in each st around. Sl st to first st to close. (12)
Round 3 – Ch 1, [sc 1 st, 2 sc next st] Repeat inside brackets 6x. Sl st to first st to close. (18)
Round 4 – Ch 1, [1 sc each of the next 2 sts, 2 sc next st] Repeat inside brackets 6x. Sl st to first st close. (24)
Round 5 – Ch 1, [1 sc each of the next 3 sts, 2 sc next st] Repeat inside brackets 6x. Sl st to first st to close. (30)
Round 6 – Ch 1, [1 sc in each of the next 4 sts, 2 sc next st] Repeat inside brackets 6x. Sl st to first st to close. (36)
Round 7 – Ch 1, [1 sc in each of the next 5 sts, 2 sc next st] Repeat inside brackets 6x. Sl st to first st to close. (42)
Rounds 8 and 9 – Ch 1, place 1 sc in each stitch around. Sl st to first st to close. (42)
Round 10 – Ch 1, place 1 sc in same st. [Ch 2, sk 2, sc next st] Repeat inside brackets around until 2 st remain. Ch 2, sl st to first st to close. (14 ch 2 spaces, 14 sc)
Change color to MC.
Round 11 – Ch 1, place 3 hdc in each ch 2 space around. Sl st to first st to close. (14 3 hdc clusters)
Change color to CC.
Round 12 – Ch 1, place 1 sc in space between first cluster and last cluster of hdc’s created in previous round. [Ch 2, sc in space between clusters of 3 hdc]. Repeat inside brackets around until 3 st remain. Ch 2, sl st to first st close. (14 ch 2 spaces, 14 sc)
Rounds 13 through 17 – Repeat Rounds 11 and 12 in sequence.
Make sure to switch color at the end of each round.
Round 27 should be a repeat of Round 11.
With Round 27 complete, begin creating the heel opening with the instructions on the next page.
Creating Heel Opening for Afterthought Heel
At the end of Round 27, change to CC.
Round 28 – Part 1:
Ch 1. Place 1 sc in the first st and next 20 sts. Ch 21 and, being careful not to twist your chains, sl st to the first sc created in the Round.
*It can be very helpful to place a stitch marker in this sc and leave it there until the stocking is finished. We will be coming back to this stitch later for the heel.
You should now have a “round” made of 21 sc and 21 chains. You may also notice that your work has naturally turned. If it hasn’t, turn your work so that you will work along the wrong side (inside of stocking).
Round 28 – Part 2:
Continuing to work with CC and working along the wrong side of Round 27:
[ch 2, sk 2, sc next st]. Repeat inside brackets around until you have 3 sts remaining before your CC sc.
Ch 2 and place 1 sc in 1st ch of your 21 chains from Row 28 Part 1.
[ch 2, sk 2, sc next st]. Repeat inside brackets across the chs until you have 2 ch remaining. Ch 2, sl st into the first ch 2 spc created in Part 2.
Change color to MC. Turn.
Round 29 – Ch 1, starting in the ch 2 spc in which the slip stitch went into to close Round 28, place 3 hdc in each ch 2 space around. Sl st to first st close. (14 3 hdc clusters)
Change color to CC.
Round 30 – Ch 1, place 1 sc in space between first cluster and last cluster of hdc’s created in previous round. [Ch 2, sc in space between clusters of 3 hdc]. Repeat inside brackets around until 3 st remain. Ch 2, sl st to first st close. (14 ch 2 spaces, 14 sc)
Change color to MC.
R31 – Ch 1, place 3 hdc in each ch 2 space around. Sl st to first st to close. (14 3 hdc clusters)
Rounds 32 through 47 – Repeat Rounds 30 and 31 in sequence. Make sure to switch color at the end of each round.
Round 47 should be a repeat of Round 31.
Cut MC, continue with CC only.
Round 48 – Ch 1, place 1 hdc in each st around. Sl st to first st to close. (42)
Rounds 49 through 52 – Ch 1, place 1 hdc in the first st, fphdc next. [1 hdc next st, 1 fphdc following st]. Repeat inside brackets around. Sl st to first st to close. (42)
Round 53 – Ch 1, place 1 sc in each st around. Sl st to first st to close. (42)
Cut CC, weave ends.
Creating the Heel
Join CC in first sc from Round 28 Part 1 with a chain 1 (This is the sc that is marked if you placed a stitch marker when the note specified).
Round 1 – Place 1 sc in the first stitch and in each of the next 20 stitches. Rotate your work so you are now working along the chains created in R28 Part 1, and place 21 sc across. Sl st to first sc made to close. (42)
*If you have trouble finding the chains to stitch into, just crochet 21 sc along the chains as evenly spaced as possible.
Round 2 – Ch 1, sc2tog first 2 sts, 1 sc next 17 sts, sc2tog 2x. 1 sc next 17 sts, sc2tog last 2 sts. Sl st to first st to close. (38)
Round 3 – Ch 1, sc2tog first 2 sts, 1 sc next 15 sts, sc2tog 2x. 1 sc next 15 sts, sc2tog last 2 sts. Sl st to first st to close. (34)
Round 4 – Ch 1, sc2tog first 2 sts, 1 sc next 13 sts, sc2tog 2x. 1 sc next 13 sts, sc2tog last 2 sts. Sl st to first st to close. (30)
Round 5 – Ch 1, sc2tog first 2 sts, 1 sc next 11 sts, sc2tog 2x. 1 sc next 11 sts, sc2tog last 2 sts. Sl st to first st to close. (26)
Round 6 – Ch 1, sc2tog first 2 sts, 1 sc next 9 sts, sc2tog 2x. 1 sc next 9 sts, sc2tog last 2 sts. Sl st to first st to close. (22)
Round 7 – Ch 1, sc2tog first 2 sts, 1 sc next 7 sts, sc2tog 2x. 1 sc next 7 sts, sc2tog last 2 sts. Sl st to close. (18)
Round 8 – Ch 1, sc2tog first 2 sts, 1 sc next 5 sts, sc2tog 2x. 1 sc next 5 sts, sc2tog last 2 sts. Sl st to first st to close. (14)
Round 9 – Ch 1, sc2tog first 2 sts, 1 sc next 3 sts, sc2tog 2x. 1 sc next 3 sts, sc2tog last 2 sts. Sl st to first st to close. (10)
Cut CC, leaving a long tail to seam the heel.
After Round 9, you will be left with a small opening of 12 stitches. Turn your stocking inside out and seam the small opening in the heel with whichever method you prefer.
I used my tapestry needle and used the whip stitch to seam.
From here, you can slip a ribbon between two stitches in the last row of the stocking to create the loop, or you can crochet a loop on if you prefer.
You now have your Fireplace Christmas Stocking! How exciting! Aren’t they adorable? Despite looking a bit intimidating to begin, this crochet Christmas stocking pattern works up quickly, so you can make as many as you like in as many colors as you like.
I didn’t stop at one… I’ve made like eight now. What colors will you make yours in?
One of my greatest joys is seeing your finished crochet projects from my patterns or tutorials, so when you post to Instagram, don’t forget to tag me so I can show you some love! I’m @theloopholefoxcrochet. You can also share pictures on my recent posts on Facebook or within my Facebook group!
And don’t forget to pin this to your Pinterest boards, so you can remember it for later!
Don’t forget to join my Facebook Group so we can chat all about your creations! We are a group for crocheters of all experiences, all interests and love to hang out together. Come join the fun!

Shannon | Designer & Editor
Shannon helps crocheters find their next project and build their skills with in depth tutorials and crochet patterns on her blog, theloopholefox.com.
With more than a decade of crochet experience, Shannon knows that understanding why we do something matters just as much as how we do it. She teaches new techniques and crochet stitches in depth so you can crochet with confidence.
Find More Free Crochet Patterns:
Crochet Santa Hats
Snowbank Pocket Scarf
Arctic Beanie
The Best Christmas Gifts for Crocheters
Hi There – TY for the pattern & for all of them – would you mind telling me which laptop you just got???
My sis doesn’t do video editing, etc. BUT if you bot 1 that DOES, then I’d luvta know which brand, model, etc. – possible??? She is a sub teacher & with the new ‘online’ schooling needs to have a hefty one that’ll handle all she has to do – ty very much for the info :))
Hooks & Hugs, Lisa
Hi Lisa!
Of course! I purchased the Asus Tuf Gaming A15 laptop – mostly because gaming laptops have upgraded video cards and capability to have more RAM included. I purchased mine from XoticPC simply because I could have the RAM upgraded from 8gb to 32gb which I needed for video editing. (This is my first time ordering from them so I won’t say I heavily recommend them as my laptop hasn’t arrived yet, but so far the process has been quick and easy! I can let you know after it has arrived if I fully recommend them or not.)
I just looked online at Amazon and they do have the stock versions available with 8gb RAM or 16gb of RAM. If your sister isn’t doing video editing or using RAM heavy software such as Premiere Pro, Photoshop or Lightroom and is more-so using Zoom and other lighter software, she should be able to get by with 8gb RAM to help with the cost. If she wants something a little more robust, she could look for one with 16gb of RAM which will be a little more expensive.
This, of course, is just what I purchased with my knowledge of computers. I would say I am somewhat knowledgeable as I’ve built gaming desktops in the past and both my husband and I utilize computers for heavy software and gaming, but I am in no way a professional and this is just my opinion. <3
I hope this helps!
Shannon
Your Christmas stockings are adorable. Makes me want to make a pair to wear. Will definitely be making some for the mantle, but also want to try making a wearable model. Thank you for sharing your time, talent and pattern. Wishing you and yours a very Merry Christmas. Stay safe and stay healthy.
Thank you so much, I’m so glad you like them! I’d love to hear how a wearable pair goes. 🙂 Thank you so much for such a kind comment. I hope you and your family have a lovely Christmas.