Crochet Arcade Stitch Tutorial
If you’re looking for a crochet stitch pattern that has a delicate look yet strong construction, looks fantastic on it’s own or as beautiful detailing for a border or larger project and is generally a beautiful stitch that is easy enough but has a four row repeat that stays interesting… You don’t want to miss out on the Crochet Arcade Stitch.
What is the Arcade Stitch?
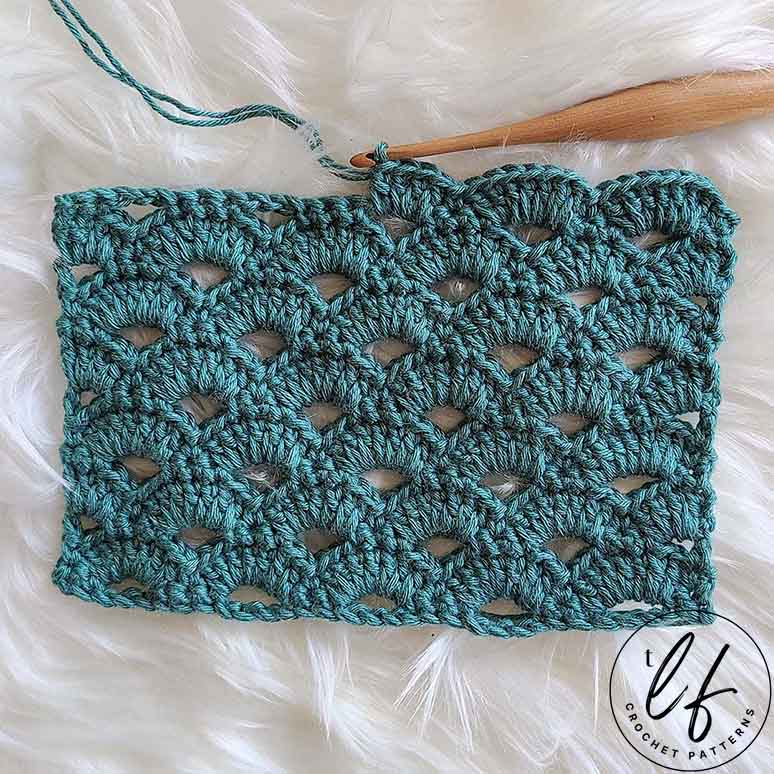
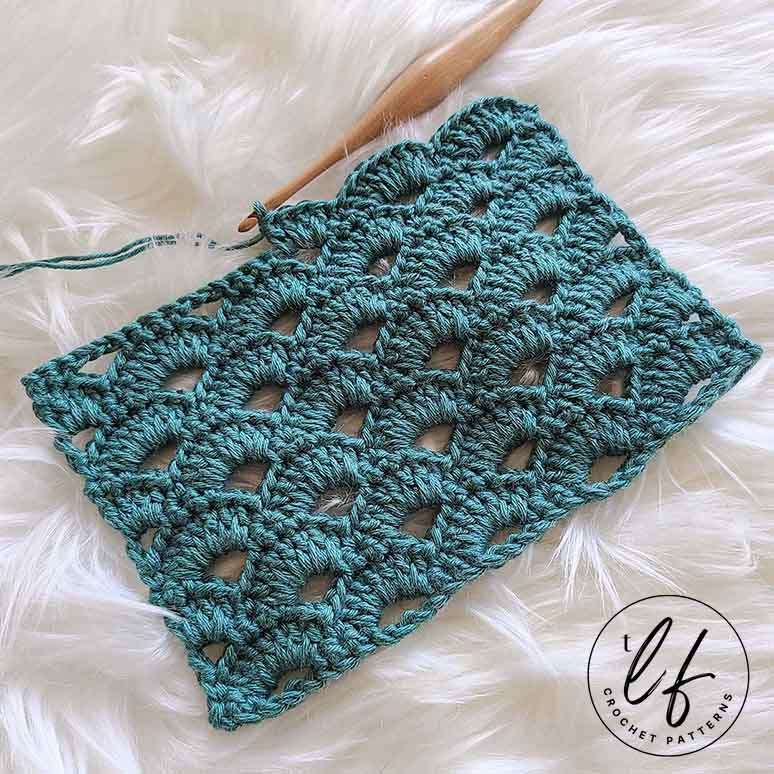
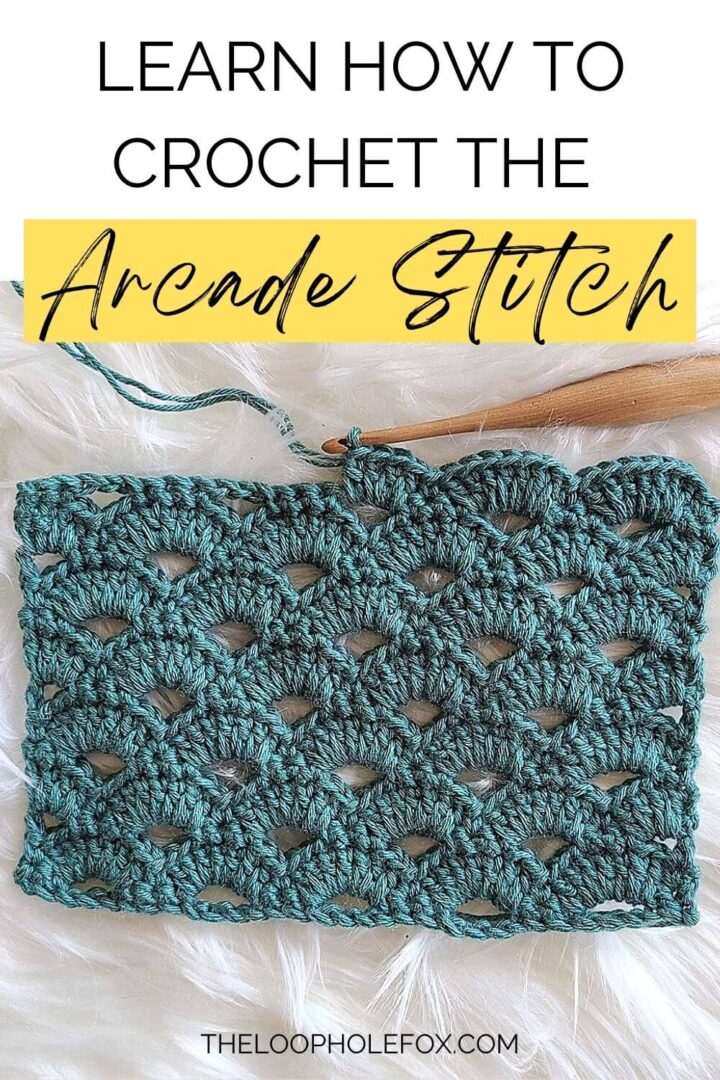
The crochet Arcade Stitch is a beautiful stitch pattern that is made up of arches or fans. This is an offset pattern which means that the arches don’t stack on top of each other but stack over the downward points of the fans instead. This creates pretty “v” shapes under the arches that shows off the shape of the arches even more.
This creates a beautiful sort of rolling wave pattern that is fantastic to use for just about anything you can think of.
What stitches should I know before I try this stitch pattern?
Before you try working this crochet stitch pattern, you should know how to chain, single crochet and double crochet. These are three of the first crochet stitches you would learn as a beginner.
The crochet Arcade Stitch does require a slightly more advanced technique which includes creating chain spaces and working into them. If you haven’t already learned how to create or work into chain spaces, you can still follow along with this crochet stitch tutorial! It’s easier than it looks and sounds.
What can I use the Crochet Arcade Stitch for?
The best thing about the Crochet Arcade Stitch is that you can use it for basically anything you can dream of. You can use a bulky yarn and a big hook to create an interesting decorative blanket, use it as borders or edging like in my crochet hand towel pattern or pair it with other crochet stitches for a bit of detail like in my Heather Shawl.
As long as it makes sense for your project to have openings in the stitches, you can use the Arcade stitch.
Does this stitch look best with any specific yarn?
Nope! This is one of the few crochet stitches I have found that looks fantastic regardless of the yarn weight, fiber or color used.
Make sure to use a yarn that makes sense for the project you’re wanting to create and choose the color(s) that look best to you and you’re all set!
How to Crochet the Arcade Stitch
This tutorial for the crochet Arcade Stitch will show you step-by-step how to work this stitch with photos along the way.
First, I’ll show you how you’d find the stitch written in one of my patterns for each row and then I’ll break down the steps in full sentence instructions.
I’ll also explain the stitch multiple required for the crochet stitch and go over what that actually means in practice.
Ready to get started? Let’s go over the technical stuff first.
THE ROW REPEAT
This crochet stitch pattern begins with a foundation row. This foundation row (Row 1) is only worked once. Then, the Arcade Stitch has a 4 row repeat. This means that you will repeat the 4 rows in sequence to create the stitch pattern.
TERMS & ABBREVIATIONS
- Ch – Chain
- Sc – Single Crochet
- Dc – Double Crochet
- St(s) – Stitch(es)
- Sk – Skip
- Spc – Space
In my crochet patterns, you will also find the following symbols:
- […] – Repeats are listed inside brackets
- (…) – Stitch counts are listed at end of row in ( ) and bold italics.
CROCHET ARCADE STITCH PATTERN NOTES
- Chain 1 to start a row doesn’t count as a stitch. Always place your first stitch in the same stitch you chained out of.
- Chain 2 to start a row doesn’t count as a stitch. Always place your first stitch in the same stitch you chained out of.
- Chain 3 to start a row counts as both a double crochet and a chain 1 space. Do not place the first stitch in the same stitch you chained out of (it counts as filled).
- Special note: If you count your turning chains as stitches, chaining 2 or 3 for a double crochet is a matter of preference. Either chain amount is completely fine. My preference is to chain 2 for a double crochet if it counts as a stitch, so with the Crochet Arcade Stitch requiring a double crochet and a chain 1 space, I chain 3.
- If you’d prefer to chain 3+1 for 4 chains in this area of the stitch pattern, that is completely okay! 🙂
- There will be a note that references this when it comes up.
STITCH MULTIPLE (& WHAT THIS MEANS IN PRACTICE)
The Crochet Arcade Stitch requires a stitch multiple of 6+1. This does NOT include the turning chain.
What this means is that you will need a multiple of 6 stitches + 1 stitch for the stitch pattern to work properly. When you create your starting chain, you will also need to add a turning chain.
For example – This crochet stitch tutorial will begin with 26 chains. Let’s break this down.
First, I need a multiple of 6 stitches. For this multiple, I chained 24. (6 times 4 = 24)
Then, I need to add an extra chain for the plus 1 stitch. So I now have 25 chains.
Finally, I need a turning chain. The Crochet Arcade Stitch’s foundation row begins with a single crochet, so I need to add one 1 chain.
I now have 26 chains to start.
You can use this basic math to create a crochet project of any size using the Arcade Stitch. Just make sure your starting number can be divided by 6, add 1 chain for the extra stitch and 1 turning chain. You’re good to go!
If you were to use the Arcade Stitch as detailing or a border instead, you’ll simply want to make sure that each side of your project that you want to work on is a multiple of 6 stitches + 1 stitch.
Step by Step Instructions
Now that we have the technical stuff out of the way, let’s walk step by step through how to work the Arcade Stitch.
For this practice swatch, chain 26. This is a multiple of 6 + 1 stitch + 1 turning chain.
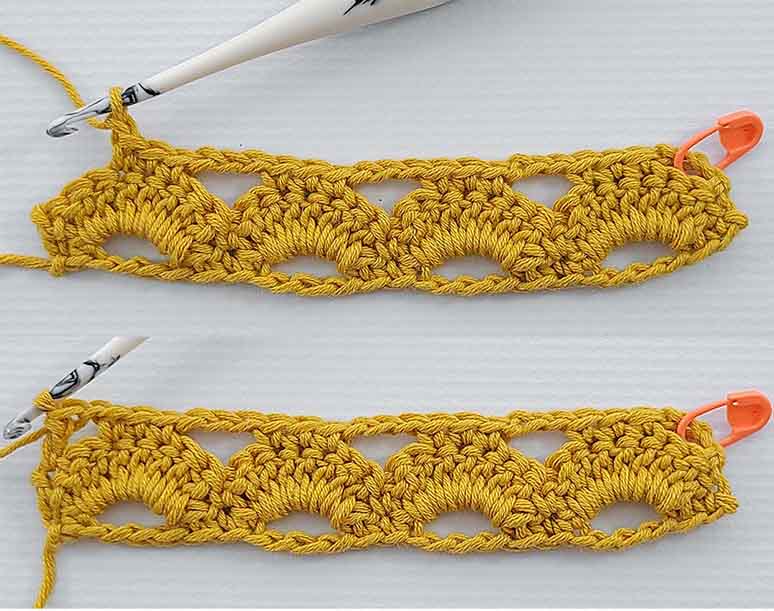
ROW 1 – The Foundation Row
To begin the crochet Arcade stitch, we first have to create the foundation row. This foundation row does not count as a part of the row repeats and will only be worked this once.
Written in one of my patterns, this row will look like this:
Row 1 – Place 1 sc in 2nd ch from hook and 1 sc in next ch, [ch 3, sk 3 ch, 1 sc next 3 chs]. Repeat across the row until 5 chs remain. Ch 3, sk 3, 1 sc in next 2 chs. (4 ch 3 spcs, 13 sc)
Here’s how to follow this row step by step:
To start the foundation row after creating our starting chains, we will place 1 single crochet in the second chain from the hook and 1 single crochet in the next chain.
Then, the stitch repeat for the row begins, which you can see in brackets in the pattern above.
We will chain 3, skip 3 chains, and place 1 single crochet in each of the next 3 stitches.
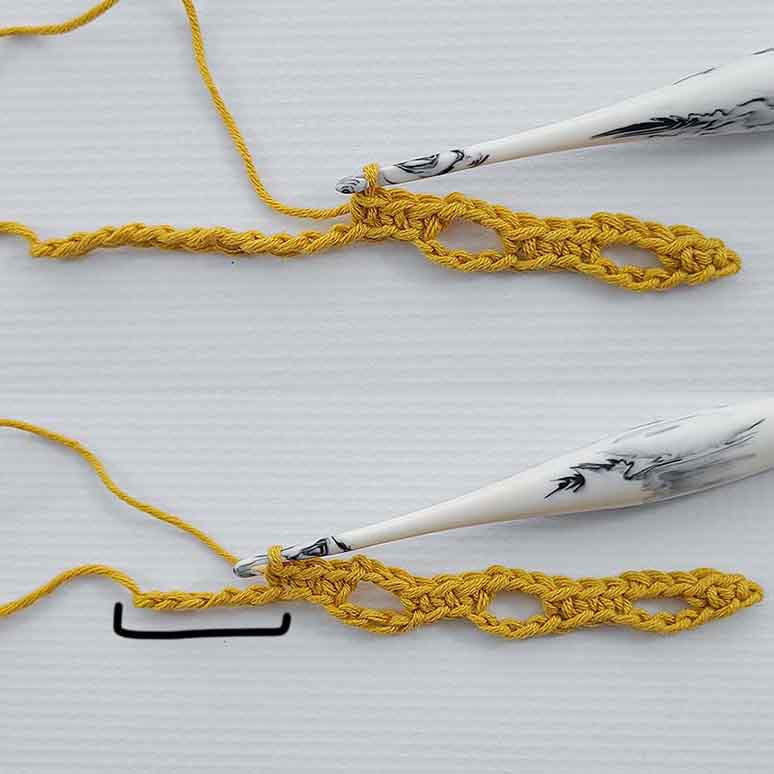
We will repeat [chain 3, skip 3 chains and place 1 single crochet in each of the next 3 stitches] across the row until only 5 chains remain.
By doing this, we are creating chain 3 spaces that will be worked into on the next row to create the arches.
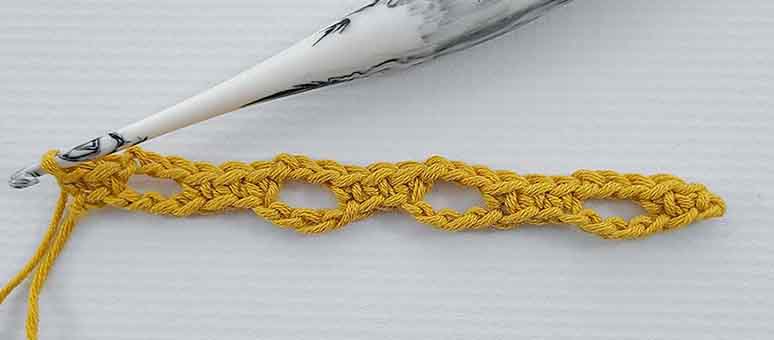
When we have 5 chains remaining, we will chain 3, skip 3 chains and place 1 single crochet in each of the last 2 chains.
Our row now starts and begins the same way.
We have a total of 13 single crochets and 4 chain spaces.
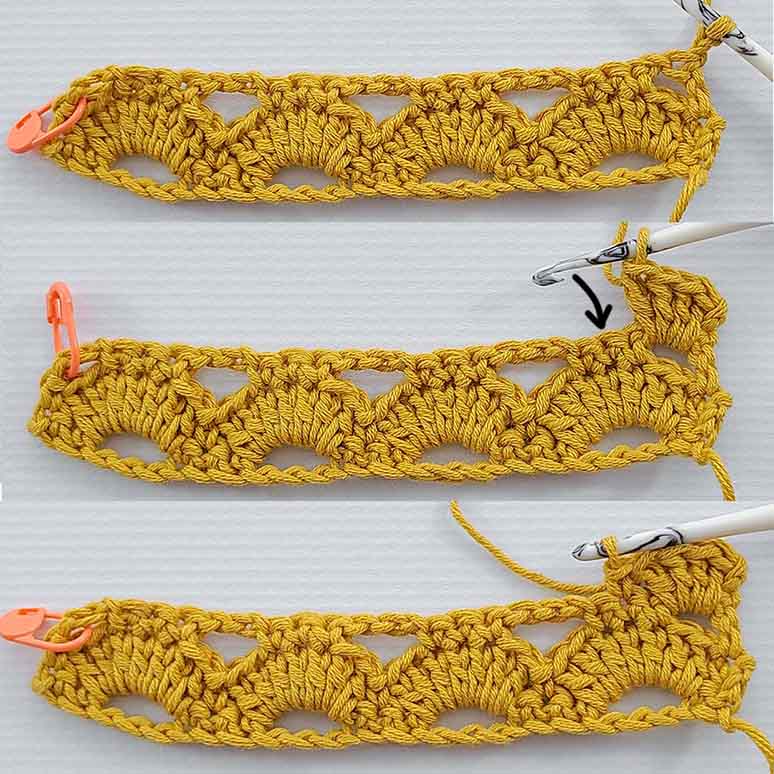
ROW 2 – Repeat Row 1
We can now begin our second row of the project. This row is considered the first repeat row.
Written in one of my patterns, this row will look like this:
Row 2 – Ch 1, turn. 1 sc first st, [sk 1 sc, 7 dc in ch 3 spc, sk 1 sc, sc next]. Repeat across the row to the end. Your last sc should be in the last st of the row. (4 Dc Fans, 5 sc)
Here’s how to follow this row step by step:
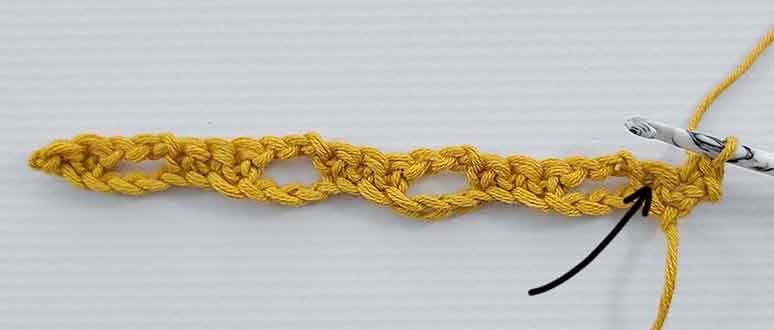
To begin this row, we will chain 1 and turn. Then, we will place 1 single crochet in the first stitch.
Our repeat begins immediately after this first stitch.
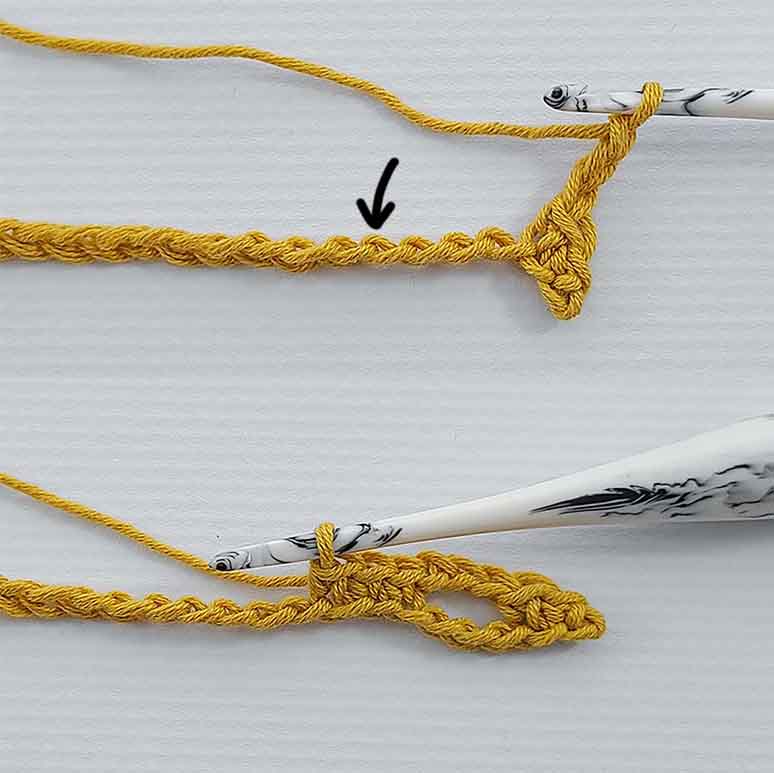
To begin the stitch repeat, we will skip 1 stitch (a black arrow points to the stitch).
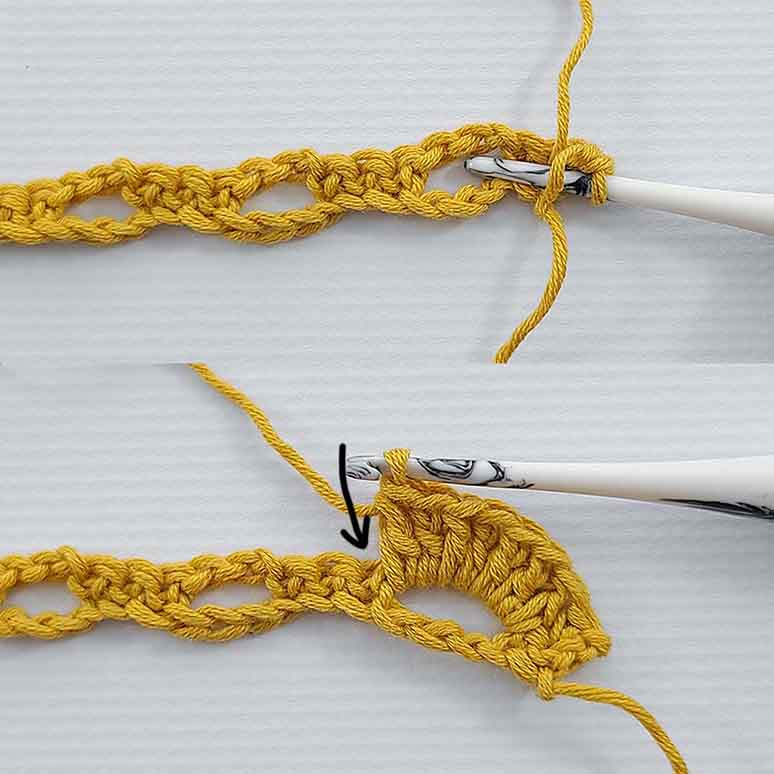
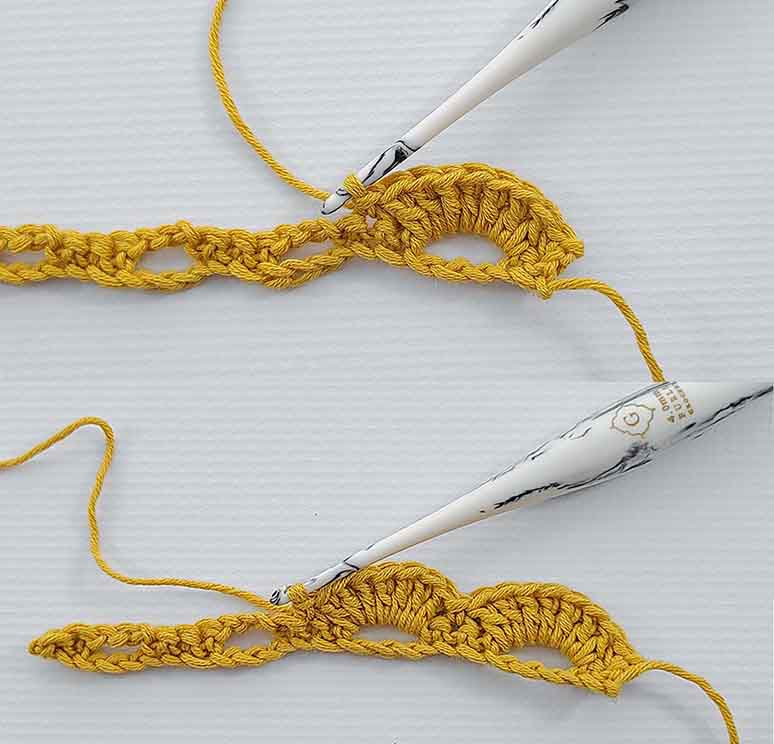
Then, place 7 double crochet into the chain 3 space.
You don’t have to find any specific stitch to work into or anything special. Just insert your hook directly into the chain 3 space and work double crochets as you normally would until you have 7.
When your 7 double crochets are completed, you will skip 1 stitch and place 1 single crochet in the next.
Sometimes the next stitch that we need to skip can sort of be hidden in the 7 double crochets of the Arcade stitch. Make sure to push the 7 double crochets out of the way so you know you’re working into the right stitch.
TIP: You can always assume the correct stitch to place 1 single crochet in is the middle single crochet of the 3.
With the single crochet placed, we have finished the first stitch repeat of this row.
We will continue to repeat [skip 1 stitch, place 7 double crochet in the chain 3 space, skip 1 stitch, place 1 single crochet in the next stitch] all the way across the row.
Your last single crochet of this row should be in the very last stitch of the row.
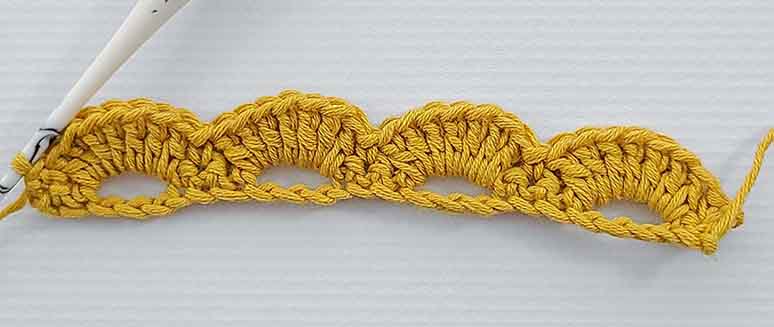
With this row complete, we now have 4 “dc fans”. These dc fans are the 7 double crochets in the chain 3 space.
We also have 5 single crochet.
We have a total of 33 stitches.
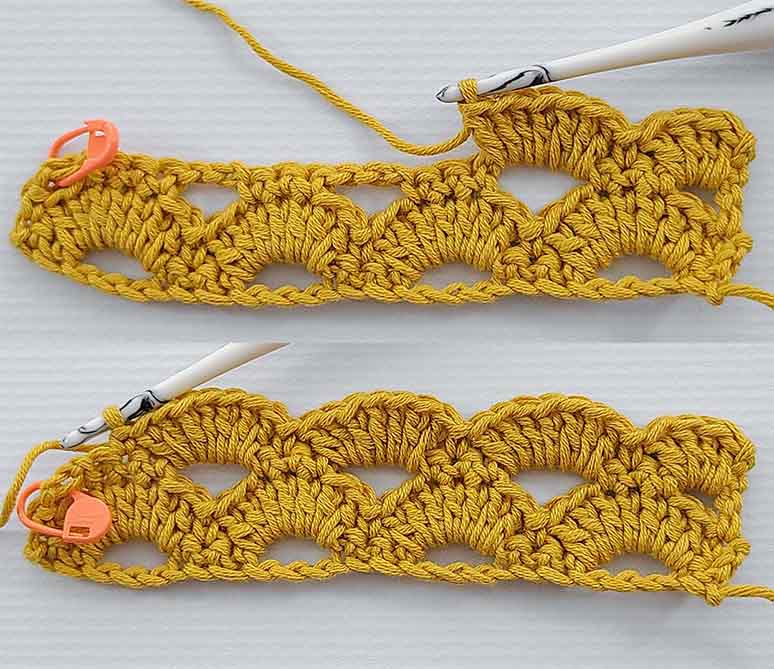
ROW 3 – Repeat Row 2
This row is considered the second repeat row of the Crochet Arcade Stitch.
Written in one of my patterns, this row will look like this:
Row 3 – Ch 3 (counts as a double crochet and a chain 1 here and throughout), turn. Sk first st and next 2 sts, 1 sc 3 sts [ch 3, sk 5 sts, 1 sc next 3 sts]. Repeat until 3 sts remain. Ch 1, sk 2, dc last. (3 ch 3 spcs, 12 sc, 2 dc, 2 ch 1 spcs)
Here’s how to follow this row step by step:
To begin this row, we will chain 3 and turn. This chain 3 counts as a double crochet and a chain 1 space.
If you prefer to chain 4 to count as a double crochet and a chain 1 space instead, that’s totally fine!
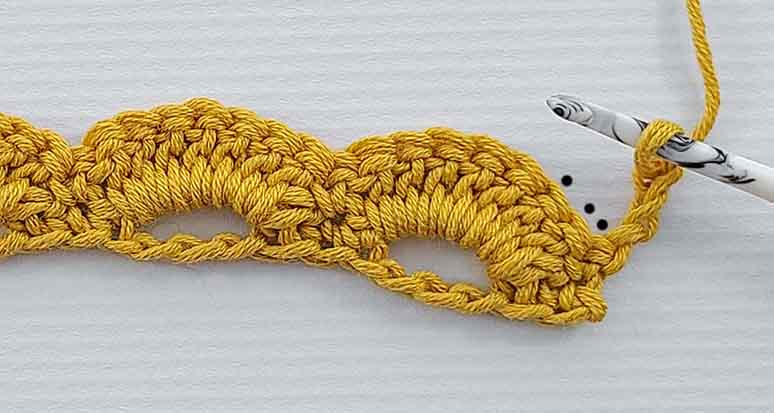
Once we have chained 3 and turned, we will then skip the stitch we chained out of (because these chains count as a stitch) and the next 2 stitches.
These stitches are marked with black dots in the picture.

We will then place 1 single crochet in each of the next 3 stitches.
If you aren’t familiar with using chains that count as a stitch and a space, you may want to place a stitch marker around the chains.
These chains have a tendency to lay against the fan of the row below and can easily be missed if you aren’t familiar with them.
Now we will begin our stitch repeat for this row.
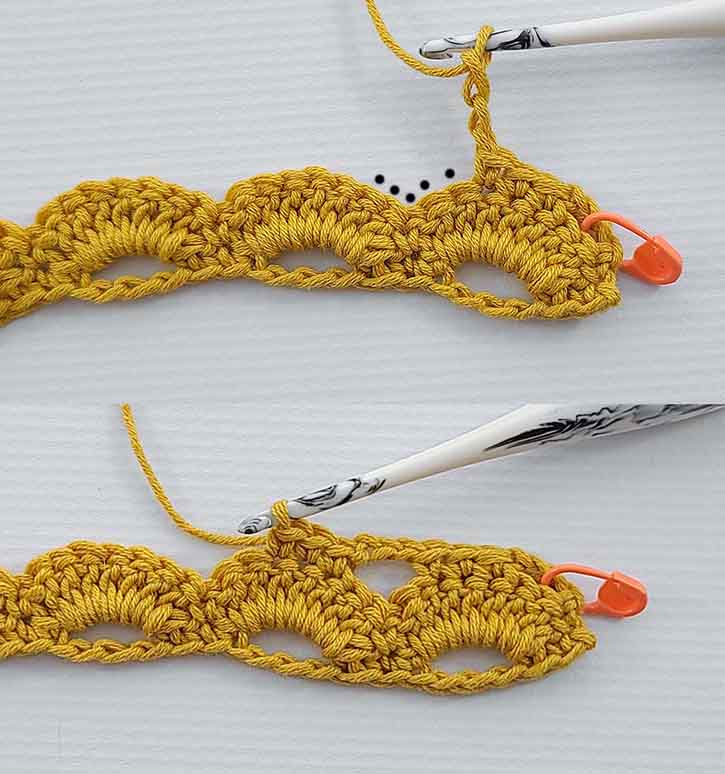
We will chain 3, skip 5 stitches and place 1 single crochet in each of the next 3 stitches.
You want to make sure you’re skipping all 5 of the stitches. If you don’t, your stitch pattern will become wonky.
We will repeat [chain 3, skip 5 stitches, place 1 single crochet in each of the next 3 stitches] until 3 stitches remain.
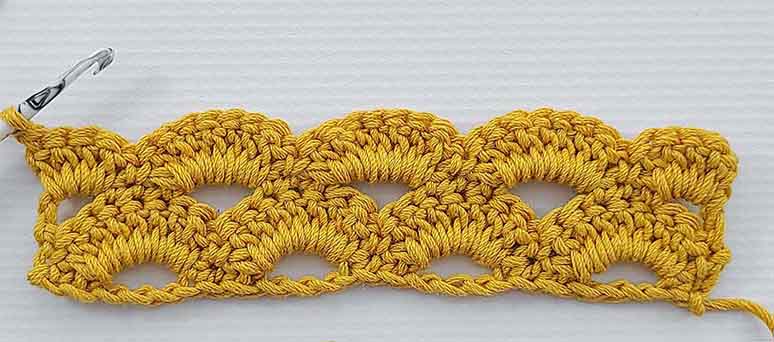
When only 3 stitches remain, we will chain 1, skip 2 stitches and place 1 double crochet in the last stitch.
This row is now complete and we will have 2 double crochet, 2 chain 1 spaces, 3 chain 3 spaces and 12 single crochet.
In this row, we have created new chain spaces for the fans of the crochet Arcade stitch to be placed into.
Because of the chain 1 spaces at the beginning and end of the row, the fans on the next row will now be offset from the previous fans.
ROW 4 – Repeat Row 3
This row is considered the third repeat row of the Crochet Arcade Stitch.
Written in one of my patterns, this row will look like this:
Row 4 – Ch 2 (doesn’t count as a stitch here or throughout), turn. 4 dc in first ch 1 spc. Sk 1 sc, sc next [sk 1 sc, 7 dc in ch 3 spc, sk 1 sc, sc next] Repeat across until ch 1 spc remains. Place 4 dc in ch 1 spc. (3 Dc Fans, 2 Dc Half Fans, 4 sc)
Here’s how to follow this row step by step:
To begin this row, we will chain 2 and turn.
Ignoring the double crochet below, we will work 4 double crochet into the chain 1 space. This will be considered a “dc half fan” as it appears as half of a full fan.
We will then skip 1 stitch and place 1 single crochet in the next. A black arrow points to the stitch that we place this single crochet into.
Now we will begin our stitch repeat for the row.
We will [skip 1 stitch, place 7 double crochet in the chain 3 space, skip 1 stitch and place 1 single crochet in the next].
This repeat is worked the same as it was in Row 2, it is just offset a little bit.
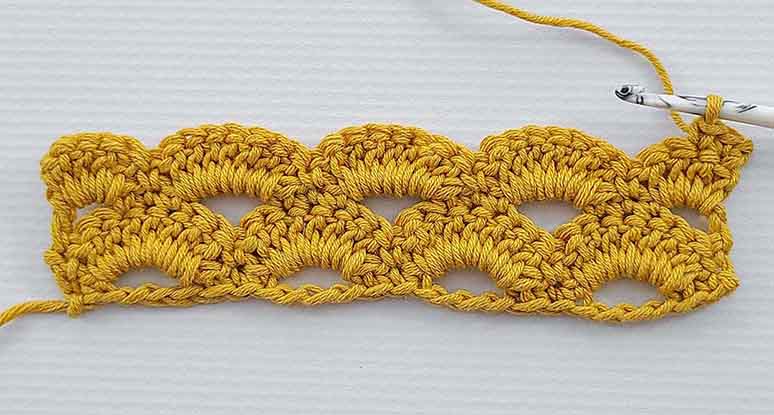
We will repeat this until only the chain 1 space remains.
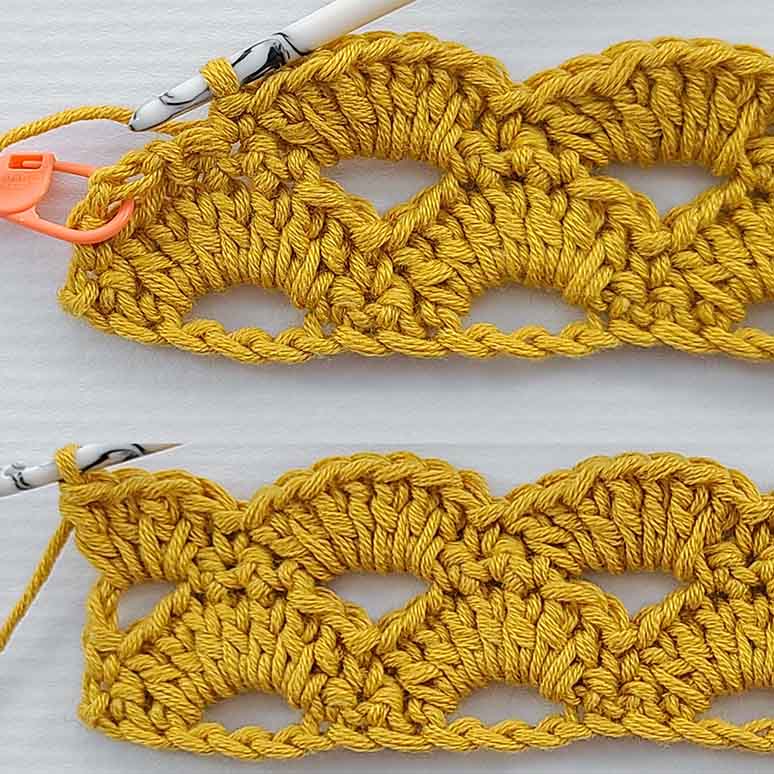
In the chain 1 space, we will place 4 double crochet.
This row is now complete and we will have 2 dc half fans, 3 dc fans and 4 single crochet.
ROW 5 – Repeat Row 4
This row is considered the fourth repeat row of the Crochet Arcade Stitch.
Written in one of my patterns, this row will look like this:
Row 5 – Ch 1, turn. Place 1 sc 2 sts. [Ch 3, sk 5 sts, 1 sc 3 sts]. Repeat across the row until 7 sts remain. Ch 3, sk 5, 1 sc last 2 sts. (4 ch 3 spcs, 13 sc)
Here’s how to follow this row step by step:
To begin this row, we will chain 1 and turn.
We will then place 1 single crochet in the first stitch and 1 single crochet in the next stitch.
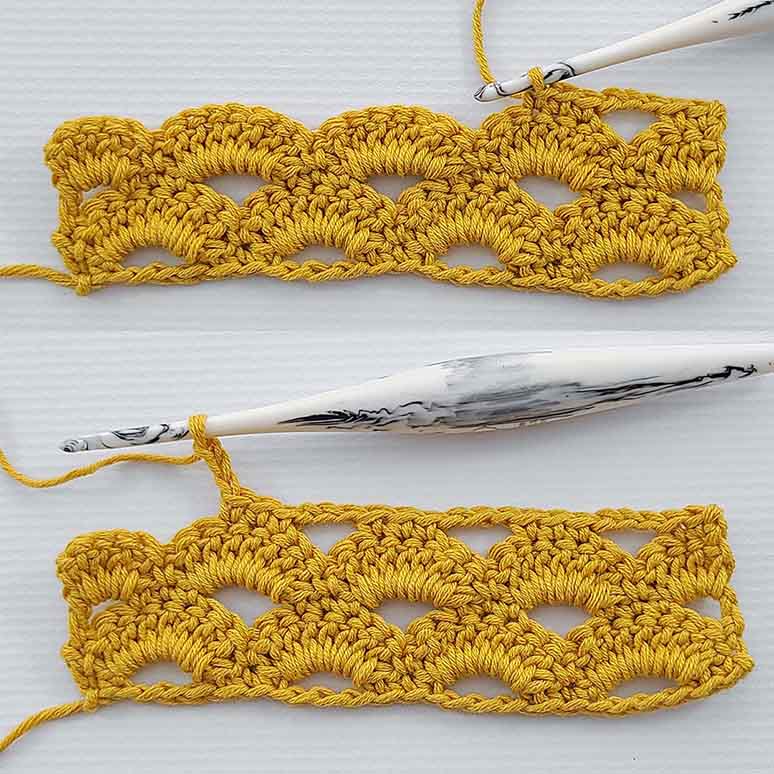
Now we will begin our stitch repeat for the row.
We will [chain 3, skip 5 stitches and place 1 single crochet in each of the next 3 stitches].
We will repeat this until
We will repeat this until we have 7 stitches remaining.
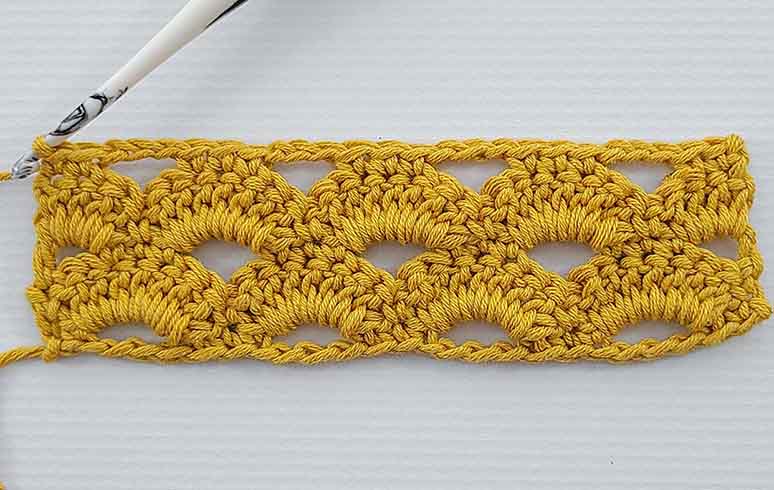
We will skip 5 stitches and place 1 single crochet in each of the last 2 stitches.
We now have 13 single crochet and 4 chain 3 spaces.
This completes both the foundation row and the four row repeat of the crochet Arcade Stitch! It’s easier than it looks, right?
So, what do I do now that I have 5 rows completed?
To continue crocheting the Arcade Stitch, you will want to repeat the 4 rows as indicated. In this tutorial, these are Rows 2 through 5.
You can continue practicing the Arcade Stitch as we have in this crochet stitch tutorial or you can make your own project based off of what you’ve learned here.
If you’re ready to try out some patterns that use the Crochet Arcade Stitch, I’ve got you covered!
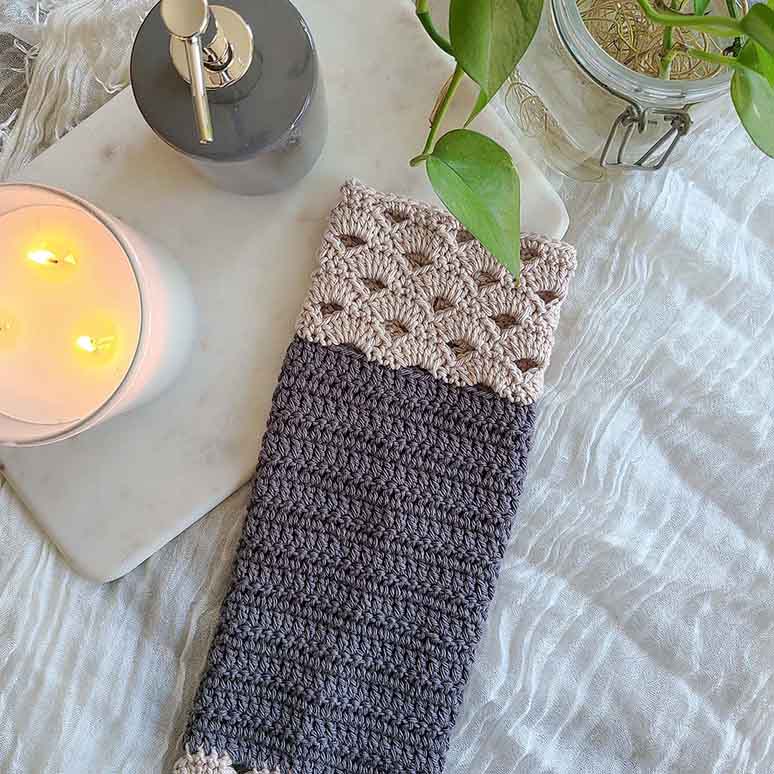
Try out this hand towel crochet pattern designed specifically for this tutorial! This quick hand towel pattern starts and ends with the crochet Arcade Stitch and has a big section of double crochets in the middle. Using the Arcade Stitch as detailing for this hand towel created something that is not only practical and usable, but pretty, too!
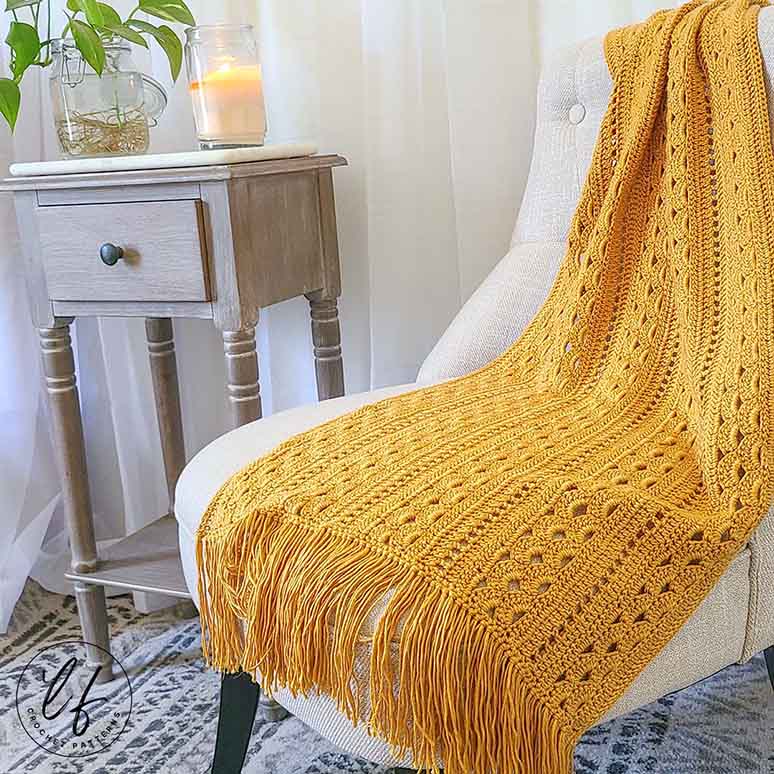
If you’re looking for something a bigger, wearable and a little more challenging, check out my Heather Shawl pattern. This pattern uses the crochet Arcade Stitch combined with other stitches to create a beautiful repeating pattern of shells and spaces.
Want to keep this tutorial? Click the blue text to Pin it to Pinterest!
I hope you’ve enjoyed this tutorial and that you can move forward crocheting all you can think of with the Arcade Stitch in confidence. Thanks so much for hanging out with me today!
Don’t forget to join my Facebook Group so we can chat all about your creations! We are a group for crocheters of all experiences, all interests and love to hang out together. Come join the fun!

Shannon | Designer & Editor
Shannon helps crocheters find their next project and build their skills with in depth tutorials and crochet patterns on her blog, theloopholefox.com.
With more than a decade of crochet experience, Shannon knows that understanding why we do something matters just as much as how we do it. She teaches new techniques and crochet stitches in depth so you can crochet with confidence.
Looking for more Crochet Stitch Tutorials? Check these out!
How to Crochet the Even Moss Stitch
How to Crochet the Moss Stitch
The Magic Circle: How and Why it Works
Foundation Single Crochet and Why It’s Awesome
Foundation Half Double Crochet and Double Crochet and Why They’re Also Awesome